|
| IMSA widebody installation - Russ style (Page 5/56) |

|
fierogt4e
|
SEP 22, 11:50 PM
|
|
|
Russ I Love following along, good pictures, thanks! The hole thing brings back fond memories of my original install. I started my car back around 1990 then bought a new home and had to build a garage so I could finish the project. One thing I did on my Original install that is not necessary for your permanent installation is the use of riv-nuts. Riv-nuts (and by other names) are large rivets that are threaded on the inside allowing the use of bolts where you can not get to the area behind for a nut, for any that do not know. I used Ľ-20’s in the door opening and under the sail panels among other places, with button head screws in them. Neat and easily removed. This will make it easer to get the rear clip off for other builders that may wish to. Another mod. I made to help simplify the removal of the rear clip was to the stock panel at the rear of the roof. The small stock section that you reuse has a couple of small humps for indexing, that I ground flat. Then I slotted the holes at the very front edge of this part and enlarged the hole diameter to clear washers I used to maintain the space between the roof and the dill-and-mill pads on the chassis. With these mods you can pull the rear clip strait back with the front roof panel, interior, and bumper in place. The draw back is you can not fill the seems with any thing but silicone. You will be exchanging smoothness for serviceability and reparability a tuff call in anyone’s book I think.
As for filling and smoothing the seems I prefer a somewhat labor intensive method. I use a 3” sanding disk on a angle grinder (rite angel dia grinder) to grinder thru the gel cote and form a channel about half the thickness of the glass deep and 1 ˝” wide. Then fill the channel back in with glass mat and resin. Use wider strips of matt first then successively narrower strips as needed. Grind the cured glass back to just below the surface of the panels being joined then cover with gel cote or filler.
Possibly the trickiest spot on the seems to do well is were the front fender meats the facia forming a square corner for the hood, extra effort is needed there. As you should come over the edge and across the flange as well as along the front edge. I hope this helps someone and offends no one. And thanks again Russ George

------------------
Sincerely
George
www.switch-tray.com
|
|
|
|
Will
|
SEP 23, 05:48 PM
|
|
| quote | Originally posted by Russ544:
I've had some trouble with bondo cracking at the upper B piller joint each time the rear clip is removed and replaced on the car |
|
Speaking of panel flex (which you were, kinda)... Would it be possible to have the front and rear fascae made in urethane instead of glass fibre? That way we wouldn't have to worry quite as much about having a rigid (and thus easily cracked) fascia at each end of the car. Also, would Sage be willing to modify the molds to incorporate the larger wheel openings that you made? If the parts were molded with larger wheel openings, then they'd have basically the same trim strips as a stock Fiero, and the molds could be further modified to make the panels accept factory trip strips... Thoughts? ------------------
Turn the key and feel the engine shake the whole car with its lope; Plant the gas pedal and feel in your chest neither a shriek nor a wail but a bellowing roar; Lift and be pushed into the harness by compression braking that only comes from the biggest cylinders while listening to music of pops and gurgles. Know that you are driving and American V8. There are finer engines made, but none of them are this cool.Luck, Fate and Destiny are words used by those who lack the courage to define their own future
|
|
|
|
Russ544
|
SEP 23, 08:55 PM
|
|
| quote | | Originally posted by Will:
Speaking of panel flex (which you were, kinda)...
Would it be possible to have the front and rear fascae made in urethane instead of glass fibre? That way we wouldn't have to worry quite as much about having a rigid (and thus easily cracked) fascia at each end of the car.
|
|
I don't think that would be possible (anything is possible, but I mean within reason) due to the way the fenders join the facia. Also the wider fenders wouldn't meet up very well with the OEM facia.
I don't see where the rear soft facia would be a benifit actually, and the front ones always seem to be warped on top and not very attractive anyway. One area that I do have on my agenda however it to try and use the more speedbump friendly "skitime" type air dam. I haven't actually tried to fit it up yet, but I'm hoping that the stock lower facia will flex out enough to meet the wider IMSA nose piece OK. I'll be finding that out before too long and will of course pass that info along in this thread.
| quote |
Also, would Sage be willing to modify the molds to incorporate the larger wheel openings that you made? If the parts were molded with larger wheel openings, then they'd have basically the same trim strips as a stock Fiero, and the molds could be further modified to make the panels accept factory trip strips... Thoughts? |
|
Perhaps Sage will answer that himself, but I've mentioned to him that the larger wheelwells would certainly be a welcome change for many potential buyers, and he did say he agreed and might be willing to make new molds for that at some point if there were enough interest. Perhaps with more input from you and others, he can be further persuaded  It is pretty simple to enlarge the wheelwells as I have, but of course if you planned to use inner wheel tubs those will need to be fabricated as well, as the glass extentions supplied wouldn't work with enlarged openings (which is why I ordered my kit without them to begin with). I most likely will make/modify some for my enlarged wheelwells, but the tubs actually aren't vital to the kit anyway IMO. It is pretty simple to enlarge the wheelwells as I have, but of course if you planned to use inner wheel tubs those will need to be fabricated as well, as the glass extentions supplied wouldn't work with enlarged openings (which is why I ordered my kit without them to begin with). I most likely will make/modify some for my enlarged wheelwells, but the tubs actually aren't vital to the kit anyway IMO.
The trim is molded into the IMSA body panels and can't be changed. Russ
|
|
|
|
Russ544
|
SEP 23, 09:08 PM
|
|
| quote | | Originally posted by fierogt4e: Russ I Love following along, good pictures, thanks! The hole thing brings back fond memories of my original install. I started my car back around 1990 then bought a new home and had to build a garage so I could finish the project. One thing I did on my Original install that is not necessary for your permanent installation is the use of riv-nuts. Riv-nuts (and by other names) are large rivets that are threaded on the inside allowing the use of bolts where you can not get to the area behind for a nut, for any that do not know. I used Ľ-20’s in the door opening and under the sail panels among other places, with button head screws in them. Neat and easily removed. This will make it easer to get the rear clip off for other builders that may wish to. Another mod. I made to help simplify the removal of the rear clip was to the stock panel at the rear of the roof. The small stock section that you reuse has a couple of small humps for indexing, that I ground flat. Then I slotted the holes at the very front edge of this part and enlarged the hole diameter to clear washers I used to maintain the space between the roof and the dill-and-mill pads on the chassis. With these mods you can pull the rear clip strait back with the front roof panel, interior, and bumper in place. The draw back is you can not fill the seems with any thing but silicone. You will be exchanging smoothness for serviceability and reparability a tuff call in anyone’s book I think.
As for filling and smoothing the seems I prefer a somewhat labor intensive method. I use a 3” sanding disk on a angle grinder (rite angel dia grinder) to grinder thru the gel cote and form a channel about half the thickness of the glass deep and 1 ˝” wide. Then fill the channel back in with glass mat and resin. Use wider strips of matt first then successively narrower strips as needed. Grind the cured glass back to just below the surface of the panels being joined then cover with gel cote or filler.
Possibly the trickiest spot on the seems to do well is were the front fender meats the facia forming a square corner for the hood, extra effort is needed there. As you should come over the edge and across the flange as well as along the front edge. I hope this helps someone and offends no one. And thanks again Russ George
|
|
Thanks for the tips George. The process of grinding out the joints and using glass is probably an especially good idea. I didn't do that, so time will tell if cracks show up in mine eventually. I did use plenty of panel adhesive in the joint as it was being bolted together however
BTW George. what happened to the photo of your car in your previous post? [This message has been edited by Russ544 (edited 09-23-2004).]
|
|
|
|
fierogt4e
|
SEP 23, 10:39 PM
|
|
Russ,
I actually posted about 9 photos to show some of the parallels to what you are doing, that is using this kit as a starting point and not the end product. However I began to think of the dial up and I also did not wish to take over your thread so I took them off.
.
This is the third time I have altered the car. I call it a GT/4E (4th edition) stock being the first. On 3E (white with blue) I installed the IMSA kit and made many changes to it but did not open the wheel wells. This tine around I am making a grate many more changes and the wheel wells are just one. Also included this time, it has been shaved and sectionedThanks
George
------------------
Sincerely
George
www.switch-tray.com
|
|
|
|
exoticse
|
SEP 23, 11:34 PM
|
|
Great thread Russ !Thanks for letting us watch in on an amazing project coming to life.
|
|
|
|
Russ544
|
SEP 27, 10:43 PM
|
|
CHAPTER 8:
This weekend the attention turns mostly to several "accessory" items.
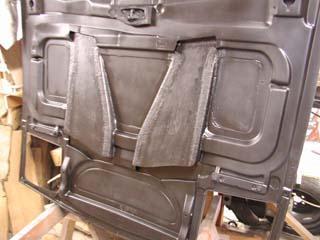
With the front wheel openings compleated, and with the panel adhesive curing on the front fenders/facia joints, I began work on a flexable air dam (aka Skitime). It wasn't certain that this would flex out enough to work on the widebody nose, but by the time all the "extra" material gets removed from the urathane aero nose, it becomes flexable enough to form into just about any shape you want it .In fact it becomes so flexable that it's much easier to do the final trimming after it gets mounted to the IMSA facia and becomes a little less of a wet noodle. A pop rivet every 6" or so, with large backup washer, seems about right. to secure it to the lower lip where it can easily be trimmed down to its finished size and the edges sanded smooth.
You might also notice the metal strip on the upper lip of the facia below. this is the Fieros origianal top facia retaining strip which the lip of the flexable facia was screwed to. By slotting out the screw holes that attach it to the spaceframe, and riveting the strip onto the lip of the IMSA nose, a good solid system is formed to attach the IMSA nose to the chassis. With the mounting holes slotted out, a degree of adjustability becomes possible to assist in squaring up the hood opening and for adjusting for the upper door/fender gaps.
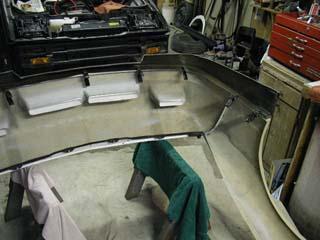
During the air dam project I began to think of ways to improve the airflow to the radiator. one thought led to another and a pretty cool project began to develop.
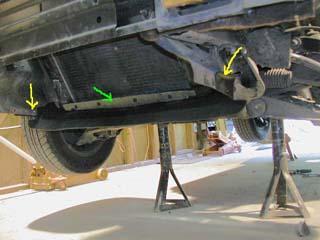
By cutting out part of the upper section of the remains of the aero nose:
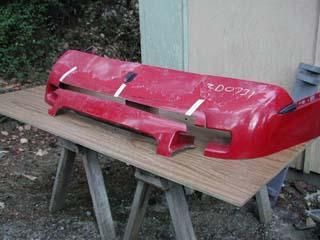
And flipping it upside down:
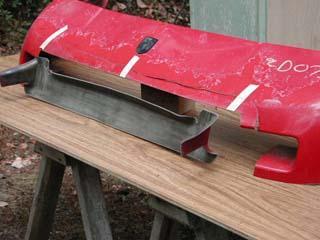
Then by standing on one foot and squinting with your left eye crossed, you'll begin to see it morph into the form of a lower radiator air deflector  . The part that was once the sides of the turn signal opening have now become support members that just happen to be spaced the perfect distance apart to mate up to the stock Fiero rubber/plastic ductwork near the sides of the radiator (yellow arrows). . The part that was once the sides of the turn signal opening have now become support members that just happen to be spaced the perfect distance apart to mate up to the stock Fiero rubber/plastic ductwork near the sides of the radiator (yellow arrows).
A couple pop rivets and a strip of fiberglass (green arrow below) secure the cleaned and painted deflector to the lower radiator support, wile one or two aditional rivets per side tie the sides to the existing Fiero ductwork.
As measured from the mounting flange this one is 3 1/4" high which seems about right for most cars.
Where do I get the patent
 [This message has been edited by Russ544 (edited 07-08-2009).]
|
|
|
|
Russ544
|
SEP 27, 11:28 PM
|
|
|
|
|
Will
|
SEP 27, 11:57 PM
|
|
| quote | Originally posted by Russ544:
The trim is molded into the IMSA body panels and can't be changed.
|
|
I know it's molded into the panels, but if the molds are being changed to go to the larger wheel wells, how hard would it be to change them to get rid of the trim and set the panel edges up like stock as well? Then the panels could be screwed/glued together just like stock panels and the stock trim applied to them... I think that would lead to a better integrated wide body kit... ------------------
Turn the key and feel the engine shake the whole car with its lope; Plant the gas pedal and feel in your chest neither a shriek nor a wail but a bellowing roar; Lift and be pushed into the harness by compression braking that only comes from the biggest cylinders while listening to music of pops and gurgles. Know that you are driving and American V8. There are finer engines made, but none of them are this cool.Luck, Fate and Destiny are words used by those who lack the courage to define their own future
|
|

|
MinnGreenGT
|
SEP 28, 12:15 PM
|
|
| quote | | Originally posted by Russ544: By cutting out part of the upper section of the remains of the aero nose:
http://pic2.picturetrail.com/VOL7/1543635/5114421/68029135.jpg
And flipping it upside down:
http://pic2.picturetrail.com/VOL7/1543635/5114421/68029127.jpg
Then by standing on one foot and squinting with your left eye crossed, you'll begin to see it morph into the form of a lower radiator air deflector . The part that was once the sides of the turn signal opening have now become support members that just happen to be spaced the perfect distance apart to mate up to the stock Fiero rubber/plastic ductwork near the sides of the radiator (yellow arrows).
A couple pop rivets and a strip of fiberglass (green arrow below) secure the cleaned and painted deflector to the lower radiator support, wile one or two aditional rivets per side tie the sides to the existing Fiero ductwork.
As measured from the mounting flange this one is 3 1/4" high which seems about right for most cars.
Where do I get the patent
http://pic2.picturetrail.com/VOL7/1543635/5114421/68029120.jpg |
|
Genius idea on this one! I knew I kept the rest of that old fascia around for a reason! 
|
|
|
|