
 
     |
| The Miura project begins (Page 42/84) |

|
355Fiero
|
NOV 18, 04:34 PM
|
|
Archie;
It would be a shame to have you stop posting updates to this thread as it is an excellent build. You guys are doing an outstanding job at solving some pretty unique design and build issues.
Keep it up and keep posting updates regardless of the occasional sidetrack down the odd turkey trail. These are inevitable in a forum setting.....
Cheers
Don
|
|
|
|
Tony Kania
|
NOV 18, 05:14 PM
|
|
The Miura has always been one of my very favorite bodies in the automotive world. Thank you for keeping up on this thread for the sole purpose of of our enjoyment.
Tony
|
|
|
|
whodeanie
|
NOV 19, 08:47 AM
|
|
Reset! 
for pic's........................................ PLEASE!!!!!! 
|
|
|
|
Archie
|
NOV 19, 01:39 PM
|
|
| quote | Originally posted by whodeanie:
Reset!
for pic's........................................ PLEASE!!!!!! |
|
ok, oK, OK
This group of updates is going to be kinda complicated to keep in order.
We've been working on several different related & yet unrelated projects.
We've been working on getting the windows operating in the doors, while doing bodywork on the doors & surrounding areas. Part of getting the windows working is getting dew wipes mounted. We can't complete with windows & dew wipes without finishing up the bodywork on the doors. Can't finalize the doors without getting the door jambs in the right conditon. Can't finish up getting the door jambs done without putting in the gas filler. Can't finish up the door jambs & get the windows finalized without finalizing the rubber weatherstripping seals.......yadda, yadda, yadda....
So we will be jumping around, try to follow along, you'll see.
I don't even know where to start.....
Back on page 9 you'll recall that we were working on the operating system for the windows....
_1.JPG)
As we got back on the doors this last few weeks, we were establishing the seal areas around the doors & windows & found that it wasn't going to work properly.
We found that the window wasn't going to be in far enough against the seals to seal properly. Because the thickness of the doors gets narrower at the bottom, we couldn't kick the bottom of the window out far enough to bring the top in far enough to deal. Having the window operating hardware on the outside of the window just wasn't going to work for us.
As I said before, there is no aftermarket power window kit that is short enough to operate a 13" tall window in a 15" tall door. So we were going to have to use a modified Fiero operating system. That still is true but now it was going to have to be mounted on the inside of the window.
That is going to require that the inside top of the inside door panel will have to be about 1.5" thicker that the original Miura door panel was.
We were not sure how well all this would work, so we had to prototype it. The best way to do that was to take the parts out of a Fiero door & mock them up.
Here we've cut the whole inside door panel out of a Fiero door.
Don't worry, it looks kinda crude but it's gotta be done.....
_2.JPG)
Then we took that whole pc. & began to mock it up on the inside of our door....
_1.JPG)
Add some sheet metal bent on the brake & it's looking kind good so far.....The window deometry isn't going to work on the Miura but once we drill out the rviits attaching it to the Fiero inside panel we can move the elements around to work on the Miura window.
.JPG)
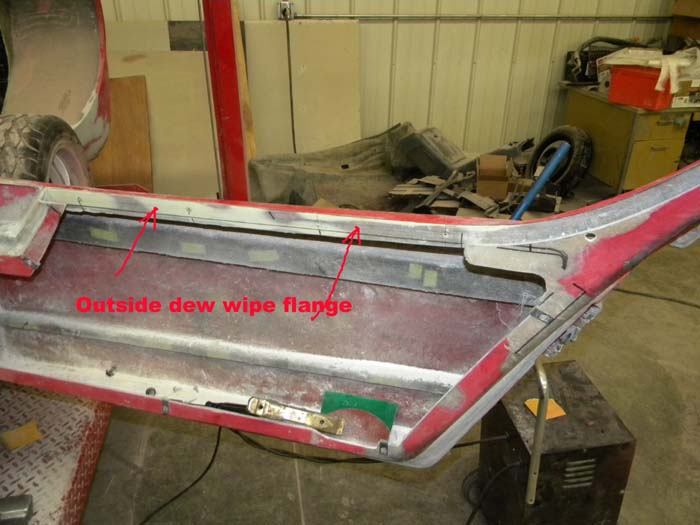
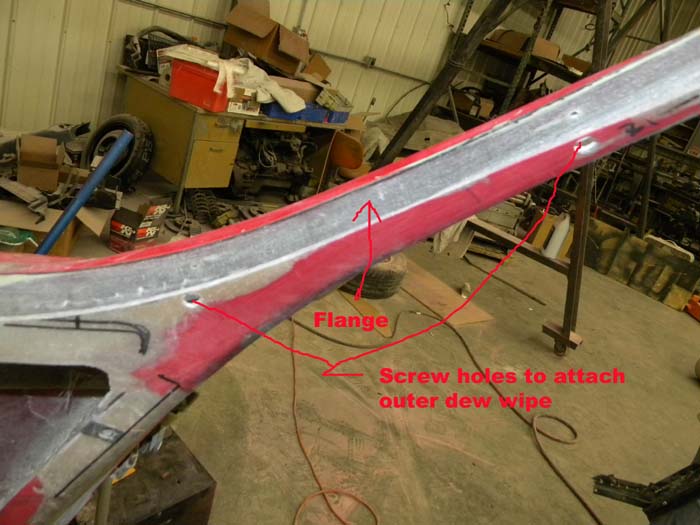
We also had to start thinking about how we were going to mount the dew wipes on the inside & outside of the window while still keeping them serviceable. More on this later.
.JPG)
You can see how the door panel will be out a little on the inside.
_1.JPG)
Once, we've got the basics figured out, it's time to make a real door panel out of sheet metal.....
_1.JPG)
_1.JPG)
Eventually we'll have to make the top part of this panel out of a seperate pc. to make it so we can mount the dew wipes...... but like i said more on that later.
This is what the door panel & window parts looks like off of the door panel.
_1.JPG)
.JPG)
Here we're working on the plan to make the top part of the door panel a seperate pc.
.JPG)
Here is a picture of the window side of the door panel..... notice that the top part is now a bolt on pc. (again, more on why we're doing that later)
_5.JPG)
Archie[This message has been edited by Archie (edited 11-19-2009).]
|
|
|
|
Archie
|
NOV 19, 03:07 PM
|
|
Here's another shot of the (now twp pc.) inside door panel. Note that I'm calling them inside door panels but they're not in inside interior door panel that will be upholstered. These steel door panels actually carry the window & it's hardware. More on why we did a 2 pc. door panel later.
_2.JPG)
Here are some more pics of the inner upper door panel bolted to the door...
.JPG)
_2.JPG)
While this is all going on, some fiberglassing is also going on. We've got to buildup the areas where the seals are going to hit on the doors. Also the outside skins of the doors have big low spots in them 7 we have to build a flat on the inside of the outer door panel to attach the outboard dew wipe to.
Here's just some of the pics of that....
_2.JPG)
_2.JPG)
_2.JPG)
_1.JPG)
_2.JPG)
Once the glass had cured, it's sanded & finished for a good seal surface like this around the edges of the door.
.JPG)
We're also working on the gas filler inlet. On the real car it's mounted up front under one of the grills on the front clip. After a lot of deliberation, it was decided that snaking a pipe from that location back to the Fiero gas tank was an unsafe situation. So it was decided to put it in the rear door jamb on the left side.
_2.JPG)
We made a fibelglass pocket to mount it into...
_1.JPG)
.JPG)
Next we'll talk about the big deal on mounting the dew wipes & making the inside door panel two pcs.
Archie
|
|
|
|
Archie
|
NOV 19, 04:18 PM
|
|
|
|
|
Archie
|
NOV 19, 05:34 PM
|
|
While we've been going thru all this with mounting the windows & doors, we've been doing a lot of bodywork.
These pics (in order) should give you an idea what we've been up to. you can see how it's evolved as you go thru these pics.
_2.JPG)
.JPG)
_1.JPG)
the body requires not only work on the outside but on the inside of things like the door panels too.
.JPG)
.JPG)
.JPG)
_2.JPG)
.JPG)
_1.JPG)
_1.JPG)
_1.JPG)
.JPG)
.JPG)
.JPG)
.JPG)
.JPG)
.JPG)
.JPG)
.JPG)
.JPG)
.JPG)
.JPG)
And the bodywork continues.....
Archie
|
|
|
|
Archie
|
NOV 19, 05:52 PM
|
|
And finally, for today anyway......
In anticipation of putting the engine into the car for the last time, as soon as we can, we've been working at putting back in the gas tank, hyd. lines, A/C lines, coolant pipes, brake lines, master brake cylinder & lines for that.
.JPG)
_1.JPG)
_3.JPG)
_1.JPG)
_1.JPG)
_2.JPG)
.JPG)
Archie
|
|

|
Bradley Jay
|
NOV 19, 06:54 PM
|
|
|
May I ask what type of engine is going into this vehicle? I probably missed it earlier on.
|
|
|
|
Archie
|
NOV 19, 09:07 PM
|
|
| quote | Originally posted by Bradley Jay:
May I ask what type of engine is going into this vehicle? I probably missed it earlier on. |
|
Early on in this project, we fitted an LS3 & a 6 speed into this chassis before we sent the chassis & engine cradle out for powdercoating.
Archie
|
|
|
|
_1.JPG)
_1.JPG)
.JPG)
.JPG)
.JPG)
.JPG)