
 
     |
| Blooze Own: An F355 Six Speed N* Build Thread (Page 4/126) |

|
pontiackid86
|
APR 27, 11:54 PM
|
|
|
Thats quite a garage you have there blooze.
|
|
|
|
ltlfrari
|
APR 28, 08:05 AM
|
|
| quote | Originally posted by pontiackid86:
Thats quite a garage you have there blooze. |
|
Yeah, but this is his house...
OK, I admit it, I'm just jealous of that garage really.
Great thread by the way, looking forward to reading (and learning) more.
------------------
Dave
www.ltlfrari.com[This message has been edited by ltlfrari (edited 04-28-2010).]
|
|
|
|
Bloozberry
|
APR 28, 08:15 AM
|
|
|
LMAO ltlfrari! No better way to start off a day than with a good laugh.
|
|
|
|
darkhorizon
|
APR 28, 11:01 AM
|
|
What happens if you just get a regular 300hp northstar from a junkyard, put it in, and run it till it dies?
It is rare that I see a rebuild motor last longer than a OEM one.
|
|
|
|
dratts
|
APR 28, 11:02 AM
|
|
|
I thought that the unabombers shack was in a museum. I love all the pictures. Everything looks so clean and neat. I have a tendency to get spread all over the place. [This message has been edited by dratts (edited 04-28-2010).]
|
|
|
|
Bloozberry
|
APR 28, 12:22 PM
|
|
| quote | Originally posted by darkhorizon:
What happens if you just get a regular 300hp northstar from a junkyard, put it in, and run it till it dies?
|
|
There's nothing wrong with doing what you suggest, but unlike some engine swappers, my goal isn't only about injecting HP. I find that a car with questionable reliability is hard to go anywhere with and have fun. Crawling under the car on the side of a freeway in the rain never appealed to me! My goals are to have a car I won't have second thoughts about taking over long distances, and for it to be a show quality ride. Spending 100 hours polishing a worn out N* engine doesn't make sense in my case.
|
|
|
|
pmbrunelle
|
APR 28, 09:00 PM
|
|
| quote | Originally posted by darkhorizon:
It is rare that I see a rebuild motor last longer than a OEM one. |
|
"Rebuild" means many different things to different people.
Foe example, some people will knurl their valve guides and call them good as new, rather than press in new ones... (like the moronic previous owner of my car).
You've probably seen mostly half-assed rebuilds, which is probably more common than good ones.
|
|
|
|
Bloozberry
|
APR 28, 10:14 PM
|
|
Very true pmbrunelle. I've seen some "rebuilt" engines that are little more than a tune up...
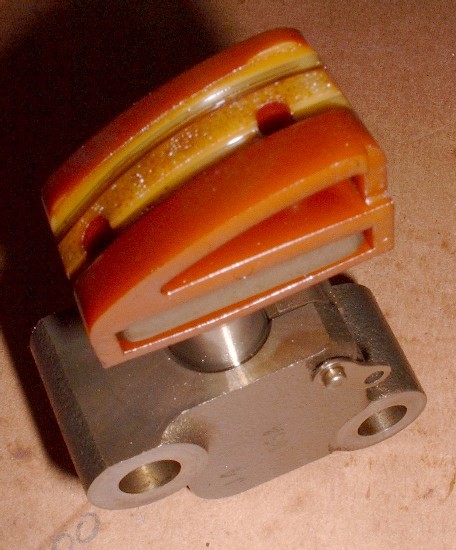
Anyways, next up in the disassembly phase was to remove the oil pump, which mounts to the front of the crankshaft on the Northstar. Since it was on the list of things to be replaced regardless of its condition, I couldn’t help but take it apart and examine it.
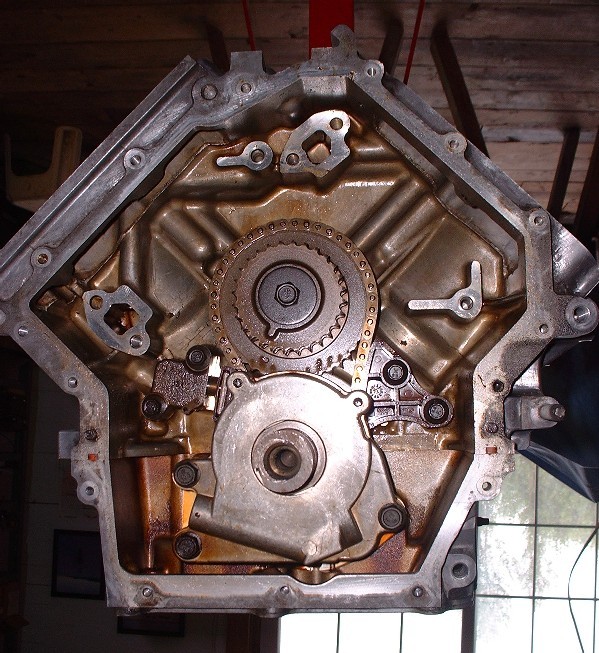
It’s a gerotor-style pump which uses a nine toothed pump gear (or inner rotor) in a ten-toothed gear housing (or outer rotor). As the crank turns counter clockwise in the image below, the inner rotor is keyed to the crank through two flats on the shaft. Since the two rotor's teeth mesh at the bottom, both rotors turn with the crank. As they do so, the space between the teeth of the inner and outer rotor increases towards the top from the 4 o’clock to the 1 o’clock postions, creating a vacuum. The vacuum pulls oil into the pump through the circular port on right hand side of the pump housing. The channel or manifold leading up from the inlet port narrows in diameter as it swirls up to the top of the pump where it meets a dead end and oil is forced between the teeth. The oil is carried around through to the 10 o'clock position where a new manifold opens up. As the rotor continues to turn, the area between the teeth decreases from the 10 o’clock to the 7 o’clock position, pumping the oil into the outlet manifold and through the outlet port.
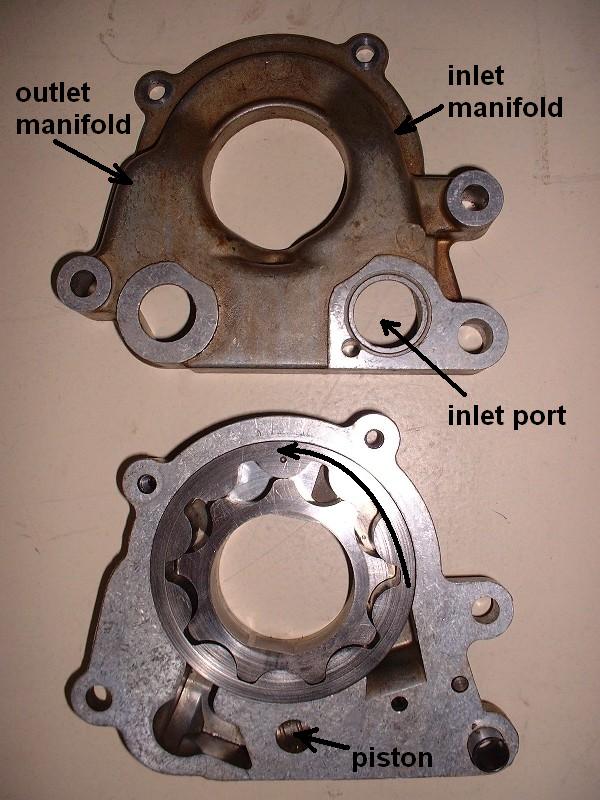
If you look carefully, the outlet manifold branches the right where the pressurized oil acts on a pressure regulating piston that you can see through a circular hole at the bottom. As higher oil pressure in the outlet manifold moves the piston further into the bore, it uncovers the circular hole which has an interconnecting passage in the other pump case half that redirects the surplus oil pressure to the inlet port area.
Things to look for if keeping an old pump:
a. check the mating surfaces of the teeth for deep scratches or uneven wear;
b. check the sides of the rotors and their mating surfaces on the pump housings for scoring;
c. check the OD of the outer rotor for scoring; and
d. check to make sure the pressure regulating piston is free to move fully into it’s bore;
|
|
|
|
Bloozberry
|
APR 29, 09:00 PM
|
|
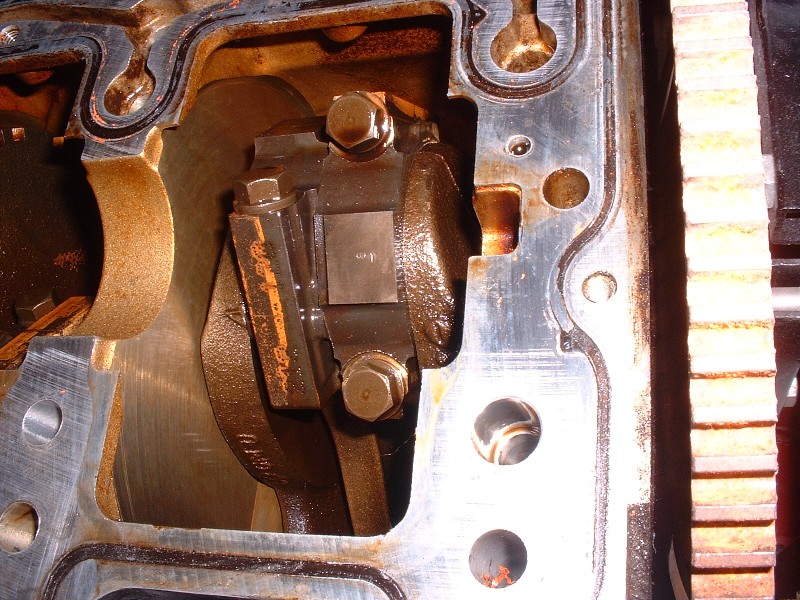
Darkhorizon mentioned it, but I’m sure there are lots of other people who would rather just drop in a used N* and run it until it dies rather than taking it apart. But here’s another reason (and there’s more to come…) why it may not last very long and you’ll find yourself dropping the cradle sooner rather than later. After the oil pump was off, I was able to get to the primary timing chain, crank and secondary sprockets. Have a look at how much the spring loaded chain tensioner on the LH side of the chain is extended.
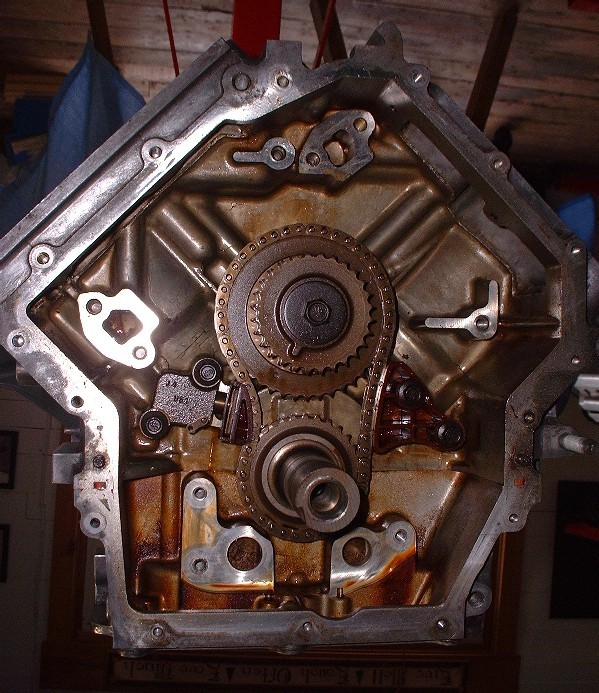
At first I thought it was due to the chain being stretched, but after I removed the tensioner, I found another reason. The cushion block on the tensioner was eaten through nearly 75% of its thickness from the chain passing over it. It’s the kind of thing that might last another 20K miles, or finish chewing through it after 5K. And you just know when that happens it’ll be catastrophic because it’ll relax the chain tension, cause the chain to jump the sprocket, and all hell will break loose when the pistons start hitting the valves. It’s important to note that this is all hidden wear that you won’t be able to see without some major disassembly. And remember, this was on an engine with a "claimed" 100K kms. To borrow a phrase (well, almost) from Forest Gump... "used engines are like a box of chocolates... "
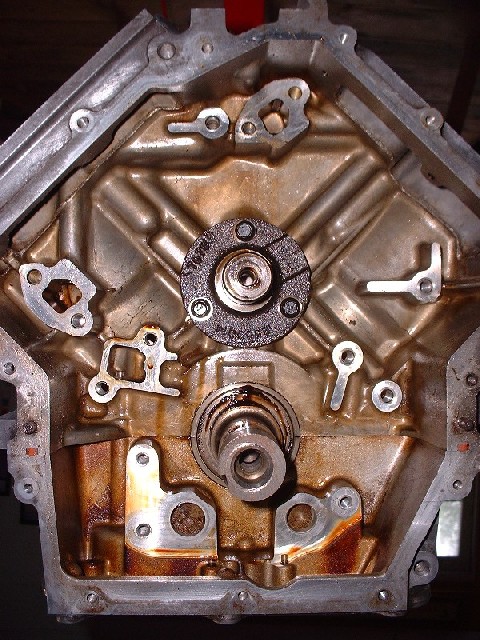
This is what the sprocket assembly looks like when it’s removed from the engine. The upper sprocket bolts onto a bearing assembly situated where the cam would be on an overhead valve (cam-in-block) engine.

Here’s the bearing assembly the upper sprocket rotates on… note that it gets fed oil from passages cast in the block.
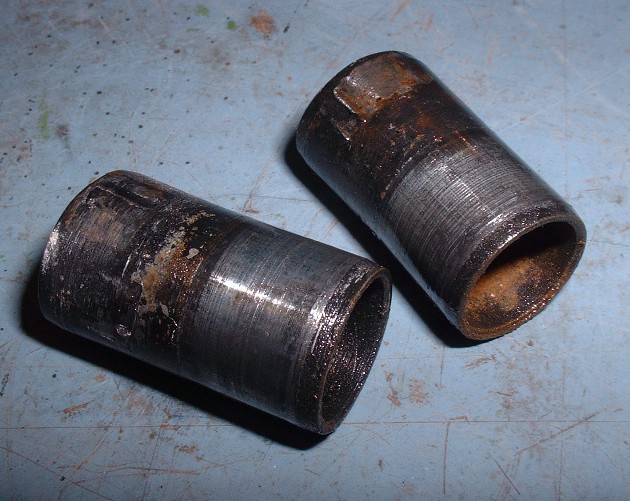
Next up was to remove the four steel head-alignment dowels on the deck surface. They’re swaged in the holes very tightly and are impossible to remove without ruining them. At first I thought they’d come out with a little gentle persuasion, but that gave way to more draconian measures. I’ve seen someone here on PFF remove them by welding a steel rod across the tops and twisting them out that way, but I found an easier method. I used Vise-grips to twist them out but found out that unless you push something into the hollow dowel, the Vise-grips will just deform it and slip rather suddenly. An extension for a 3/8” drive socket wrench fits just right. The extension prevents the dowel from collapsing and from there it was a simple matter of twisting and pulling at the same time. It still took a couple minutes per dowel though.
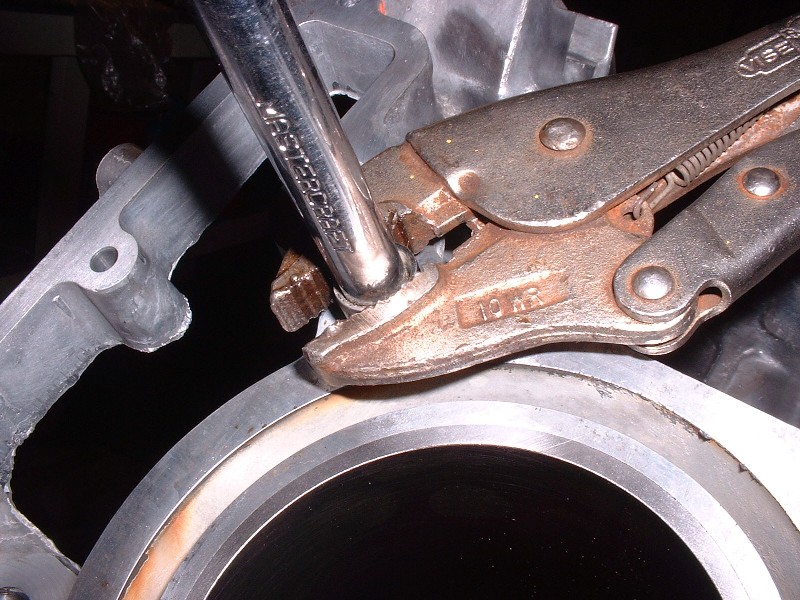

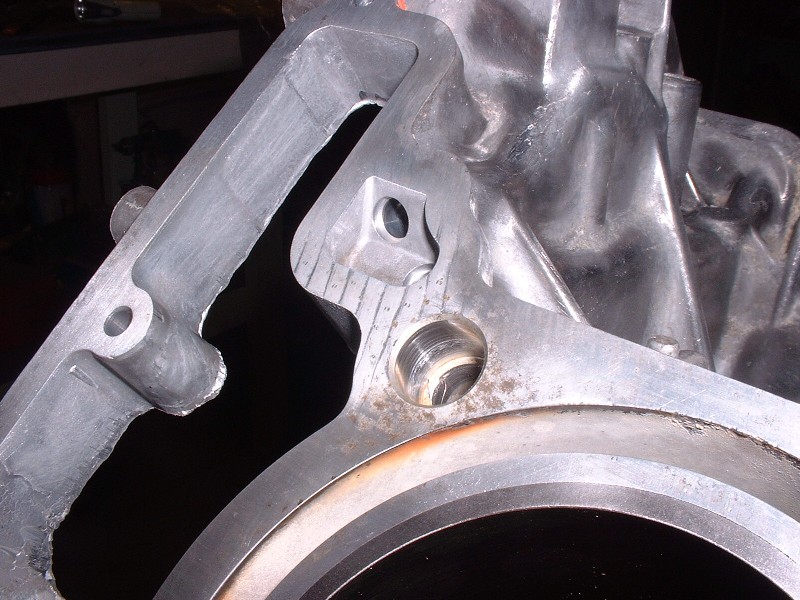
Here’s what they looked like after they came out. Definitely not reusable, and after a quick call to the local dealership, I found out that they wanted $17(!) for each one! And, to top things off, they are discontinued. There were still a few sets here and there across the good ol’ US of A, but I’m certain that shipping, brokerage fees, and taxes would have nearly doubled the price of these puppies. Luckily I have a friend with a metal lathe who turned some new ones for me for $20 labor.
 [This message has been edited by Bloozberry (edited 05-03-2010).]
|
|
|
|
Bloozberry
|
MAY 03, 09:13 AM
|
|
The next step on the tear-down was “The Big Decision”… Do I go the whole nine yards and pull the pistons, separate the case halves and renew everything? Or just listen to reason and leave the lower rotating assembly together... after all, the compression test results I did at the start were good. I had also read several horror stories of hone jobs gone amok here on PFF. In the end, a combination of the problems I’d found to date, the slightly out of round cylinders, and plain ol’ curiosity “made” me go the distance and commit to opening it (and my wallet) up.
One of the interesting things about the Northstar, is that the windage tray, an oil manifold plate, and the lower case half are all held in place with the main crank bearing cap bolts.
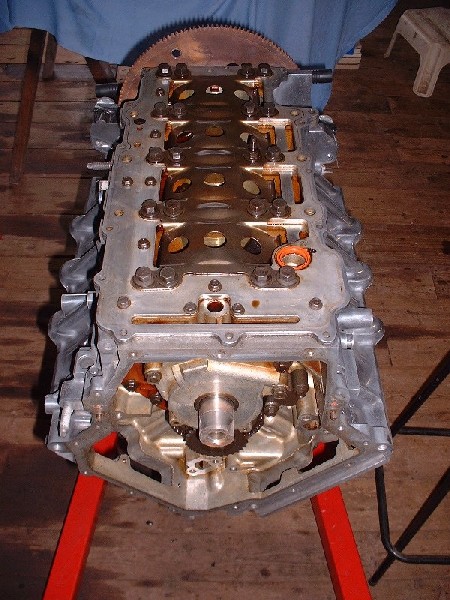
To gain access to the connecting rod cap bolts, you must remove the main bearing cap bolts (all 20 of them) and remove the, pick-up tube...
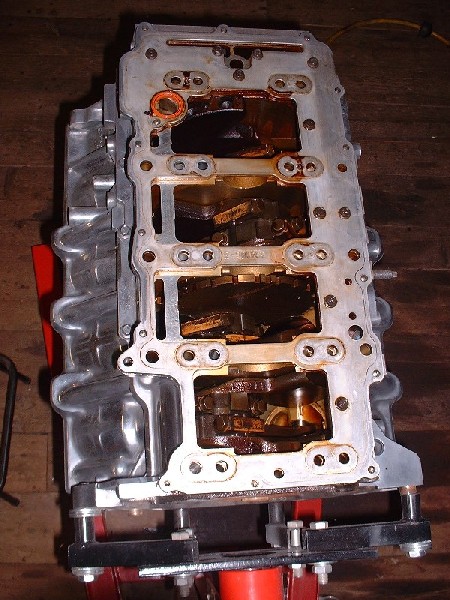
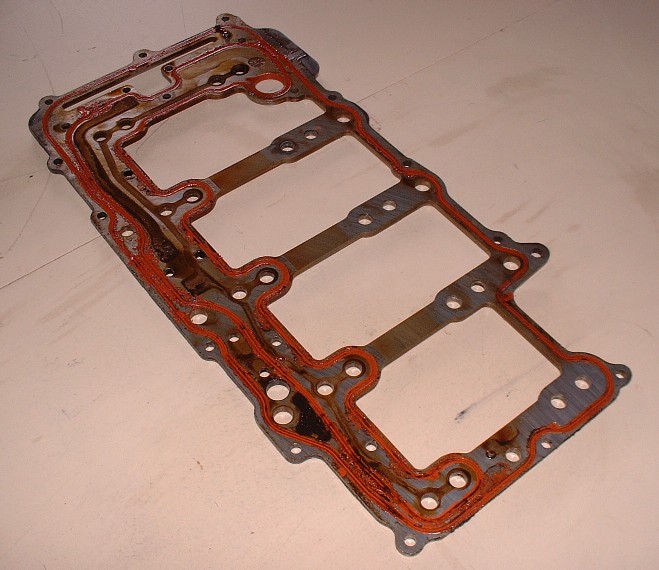
…the windage tray, and the oil metering plate...
I finally had access to the connecting rod bolts, which I numbered with my stamps like a good boy before taking them apart.
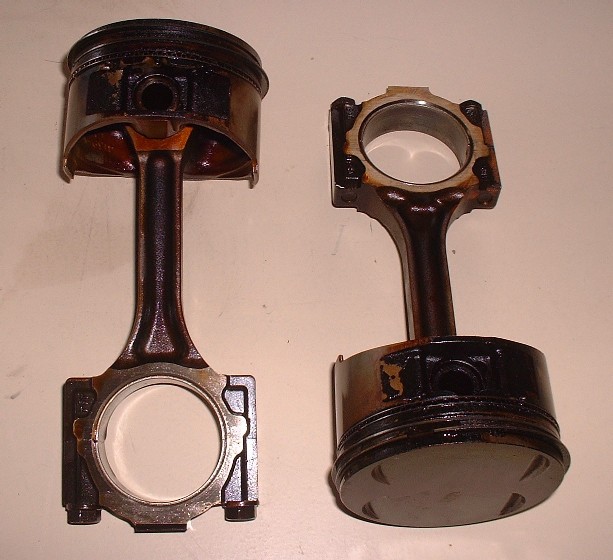
Here’s where being skeptical of the condition of the engine paid off big time… after I had removed the rod bolts and caps, and while I was pushing the pistons downward out of the bores, something went clinkity-clink on the floor when pistons 2, 4 AND 6 cleared the block. Unfortunately it wasn’t just a couple broken rings.
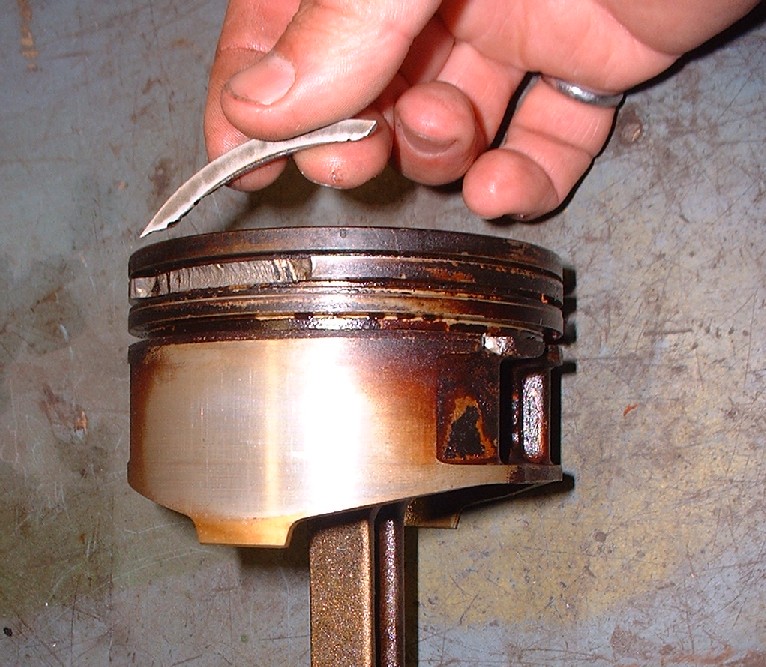
The amazing part is that even with these broken ring lands, the compression was still at 170 psi at cranking speeds. Well, that and the fact that the pieces had stayed in place and hadn’t scored the cylinder walls at all. After having exchanged posts here on PFF with a few of you, and consulting my machine shop, the consensus was that this was probably caused by detonation. It didn’t appear as though the engine was run for any length of time, or at all, after this damage occured since there was no secondary damage… well, except to my wallet... cha-ching! Have you ever priced out new Caddy pistons?
|
|
|
|