Well I managed to pull off bringing a Fiero project to tinker with during my vacation week up at the cottage I purchased one of the prototype headlight kits from doublec4 since I hadn't gotten around to rebuilding my headlight motor (probably because I wanted to do a mod on the headlights anyways).
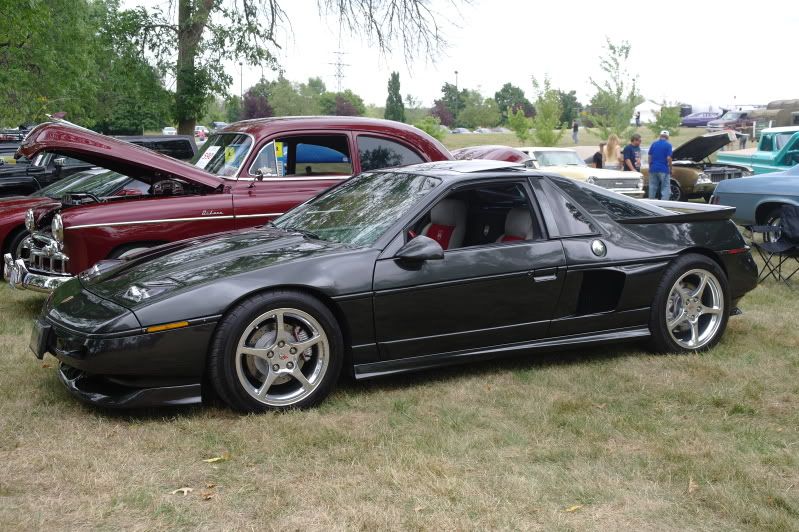
When I stopped by to pick them up, I found out that Fiero's weren't the only similar vehicles in the driveway to mine
After I finished reading my Top Gear book, I decided to start working on the headlight buckets. First I slotted the projector mounting holes for adjustment purposes to match the current kit version.
Also the holes on the outer side of the bucket were relocated (again these were prototypes I modded).
After throughly cleaning the oil off the bare metal, I painted buckets and brackets with a black rust paint.
After several light coats, they were allowed to cure in the shed for 24 hrs.
Here I am enjoying a few pints while assembling the projector hardware...
They should look something like this providing you've followed the instructions.
Once you've done both sides, you decide on a pattern for painting the lenses.
Masking the lens and more importantly ensure the other one is a mirror image of it requires some thought, measuring and patience. For this reason I waited until the next day prior to happy hour.
Once you've masked your pattern on the outside with painter's tape, you can flip it over and mask the remaining clear portion on the inside of the lens.
Finish up masking the rest of the outside and then you're ready to paint the inside with around 6 light coats of paint.
This is the paint I chose for the lenses (same matching paint I used on my Fiero tailights)
I waited another 24hrs before removing the masking tape and this is how they came out.
Since the inside is painted, they look great from the outside like they were bought that way.
Next I mounted the supplied Velcro and trimmed to them to fit the bucket lips.
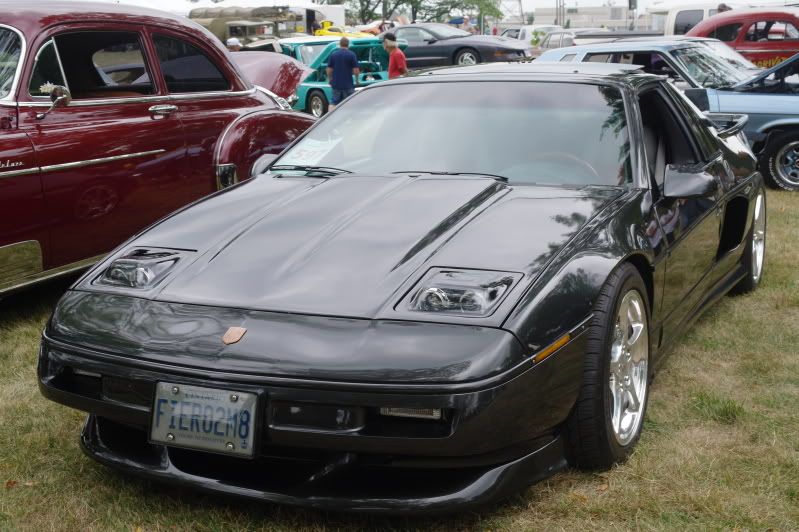
After removing the existing stock headlight assemblies and doors the buckets are bolted in. Once the depth is adjusted you can install the lenses and they should look something like this...
Make sure to allow the Velcro adhesive to cure to the lens prior to trying to remove them.
If you're looking to custom update the look and performance of the Fiero headlamps with a bolt in that could later be returned to stock, I highly recommend this kit.
Cheers, Fiero2m8
doublec4
AUG 15, 06:11 AM
Great write up, Ryan,
Thank you!
They look really nice on your car! One of the most unique Fieros ever built!
1988holleyformula
AUG 15, 06:50 PM
quote
Originally posted by doublec4:
Great write up, Ryan,
Thank you!
They look really nice on your car! One of the most unique Fieros ever built!
I'll second this, and would humbly ask for a head-on picture with those lights installed.
Fiero2m8
AUG 15, 07:17 PM
quote
Originally posted by 1988holleyformula:
I'll second this, and would humbly ask for a head-on picture with those lights installed.
Thanks, ask and you shall receive...
Just FYI projector's are not aimmed yet as I still need to pick up my HID kit.
It's a free annual show that included a plant tour to see the LS3 engine line. Also my son and I met Canadian Indy driver of the Go Daddy car James Hinchcliffe outside the factory.
Oh yeah they also had a mobile chassis dyno at the event for testing in (front of the crowd) what power you are REALLY putting to the wheels
FieroWannaBe
AUG 21, 09:30 AM
quote
Originally posted by Fiero2m8:
Oh yeah they also had a mobile chassis dyno at the event for testing in (front of the crowd) what power you are REALLY putting to the wheels
and... did you give it a try? Interested to see how your carb tuning is turning out on a wideband.
I like the look with the new headlights. Cant wait to get mine installed on my Chump Car.
Fiero2m8
AUG 21, 06:23 PM
quote
Originally posted by FieroWannaBe: and... did you give it a try? Interested to see how your carb tuning is turning out on a wideband...
Yes I did. While it was not a tuning session I did make three pulls (noting my carb and timing settings) so now I have a baseline to work off of. It also helps answer one of the top questions I get other than "how long did it take to build?" and "how much does it weigh?" (which I still need to get a measurement on).
Here I am in line for the dyno:
My son took some pictures of me on the mobile trailer:
After it was strapped in, tach lead was connected and blower fans moved to the side of the car...
I did 3 runs in 4th gear pulling to redline:
Here is the view from the car of the spectators watching the monitor:
And my view of the engine (I did remove the air cleaners for the test):
Fiero2m8
AUG 21, 07:04 PM
Don't worry, we managed to get a video of the third run as well Third run produced the best numbers but all three all were very consistent...
If you have a decent computer speaker system, it will give you a good idea of how the Indy Northstar sounds (one of my favourite features of the newst project) I decided to share the results here on the build thread and will post the graph too. Hopefully I'll get some positive ratings and useful feedback versus regretting sharing
Fiero2m8
Fiero2m8
AUG 21, 07:19 PM
doublec4
AUG 21, 11:29 PM
Nice!!
Sounds great and looks incredible. Very awesome to see this car come so far. Great work Ryan.