
 
     |
| Blooze Own: An F355 Six Speed N* Build Thread (Page 24/126) |

|
dratts
|
OCT 14, 07:14 PM
|
|
|
What fun! That is one of the movies that I recorded on vhs and watched at least 6 times. I guess you won't see the incredible animation at a concert, but todays kids being used to digital animation are probably not impressed anyway. Now I'm envious of you for that too!!
|
|
|
|
BtotheB
|
OCT 15, 10:35 AM
|
|
Great thread, been following for a while now and am impressed at the time you're spending on this.
I'll be at the Roger Waters show on Sunday too, should be fun!
Brad
|
|
|
|
Bloozberry
|
OCT 18, 08:29 PM
|
|
I’m back… and feeling comfortably numb. What a show, simply awesome. I looked for a Fiero in the parking lot (all 30,000 cars) but didn't see yours there BtotheB! As for Dratts... I can't remember how many times I've seen the movie, each time figuring out a little more of the meaning behind it all. My brothers and I rented it again and watched it as a primer on Sat night... I still like the girl with the pink pants! BTW, the graphics were first-rate during the show... turning a 250' wide white wall into the world's largest HD wide screen TV.
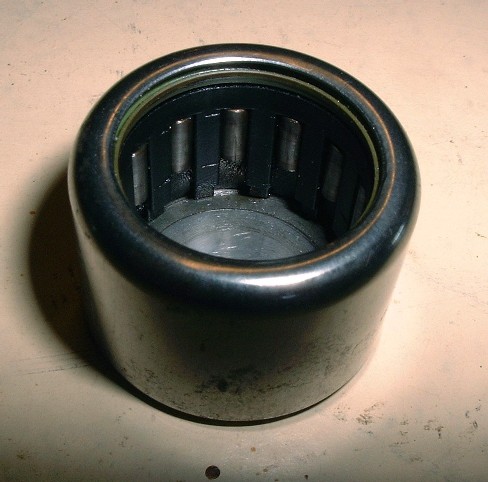
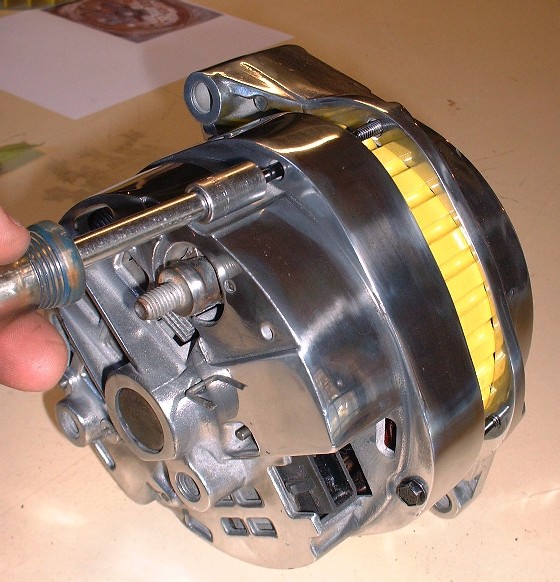
But back to business… I popped out the needle bearing when I took the case apart, cleaned it with varsol, blew it dry with air, inspected it, and decided to re-use it after suitably greasing it back up with clean synthetic grease.
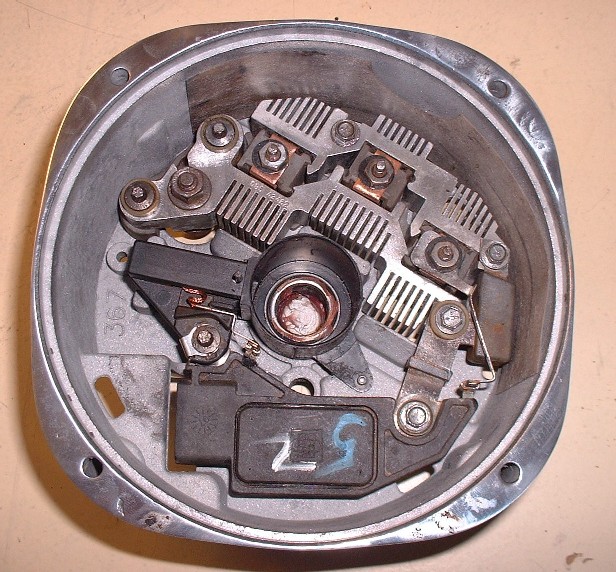
I used my arbor press to squeeze it back into the rear case and then focused on installing the remaining electronics. Here is everything installed in its proper place. When I installed the brush assembly, I had to remove the pin, hold the brushes in place with one finger, and reinsert the pin through a little hole in the back face of the rear case made just for this purpose. I actually got a little ahead of myself in this picture. If you note the two nuts between the 12 and 1 o’clock positions on top of the copper strips, and a similar nut at the 3 o’clock position, well, the three eyelets from the field windings are supposed to go on those studs before the nuts go on, so I had to take them off.
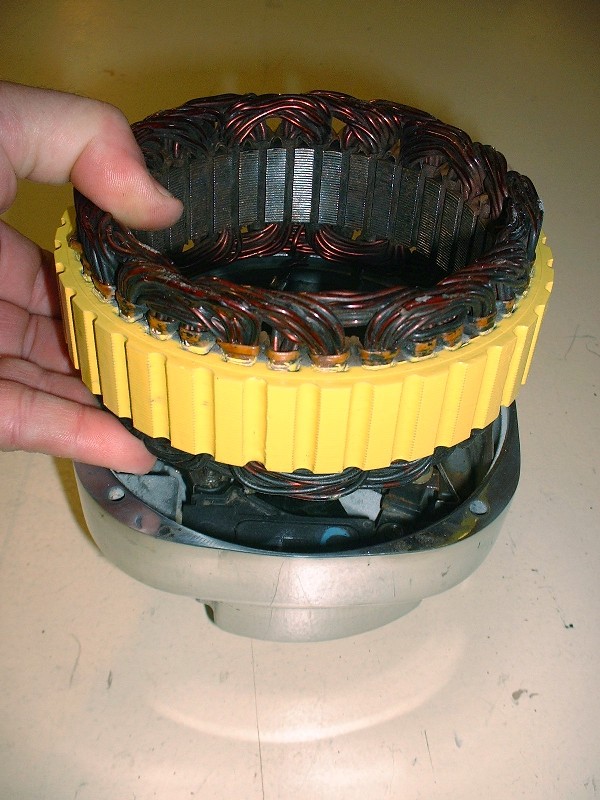
Here are the field windings being installed. Not visible in this photo are the three wires with eyelets on them that attach to the three studs mentioned above. The windings themselves are countersunk into the rear housing by about 3/16”. Notice a trend in the color?
Once the field windings are in, the armature/commutator assembly needed a little attention. Here’s what it looked like before the make-over:

And after:

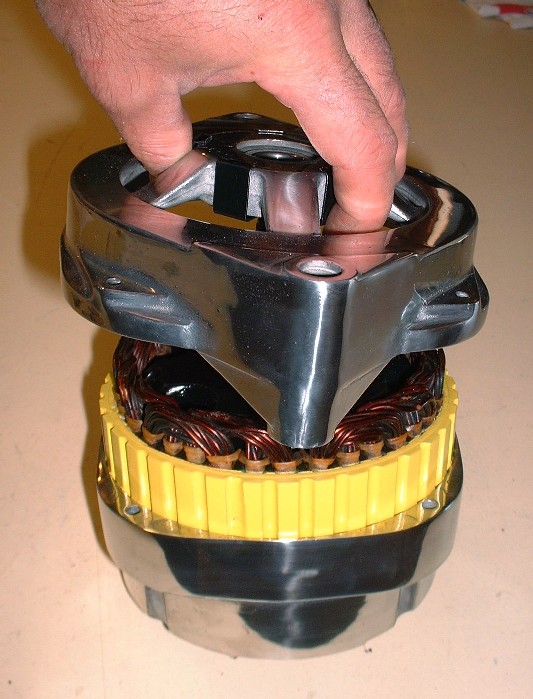
Once ready, it just gets lowered into place with the end of the shaft seating in the needle bearing that was installed earlier. At this stage, don’t forget to reinstall a thick spacer washer on the free-end of the rotor shaft. It serves as a thrust washer against the inside of the front housing.

Next up is the front housing which needs to be clocked in the proper orientation with respect to the rear housing if you want the electrical connections to be accessible once it’s installed on the engine. When looking at the front of the alternator, place the thickest of the two ears on the front housing at the 3 o’clock position, then line up the large lug for the positive battery lead on the rear housing at approximately the 1 o’clock position.
Then reinstall the four housing screws and torque them to 60 in-lbs.
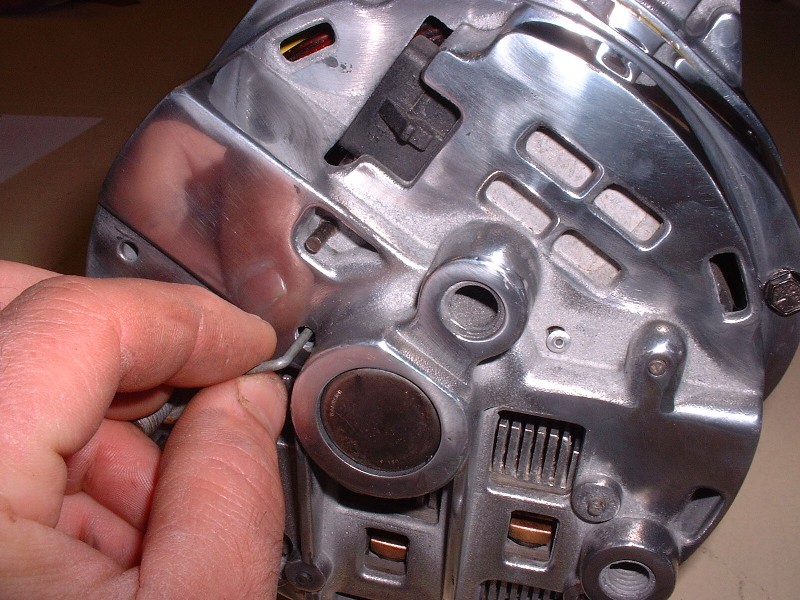
With the two halves back together again, it’s time to pull the pin out of the back of the alternator to release the brushes, like so:
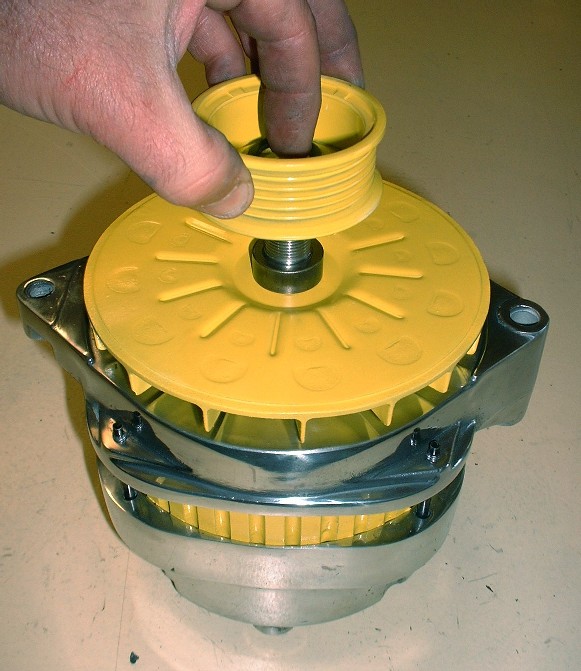
The last step is to reinstall the front end components in this order: thin spacer, fan assembly, thick spacer, pulley, washer, then nut. I used my impact wrench set on medium to tighten the nut.
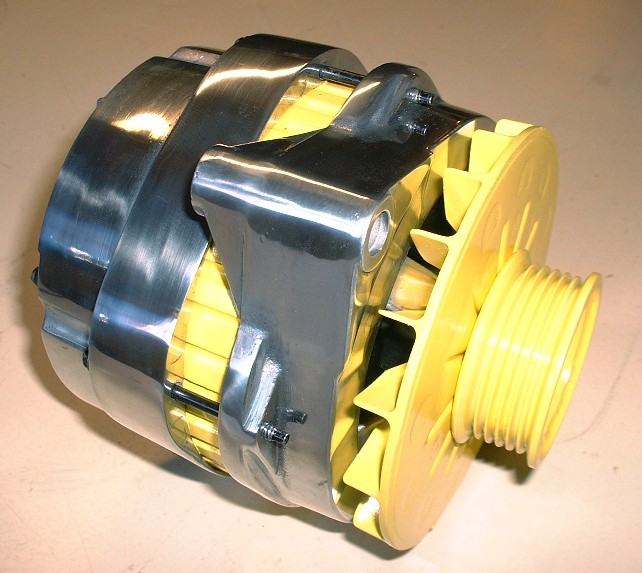
And voila! A far cry from what it looked like before.
|
|
|
|
dratts
|
OCT 19, 08:08 PM
|
|
|
Regarding the girl in the pink pants. I'm pretty sure I know the one you are talking about and it's been a while since I watched it. In fact it's on vhs and I don't even have a vhs anymore. She was a groupie right?
|
|
|
|
Bloozberry
|
OCT 19, 09:35 PM
|
|
|
How can you not remember the girl in the pink leather pants?!! In the movie, she's the one who says "Wanna take a baaaath?" Now do you remember her?
|
|
|
|
mattwa
|
OCT 21, 12:50 AM
|
|
Looking good! I love all the shiny metal.  Quick question, do you clear coat the aluminum pieces after you polish them, so they don't corrode again? Quick question, do you clear coat the aluminum pieces after you polish them, so they don't corrode again?
|
|
|
|
Bloozberry
|
OCT 21, 08:11 AM
|
|
Thanks Mattwa. There's a couple of considerations when deciding what to do to keep the aluminum shiny. The most important is polishing the part as best as you can. That means sanding out all of the little pits in the surface since that's where the corrosion starts. The next thing is being able to tell whether the part is aluminum or "pot metal" (aka white metal) which is just a blend of all kinds of scrap alloys melted together and cast in a very porous state. Sometimes it's hard to tell which is which, but usually the aluminum is denser and just "feels" like a better quality part. For aluminum, corrosion isn't usually a problem if the parts stay dry. I'm using a coat of a good quality paste car wax on these parts. This fills in any of the pores to seal them off. For the pot metal parts, there isn't much other than a coating of WD40 that keeps them shiny. The metal is just so porous that even when you sand it, you break into tiny cavities that are everywhere under the surface.
Clear coating may work for aluminum but it won't work very well for pot metal because of the porosity. It's very hard to get the polishing compound out of the tiny pores in the surface, so the clearcoat "fish-eyes" when you try to apply it. The other problems with clearcoating though, are that the moment gasoline touches it, it turns yellow, and anywhere that a bolt must be tightened down over-top of the clearcoat, it breaks through the protective coating and the corrosion starts from there.
Polished parts need regular maintenance, but if you're starting off with quality aluminum rather than pot metal, you'll have way less work to do to keep it shiny.
(Edited for spelling)[This message has been edited by Bloozberry (edited 10-21-2010).]
|
|
|
|
Kento
|
OCT 21, 11:11 AM
|
|
| quote | Originally posted by Bloozberry:
Clear coating may work for aluminum but it won't work very well for pot metal becasue of the porousness. It's very hard to get the polishing compound out of the tiny pores in the surface, so the clearcoat "fish-eyes" when you try to apply it. The other problems with clearcoating though is that the moment gas touches it, it turns yellow, and anywhere that a bolt must be tightened down over-top of the clearcoat, it breaks through the protective coating and the corrosion starts from there.
Polished parts need regular maintenance, but if you're starting off with quality aluminum rather than pot metal, you'll have way less work to do to keep it shiny. |
|
You can powder coat the parts with a clear and it will protect the "shiney "
|
|
|
|
Bloozberry
|
OCT 22, 09:03 PM
|
|
With all the front mounted accessories finally polished and/or painted, it was time to install them so I could take a few measurements for my new serpentine belt. When I started to wrap the stock belt around the pulleys to do this, I realized that the stationary idler pulley would need to be changed out for one with grooves. I’ll need to go scour the scrap yards one of these days if the rain and freezing-cold wind ever stop. Here’s everything installed, at least temporarily, with the wrong idler pulley.

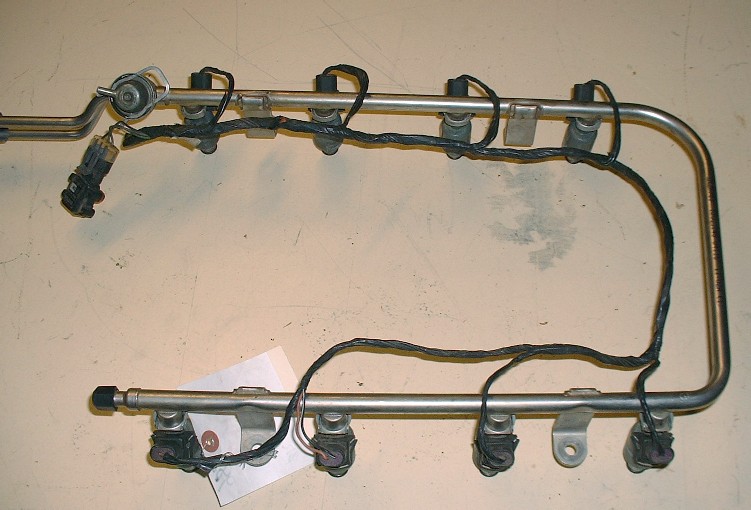
A couple weeks ago I started surfing eBay for a stainless steel fuel rail and came up with one from an Oldsmobile Aurora for $50 including the injectors, pressure regulator, MAP, and harness. I probably could have gotten it for cheaper but I decided to use the “Buy it Now” button since I figured it was a good deal as is. It arrived a couple days ago and except for the electrical connector having been cut off, it was in good condition. I don’t need the connector since I already have one from the old plastic Northstar rail.
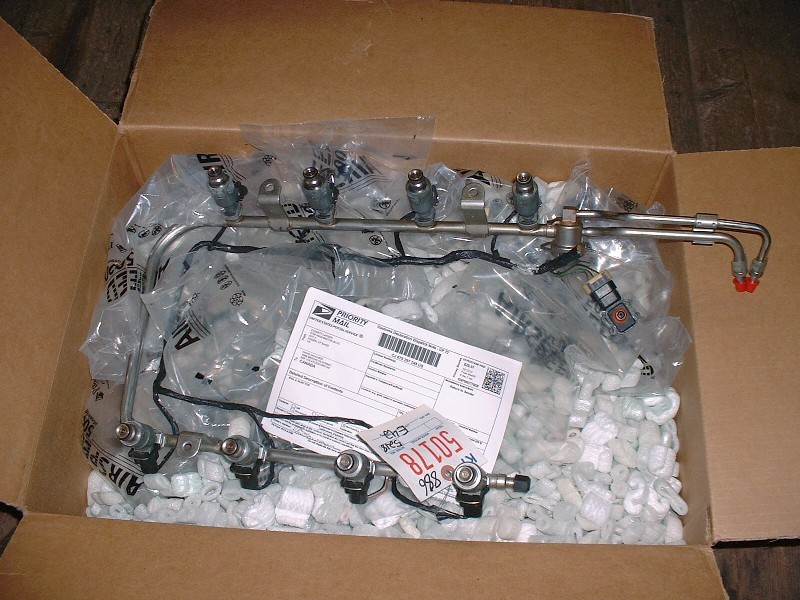
I wanted the Aurora rail because the fuel connections are on the forward bank of the engine rather than on the aft bank in the stock Northstar configuration. Both are still at the transmission end, which means having to lead the lines over to the passenger side of the engine bay but at least with the Aurora rail I won’t have to lead the fuel lines forward since they’ll already be on the correct side of the engine.
The Aurora rail has it’s own set of challenges though. It can’t be installed directly on the Northstar without removing the dog-bone mount at the transmission end of the engine since the fuel rail interferes with it. The ends of the rail also have an up-turn so I will cut off the ends to kill two birds with one stone. I haven’t decided how I will couple the rail to the car’s fuel lines yet but I recall a post where someone was able to use some AN fittings from Russell. More on that once I do some more research.
Since I wasn’t entirely sure the Aurora rail had the same fuel pressure regulator or that it was set at the same pressure as the Northstar, I swapped them around. To remove it from the rail it’s a simple matter of pulling off a retaining clip with your fingers (this one is on the old plastic rail)...
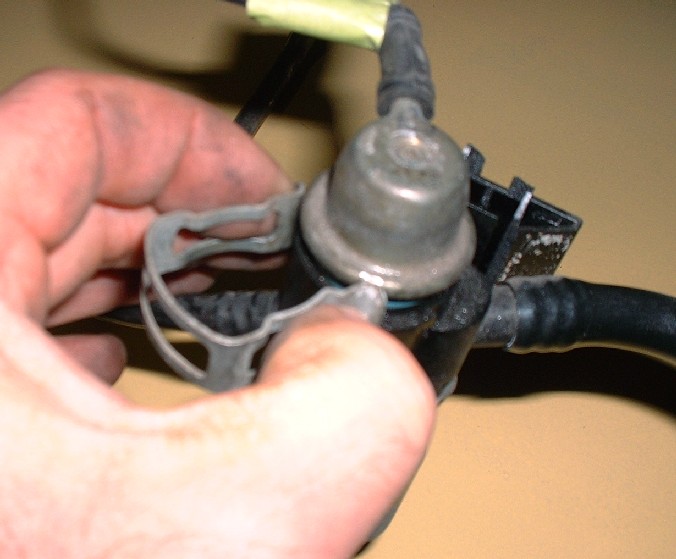
…and pulling up on the little regulator. It’s a good thing I decided to swap them over because the inside of the regulator on the Aurora rail was partly rusty and very gnarly-looking. If you do this yourself, be aware that there’s a large o-ring on the regulator OD, then there’s a very fine plastic fuel filter, and deeper inside the housing part of the rail, there’s another tiny o-ring that seals against the little tube at the bottom of the regulator. Sometimes the filter stays inside the housing, but the tiny o-ring almost always stays inside it.
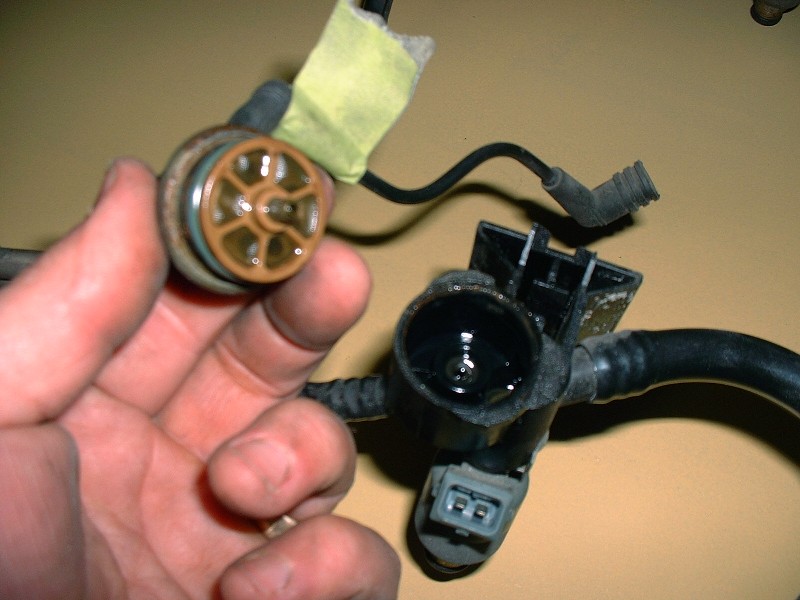
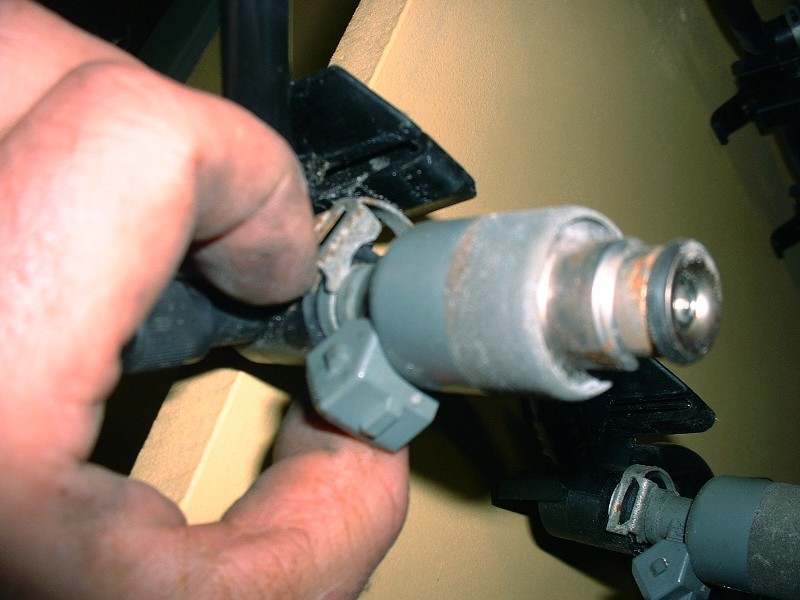
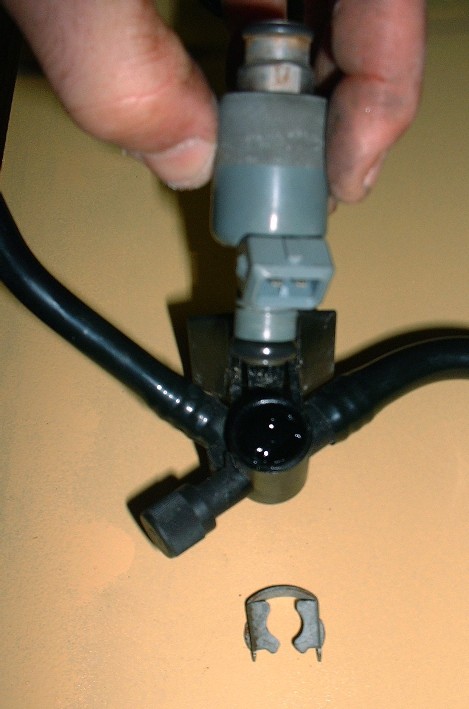
I haven’t decided yet whether to replace the injectors or try to get them cleaned. Where I live, I haven’t yet found a shop that can clean them unless they’re installed in the car, which makes the whole process moot if I have to drive there first only to burn up a piston and some valves. I may have to break down and buy some new ones for peace of mind. PFF’er Will mentioned that there are inexpensive Ford pieces that are direct replacements. Regardless, here’s how you take them off the fuel rail… first, you have to pry off a stiff little metal clip at the top of each injector…
…and then you have to pull pretty hard on the injector to get it to let go of the rail. I’d say about half of the time the upper injector o-ring stayed in the rail rather than come out with it, so have a good look to be sure you have them all out. After they were pulled out of both rails I noticed that the injector part number is the same for both the Aurora and the Northstar rails. I would have figured the Aurora injectors would be different because of the smaller displacement, so they must compensate with shorter pulse widths instead.
|
|

|
elitopr
|
OCT 22, 10:27 PM
|
|
|
nice job!!!!!!!!!!! keep doing that way
|
|
|
|