 
     |
| LS4 / F40 swap - fieroguru (Page 20/216) |

|
fieroguru
|
MAR 30, 09:32 AM
|
|
| quote | Originally posted by av8fiero:
Ok. I'm wondering then why you used the flex for the front manifold/downpipe. If the whole exhaust system is going to float with the engine is the flex even necessary? |
|
To keep the manifolds from cracking. If the front & rear manifolds are connected w/o a flexible joint, as the exhaust heats up and expands it will push the manifolds away from each other. This puts quite a bit of stress on the primary's and the manifold flange and leads to cracking (learned this from my SBC swap).
|
|
|
|
dobey
|
MAR 30, 10:02 AM
|
|
| quote | Originally posted by fieroguru:
To keep the manifolds from cracking. If the front & rear manifolds are connected w/o a flexible joint, as the exhaust heats up and expands it will push the manifolds away from each other. This puts quite a bit of stress on the primary's and the manifold flange and leads to cracking (learned this from my SBC swap). |
|
I wonder if that's a problem with the hydroformed LS7 manifolds though. No harm in being cautious of course, but the LS7 manifolds do seem a bit beefier.
|
|
|
|
1fatcat
|
MAR 30, 10:14 AM
|
|
|
I'm sure it would take it's toll on the manifold bolts at least, they won't take that kind of pressure for long.
|
|
|
|
fieroguru
|
MAR 30, 10:50 PM
|
|
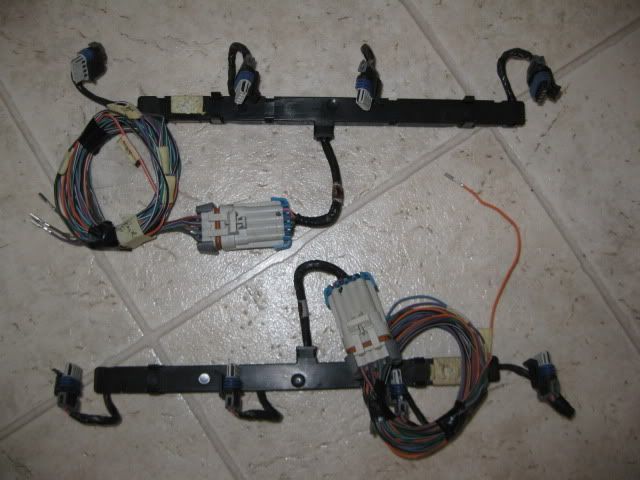
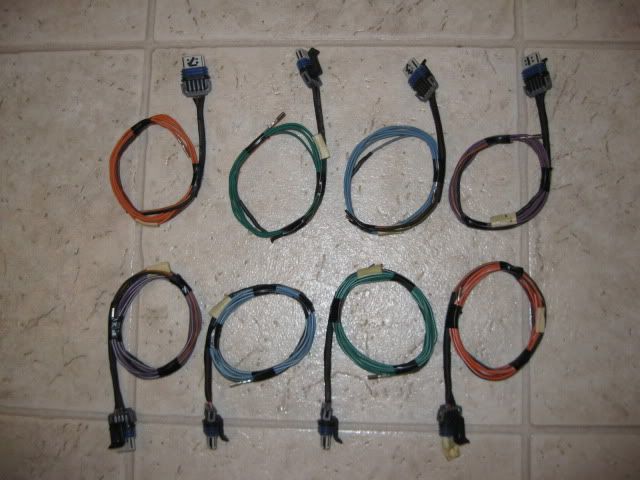
Spent some more time on the harness simplification. Since the coils were relocated, I had little use for the unsightly coil sub-harnesses, so I took them apart and wired up each coil individually. The first 4" or so from the connector was wrapped in heat shrink insulation to protect the wires and make the harness as small as possible when the individual coil wires come off the main harness along the bellhousing area. I also use a black sharpie to put the cylinder # on the internal portion of the connector.
Before:
After:
 [This message has been edited by fieroguru (edited 03-30-2011).]
|
|
|
|
fieroguru
|
APR 02, 07:39 PM
|
|
Ring gear is now installed:
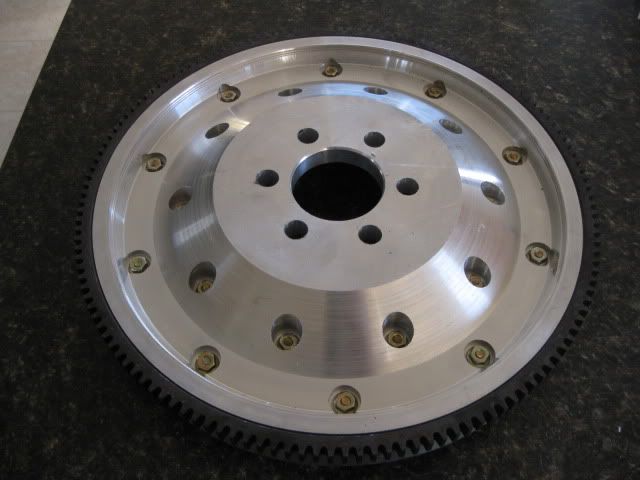
I took it to the same place I dyno'd my SBC fiero to have the balance checked and it came out nearly perfect... no need to remove any additional material to balance it.
Using the wife's new 30 lb digital postal scale, this flywheel weighs 11.2 lbs with the 6 pressure plate bolts. The stock version of my clutch/pressure plate combo weighs 18.4 lbs + the 11.2 lbs for the flywheel = 29.6lbs for flywheel/clutch combo. For comparison, a stock 2.8 fiero setup is about 15 lbs for the flywheel and 15.6 lbs for the clutch/pressure plate = 30.65 lbs. Stock 2000 LS1 is 24 lbs for the flywheel and 32 lbs for the clutch/pressure plate = 56 lbs and this weight is spread over a 2" larger diameter. So this LS4/F40 flywheel/clutch combo will have a very similar weight as the stock 2.8 setup and about 26 lbs less than the RWD setup.
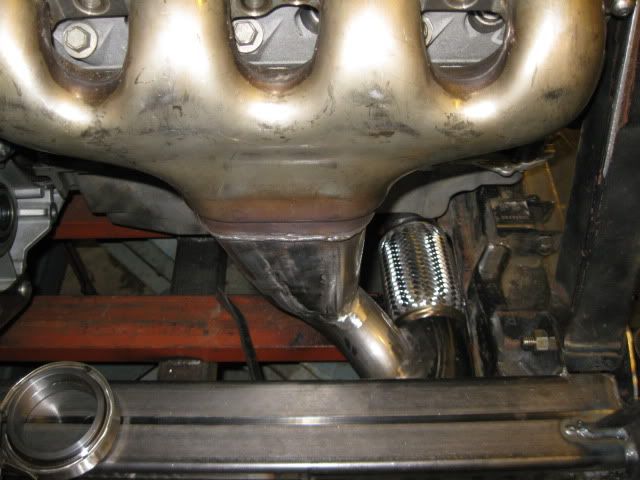
I was also able to finish the rear collector. Maybe on Sunday I will get the V-band clamp installed and the rest of the exhaust welded up.
|
|
|
|
Bloozberry
|
APR 02, 07:51 PM
|
|
|
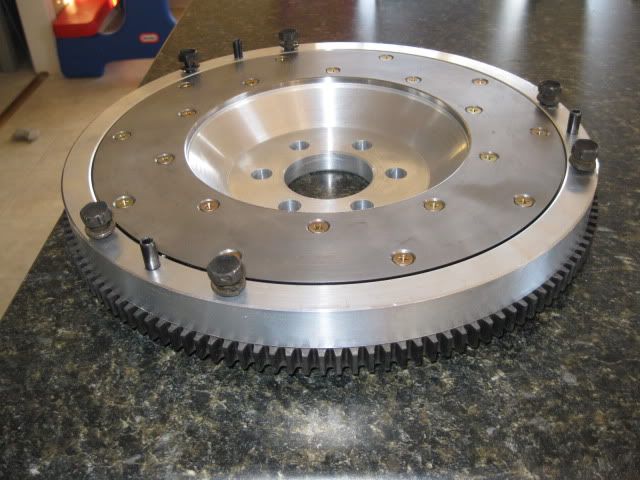
Very slick flywheel... hard to believe it was a chunk of 6061 Al only a few short days ago. What are you using to attach the wear plate to the flywheel? They look like Phillips head countersinkable bolts. Where did you get them, what grade are they, what torque did you put on the nuts, and did you find it hard to torque the nuts properly with only the Phillips drive to hold them still?
|
|
|
|
fieroguru
|
APR 02, 08:18 PM
|
|
| quote | Originally posted by Bloozberry:
Very slick flywheel... hard to believe it was a chunk of 6061 Al only a few short days ago. What are you using to attach the wear plate to the flywheel? They look like Phillips head countersinkable bolts. Where did you get them, what grade are they, what torque did you put on the nuts, and did you find it hard to torque the nuts properly with only the Phillips drive to hold them still? |
|
They came supplied with the fidanza wear strip, so I can't comment on their details, but I assume they have been proven to work. The nuts have a serration on the backside to prevent them from working loose. The instructions that came with the wear strip specified to torque them to 7lb-ft. I used a vice to hold the flywheel while I use a screw driver to hold one side and an in-lb torque wrench on the other side. My original fidanza flywheel had the counter bores for these bolts at 1/2" in diameter but none of my sockets would fit down in the holes, so I used 5/8" on mine.
I am sure you are aware, but for the others, this is the amount of work that went into this flywheel. Each box is a just 1 step in the process.
BTW, I sent you an email.[This message has been edited by fieroguru (edited 04-02-2011).]
|
|
|
|
Bloozberry
|
APR 02, 09:14 PM
|
|
You my friend, are a gentleman and a scholar. 
|
|
|
|
1fatcat
|
APR 02, 09:26 PM
|
|
|
Fieroguru, that is a work of art! Nice weight too! I have replaced the fidanza plates before, there was no problems holding the philips head for me either. My plate also came with fasteners, and they looked to be of high grade. I like to use loc-tite on the threads too, just because those are not the kind of bolts you want comming loose.
|
|
|
|
fieroguru
|
APR 06, 07:18 PM
|
|
Work has kept me pretty busy, but I was able to do some work on the swap today. Installed the MLS exhaust gaskets to ensure proper manifold placement, installed the 2nd and last v-band and started to clean up the welds. The end product will be 3 pieces: two manifolds/downpipes and a single Y pipe/muffler/tail pipe section.
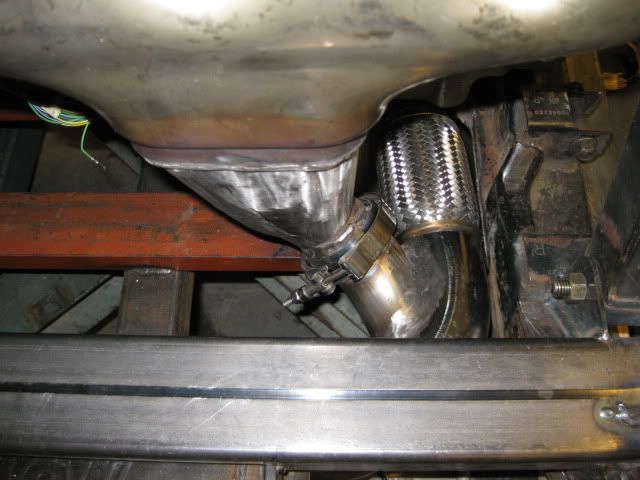
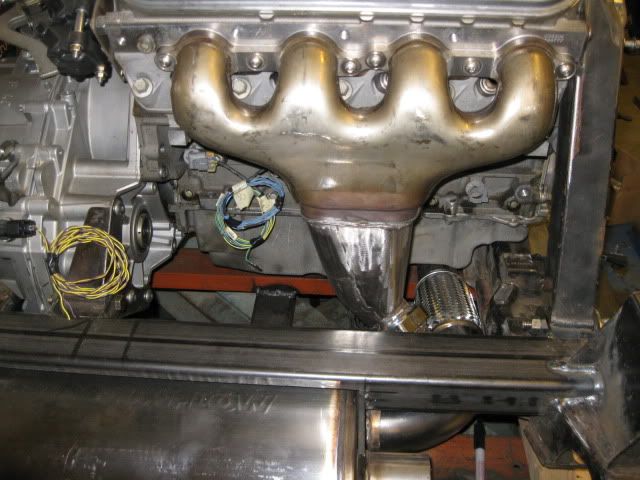
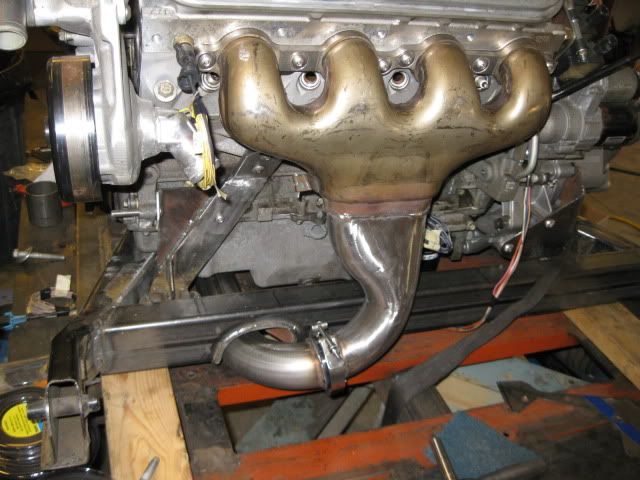
The next step is to slide the engine/tranny/cradle back under the car and finish welding the flexible section, the 3" section going into the muffler and the two tail pipes.
|
|
|
