 
     |
| 88 Coupe 4.9 Swap Thread (Page 20/69) |

|
josef644
|
NOV 17, 10:58 PM
|
|
| quote | Originally posted by Fieroseverywhere:
Ha! Thats a classic there!  |
|
I knew someone would enjoy that
|
|

|
Mickey_Moose
|
NOV 18, 09:25 AM
|
|

...but mind if I ask a stupid question? Where exactly are the filter in relation to the injector body (I know this is probably obvious if I would just look at the injectors). You go the replacement filter from (Mr. Injector)?
Cheers,
|
|
|
|
josef644
|
NOV 18, 10:14 AM
|
|
Sorry M_M, I assumed you had removed one in the past for some reason.
I ordered the injector service kit yesterday, $24.00 delivered.
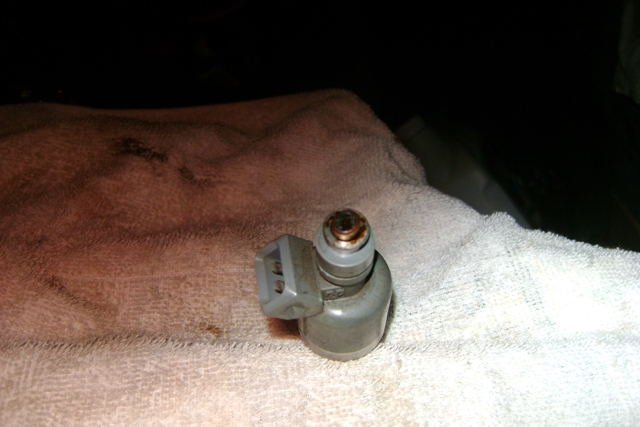
Here are some pictures of the placement of the filter:

and in the injector but not seated:
I want to give credit to whoever wrote this web page on how to clean their injectors in the link below. I recommend taking the 5 mins or so to read his instructions. The names Mike and Debbie are at the bottom of the page:
http://www.rowand.net/shop/...InjectorCleaning.htm[This message has been edited by josef644 (edited 11-18-2009).]
|
|
|
|
Fieroseverywhere
|
NOV 18, 11:42 AM
|
|
Very good article. I took a quick peek for a ultrasonic cleaner and found this...
http://www.geeks.com/detail...utm_campaign=CD-2800
Has a stainless steel tank and looks like it would work well. Worth the money for $20 + shipping. I think I'm going to order one up and get a rebuild kit for my injectors also. I'm pretty sure at least one leaks. I just need to find a good, non-flamable liquid to use in the cleaner. Thanks for posting the info Joe.[This message has been edited by Fieroseverywhere (edited 11-18-2009).]
|
|
|
|
Mickey_Moose
|
NOV 18, 11:54 AM
|
|
| quote | Originally posted by Fieroseverywhere:
Very good article. I took a quick peek for a ultrasonic cleaner and found this...
|
|
Yes I would recommend picking up a cheaper ultrasonic cleaner as they work quite well. I have cleaned my 2.8 and 4.9 injectors with one and it made a big difference. On a side note I also used the cleaner to do the door latches on the one car and boy that sure made a difference in the power locks. 
josef644 >> thanks for the pictures, that is how I assumed they came apart.
|
|
|
|
josef644
|
NOV 18, 01:59 PM
|
|
Well I collected all my 'Patented" fuel injector checker parts
one can of Max's 8700 Carb and Choke cleaner
8 " of 5/8" heater hose w/ one ty strap
Air nose putton pushed compressed air on and off unit
one used trunk lock popper button off of a 91 Deville, not seen in the first photo
one lawn mower battery
wire and connectors

Assemble 'Patented" injector checker
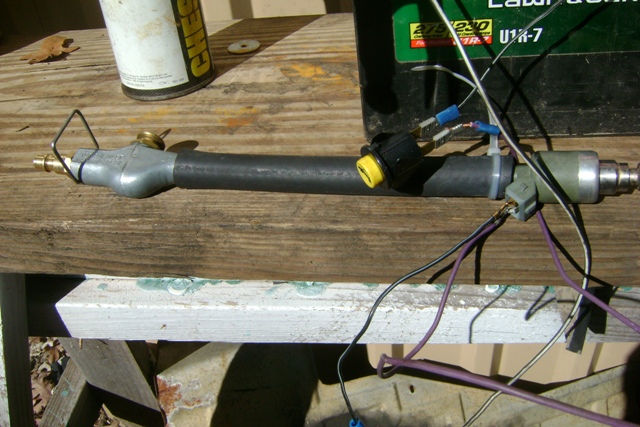
The 5/8th hose fits good on the top of the injector. I turned on the air compressor untill I had 40 lbs of air pressure. I put the hose on the injector. Add a bit of the Max's 8700 Carb and Choke cleaner from NAPA, insert the air nozzel into the hose and hold the button down on the air nozzel. I pushed the button up and down and watched for a spray. I was rewarded three times. I had one that would omly drip at first, but was able to clear it up. I had two that I had to play with a bit to get them to un plug an spray. I have six working injectors now. Two have refused to cooperate. I am gonna soak them over night in gas or a carb cleaner of some type. I usually use laquier thinner for carb parts, but I'm not so sure if I want to put these plastic injectors in that kind of thinner.
6 good, and they have a nice TIC<TIC<TIC when the power is applied to the injectors
2 Deceased
Edited to add :
The two deceased ones are now in Berryman's Chem Dip for overnight.[This message has been edited by josef644 (edited 11-18-2009).]
|
|
|
|
josef644
|
NOV 18, 04:38 PM
|
|
Went outside and removed the TB so I could do a good job cleaning the intake around where the injectors plug back in . Got it all cleaned pretty good and saw this. What tha hell is this? :
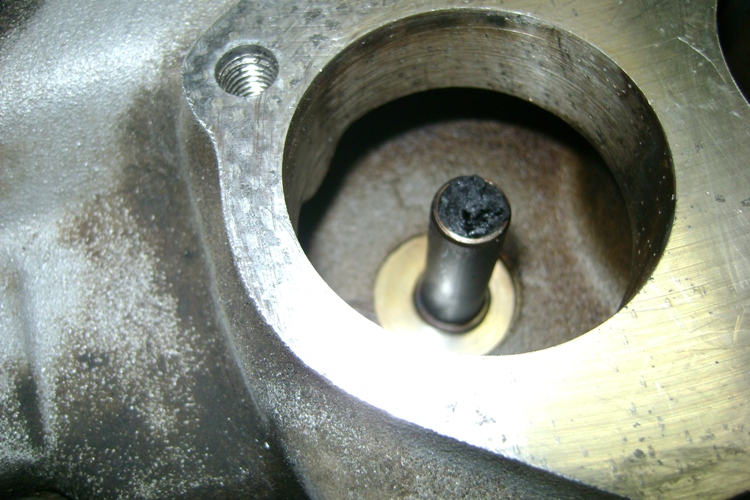
I put my shop vac in the throttle bore and turned it on. This is the rear one, and I could hear and feel air coming threw the injector holes on the forward bank.
At first I thought maybe EGR path, as it is right behind this intake bore. But the air flow is on the other side of the intake.
The other bore has a shorter one, but it isn't stopped up near this bad.
Took my finger and feeled of it. Its simi soft. Not crunchy like burnt ERG waste is that I have had to dig out of SBC engines before.
Edit to ask:
When you guys have replace thte fuel rails to the intake, what method did you use? As a one piece unit, or take the two sides apart? When I removed it from the in take, I started on the forward bank alt end, rear alt end, Rear transm end, then the forward bank transm end. Just wondered what worked best for everyone. I want to have the harness on the underside as Fieroseverywhere suggested before I stab it on.[This message has been edited by josef644 (edited 11-18-2009).]
|
|
|
|
Fieroseverywhere
|
NOV 18, 07:11 PM
|
|
I replace as a full unit. Never had a problem that way.
On a side note a wrecking yard close to me wants 76 dollars for a caddy fuel rail with all injectors, harness, and regulator attached. They have a few if your interested. I'm going to pick one up for a fuel rail project.
|
|
|
|
josef644
|
NOV 18, 07:32 PM
|
|
|
I'll see what happends after I get them out of the Chem Dip tomorrow. I will be mowing till 2 or so it'll be later in the day before I know if they cleaned up or not.
|
|
|
|
josef644
|
NOV 18, 08:18 PM
|
|
| quote | Originally posted by Fieroseverywhere:
I replace as a full unit. Never had a problem that way.
On a side note a wrecking yard close to me wants 76 dollars for a caddy fuel rail with all injectors, harness, and regulator attached. They have a few if your interested. I'm going to pick one up for a fuel rail project. |
|
Ok so one piece, and then what. Please don't tell me " Installation is the reverse of the removal procedure" like my Haynes does. ANY tips for easy replacement?
When I removed the rails from the intake the top O rings were still soft and puffed up,round-ish sort of. The ones from the intake were real flat on the sides. I know this is gonna be fun.
|
|
|
