|
| Blooze Own: An F355 Six Speed N* Build Thread (Page 17/126) |

|
NiNeFiVeFoUrOh
|
JUL 22, 04:18 PM
|
|
Nice build up.
I am currently doing basically the exact same thing with a few exceptions.
I have a couple of suggestions for you that you might want to try.
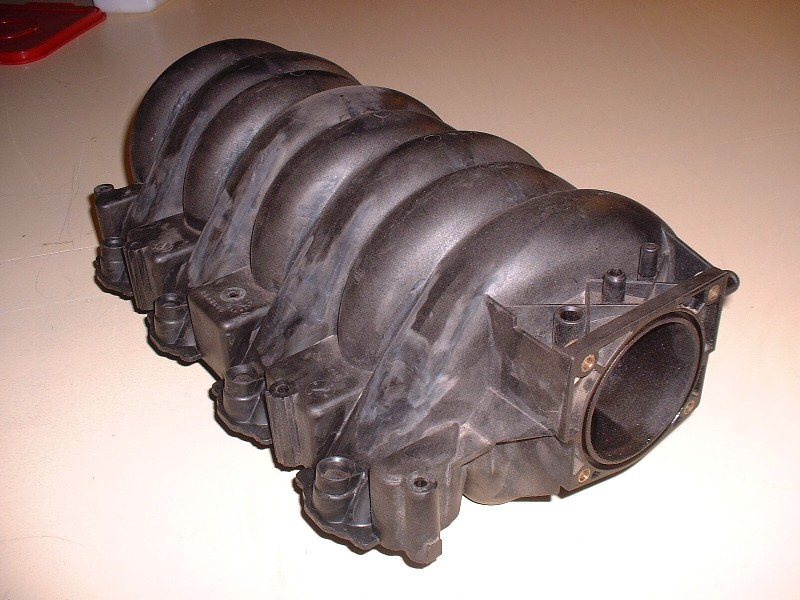
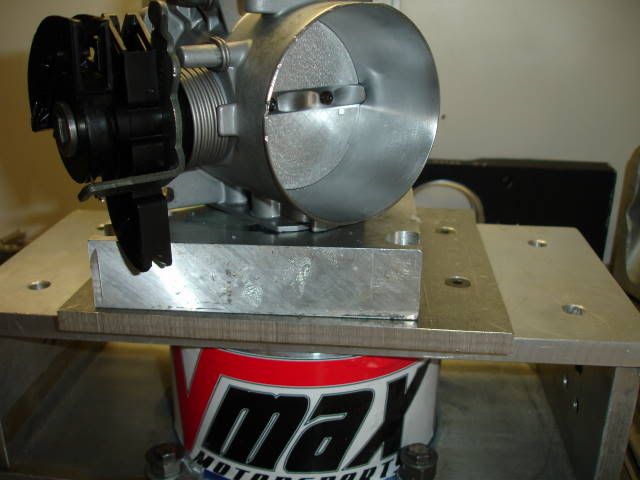
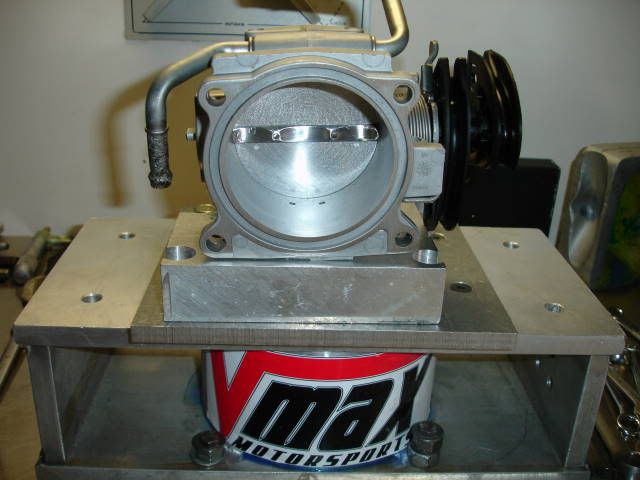
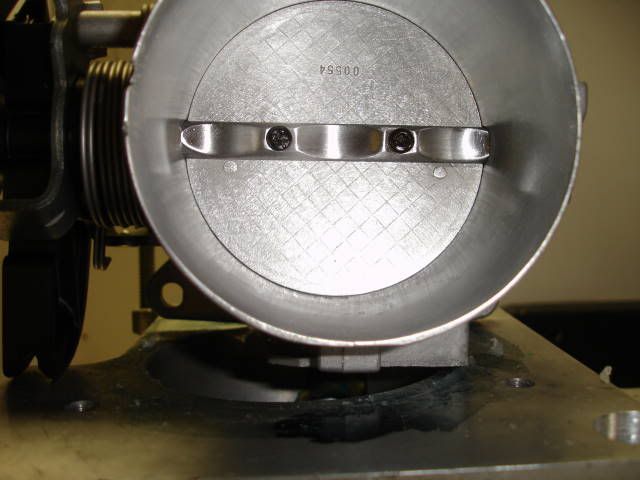
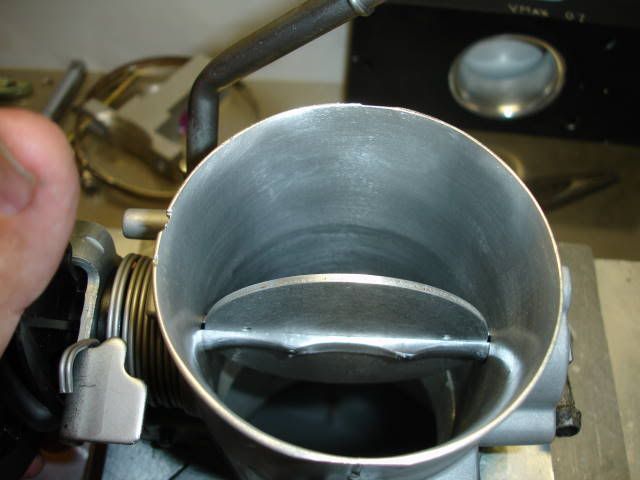
I sent my TB and intake to a company called VmaxMotorsports, they specialize in LS1 stuff mainly, but they port the plastic style intakes for LS1's. When I noticed this, I contacted Pete at Vmax and asked him if he would do a Northstar intake (since they're very similar to the LS1 type). He said he had done a few and would be glad to do mine. Along with that, I sent in my TB and he opened it up for me.
He told me that the LS1s typically see 15-20whp from these mods combined on a stock motor. I know our gains may not be as generous, but as a Northstar modder, it's great to get anything, even if it costs a little bit more for us. From the TB alone after flowbenching it, Pete told me that gained 17.2 cfm over stock. I don't know how much the intake gained, because mine was soaked in carbon and oil build up like yours, but I'm sure it'll be a decent amount. (BTW, I haven't tried cleaning it yet, but I don't think "soap and water and a pressure washer" will be adequate, that stuff is thick and hard to clean! I'm going to try using this thing a friend of mine has called "VAT", it's some really strong chemicals used to clean parts with in a 5 gallon sized jug... it shouldn't hurt the plastic, but hopefully will clean up the majority of the buildup inside of the intake).

It cost me $430ish? plus shipping to get these mods done. The application is a 4.6 being swapped into a 95 Aurora. Among other things going in the motor (very similar build to yours) will be CHRFAB 272 cams, Wiseco .020 over pistons, Eagle rods, and worked heads. Planning on tuning with Westers.
I decided to go with the lighter lower end parts (the Wiseco Pistons and Eagle rods) because according to my math, there is a 2-3 pound weight difference, maybe this will make a noticeable difference in the performance of the motor (it better!).
I'd like to get this intake/TB setup on a stock 4.0 Aurora and dyno it, to see what the actual gains are.
I really dig that gasket job on the Oil manifold on your motor... where did you come across that technique? I've been racking my brains to try and figure out what to do when I get to that point. If you have a write up on it or anything specific I'd love to see it.
|
|
|
|
Bloozberry
|
JUL 23, 09:55 PM
|
|
Thanks for the comments katatak, fieroguru, and bamman. Bamman swung by my place about two weeks ago with his 4.9 powered black coupe... sure sounded nice! I'm not sure I would change that engine even if I won the lotto... your car's a real sleeper.
As for NiNeFiVeFoUrOh (wouldn't it be easier just to write 9540?), that's one nice lookin' TB. US $430.00 works out to about 600 clams up here in Canada after shipping, duty, taxes, and exchange... a bit rich for my already swelled budget! You'll have to post your results once you get your car running. It will be interesting to see how that porting affected overall performance.
You asked about the oil manifold sealant procedure I used. I don't have any other write up other than what's in this thread. But there's no black magic involved... I just couldn't see myself spending the money on a new oil manifold plate when it isn't a wear item. GM probably recommends replacing it because it isn't worth the time and effort for a dealership technician paid at $65/hour to dig out the old sealant. It's a time consuming process that took me a couple hours. Then, I figured the oil manifold plate sees the same harsh conditions as the insides of the case halves, so the case-half sealant should be good enough for the oil manifold too. The part number for the sealant in the US is different than it is here in Canada. For you, the sealant is GM part number 12378521. Just be sure to completely fill and slightly overfill the oil manifold seal grooves with a continuous bead of it, ensuring the sealant is higher than the rail surface by about 3 mm (0.118 in). Be sure to stick it together before 20 mins are up too, or it won't seal properly.
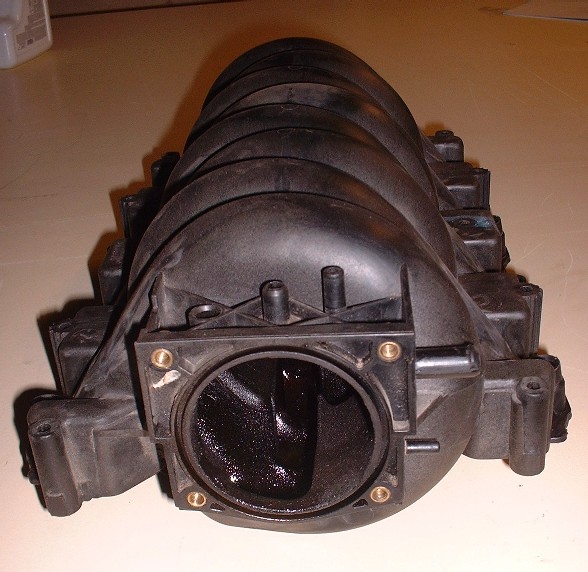
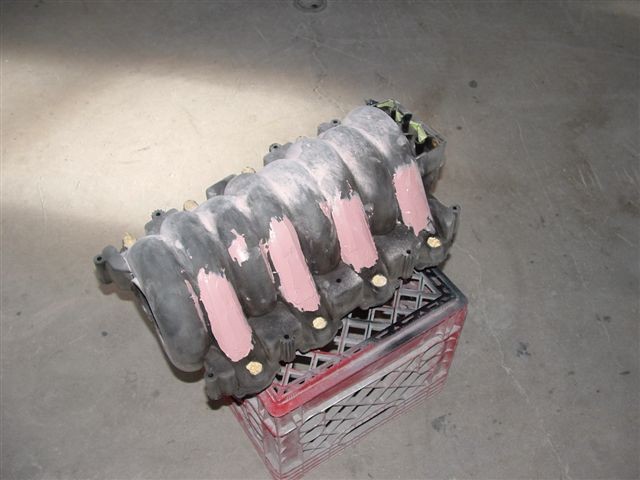
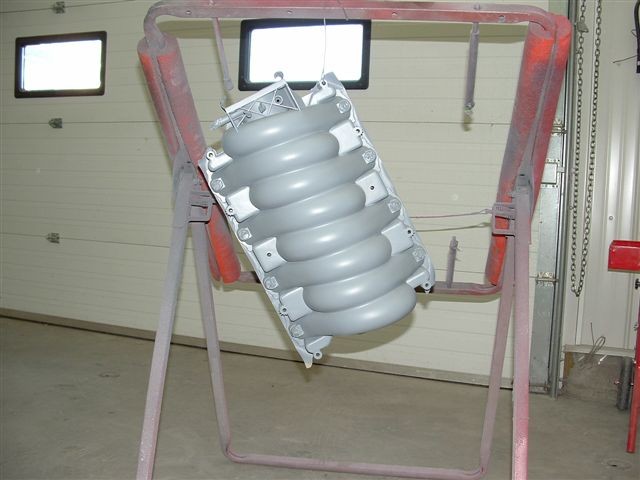
As for a quick update: I finally managed to clean out the insides of the plenum by first dropping it off at my favorite machine shop to get it hot-tanked. They assured me that the solution they used would not melt my plenum, but only after they double-checked with the manufacturer of the chemicals! Once the oil residue was removed, I lightly bead-blasted the interior of the runners and the insides of the main central part of the plenum with very fine glass beads. It worked like magic, removing every bit of carbon as far as the eye could see. I used a lower air pressure around 80 psi and the beads just bounced off the plastic manifold without so much as even discoloring it. Lastly, I blew it out really good with shop air. Next, I block sanded the entire intake plenum then ran lots of water through it to ensure it was clean. Today, I dropped it off at the paint shop for final smoothing and color. I'll update with pictures as they become available from the shop. Any guesses what color I picked?
|
|
|
|
motoracer838
|
JUL 24, 01:19 PM
|
|
|
|
|
Bloozberry
|
JUL 24, 02:10 PM
|
|
|
Thanks Joe! Actually, I thought I had an original idea shaving the plenum, but it turns out after reviewing some earlier threads that WAWAZAT came up with the idea before me in this thread on page 2 near the bottom: www.fiero.nl/forum/Forum3/HTML/000028-2.html Goes to show that there aren't too many truely original ideas out there.
|
|
|
|
17Car
|
JUL 24, 09:30 PM
|
|
|
motoracer838, I did the exact same thing, only I painted my cover to match the valve covers. Which side did you move your coil pack to? I put mine where the air filter canister used to be.
|
|
|
|
motoracer838
|
JUL 24, 10:20 PM
|
|
| quote | Originally posted by 17Car:
motoracer838, I did the exact same thing, only I painted my cover to match the valve covers. Which side did you move your coil pack to? I put mine where the air filter canister used to be. |
|
I put mine on the bulkhead between the engine compartment and trunk.
Joe
|
|
|
|
Bloozberry
|
AUG 01, 12:30 PM
|
|
Before getting ahead of myself only to find that I needed to backtrack and redo things all over again, I headed out to my favorite paint shop to get their opinion on the best way to fill the nicks and imperfections in the plenum. The good news was that the plenum isn’t made of Bakelite… apparently this is a notoriously difficult material to get paint to adhere to. I believe the plenum’s made of ABS plastic… the same stuff your in-home drain pipes are made of.
The paint shop recommended one of two courses of action: 1. do it the cheap way... epoxy prime it first then apply a polyester filler to the primer to ensure good adhesion, or 2. do it the proper (read:expensive) way with a special flexible epoxy filler directly on the plastic. I already knew that applying a polyester filler directly to the runners wasn't going to work since I tried it on one only to find I couldn’t feather it effectively. So I opted for choice number 2. The body shop owner, who knows what this is for, also convinced me that if I tried to do this at home it would take five or six hours to smooth out whereas his much more experienced body guy could do it in two. So with instructions to lightly sandblast the whole shemozzle to rough it up a bit and bring it back to them for prep and paint, off I went.
As mentioned earlier, I used about 80 psi pressure and crushed glass to bead-blast it, and when I saw how well that worked, I opted to turn the blaster onto the insides as well. It worked like magic to remove the leftover carbon deposits in the runners and central part of the plenum. The important thing to remember is to get the plenum hot-tanked first to remove any residual oil. That way when you sandblast the insides it’s bone-dry and the sand won’t stick to it. As a final step, I ran hot water through it to rinse out any glass dust, blew it out with shop air, and let it complete drying in the sun.
I dropped it off at the paint shop with instructions of my own for them to take a few pictures of it while undergoing the transformation. Here it is with the body filler applied. It’s the same stuff they use to fill the flexible bumper covers on cars. Apparently there are around three different levels of flexibility of the stuff… they used the stiffest.
Luckily they quoted me a cost of $300 to do this work and stuck with it. It sounds like a lot of money (and it is) but, I wanted it flawless since it’s the main point of focus when you open the decklid. The body man who I know to be very experienced and also a perfectionist, said it took him 5 hours, not two, to properly shape the filler to the contours of the runners. They had originally thought it would take about two hours. Here it is with the sanding underway.
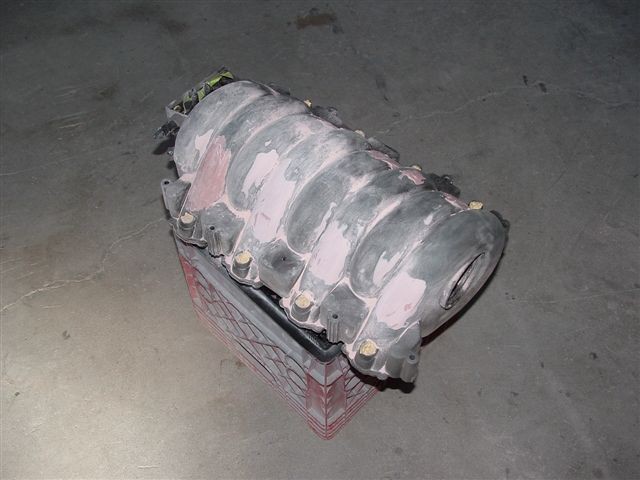
With it fully shaped, the next step was the application of an epoxy primer. Here you can really see how much cleaner the lines of the plenum are.
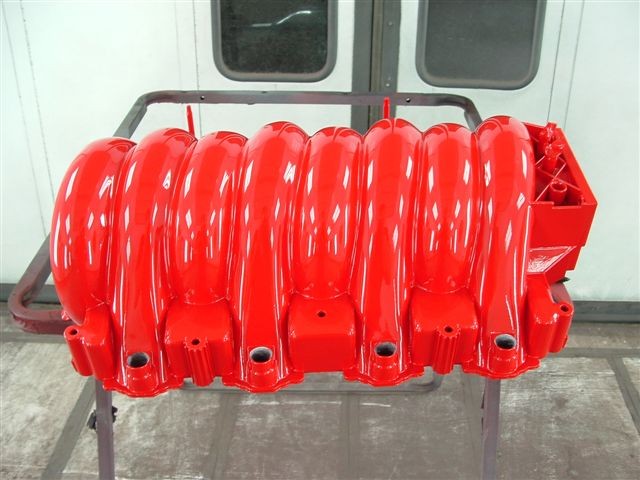
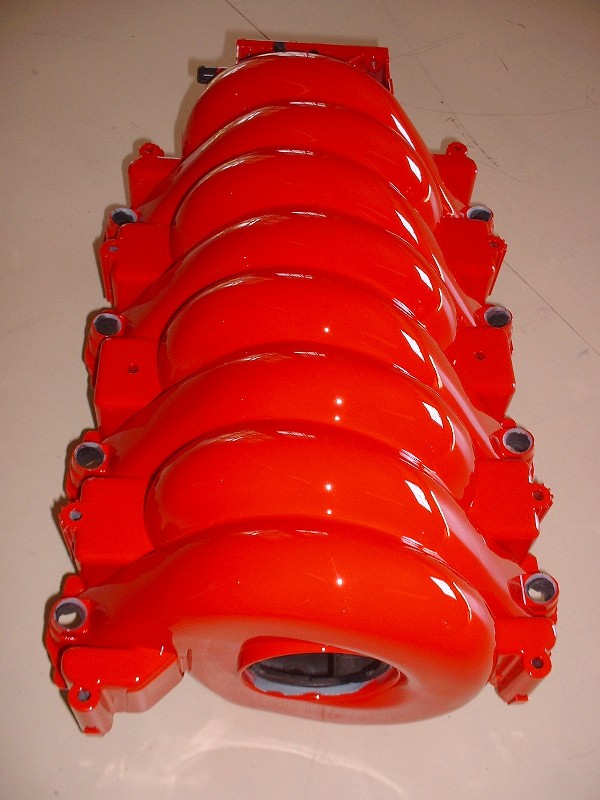
I had searched for just the right color when I saw a late model Mazda in “True Red”. The color code is A4A. Here’s the plenum with the flat looking basecoat sprayed on. Notice the air drier in the background… the body shop is a fully modernized water-borne paint facility.

And finally, with the clear coat. This thing looks like a whole bunch of Rolling Stones lips all puckered up and ready for a big wet kiss… something the painter thought I would give him when he saw how happy I was at the way it turned out. 
|
|

|
katatak
|
AUG 01, 01:05 PM
|
|
|
That manifold is beautiful Blooz - very nice!
|
|
|
|
cptsnoopy
|
AUG 01, 06:12 PM
|
|
Very nice WOW factor! 
Charlie
|
|

|
motoracer838
|
AUG 01, 06:17 PM
|
|
I don't think you'll get that kind of deal from your body shop again, that looks fantastic.
Joe
|
|
|
|