
 
     |
| Blooze Own: An F355 Six Speed N* Build Thread (Page 12/126) |

|
Fierofreak00
|
MAY 27, 07:05 AM
|
|
Ahhhh sweet serenity, that's much better.... but, it's only going to last a day or two so get to work!  -Jason -Jason
|
|

|
Bloozberry
|
MAY 30, 03:47 PM
|
|
With the heads in place, the next step was getting them torqued on. There’s some good discussion here on PFF about whether the head bolts are reusable or not since the GM service manual states that they must be replaced without really explaining why. The consensus is that they are theoretically reusable since they aren’t torqued beyond their yield point (ie TTY). But from a practical standpoint, they should be replaced because of the specialized coating on the threads. Apparently it is a one-time-use coating that cannot be reapplied to the threads outside of having the highly specialized machine processes at your disposal. One other thing to point out here, is that if you haven’t drilled out your OEM threads in the block and replaced them with inserts, GM makes it pretty clear that you MUST clean the coating left over from the old head bolts out of the threads in the block before using new bolts.
So armed with this information, I took my 20 perfectly good used head bolts and set them in my bin of used-big-bolts-in-case-I-ever-need-that-particular-odd-size-ever-again. It’s amazing how many bolts are collecting dust in there. And off to the internet I went to order two boxes of ten Fel Pro head bolts (p/n ES-72186) at $42.50 each box. Here’s what they look like:
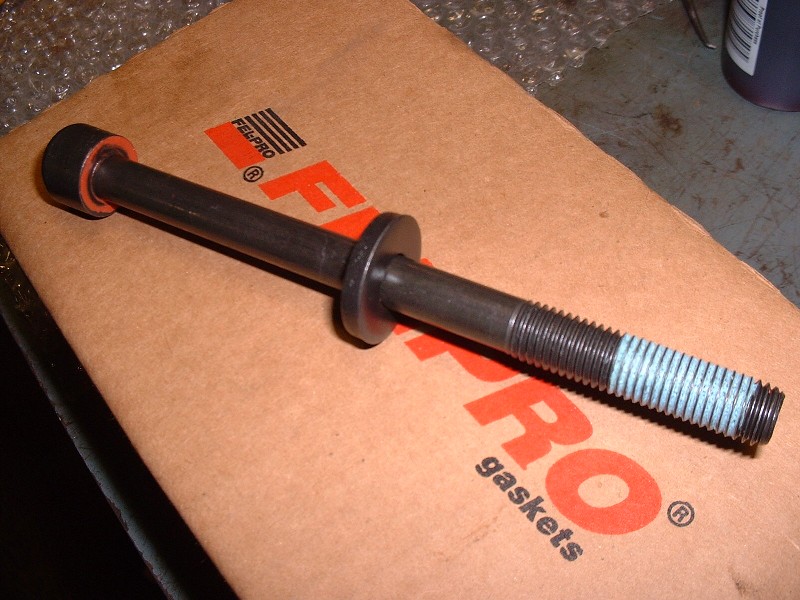
Notice there’s not only a coating on the threads, but also on the underside of the head too. Presumably it’s there to give an accurate torque reading, but then again these bolts are tightened with a specific number of degrees of rotation so there’s not much need to reduce the friction under the head. It's possible that it's a sealant to keep engine oil from creeping down the bolt holes and affecting the coating on the threads, but I'm just speculating. One thing it does do is give you a hard time after you’ve finished torquing the bolts. The rubberized orange sealant squeezes out as the underside of the bolt comes in contact with the cylinder head, and then gets pinched off by further tightening. So you end up with these little strands of orange sealant dropping off into the cylinder head. I wasn’t impressed since it took about half an hour using tweezers to pick out the pieces after I was done.
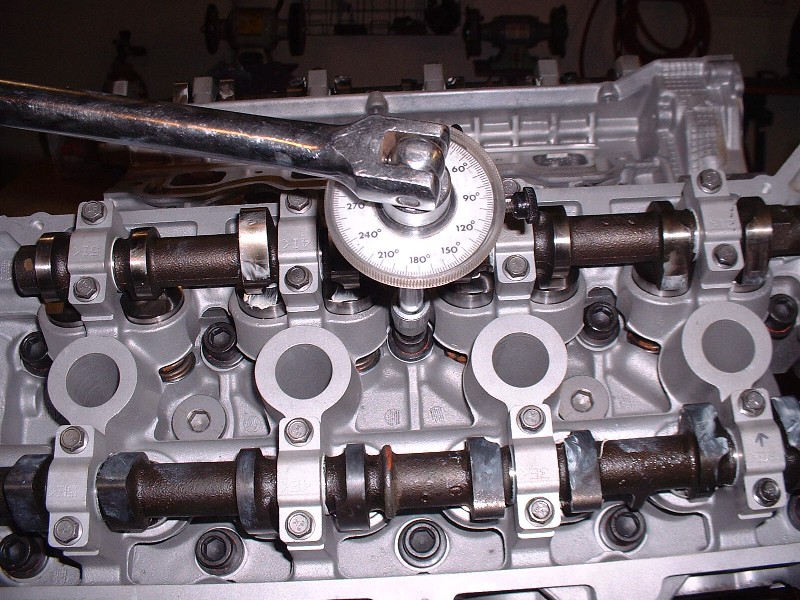
Here’s a quick pic of me using the angle meter again while torquing the head bolts on. For these, you start by applying 22 lbft of torque with a torque wrench to all twenty bolts in a particular sequence and then recheck them a second time. Next you rotate all twenty head bolts in sequence a further 60* one after the other, then go around again for another 60*, and then a final 60*. It takes a bit of time to set up the meter each time and you really don’t want to be in a rush or be disturbed while doing this and lose track of where you are in the sequence. It’s best if you lock yourself in your garage and let no one disturb you until it’s done.
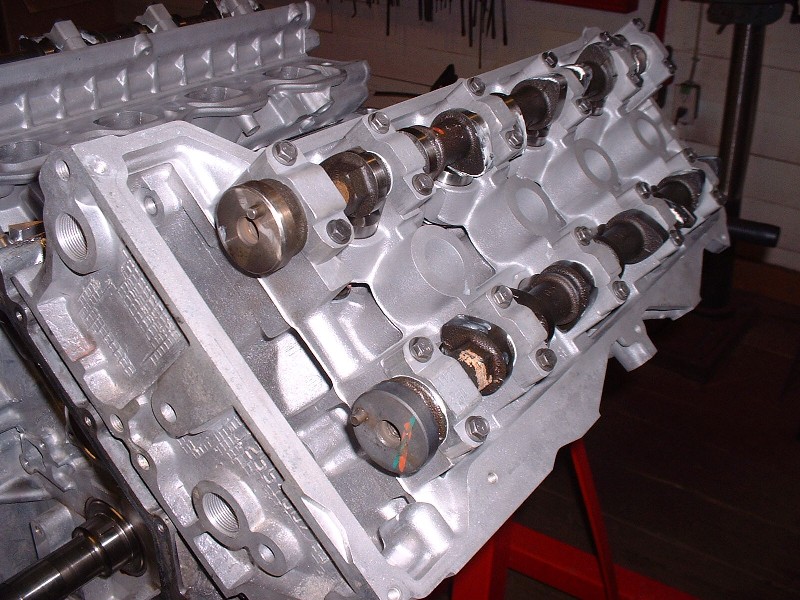
Here’s a topside view of the heads once they were installed. The orangey-yellow stain on the intake cam and the white stain on the exhaust cam are factory paint markings probably to enable the assembly line worker to differentiate between the two at a glance.

And here’s a close up of the cams. Notice that the cam journals ride directly on the casting, without bearings per se. If you’ve been following my thread since the beginning, you’ll remember that I had to replace a number of the cam bearing cap bolts due to them having been over-tightened at some point in their previous lives and therefore significantly stretched beyond their yield point… two of them to the point of fracture. Luckily I was able to steal a couple from my spare-parts engine.
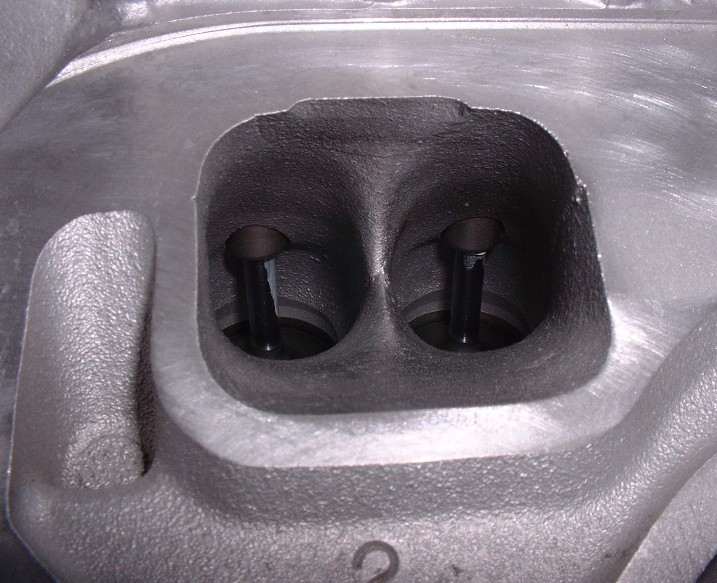
A picture is worth a thousand words, so here’s a close up of one of the intake ports just dying to have something accidentally fall into it. It’s a good idea to mask off the intake decks until you’re ready to install the intake.
|
|
|
|
darkhorizon
|
JUN 01, 10:36 AM
|
|
In a-typical PFF fashion this project is coming together quite quickly and is looking really interesting!
This is going to be a purely n/a build right?
|
|
|
|
Bloozberry
|
JUN 01, 12:59 PM
|
|
|
Yes Darkhorizon... it's going to be normally aspirated. I figure trying to get this thing to run nicely on either a reprogrammed LS1 or a Caddy PCM is going to be challenging enough!
|
|
|
|
darkhorizon
|
JUN 01, 01:33 PM
|
|
| quote | Originally posted by Bloozberry:
Yes Darkhorizon... it's going to be normally aspirated. I figure trying to get this thing to run nicely on either a reprogrammed LS1 or a Caddy PCM is going to be challenging enough! |
|
Its not so bad, just pick up a TC2 for about $700 and you will have it dialed in in no time. I considered stepping in behind AJ and finishing where he has sorta faltered at as far as the plug and play northstar market is concerned. I am a bit confused why Ryan at GMtuners has yet to offer anything (although I think he would be your best bet for getting a economical mail-order tune). I just do not have a northstar to play with to justify getting a TC2 (I would probably need 2 northstars to justify doing 1).
Boost on a LS1 pcm is possibly the easiest thing you could do. It is just a matter of getting a maf sensor that mind the boost (pretty much any gm maf will work great, some are better than others)
I bet if you begged HPT enough, they would plug in the northstar bits to their software as well.
|
|
|
|
Bloozberry
|
JUN 01, 06:49 PM
|
|
Thanks for the info Darkhorizon... I'll be looking at management systems soon enough so this will help.
Back to business: At this point, rather than carry on with the installation of the timing chains and sprockets, I decided to take a different tack and rebuild the starter. If any of you aren’t familiar with the Northstar starter, it’s located under the intake manifold in the Vee formed by the cylinders. It’s a crazy location at first glance, but on the other hand it leaves more room on the exterior of the engine block to route things like the exhaust system, axles, and mounts. I kind of like the ingenuity behind the decision to stick it in an otherwise empty space.
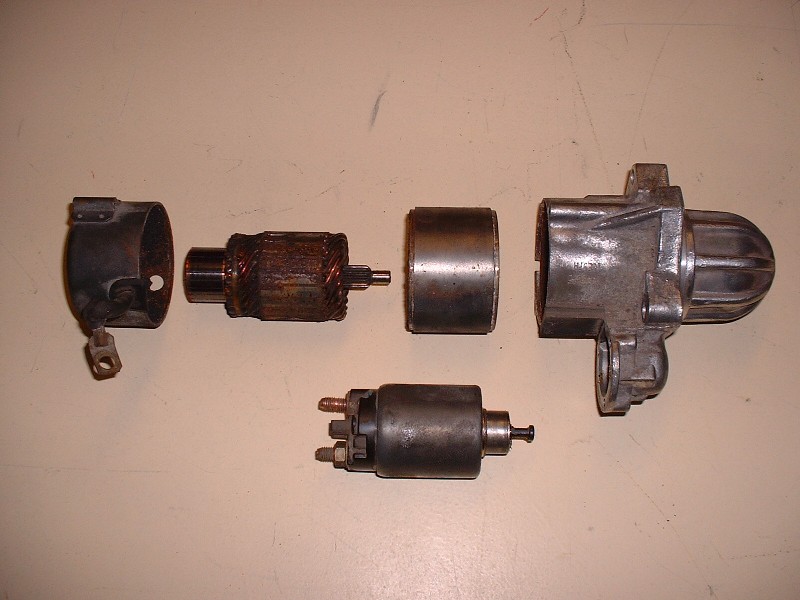
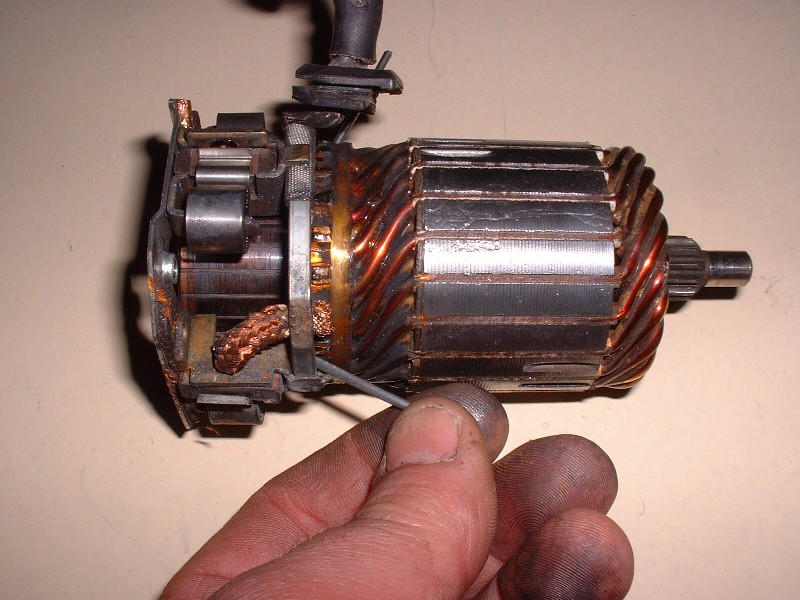
Of course this just means that it would be silly to stick the old one back in without rebuilding it. Mine looked OK from the outside, but it was a different story once I opened it up (another reason not to just install a N* without taking a good hard look at it). Here’s a breakdown of the major parts from top left: brush carrier, armature, magnet housing, gearbox, and at the bottom of the image is the solenoid.
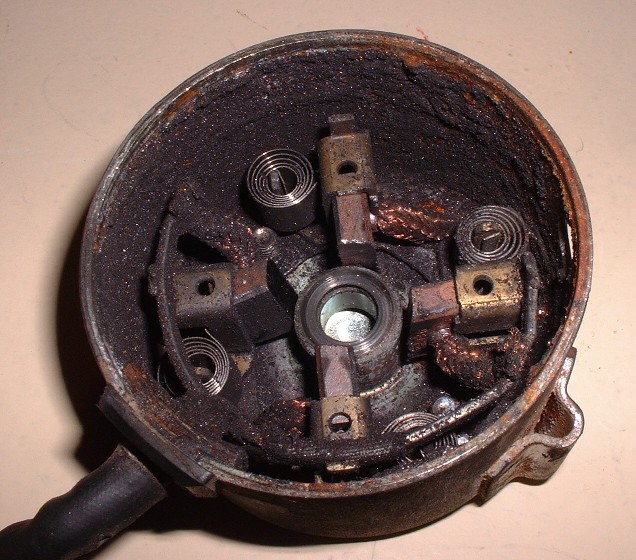
Here’s a close up of the housing for the starter brushes. Note how much dust there is from the wear of the four brushes. I would imagine that at some point in time that all that electrically conductive dust would cause problems. The entire four-brush assembly is held in the housing with only two screws making it easy to take out and clean. Once removed, all I did was spray some electrical component cleaner on the brush assembly and in the housing to rinse it all out.
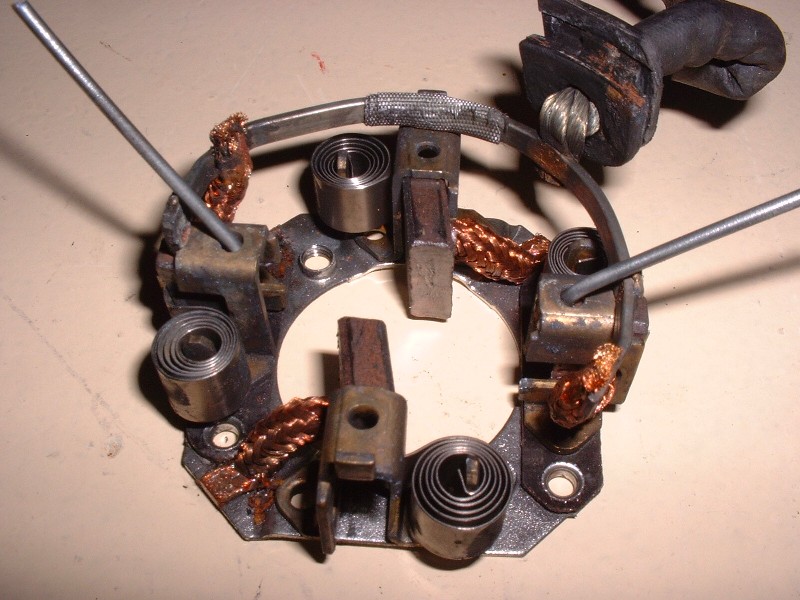
The brushes were nowhere near worn out, so there was no need to replace them. Notice in the picture below that there are holes in the rectangular brush guides that allow you to stick in a small diameter rod to hold the brushes in the retracted position. This allows you to slip the commutator end of the armature back in between the brushes later on.
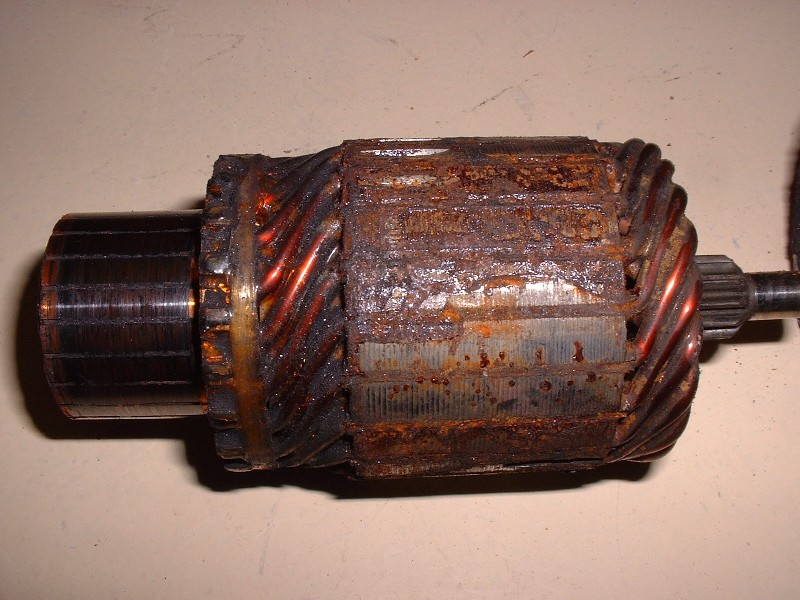
Here’s the commutator/armature assembly before I attacked it with the wire wheel on the bench grinder. (The commutator is the part on the left and the armature is on the right.) Mine had obviously been penetrated by moisture and sat in the same position for some time as the armature had a build-up of rust on one side. If you use a wire wheel to clean one up, you have to be careful not to grind away any of the insulating varnish on the copper wires of the armature coils. There was also a lot of ground-in brush dust between the individual sections of the commutator so I took an Exacto knife and cleaned out the grooves.
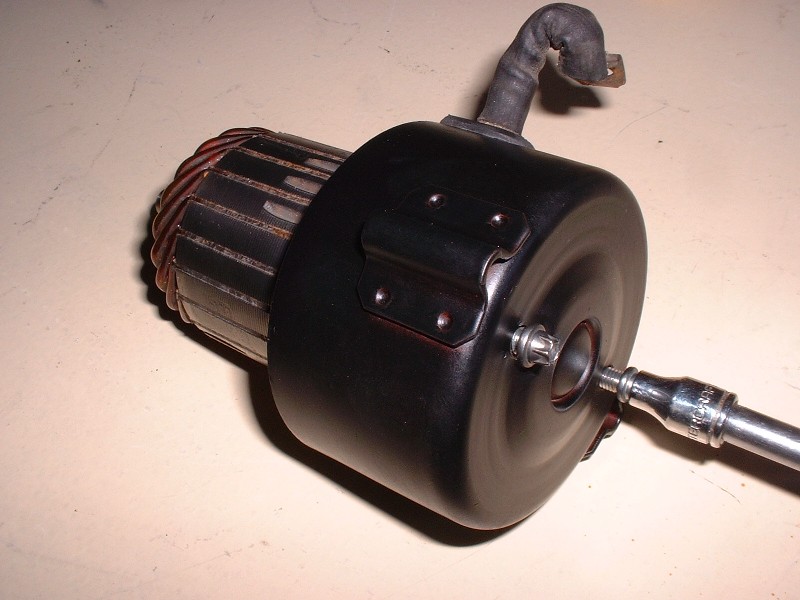
Here’s what it looked like after it was cleaned up. Once it was spic and span, I mated the brush assembly to the commutator end of the armature and pulled out the little brush retaining pins I had made out of some piano wire. The brushes snap into place since they’re spring loaded.
With that bit of business taken care of, I could reinstall the guts of the motor assembly back into the freshly refinished brush housing. The brush housing has a small Oilite bushing in the end that the shaft of the armature slips into.
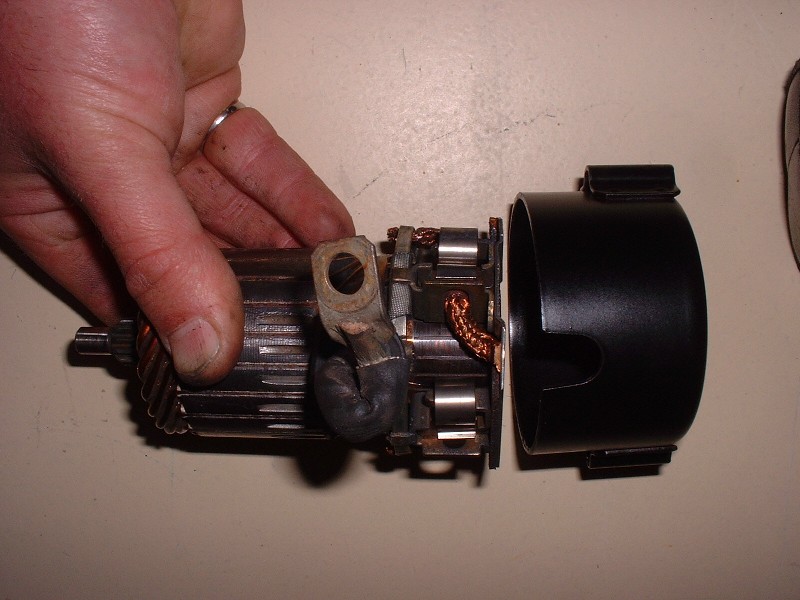
Once the rubber plug for the main wire lead is lined up with the notch in the housing, the brush assembly can be screwed to the housing from the outside. At this point you have to be careful not to turn the assembly upside down since the armature will fall out. If that happens you have to remove the brush assembly again and retract the brushes with the pins and start over again.
 [This message has been edited by Bloozberry (edited 06-01-2010).]
|
|
|
|
Will
|
JUN 02, 01:43 AM
|
|
| quote | Originally posted by Bloozberry:
Back to business: At this point, rather than carry on with the installation of the timing chains and sprockets, I decided to take a different tack and rebuild the starter. If any of you aren’t familiar with the Northstar starter, it’s located under the intake manifold in the Vee formed by the cylinders. It’s a crazy location at first glance, but on the other hand it leaves more room on the exterior of the engine block to route things like the exhaust system, axles, and mounts. I kind of like the ingenuity behind the decision to stick it in an otherwise empty space.
|
|
With the engine in the car, it takes about 10 minutes to get to the starter. Under normal circumstances, the starter will also be CLEAN. The Northstar has the easiest starter replacement of any engine swapped into a Fiero. Don't even have to lift the car.
|
|
|
|
Erik
|
JUN 02, 02:11 AM
|
|
| quote | Originally posted by Will:
With the engine in the car, it takes about 10 minutes to get to the starter. Under normal circumstances, the starter will also be CLEAN. The Northstar has the easiest starter replacement of any engine swapped into a Fiero. Don't even have to lift the car. |
|
Nice thing about the N* starter is you can swap the motor to the later small form factor 60 dgree v6 starters and vice versa ..since I have tons of them I am good to go for the forseeable future
|
|
|
|
doublec4
|
JUN 02, 10:09 AM
|
|
|
Very thorough and complete write up! Awesome work!
|
|
|
|
Will
|
JUN 02, 01:15 PM
|
|
| quote | Originally posted by Erik:
Nice thing about the N* starter is you can swap the motor to the later small form factor 60 dgree v6 starters and vice versa ..since I have tons of them I am good to go for the forseeable future
|
|
Not unless you change the drive housing... The Northstar starter is mounted via axial bolts, while the V6 starter is mounted via perpendicular bolts.
Edit: N/M, you meant swap the Northstar drive housing onto the V6 starter.[This message has been edited by Will (edited 06-02-2010).]
|
|
|
|