
 
     |
| Fiero with 120k 1986 v6. What to check after engine is out. Back cooling air vent. (Page 1/1) |

|
random69
|
OCT 12, 03:46 PM
|
|
Hi All, my 1986 fiero gt v6 has 120K miles on it (based on odo - this car has seen about 12 owners so who knows).
I have the engine out. It was running rich and found big exhaust leak.
Anyhow, while this is out, what should I do to check the engine before putting it back in? Ideas?
Also, is there any CAD drawings for any of the deading material in engine compartment. Any recommendations on what to use?
One last item, how can I remove the back vent assembly in the trunk to get access to the motor and inside panel.
Sorry for the many questions. If there are articles I missed, please link.
Thanks!
Dave
|
|
|
|
82-T/A [At Work]
|
OCT 13, 07:00 AM
|
|
| quote | Originally posted by random69:
Hi All, my 1986 fiero gt v6 has 120K miles on it (based on odo - this car has seen about 12 owners so who knows).
I have the engine out. It was running rich and found big exhaust leak.
Anyhow, while this is out, what should I do to check the engine before putting it back in? Ideas?
Also, is there any CAD drawings for any of the deading material in engine compartment. Any recommendations on what to use?
Dave |
|
So, just my opinion here, but getting these motors in and out is a pain in the butt. Since it's out, you might as well change out the crank and rod bearings. How comfortable are you in doing that? You can get an entire set of crank and rod bearings for pretty cheap... and then you can probably go another 120k miles with no issues at all.
Here's a quick list I think I'd go over:
- Replace crank and rod bearings
- Replace all the engine seals (oil pan, timing cover, etc.).
- Replace the harmonic balancer
- Remove and replace all the exhaust manifold bolts (they tend to break, now's the time to check them and replace them with new bolts)
- Degrease and paint the engine again
And maybe...
- Replace Timing Chain
- Replace Water Pump
As for the sound deadening... it's nasty stuff... I just ripped it all out. My daughter ended up going with some reflective sound deadening (that worked quite well). You can see her install that here (3/4ths of the way through the video):
We ended up getting a piece of cardboard and cutting it to fit all the things sticking out in the engine bay, and then cut the sound deadening with a razorblade using the cardboard as a template on top of it.
Word of advice (as me how I know). Make sure you've got the sticky side and reflective side on the correct side. Our first try, we cut it backwards, and we had to discard the entire thing.
There is also a company called MetroMouldings that is apparently making engine compartment lining... I ordered some, but don't receive it until later in the week. I will make sure to post my thoughts on it when I get it. It should be another good option.
| quote | Originally posted by random69:
One last item, how can I remove the back vent assembly in the trunk to get access to the motor and inside panel.
Sorry for the many questions. If there are articles I missed, please link.
Thanks!
Dave |
|
I don't really know what you mean the back vent assembly. Do you mean the two black grills that sit next to the decklid? There are two screws that hold each of them down. You then lift the back up, and pull it towards you about 1/2 an inch, and then you should be able to lift them up and off.
|
|
|
|
Dennis LaGrua
|
OCT 13, 09:59 AM
|
|
The first thing that we did when we purchased an engine with unknown mileage was to do a cylinder leak-down test. If you do not have access to the leak-down test gauges then a compression test with an inexpensive gauge will provide an idea if the rings are good. If compression reads good then it pays to do further checks, if not a total rebuild is in order. You state that the engine was running rich but that doesn't give an idea of engine condition. There are many unknowns here but checking the cylinders is a good first step.
------------------
" THE BLACK PARALYZER" -87GT 3800SC Series III engine, custom ZZP /Frozen Boost Intercooler setup, 3.4" Pulley, Northstar TB, LS1 MAF, 3" Spintech/Hedman Exhaust, P-log Manifold, Autolite 104's, MSD wires, Custom CAI, 4T65eHD w. custom axles, Champion Radiator, S10 Brake Booster, HP Tuners VCM Suite.
"THE COLUSSUS"
87GT - ALL OUT 3.4L Turbocharged engine, Garrett Hybrid Turbo, MSD ign., modified TH125H
" ON THE LOOSE WITHOUT THE JUICE "
|
|
|
|
random69
|
OCT 13, 06:34 PM
|
|
Thanks for everyone's input! Picture is attached for vent in trunk.
* Engine running fine except for slight tick near cyl 4 or 6 (closest to firewall, driver side).
* Compression - 140 to 145 - all cylinders. Never more than 5 psi out.
* Bearings - definitey check and or replace. Where can I get some good ones? The oil pan leaks, so need to do this anyhow.
* No leak down test yet. I'll check that.
* I've already replace all the sensors, injectors. I will replace the water pump, timing, and probably oil pump. No vacuum leaks (well, very minor at throttle body flap axel ends).
* Fuel pressure, after fixing pump and pressure regulator - around 40-45.
* Should I check pushrods/lifters? Or replace those. Reccomanedations?
I'd really like to not pull a head.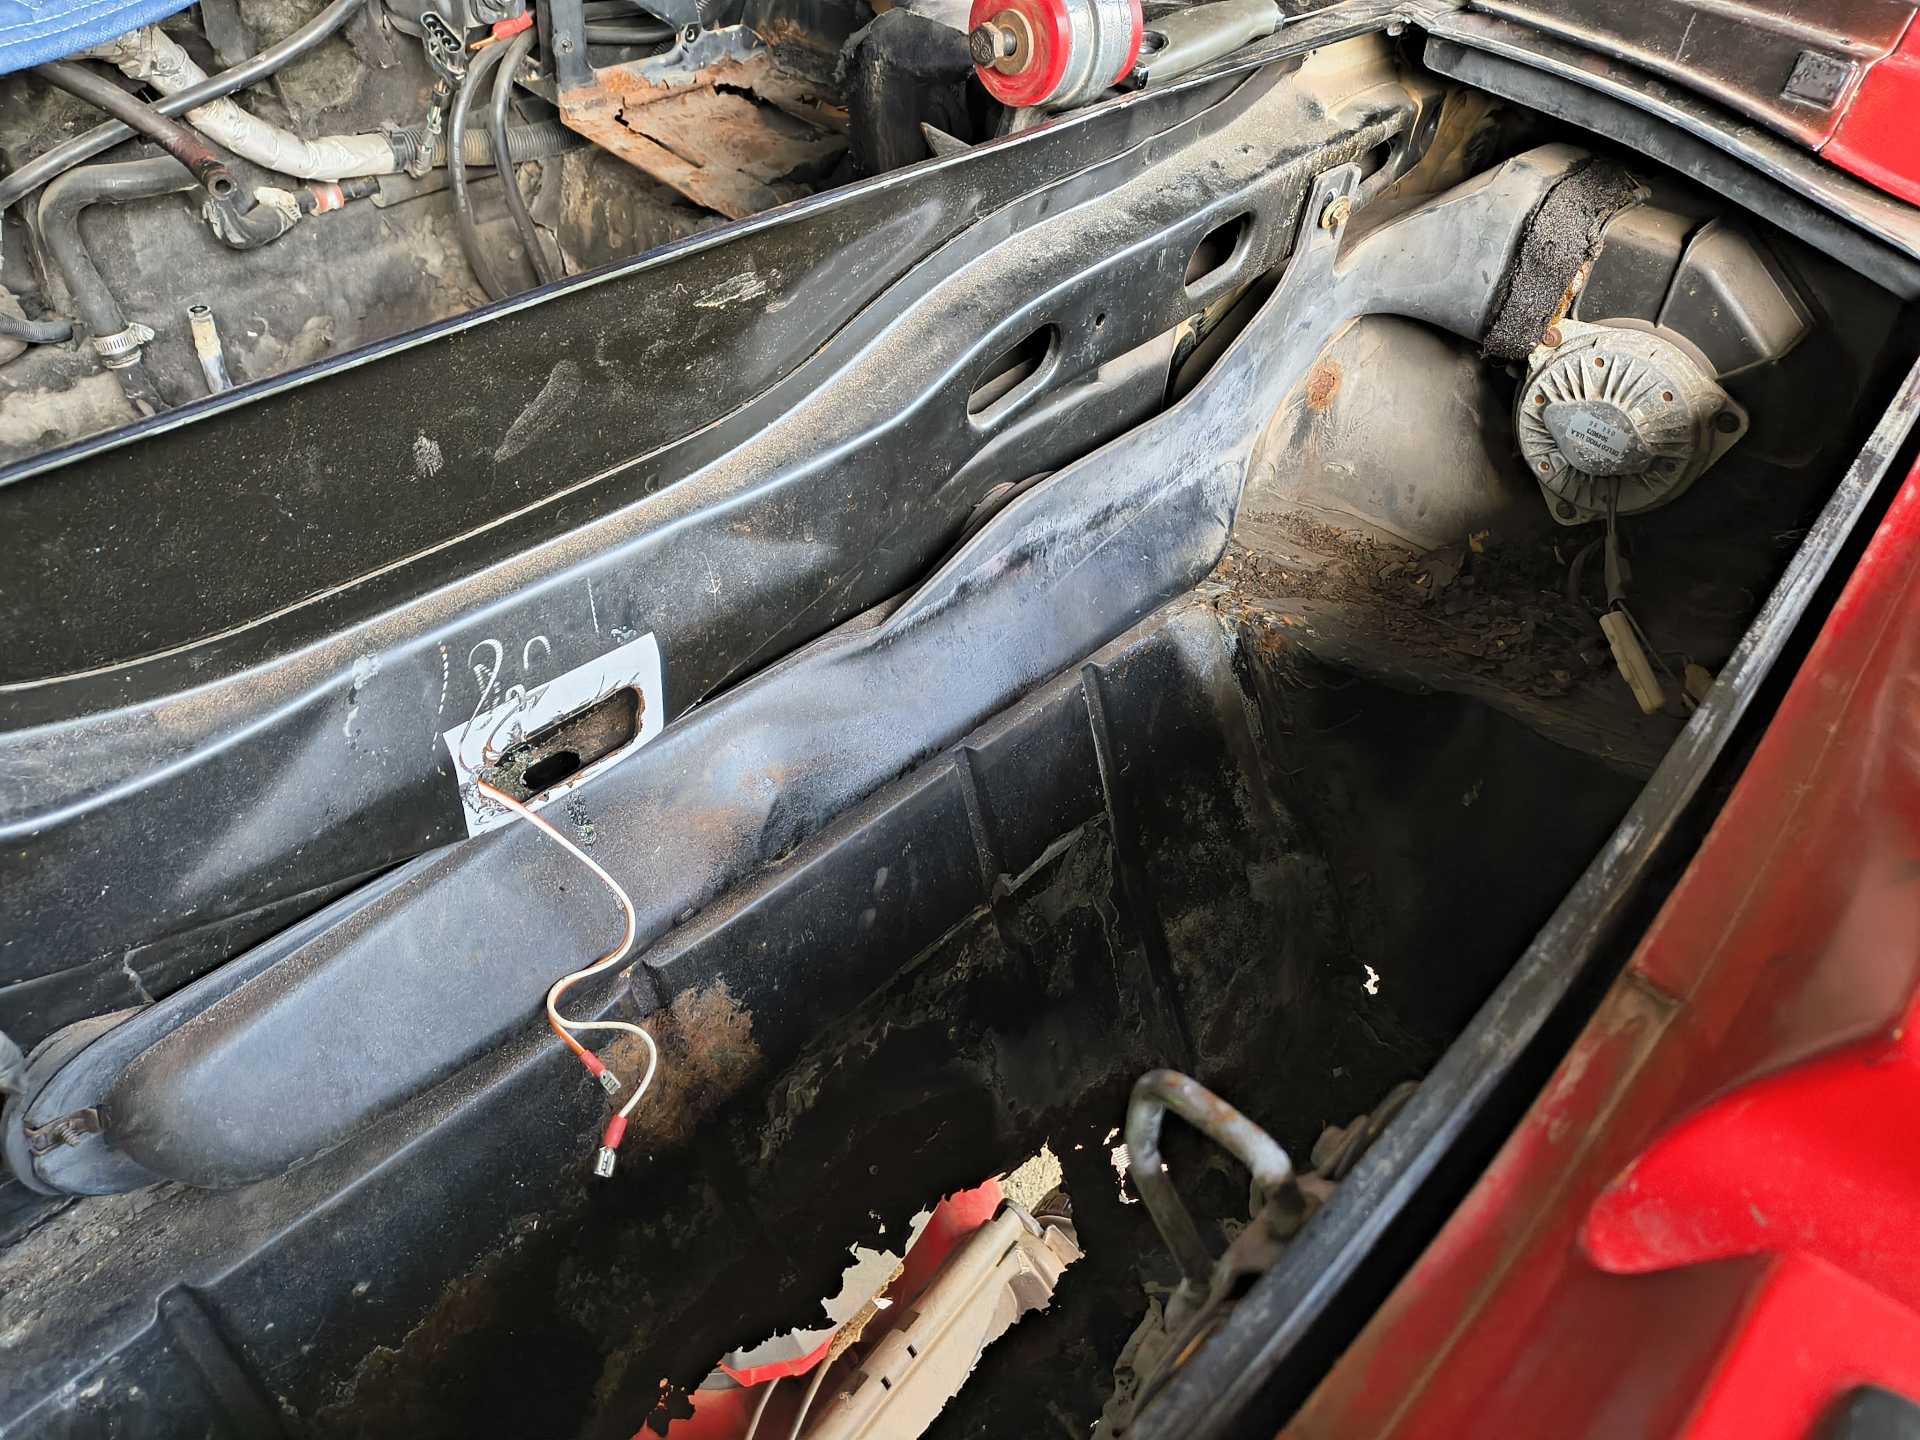
Many thanks again to all!
Dave
|
|
|
|
Dennis LaGrua
|
OCT 13, 10:20 PM
|
|
|
My guess is the slight tick may be a lifter. I would replace all and then tighten the rockers to zero lash plus 1/2 turn. Best way to do this is when all is loose. to remove all slack from the pushrods for an entire two turns of the engine, Start at TDC go 1/4 turn of rotation, just tighten enough to take out all pushrod slack by moving them with your fingers up and down. Go another 1/4 turn and take out the slack again for a total of 8 90* turns. Now that all the slack has been taken out you can go to each rocker arm and give each another 1/2 turn on the pushrod nut. This is the most accurate way of adjusting lifters. ------------------
" THE BLACK PARALYZER" -87GT 3800SC Series III engine, custom ZZP /Frozen Boost Intercooler setup, 3.4" Pulley, Northstar TB, LS1 MAF, 3" Spintech/Hedman Exhaust, P-log Manifold, Autolite 104's, MSD wires, Custom CAI, 4T65eHD w. custom axles, Champion Radiator, S10 Brake Booster, HP Tuners VCM Suite.
"THE COLUSSUS"
87GT - ALL OUT 3.4L Turbocharged engine, Garrett Hybrid Turbo, MSD ign., modified TH125H
" ON THE LOOSE WITHOUT THE JUICE "
|
|
|
|
sleek fiero
|
OCT 13, 11:21 PM
|
|
|
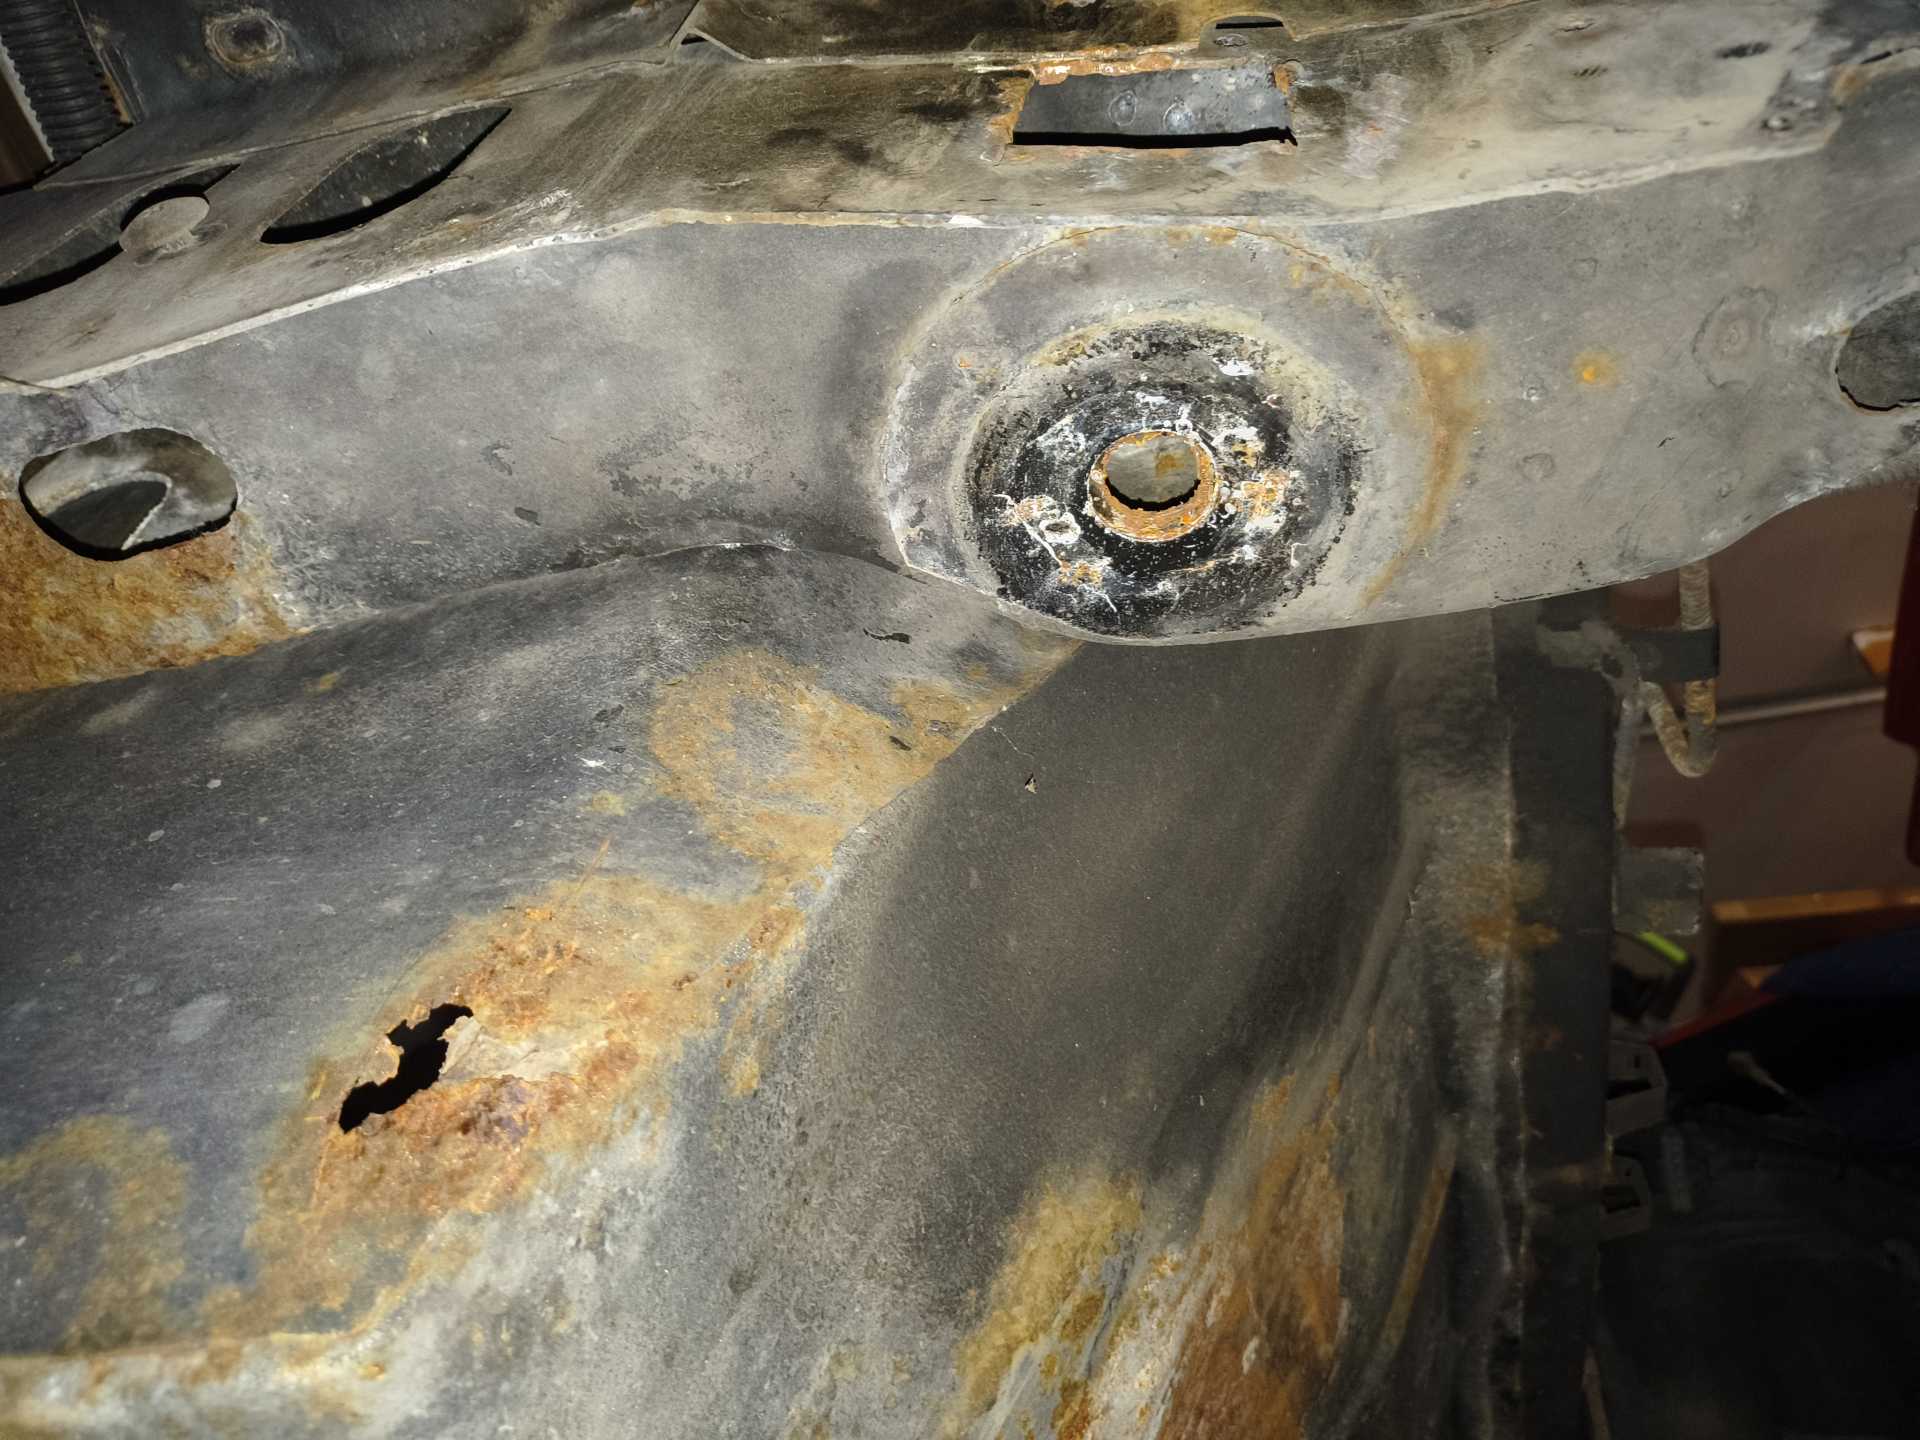
While your engine is out you should do the repairs to the trunk. And if the trunk is that bad what is the subframe/cradle look like.. much easier to repair while running gear is out . sleek
|
|
|
|
random69
|
OCT 13, 11:35 PM
|
|
| quote | Originally posted by sleek fiero:
While your engine is out you should do the repairs to the trunk. And if the trunk is that bad what is the subframe/cradle look like.. much easier to repair while running gear is out . sleek |
|
Thanks!. Yes, that's the idea - panel bond or welding? Hmmm gonna try both. The rest of the car is pretty good, including the cradle. The rust areas are that bottom and right rear qp.
|
|

|
Patrick
|
OCT 14, 02:40 AM
|
|
| quote | Originally posted by sleek fiero:
And if the trunk is that bad what is the subframe/cradle look like...
|
|
Totally agree. With the trunk looking like that, you've got to wonder what the rear upper frame rails look like. 
Dave, if you haven't already... you better remove the rear plastic wheel well liners and have a really good look at what's hiding behind 'em.
|
|
|
|
random69
|
OCT 14, 11:37 PM
|
|
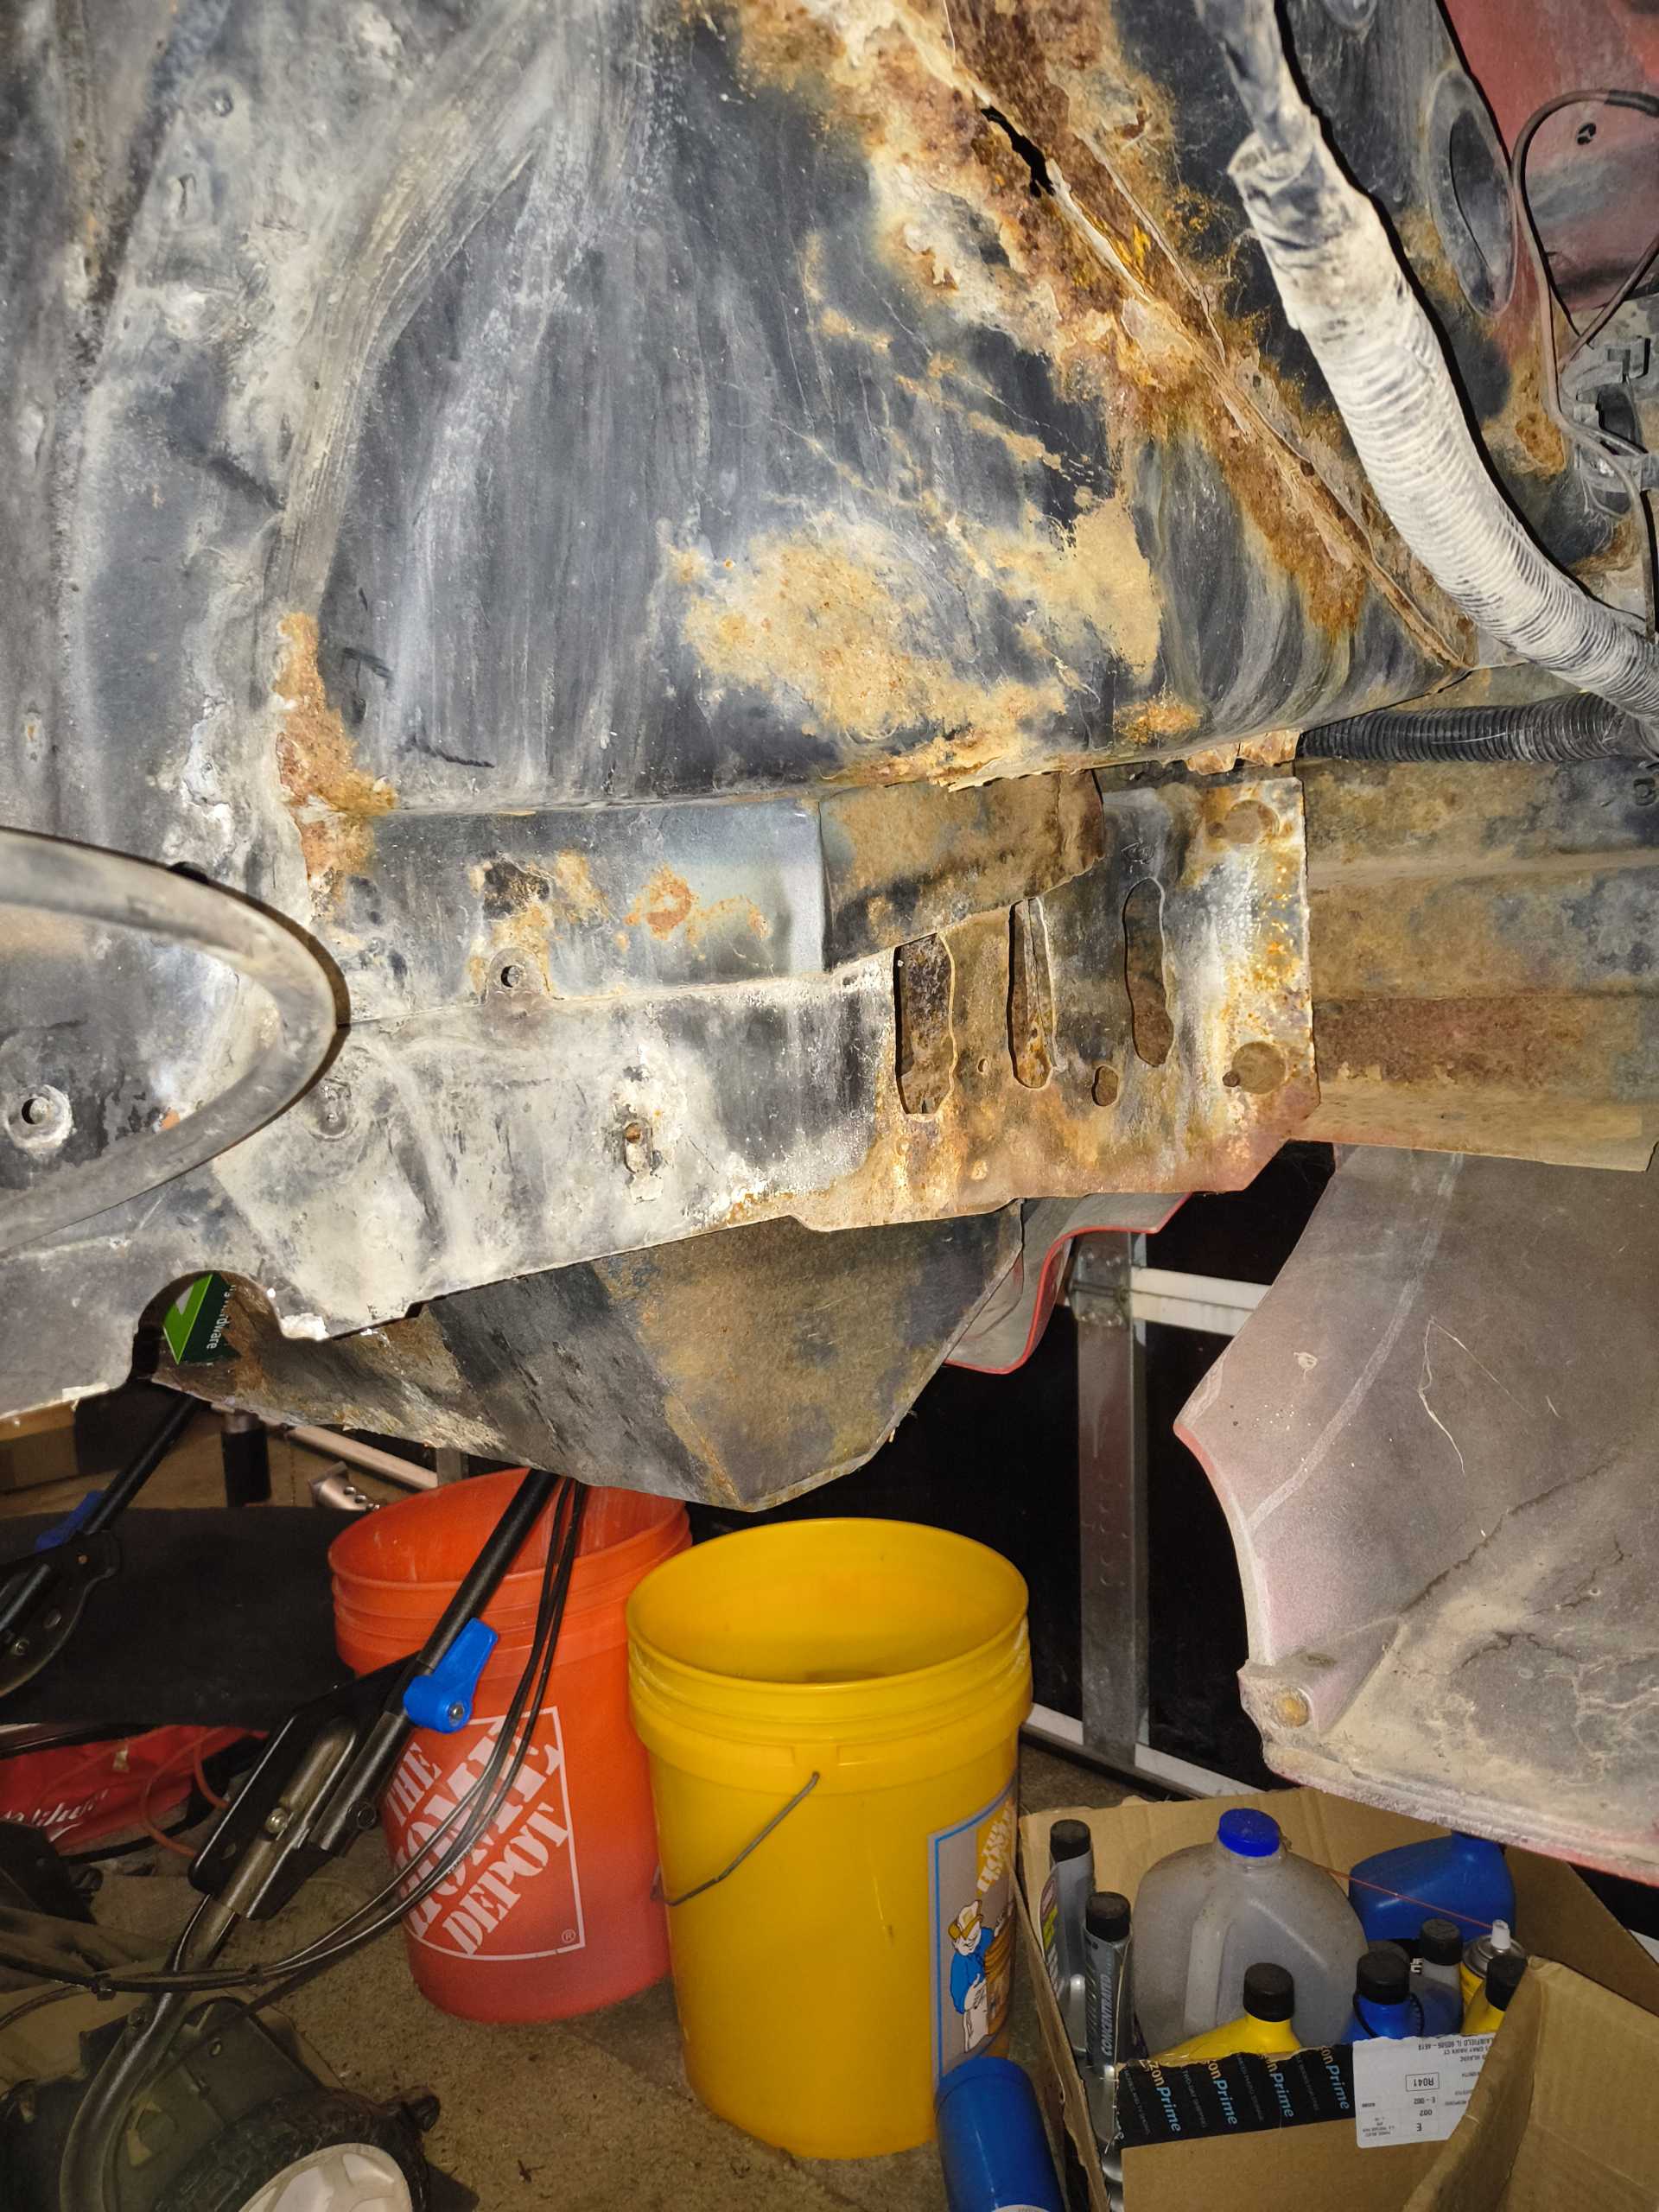
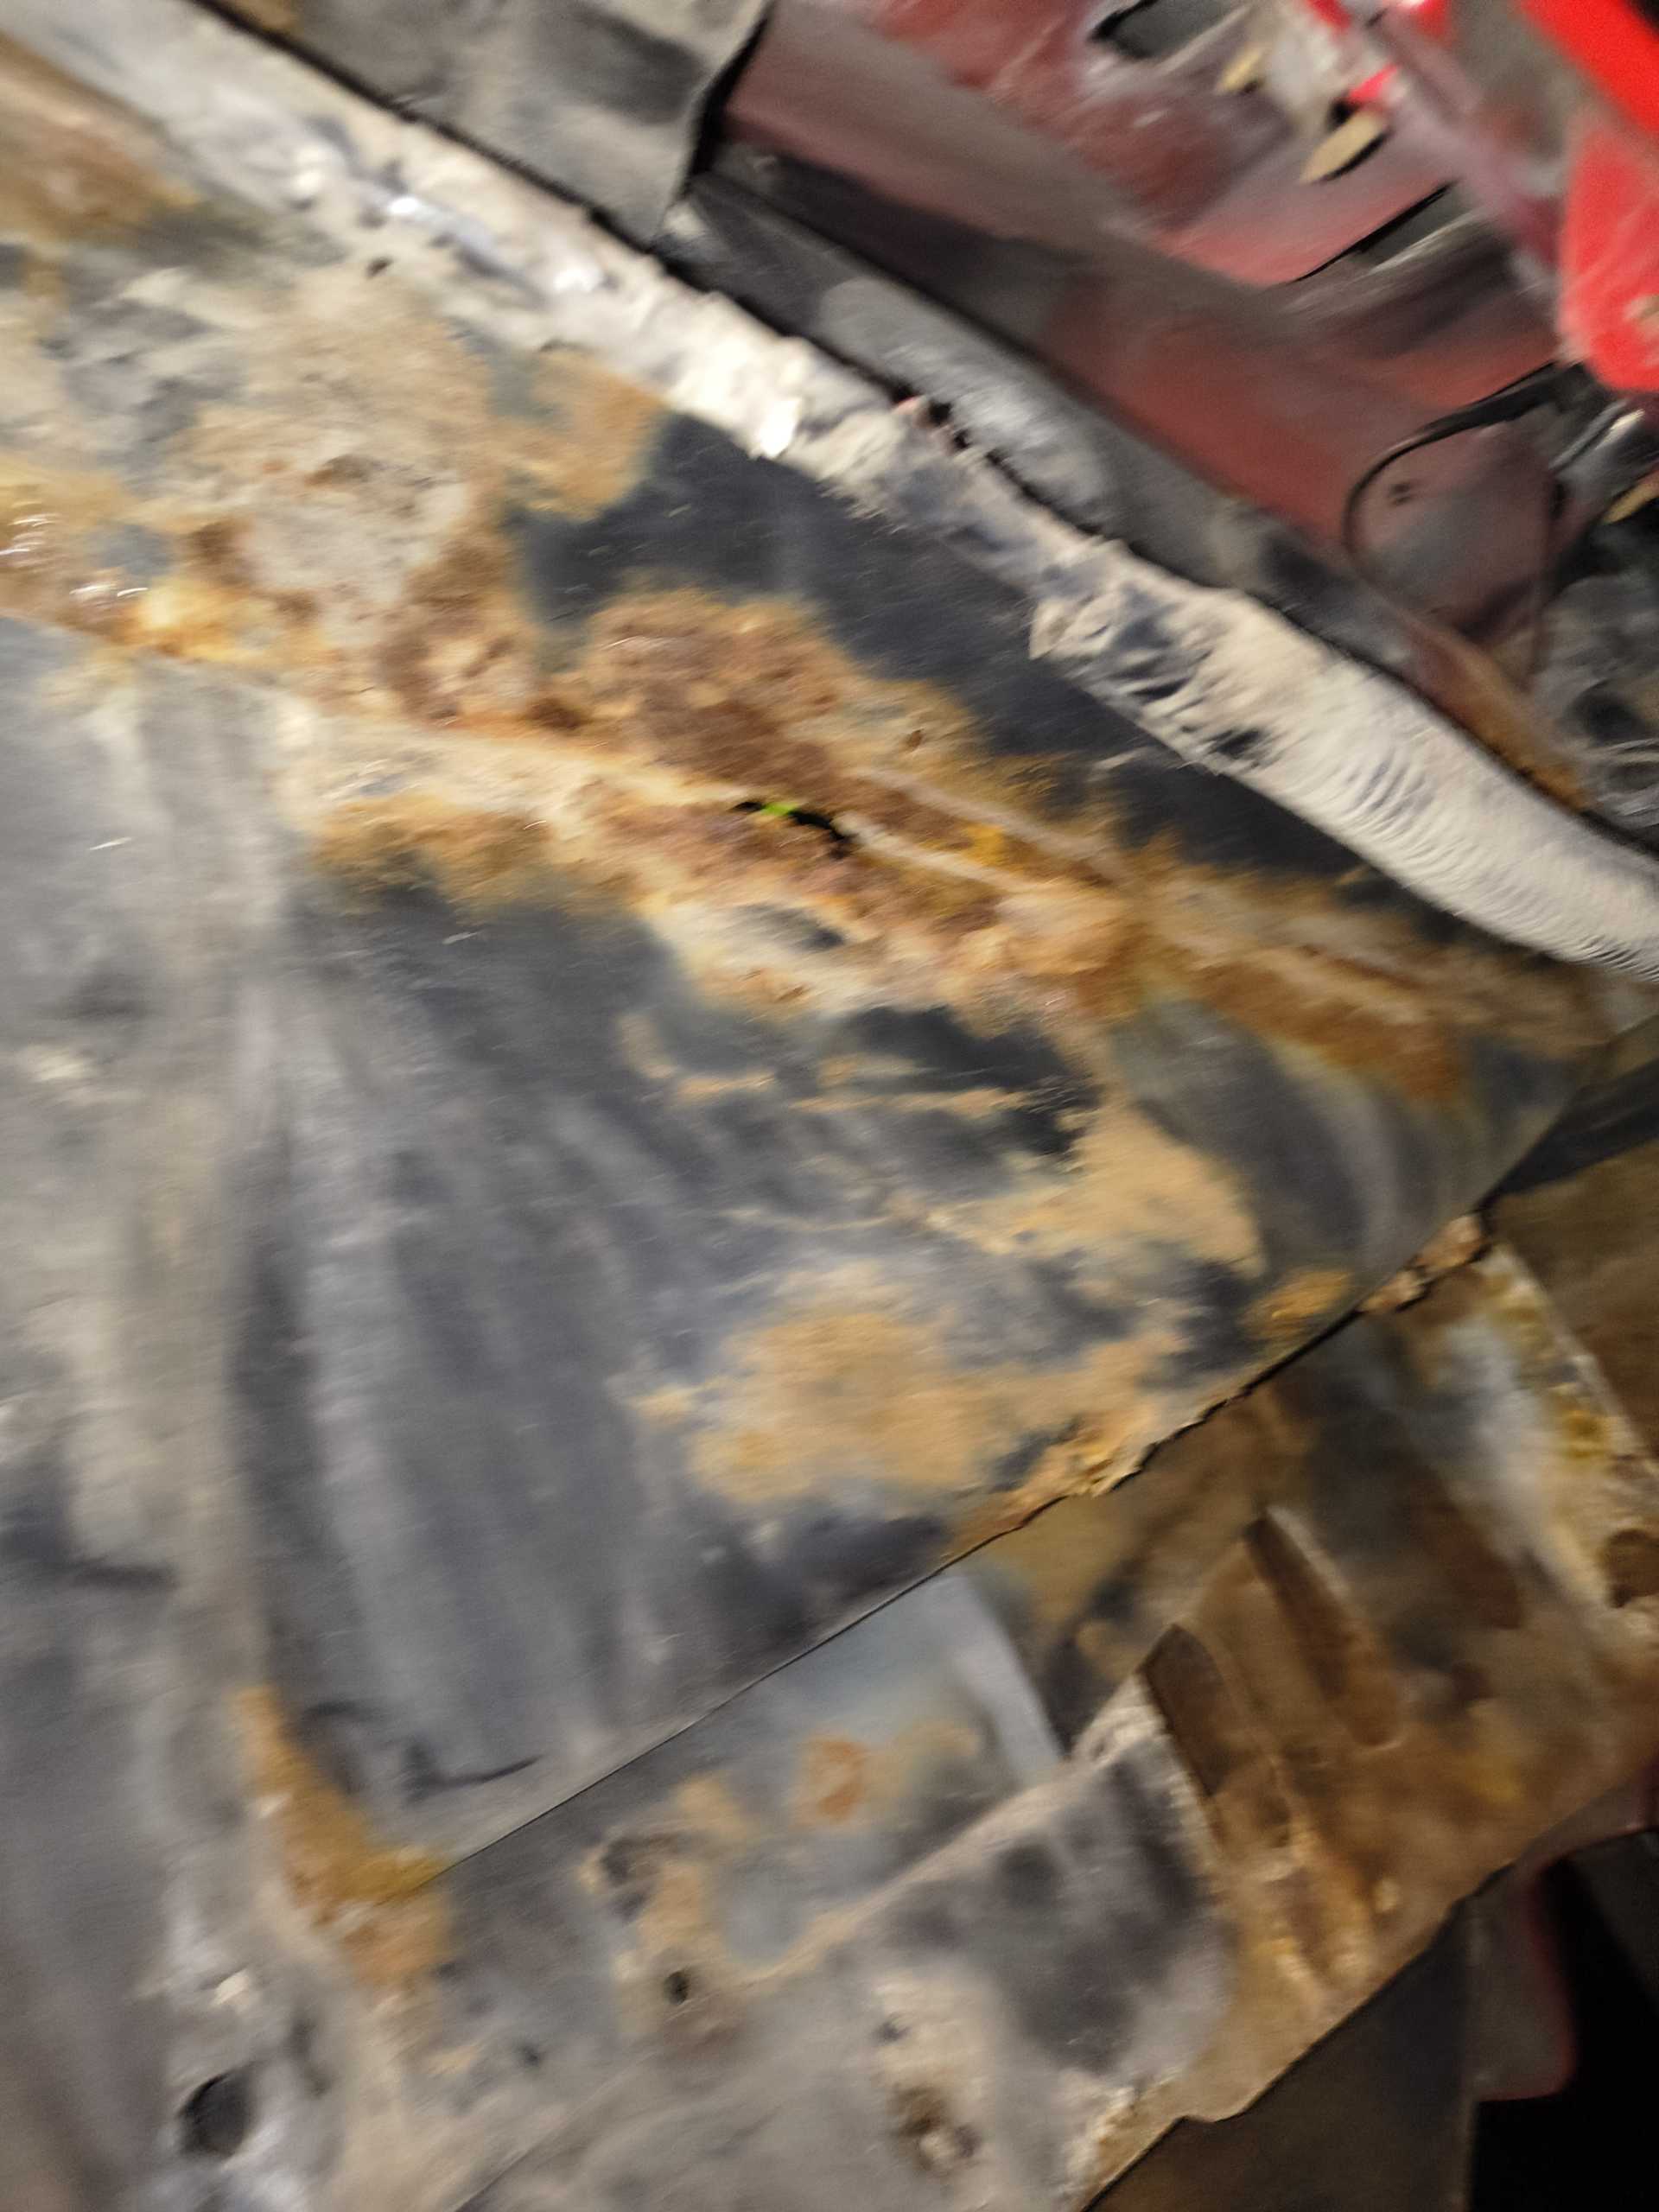
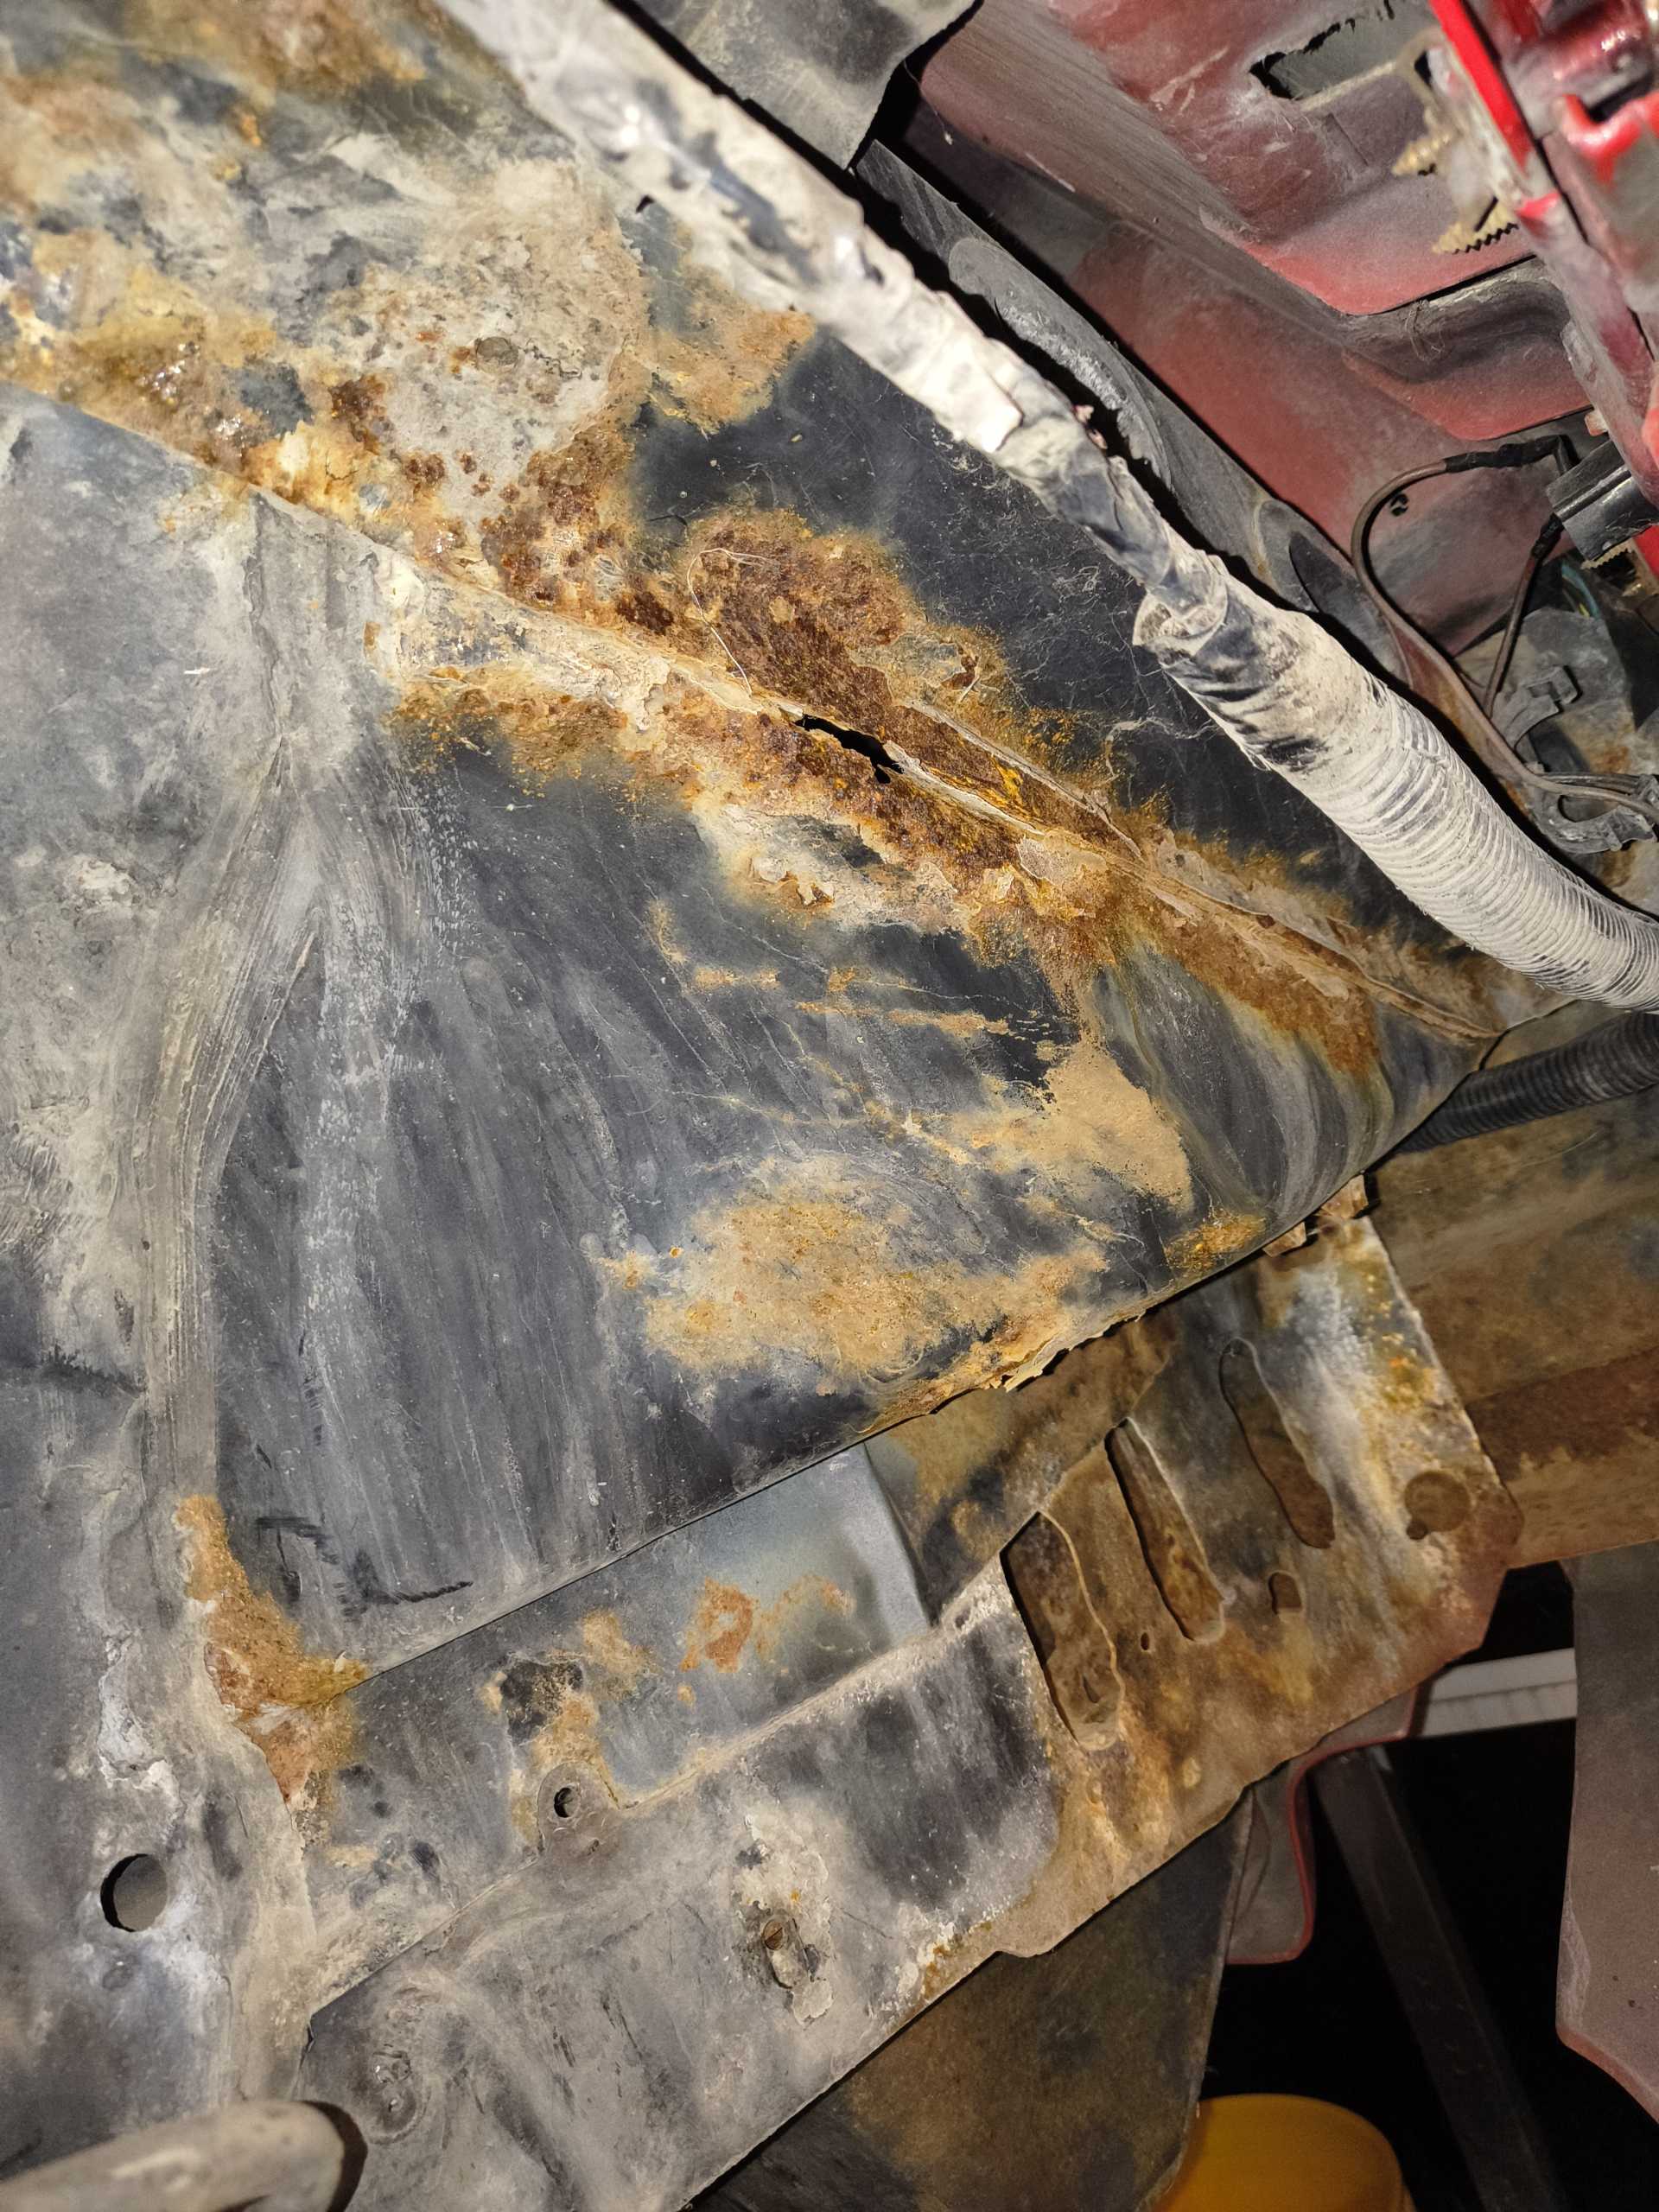
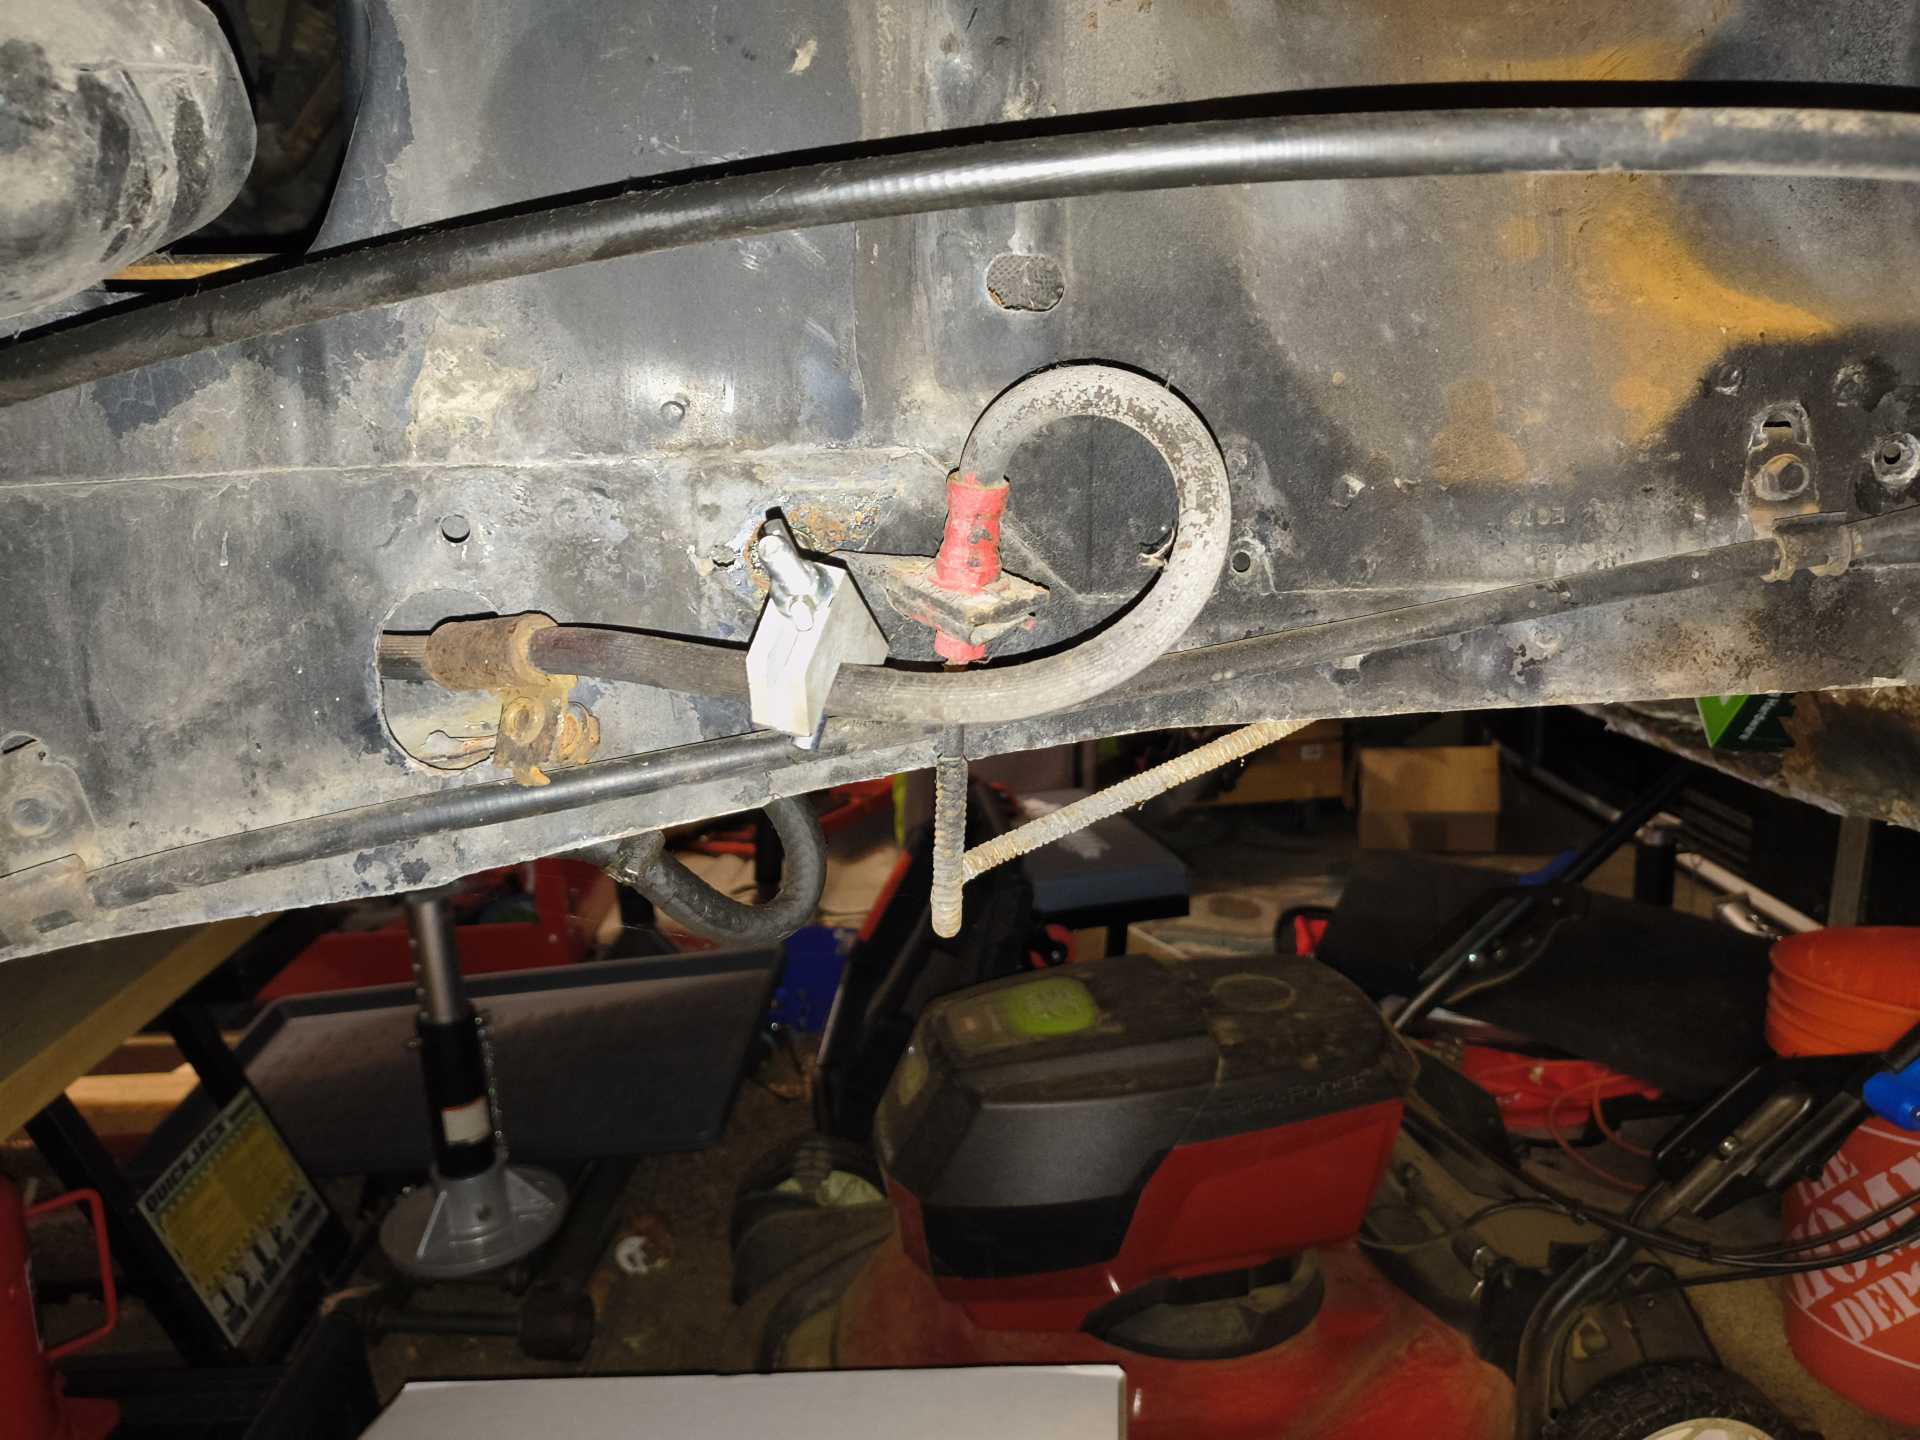
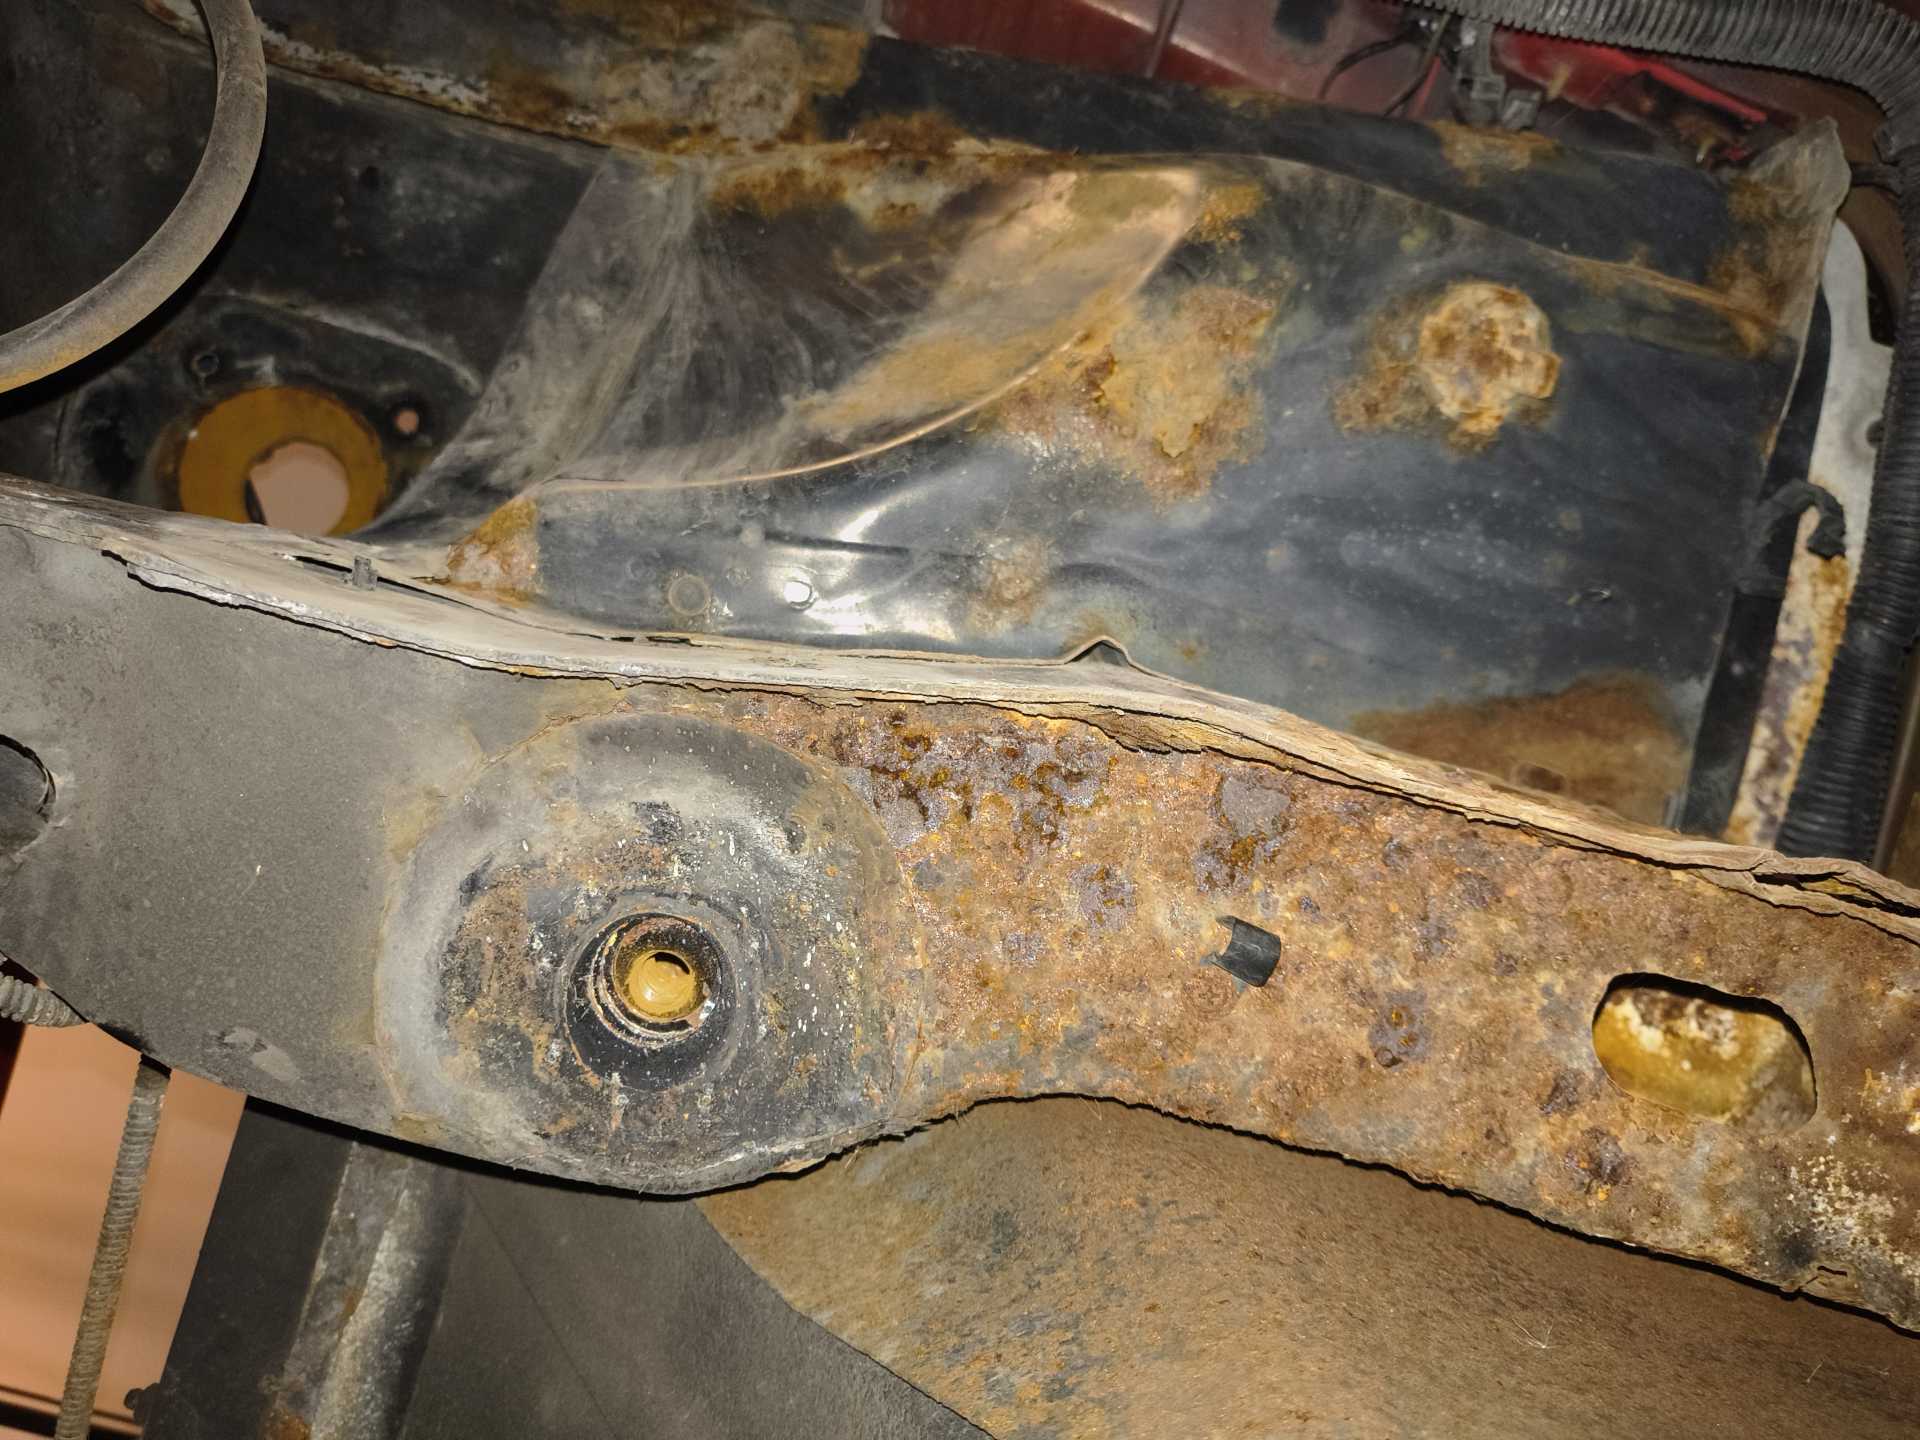
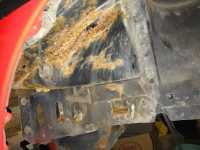
Yeah, I looked at wheel wells and have attached pics. I'm either gonna patch/weld and/or rust convert. The rest of the car is really clean under there.
As long as I don't take it out in snow/rain...let me know if this is really bad.

|
|
|
|
Patrick
|
OCT 15, 12:01 AM
|
|
| quote | Originally posted by random69:
...let me know if this is really bad.
|
|
It's difficult to tell just looking at the rust... but if you can poke a screwdriver through the upper frame rails, then they're rotten.
This appears pretty bad to me. Seems to be some holes actually rusted right through the frame rail. Is the tail light harness ground wire still attached to this frame rail? Often that ground wire will become detached due to the corrosion.
 | | CLICK FOR FULL SIZE |
[This message has been edited by Patrick (edited 10-15-2025).]
|
|
|
|