
 
     |
| New Form of Matter Discovered After Head Gasket Removal (Page 1/1) |

|
Notorio
|
SEP 30, 07:33 PM
|
|
|
Given the birth of the internal combustion engine in the late 1880s this gave humanity 100 years of experience with head gasket design by the time my little V6 88 rolled off the assembly line. For reasons known only to the Pontiac engineers they chose a head gasket material that leaves a residue behind with diamond-like hardness all over the two sealing surfaces. So far a dremel mini-wire wheel has been very, very slowly abrading away the residue without injuring the block. Is there something I can apply to the residue that might soften it to, let's say, the mere hardness of case-hardened steel? Aside from that approach, has anyone got a proven method for removing these stubborn deposits??
|
|

|
Patrick
|
SEP 30, 07:54 PM
|
|

Sorry, that's all I've got.
|
|
|
|
hnthomps
|
OCT 01, 07:09 AM
|
|
Acetone is s pretty good solvent so it might be worthwhile to give that a try.
Nelson
|
|
|
|
Notorio
|
OCT 01, 10:45 AM
|
|
Excellent, thanks guys. Things to try: Fire and Acetone ... but maybe not at the same time 
I've been looking at suggested methods on Youtube as well so I will try a couple and report back. But now, off to work ...
|
|
|
|
da.slyboy
|
OCT 01, 12:43 PM
|
|
|
|
|
theogre
|
OCT 02, 01:20 AM
|
|
3M Roloc disc or bristle(Brush) products and others are made to remove w/ damaging. https://www.youtube.com/watch?v=zoEh3sq_s1U
But Note that Metal vs Type matters. Too hard/rough can eat Aluminum parts. Harder can even debur or eat steel.------------------
Dr. Ian Malcolm: Yeah, but your scientists were so preoccupied with whether or not they could, they didn't stop to think if they should.
(Jurassic Park)
The Ogre's Fiero Cave
|
|
|
|
fierobear
|
OCT 02, 11:11 AM
|
|
| quote | Originally posted by da.slyboy:
Have you tried those plastic bristle brushes
Worked very well for me. |
|
I use these especially for cleaning the mounting surface of the water pump. It turns the job of cleaning the surface from two hours of careful scraping to about 5 to 10 minutes with an air tool.[This message has been edited by fierobear (edited 10-02-2019).]
|
|
|
|
Notorio
|
OCT 03, 01:04 AM
|
|
OK, so looking over some YouTube methods and your suggestions I tried to acquire some Roloc disc-cups but no dice, only available from on line order or at the Graingers 25 miles away. So I decided to used what I had, namely, a multi-tool with a triangular pad and a dremel with a flexible extension.
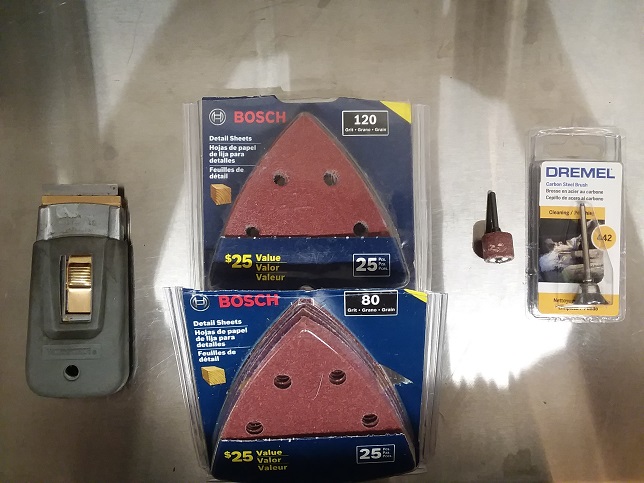
BLOCK
1) gently scrape off some of the gasket with the razor blade, taking care not to scratch the surface
2) abrade away the remaining residue with the multi-tool and the 80 grit pad, taking care not to stay in any one place too long and to keep the sand paper flat against the surface
3) dress the surface with the multi-tool and the 120 grit pad.
Elapsed time for the even cylinder bank, hardest to reach, 30 minutes.
PISTONS
1) gently abrade away most of the carbon deposits (some of these must have been close to 1mm thick!) with the dremel and sanding drum (240 grit), taking care not to remove Aluminum from the surface (wear a mask to avoid breathing the resulting carbon dust cloud)
2) dress the surface with the multi-tool and the 442 carbon steel brush.
Elapsed time per piston about 5 minutes. I would have preferred some smallish and flat sanding disk rather than the drum I had. The steel brush left almost a mirror finish, even eliminating the original very faint casting lines (I hope that won't be a problem ...)
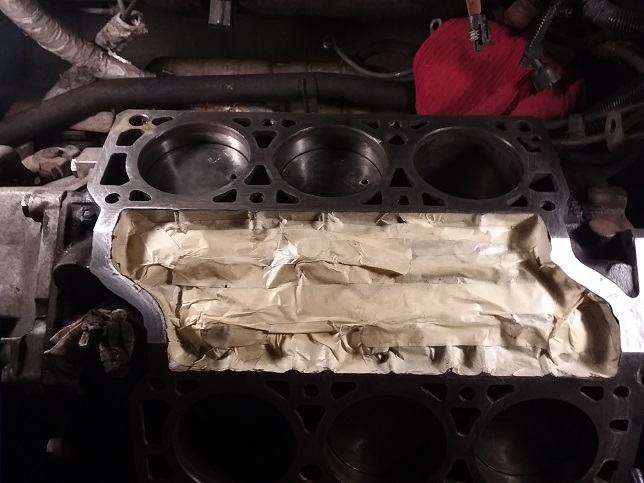
RESULTS
This shot sort of shows the finished block and piston surfaces. I started the job by taping off the valley with a few layers of masking tape to keep gasket debris from falling down onto the camshaft. All in all, not too tedious a job. Unfortunately I didn't leave well-enough alone and peered over the front edge of the block to see how badly the timing cover gasket was stuck on ... that doesn't look like much fun 
 [This message has been edited by Notorio (edited 10-03-2019).]
|
|
|
|