 
     |
| Instrument panel bulb layout (Page 2/2) |

|
olejoedad
|
FEB 18, 11:58 AM
|
|
|
All Fieros have the dayglo orange paint on the inside of the metal cluster cover.
|
|
|
|
wgpierce
|
FEB 18, 05:38 PM
|
|
| quote | Originally posted by olejoedad:
All Fieros have the dayglo orange paint on the inside of the metal cluster cover. |
|
True, but it's only impact is on cars with front lit gauges. For the backlit, the dials are orange tinted for the shine through bits. On these cars paining the orange cover a different color will make no difference.
|
|
|
|
wgpierce
|
FEB 18, 05:41 PM
|
|
| quote | Originally posted by theogre:
Changing Colors for 120mph is harder to impossible when you don't change gauge background etc.
Example: Somewhere in archives is how you can fix back-lite pointers to light w/ another color. Big issue is First you must carefully remove the pointer's paint. You can wreck the pointer very easy.
|
|
A long time ago in a galaxy far far away.... I was able to change the needle colors without removing the needle from the gauge. Cover the gauge face with something (maybe blue tape) use a little solvent on paper towel slid under the needle to remove the orange, and use a tiny paint brush to put on a new color.
|
|
|
|
theogre
|
FEB 03, 03:39 PM
|
|
|
|
|
jaydaug2008
|
JAN 04, 04:29 PM
|
|
|
Great Thread here!!!! Extremely helpful for me because I thought I had a bad circuit board because out of every bulb in that cluster only 2 bulbs worked...I had no check engine light or battery light with only 2 illumination bulbs working...I took the cluster out used 0000 steel wool to the board shined them up like gold! Bent the ears on the sockets to make them make more pressure twisting them in.. And WALAAA!!! Now I have a Bright brand new looking cluster and a CEL light to check codes. And now my alternator is charging!!!!!!!!!!!...Talk about a awesome one stop fix!!! Now just to be clear I was bench testing each socket with a 12 v power source. And most of the bulbs just needed to be taken out of the socket swiped gently with 0000steel wool and put back in...I went the extra mile and shined every connection possible.....
|
|

|
theogre
|
JAN 04, 11:47 PM
|
|
You need to "lube" very thin coat w/ silicon or permatex green label brake grease or can happen again.
Permatex won't run when hot like parked in summer.
|
|
|
|
theogre
|
MAY 26, 10:06 AM
|
|
Update to add bulb problems...
When 1 or more Bulbs are "dead" but a Bulb isn't blown, check the sockets.
Most OE Socket are separate parts. Typical GM one here but others can interchange w/ minor difference how the look etc.
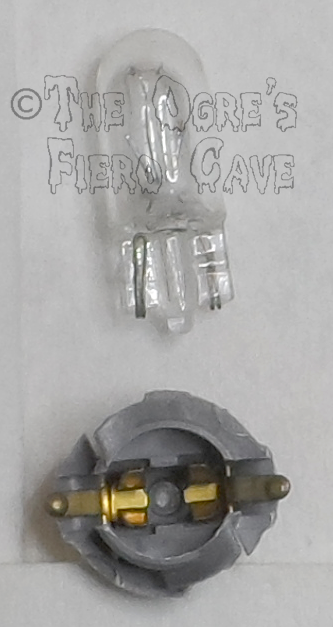
⚠️ Some later OE & Aftermarket bulbs w/ socket attach maybe sold as 194PC are not made to take apart. When bad often have to replace the whole thing.
Common Problems...
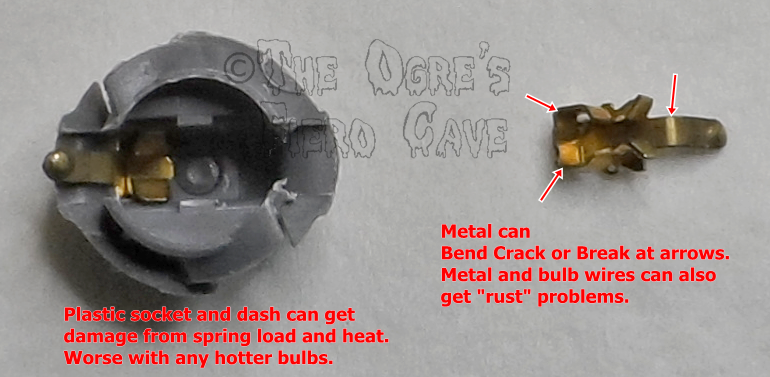
⚠️ Don't take apart the sockets. Often doing that will break the metal, plastic or both. It was hard enough to take apart to get the pic above w/o major damage.
While the metal grips both sides of the bulb, the bulb wires only go to 1 side. If the metal cracks @ sharp bends then may not hit the wires.
The metal "arms" to hit the dash can crack & seem ok @ first look but still won't touch the dash.
If the plastic is warped/"crush" then try turning the socket "out" a tiny bit may help. Note that a new socket may still have problems because the dash plastic has damage from heat or spring load. Worse if use 168 & other hotter bulbs.
Locking "ears" on the plastic socket shell can break too.
If you have problems, just replace a bad socket.
Note: Dorman has them but "says" only fit some GM 1970's models... can get them in a lot of other places for less $.
|
|
|
|
theogre
|
JUN 29, 10:19 PM
|
|
Update to add bulk socket problems...
"Dead" Bulbs or other dash problems are often Bend "pins" on 1 or both plug sockets on back.
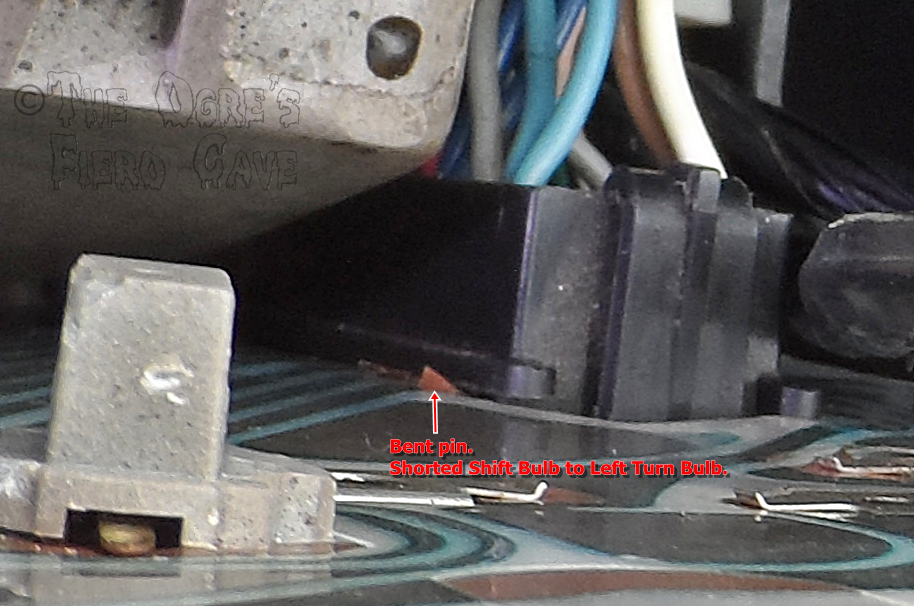
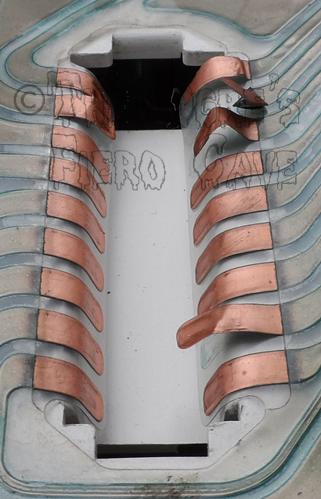
Many times they just bend...
While shows only a few bad ones, all on the right had glue fail.
To fix must clean the plastic & back of copper. Use Plastic Safe solvents w/o lube.
Do Not allow the copper to fold tight while cleaning. I bend them over backward on a "q-tip" round shaft.
Yes, 1 above is Z bent... You pray that will survive when straighten.
For 3 on left w/ glue fail, I used Permatex High Tack gasket "glue"/sealer to attach them to the plastic.
For all right needing something better, I use 3M/Scotch Photo Mount Spray Adhesive. It's a "Contact" type glue that dries very fast. This is safe & sticks for many plastic types.
I avoid remove those plugs for this reason but had this week to try to find why OP gauge is lying reading High vs. sender or resistor in back read by Ω meter. Result is better but still reading high so more wiring problems.[This message has been edited by theogre (edited 06-30-2024).]
|
|
|


