
 
     |
| Neil's Aventador build (Page 51/74) |

|
Neils88
|
FEB 05, 09:45 PM
|
|
I'm going to take a short pause on putting together the exterior emergency door handle. The handle/cable I was all set to use just couldn't cut it, so I'm going to redesign that portion of the system. I've ordered a pair of new exterior door handles. Unfortunately I'll have to do some major modifications to get them installed.
Since I've got some time to kill waiting for the new handles, I decided to work on the active vents that are located on either side of the engine cover. These will be automated to open based on the car's speed and engine compartment temperature...and I'll probably add a manual switch for when I just want to look cool.  The vents only open a few inches to help redirect airflow through the engine compartment. The vents only open a few inches to help redirect airflow through the engine compartment.
I built a small frame that will be bonded to the vent panel (and then fiberglassed to ensure it's properly bonded). The frame is hinged on the outer edge, and moved by a small linear actuator.

Short video of the panel in operation (the panel hasn't been bonded to the frame yet).
I'll try to duplicate the other side later in the week.
|
|
|
|
Neils88
|
FEB 11, 10:10 PM
|
|
The passenger side vent frame is now in place. I had some issues with the alignment. I'll have to tweak both sides slightly when I install the panels. It'll be important to ensure that the panels move in sync, starting and stopping at the same time with the same opening. I'll try to get the linear actuator installed tomorrow, including the rough installation of the wiring and controller.

|
|
|
|
Neils88
|
FEB 12, 05:48 PM
|
|
|
I started to make the passenger side linear actuator brackets today, but didn't manage to install them. It should be a pretty quick job to get them put in this week. I'll run the cables for the actuators just to get them out of the way, but won't bother setting up the controller until I'm working on the interior. I'll likely install the linear actuator controller in the "trunk" (...that is, the area that used to be a Fiero trunk, since mine is mostly gone). That way I'll only need two wires from the cabin; one that triggers up motion, the other triggering down motion.
|
|
|
|
Neils88
|
FEB 18, 03:14 PM
|
|
Finally got the active vents finished...more or less. The frames and linear actuators are in place, and wired up. The wires are still sitting loosely...they'll have to be routed properly and secured. Eventually the panels will get installed properly as well.

[This message has been edited by Neils88 (edited 02-18-2017).]
|
|
|
|
Neils88
|
MAR 06, 08:27 PM
|
|
Just got back from a week in Tulum, Mexico. I should be back to working on the car this week. I was working on the rear active spoiler just before I left. 

|
|
|
|
Drewbdo
|
MAR 07, 02:41 PM
|
|
| quote | Originally posted by Neils88:
Almost finished the lock / latch connection system (driver's side only). I added the linkage to the lock cable.

Here's a summary of the functionality:
1. Interior door handle. Connected and works well.
2. Interior door lock. Connected and functional, but cable end needs to be attached a little better to the lock pivot linkage.
3. Exterior door handle (electric release switch on door connected to solenoid). Solenoid (also called a "popper") connected and works well...but too noisy. Will replace with a quieter solenoid.
4. Power door locks (unit built into latch, not seen in pic). System is connected and tested, but final wiring not complete yet.
5. Key (emergency use lock control). Connected, but linkage bar is a little too flimsy. Unlock works well, but linkage sometimes flexes a bit too much when using key to lock door. I'll change to a stiffer linkage.
6. Exterior door handle (emergency use latch release). Not connected yet. 4 different attempts all failed. I may have to get a different handle or cable. 
Progress on this has been slow...but steady. Still needs the one connection and a few tweaks, but I'm happy with the overall result.
|
|
I've enjoyed this thread. I'm especially interested in the door lock/handles. My 88 GT has a Testarossa replica body, and the builder installed poppers instead of exterior handles/locks. The poppers are 20+ years old, and not very reliable. I think I'm going to order new poppers, but I really like the idea of adding a "real" working exterior handle / lock system.
Anyway, keep up the great work and the write-up.
|
|
|
|
Neils88
|
MAR 07, 07:30 PM
|
|
| quote | Originally posted by Drewbdo:
I've enjoyed this thread. I'm especially interested in the door lock/handles. My 88 GT has a Testarossa replica body, and the builder installed poppers instead of exterior handles/locks. The poppers are 20+ years old, and not very reliable. I think I'm going to order new poppers, but I really like the idea of adding a "real" working exterior handle / lock system.
Anyway, keep up the great work and the write-up. |
|
Thanks Drewbdo. I still need to install my new AVS poppers. They are much quieter than the original ones I installed. I'll post some pics once I get back to them.
We are required by law to have a mechanical release system here in addition to the poppers...obviously for safety in the event of an accident. The internal mechanical system keeps you from looking silly if your battery dies while you are in the car.  I wish there was a better way to combine all these parts, but there really isn't a simple way to do it. I wish there was a better way to combine all these parts, but there really isn't a simple way to do it.
|
|
|
|
2.5
|
MAR 08, 11:58 AM
|
|
| quote | Originally posted by Neils88:
Finally got the active vents finished...more or less. The frames and linear actuators are in place, and wired up. The wires are still sitting loosely...they'll have to be routed properly and secured. Eventually the panels will get installed properly as well.
|
|
Nice 
|
|
|
|
Neils88
|
MAR 19, 05:39 PM
|
|
I've been a little lax in the last few weeks, but finally had a chance to get into the garage this weekend. As mentioned before, I'm working on the basics for the active spoiler. The first consideration for the spoiler is the requirement for a hinge mechanism that lifts the spoiler to the correct height and angle through the travel of the spoiler. The oem spoiler has three positions depending on the speed of the car; 0 degrees (fully down), 4 degrees and 11 degrees.
It is a pretty tight spot to install the hinges under the spoiler, so I won't be able to use something like a trunk hinge...they simply won't fit. However, trunk hinges are built with nice solid pivot joints and so I decided I could modify them to achieve the required structure.
Honestly...this is one of the more complex items I've had to put together for the build. 
It takes two Mazda 3 trunk hinges to build a single spoiler hinge...
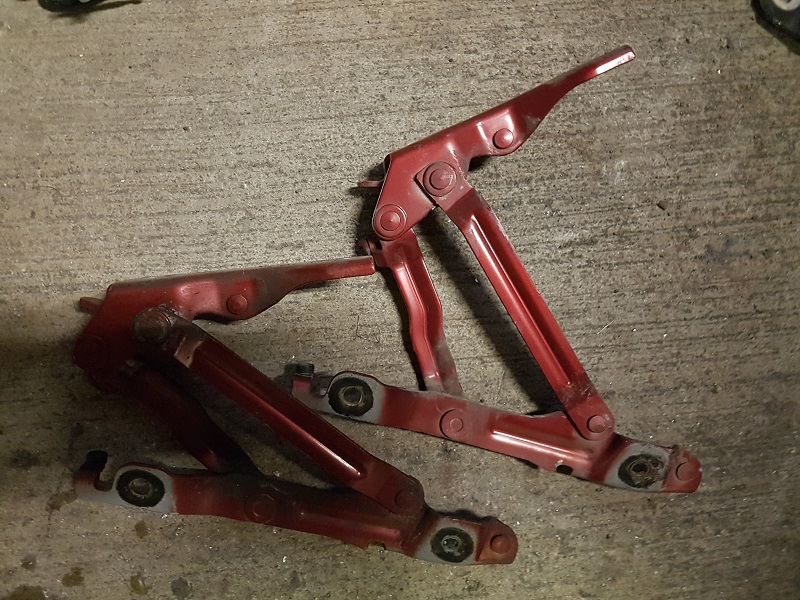
I created the hinge in a CAD program that allows simulation of mechanical systems to ensure the arm lengths and pivot locations were correct. Here is the final mechanism...just needs a little dressing (grind / sand some rough spots) and then it'll get a little black paint...
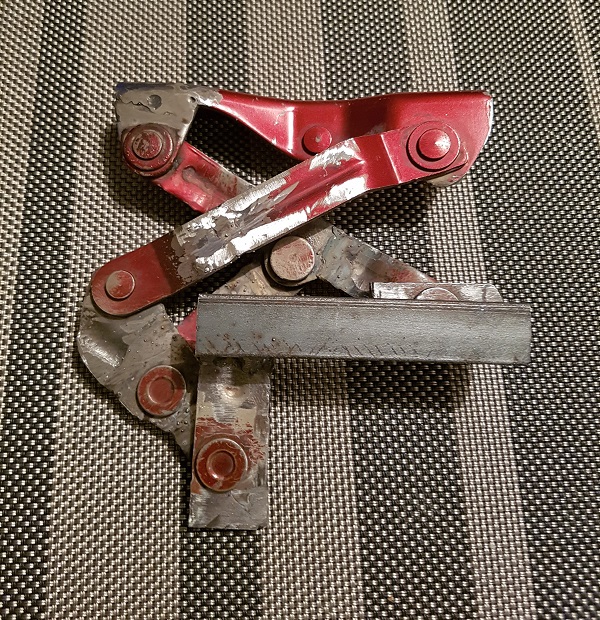
The bare metal piece is the mounting bracket that fits onto the rear framing next to the tail lights.
The spoiler will be driven by a slow speed, high torque motor. The tough part will be be duplicating the hinge exactly. This system is dimensionally sensitive, and if I don't get it right then there is the chance that the spoiler will twist as it rises.
|
|
|
|
RCR
|
MAR 19, 06:26 PM
|
|
Really cool, Neil. You've got me wanting to get back out in the garage.
Bob
|
|
|
|