|
| Poly Suspension Upgrade (all pics) (Page 5/16) |

|
theogre
|
SEP 08, 08:14 PM
|
|
Poly dust boots, like those shown here, are garbage on all joints and rod ends.
They may look pretty but they offer no protection. OEM type boots are the way to do that job. You need the sealing that they provide at both ends.
Replacements for torn ones are not hard to find. You can get them thru MotorMite's HELP! line in several common sizes. They should be at many parts stores or they should be able to get them for you.
To seat the large end, try very big sockets or some plastic pipe. (and/or pipe fittings...) Any tubing type thing w/o sharp edges will make short work of them. ------------------
Dr. Ian Malcolm: Yeah, but your scientists were so preoccupied with whether or not they could, they didn't stop to think if they should.
(Jurassic Park)
The Ogre's Fiero Cave (It's also at the top of every forum page...)
|
|
|
|
MulletproofMonk
|
APR 07, 11:59 AM
|
|
|
|
|
JohnL
|
APR 07, 03:05 PM
|
|
Great photos....
Concerning the front Sway Bar, and the bolts on the sway bar ends.... Is there enough "wiggle room" to get the old bolt and bushings out without having to do more unbolting of the sway bar from the frame??
Thanks
John
|
|
|
|
MulletproofMonk
|
APR 07, 04:15 PM
|
|
|
|
|
BMTFIERO
|
APR 07, 04:58 PM
|
|
I have no clue on how I missed this thread! Even though I have 88's, it is good to be able to see how it all comes together.
Thanks for taking the time. +4U------------------
White 88 GT 5 spd
(Soon to be a Shelby S1 powered 6 spd)
Red 88 GT Auto
(Soon to be Shelby S1 powered)
Black 88 coupe 5 spd (For Sale)
|
|
|
|
telefragg3d
|
APR 07, 05:53 PM
|
|
cool! nice write up! + for you. however....
did you take the spring off at all? isn't that crazy dangerous?
|
|
|
|
MulletproofMonk
|
APR 08, 08:40 AM
|
|
EDIT to make some space...
| quote | Originally posted by JohnL:
Great photos....
Concerning the front Sway Bar, and the bolts on the sway bar ends.... Is there enough "wiggle room" to get the old bolt and bushings out without having to do more unbolting of the sway bar from the frame??
Thanks
John |
|
Good question. I will try that first when I go to do the front end. I'm going to see if I can do it better/faster than I did last time...
-Brian
| quote | Originally posted by telefragg3d:
cool! nice write up! + for you. however....
did you take the spring off at all? isn't that crazy dangerous? |
|
Rear springs stay on the strut. Front springs you have to pop them out. It made me a little twitchy but they just popped out, no shooting across the room or anything like that.[This message has been edited by MulletproofMonk (edited 05-23-2013).]
|
|
|
|
Justin Heileman
|
APR 08, 01:00 PM
|
|
|
One good thing to do is to link a chain around the spring and the control arm. In case that jack slips, it keeps the spring from shooting out of there.
|
|
|
|
MulletproofMonk
|
MAY 18, 03:00 PM
|
|
| quote | Originally posted by JohnL:
Great photos....
Concerning the front Sway Bar, and the bolts on the sway bar ends.... Is there enough "wiggle room" to get the old bolt and bushings out without having to do more unbolting of the sway bar from the frame??
Thanks
John |
|
John,
Just got around to working on the front end last night... I have been occupied with a 7730 ECM, Digital EGR and Digital Cruise Control upgrade...
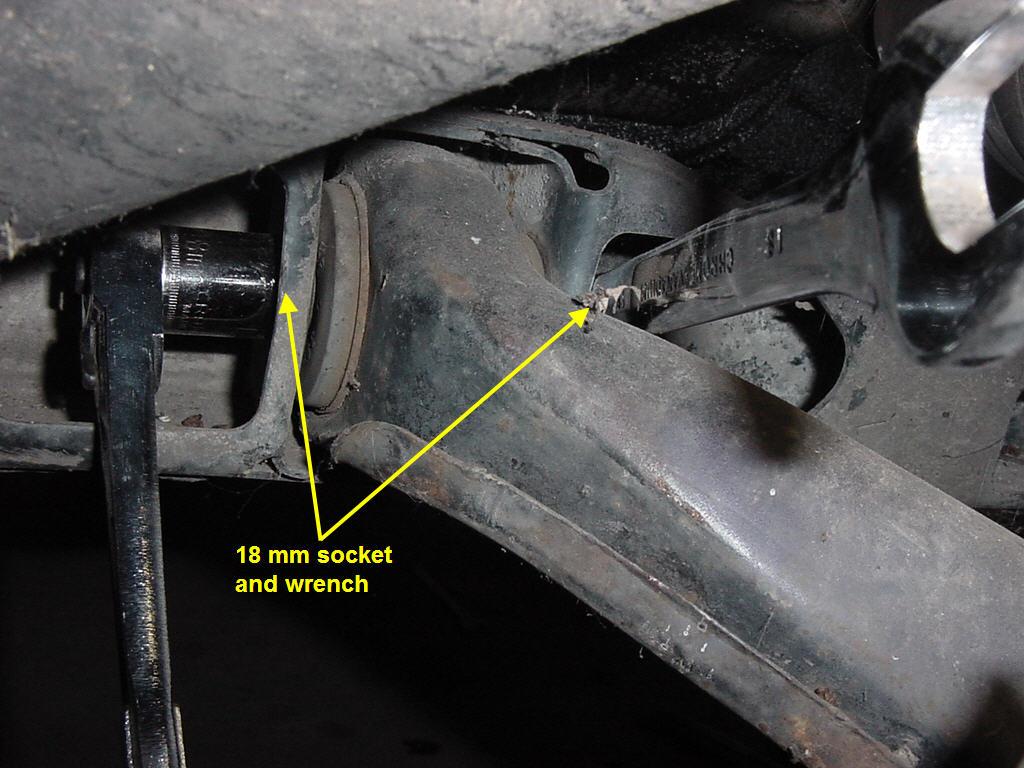
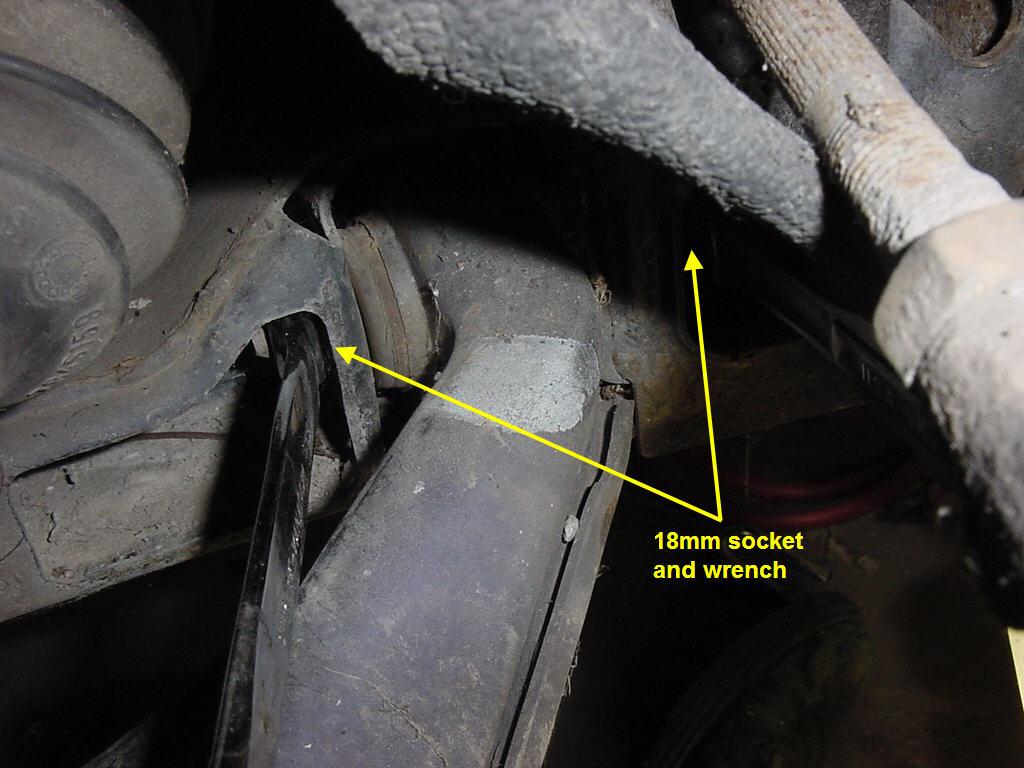
I tried taking off just the swaybar and the answer to the question is yes. You can do the front swaybar using two 13mm wrenches but it was VERY time consuming. IF I were going to do it this way again I would use a cutoff tool to cut the extra threads off the bolt. That way you only have to do 2-3 turns to get the nut off. Your arm shouldn't get too tired putting the new nut on since it doesn't have 20 years of rust built up on the bolt threads... Doing it with the two 13mm wrenched took almost the same amount of time it took to get the upper control arm off and use a socket on the swaybar bushing...
-Brian
|
|

|
my86fiero
|
JUN 09, 07:35 PM
|
|
"WOW" man that is a really nice build thread on the bushings... thanks so much. I too like a lot of pics. and benifit from the whloe look and learn. i plan on buyong that same bushing set up from ebay. and did you get your cradle bushings from there also? i just pulled my engine this weekend to do a swap to an L67 and i figured this would be the best time to get it out of the way. Since i already have it in my mind that i won't be done my car until late summer 2010. again thanks so much. oh and a + for ya!
, Jason
|
|
|