
 
     |
| How I Fixed Fuel Sender Binding Problem in 88 Tank (Page 3/4) |

|
Archie
|
JAN 13, 07:33 PM
|
|
A shout out to Steve.
I've had the same problem as Steve did only on an 86 tank.
Steve has my Float parts & I'm having the same problem with the float hanging up on the right side baffle.
We feel that he can get the same results without cutting the float in half.
I'm sure that he will do some follow up here.
Thanks
Archie
edited to add.....BTW, I think the split float is bad ass & a well thought out idea. but once it's in the tank, who's gonna know?
Thanks[This message has been edited by Archie (edited 01-13-2021).]
|
|

|
V8Steve
|
JAN 13, 11:35 PM
|
|
|
The fix for Archie's float is almost done. The float remains as a one piece instead of the above two piece. There are pros and cons for both fixes. Stay tuned for pictures. ------------------
88GT 355 CI Sequential Holley Multiport , AFR milled 180, Dyno'd at 427 HP, 320 WHP
anderson@gdsconsulting.com
|
|
|
|
DrXtreme
|
JAN 16, 12:36 PM
|
|
| quote | Originally posted by V8Steve:
The fix for Archie's float is almost done. The float remains as a one piece instead of the above two piece. There are pros and cons for both fixes. Stay tuned for pictures.
|
|
Let me know how you fixed it. I'm waiting on new pump for my 1988 and need to fix the float as it never shows below 3/4 of tank. Previous owner replaced pump, not sure what they did, but I'm installing a better pump to ensure the V8 gets proper fuel pressure.
Dr Xtreme
|
|
|
|
V8Steve
|
JAN 16, 12:51 PM
|
|
I hope to finish the "fix" today or tomorrow. I've been trying to come come up with a solution requiring no welding, by using a new piece of steel or stainless 1/8" diameter rod. For me, it's not possible because of the tight inside radius of the 90 degree bend where the rod enters the wiper. I now have a long length of steel and stainless steel to finish up. Both will have a paint roller design, allowing the float to remain as one piece.
If you want some assistance with the V8 fuel pump, I went through a lot of that last summer. Email me if you want.
------------------
88GT 355 CI Sequential Holley HP Multiport EFI, AFR milled 180, Dyno'd at 427 HP, 320 WHP, F40 6-Spd
anderson@gdsconsulting.com[This message has been edited by V8Steve (edited 01-16-2021).]
|
|
|
|
V8Steve
|
JAN 16, 09:56 PM
|
|
I gave up on a one piece design because the rod needs a really tight inside radius where it fits into the wiper. I had to cut the rod nearly all the way through, bend 90 degrees, and then back fill with weld. It's a delicate weld and it took me some time to master it. After that, it takes too much effort to heat and bend the new rod to conform to the original.
Archie's Fiero Store float assembly was binding just like mine when I started this thread.
The first step is to make an outline that later serves as a template. I used simple graph paper, traced around the offset float, and wrote down some measurements.

The goal is to move the float to be roughly centered on the rod. Then I weighed the pros and cons of just cutting the float like the beginning of this thread or making a paint roller. I chose the paint roller in order to avoid cutting the float.
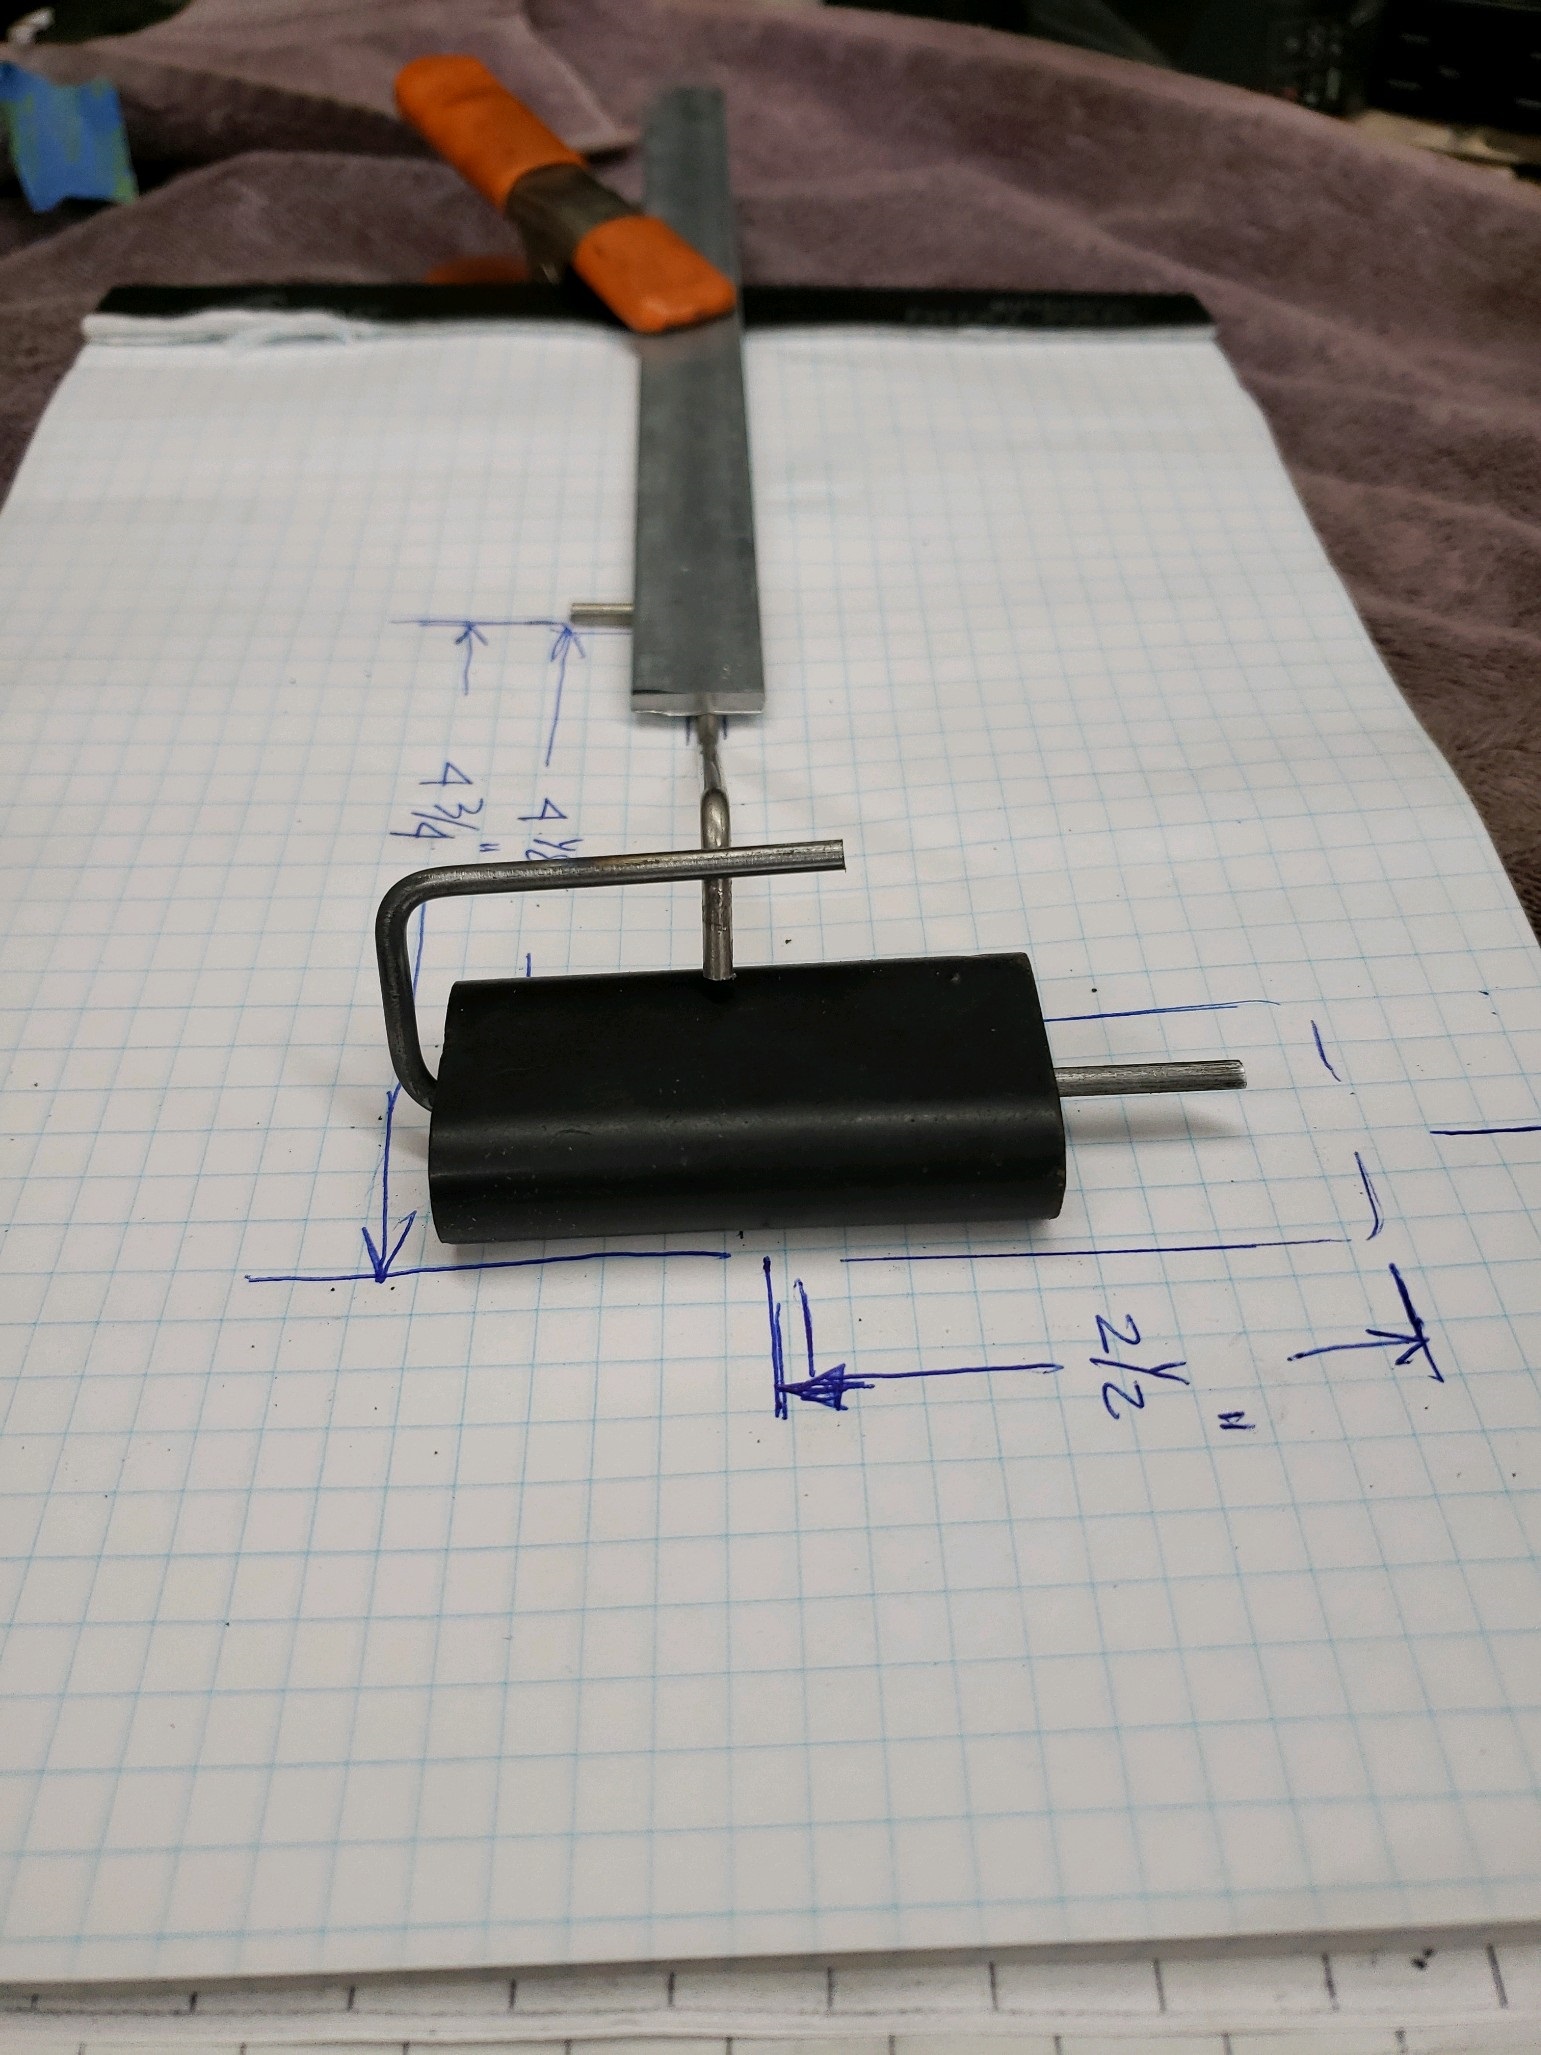
The U-shaped rod is made from .125" stock from Tractor Supply. It's pretty easy to bend with a Bernzomatic and a bottle of MAP gas. I'd already cut off the end of the original rod so there was no turning back. This is where the template helps out. By clamping the rod on to the template, all the original geometry is preserved. I positioned the float and then noted where the U-shaped rod intersects the original rod. This is where you get only one shot at it. If you keep messing up the weld, the entire geometry and float location changes.
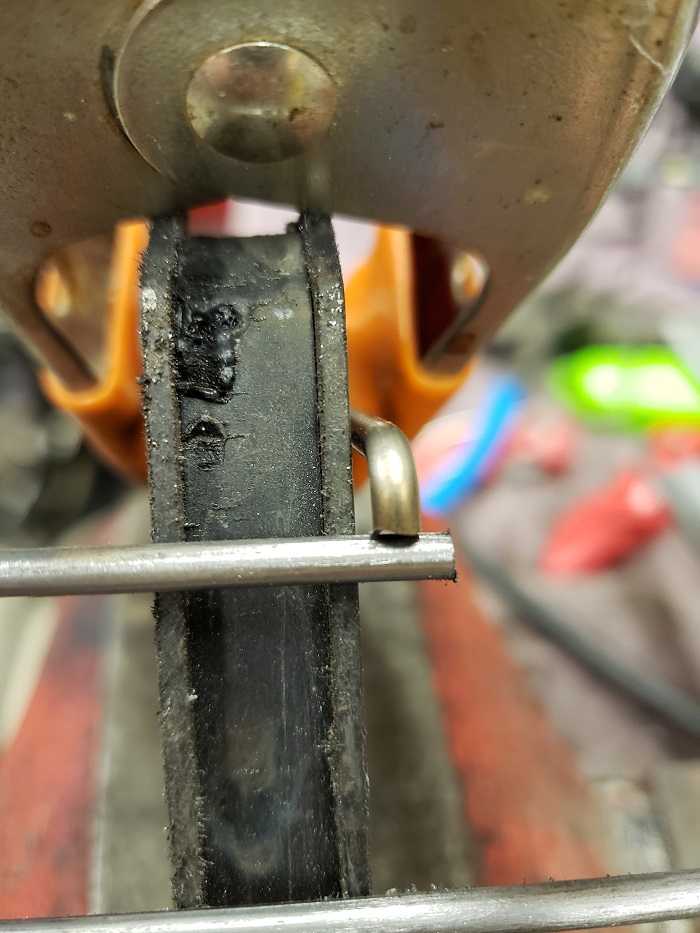
By cutting the original rod with a Dremel and cutoff wheel, the new U-shaped piece and original rod will match up. Now is the hard part because you have to weld them without losing the geometry. After making plenty of practice welds on leftover stock and making a holding fixture I was able to weld it. The mig welder made just 2-3 pulses (not trigger pulses) to just fuse them together. After careful inspection, I added 2-3 more welds and then cleaned them up.
Here's the weld fixture:
Finished

Retaining Washer - They're called a push on retaining washer or push washer and you can buy them at a hardware store.
So what's the best way to do it? Since I've made two of them now, the simplest way is the split float because you don't have to worry about retaining geometry or making a touchy weld. Just buy the .125" rod, cut off the original, and weld on a piece.
|
|
|
|
Archie
|
JAN 17, 01:35 PM
|
|
I'll be installing this as soon as it gets back here.
Hopefully by then I'll figure out how to get PIP working for me again.
Thanks
Archie
|
|
|
|
gjgpff
|
JAN 17, 02:24 PM
|
|
First of all, i want to thank V8Steve and everyone else for going to all this trouble and partially sacrificing an 88 tank to get to the bottom of this issue.
I'm wondering if I might have the same problem in my 88 Iron Duke. I got the car in May and the owner said that the fuel gauge didn't work 100%. It seems to work okay from Full to about 1/2 Full, but the needle stops at that point. Right now I'm just using the trip-meter to tell me when to fill up (conservatively I fill up every 200 miles, the car gets 29-31 mpg).
So, what's the least invasive way of checking the resistance? If my resistance is right from full to half full, there's a good chance I have a similar, mechanical problem.
------------------
Geoff Gibbons
1988 4cyl Manual[This message has been edited by gjgpff (edited 01-17-2021).]
|
|
|
|
V8Steve
|
JAN 17, 02:56 PM
|
|
It's hard to know. If the float assembly is original, one can assume your problem is not the same. If anyone, including the previous owner, changed out the float assembly, there's a chance it could be the same problem.
I'd run the car to nearly empty and then check the ohms. Then I'd add 5 gal and check again and so on. If the resistance checks out OK, near empty, half full, and full, then the problem is likely your dash gauge.
Checking Resistance - I did most of my checking either under the car or while the tank was on saw horses. You could also check it by removing the gauge cluster or finding the pin in a connector plug. This forum has plenty of information on fuel gage problems.
Replacement of Assembly - Chances are pretty good if you or your mechanic buys a new assembly with an offset float you'll end up with the same problem. I gave thought to reworking these for PFF members at a small fee but the split float can be done really cheap. McMaster Carr sold me a stainless .125" rod, next day delivery for $3.41. Even if you don't have a welder, any weld shop can tack on the crosswise float "axle" for short $. It turns out to be an under $20 fix. Lastly, DO NOT USE THE ROUND TANK SEAL THAT COMES WITH THE ASSEMBLY. I could never get it to seal when turning the tank upside down to check the ohms. On two different tanks, it would not seal. USE THE GM DELCO SEAL with the three locating tabs.
------------------
88GT 355 CI Sequential Holley HP Multiport EFI, AFR milled 180, Dyno'd at 427 HP, 320 WHP, F40 6-Spd
anderson@gdsconsulting.com[This message has been edited by V8Steve (edited 01-17-2021).]
|
|
|
|
VanGTP5000
|
JAN 18, 07:49 AM
|
|
My 85 tank with the new Fiero Store unit hasn't worked since the day I had it installed. I would love to get this problem solved but it is outside of my comfortzone. I think The Fiero Store should find a way to make good on this so that people can have the issue corrected.
Van
|
|
|
|
Dennis LaGrua
|
JAN 19, 09:21 AM
|
|
|
Great info in this post and excellent solutions. I am surprised that the Fiero Store hasn't corrected the problem. Just came up with an idea that may or may not work. Suppose we cut off about 1/4" from the new float and shortened the rod. That might provide the needed clearance but its difficult to tell if the buoyancy change (if any) of a slightly shorter float will affect performance. ------------------
" THE BLACK PARALYZER" -87GT 3800SC Series III engine, custom ZZP /Frozen Boost Intercooler setup, 3.4" Pulley, Northstar TB, LS1 MAF, 3" Spintech/Hedman Exhaust, P-log Manifold, Autolite 104's, MSD wires, Custom CAI, 4T65eHD w. custom axles, Champion Radiator, S10 Brake Booster, HP Tuners VCM Suite.
"THE COLUSSUS"
87GT - ALL OUT 3.4L Turbocharged engine, Garrett Hybrid Turbo, MSD ign., modified TH125H
" ON THE LOOSE WITHOUT THE JUICE "
|
|
|
|