|
| SBC Serpentine Accessory Belt Upgrade (Page 2/7) |

|
fieroguru
|
SEP 05, 03:53 PM
|
|
|
|
|
rcp builders
|
SEP 05, 06:59 PM
|
|
|
Does the 2.5 balancer rear go into the motor further like it should? Nice work, Ray
|
|
|
|
fieroguru
|
SEP 05, 07:07 PM
|
|
| quote | Originally posted by rcp builders:
Does the 2.5 balancer rear go into the motor further like it should? Nice work, Ray |
|
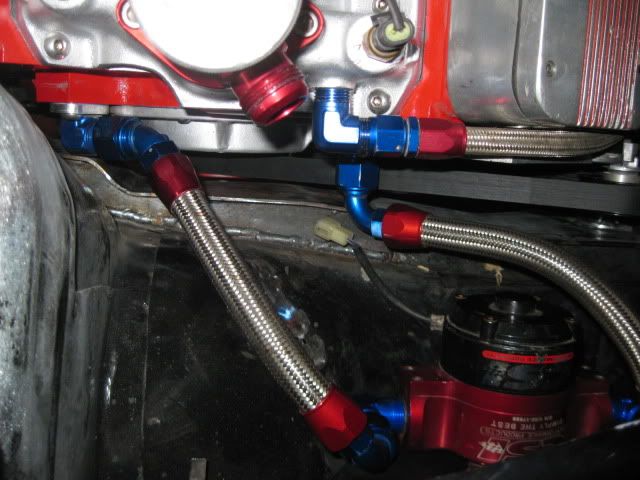
Yes, it has the same back spacing as the Archie V belt balancer and can be installed without any need for further machining or modification to the balancer. In this pic the 2.5 balancer is in the middle:

Now, if you are using a plastic vortec engine timing cover (or this milodon gear drive), then you will need to make a spacer (about 1/4" thick) so the balancer can bottom out on the spacer while still clearing the timing crank sensor boss (or the excess protrusion of the timing cover), but this is needed if you use the V belt balancer as well.[This message has been edited by fieroguru (edited 09-05-2011).]
|
|

|
rcp builders
|
NOV 01, 05:05 PM
|
|
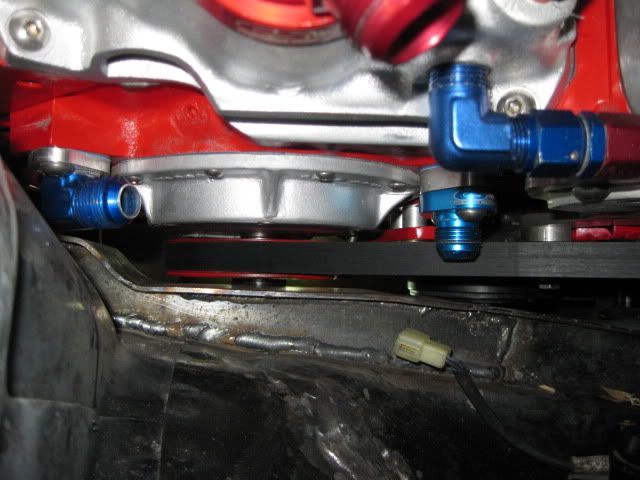
I know this is an old thread but it wasn't archived so I thought it best to post to this one, instead of starting a new one.
I just finished installing the 2.5 serpentine pulley. I was wondering if you have done this on a motor with a regular timing cover??
If you have, what kind of clearance did you end up with between balancer and timing cover? Also what is the best washer and bolt to use?
It seems I have a gap still where the balancer isn't flush with crank snout, is this normal? Thanks Ray
.jpg)
_(640x480).jpg)
|
|
|
|
fieroguru
|
NOV 01, 07:04 PM
|
|
I have used them on the L31 plastic timing covers, but not the stamped metal ones.
When I set up the balancer on the crank, I use a 3 step operation. First with the timing cover off, I slide the balancer all the way on the crankshaft and measure the depth (with digital calipers) of the crankshaft end to the face of the balancer. This is the needed dimension to fully bottom out the balancer. Then remove the balancer.
Next step is to install the balancer with the timing cover in place. I slide it on as far as it will go w/o any interference. Once I am happy with the placement, I check the depth of the crankshaft again. Whatever the difference is between the two measurements is the needed thickness for the spacer. Then remove the balancer.
If the spacer is less and 1/8" then you can use a large washer if you notch it to clear the crankshaft key. If it is wider, I use a junk balancer and cut the seal surface off it and turn it to the right dimension. The spacer from the junk balancer can be installed through the hole in the timing cover, but the spacer from a washer might need the timing cover removed to install.
If you have access to a lathe, you can remove some material from the backside of the balancer to pull it even closer to the timing cover.
|
|
|
|
Trinten
|
JUL 07, 03:19 PM
|
|
Thanks for sending me this link, FieroGuru!
Not only is this an awesome belting solution, but it shows a MUCH better way to do a remote electric water pump. When I looked into trying to do that, all I found was these "remote water pump bars" that connect to the block. I got one and we realized there wasn't going to be a way to get that to work. But if it's done as pictured above... that's just all sorts of awesome!
(I really like the fixes to stop deflection under WOT, I've had the current v-belt pop off at both the dyno and the track because of that!)
|
|

|
sick lake city fiero
|
DEC 19, 02:28 AM
|
|
good info guru thanks 
|
|
|
|
garage monster
|
DEC 20, 03:05 AM
|
|
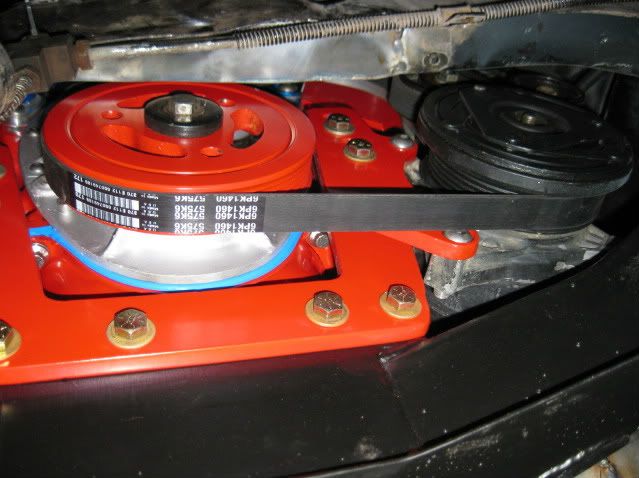
Here is a picture of my 383.

I did this more than a year ago and it works well. I did find the end of Archie's mount where the alternator bolts on began to bend. The aluminum is thinner there. I just added 1/4" steel plates on the front side of Archie's mount to reinforce those areas.
|
|
|
|
fieroguru
|
DEC 20, 06:23 AM
|
|
|
I am glad to see this setup is getting more use. I should have some pictures of the one I am currently working on posted up this weekend.
|
|
|
|
John DeHaan
|
DEC 20, 10:04 AM
|
|
|
Will this function properly as a vibration damper at high RPM on a V8? It would seem that the V8 vibration dynamics would be much different than smaller 4-6 cylinder engines.
|
|
|