|
| 85 Notchie Build (Page 11/23) |

|
davylong86
|
MAR 15, 07:43 PM
|
|
|
Thanks for taking the time to document all your work. I have a 3800 SC staring at me wondering when it gets to go to its new home. Great job
|
|
|
|
La fiera
|
MAR 15, 08:52 PM
|
|
| quote | Originally posted by zkhennings:
"The WOT-Tech NA Stage 2 cam, also known as the Strip cam. It has a mild lope to it and suffers a slight torque loss in exchange for more RPM and HP. Shift points anywhere from 6500-7000 should consider this one, racing or street use. Tuning won't be too difficult for this one either.
276 / 264 Duration @ .006"
224 / 212 Duration @ .050"
.335" / ..325" Lobe Lift
.536"/.520" 1.6 Rocker
109 ICL
111 LSA"
|
|
Looking at the cam specs the power delivety of that cam will be very linear and laggy. It'll be a good overall street cam with attitude. If it is a "reverse pattern" cam (by the way you posted the specs) it will benefit the engine if you are retaining the stock intake manifold.
Keep pounding!! Looking forward to see it running!
|
|
|
|
zkhennings
|
MAR 16, 09:05 AM
|
|
| quote | Originally posted by La fiera:
Looking at the cam specs the power delivety of that cam will be very linear and laggy. It'll be a good overall street cam with attitude. If it is a "reverse pattern" cam (by the way you posted the specs) it will benefit the engine if you are retaining the stock intake manifold.
Keep pounding!! Looking forward to see it running! |
|
Thanks! That is how the cam specs are posted on WOT Tech, I think though that the exhaust has the greater lift than the intake so maybe the specs were posted backwards on the site. I looked at a turbo cam to compare and it does seem the specs are backwards (Ex/Int). I am maintaining the stock intake but it will be ported and gasket matched, and I have a larger throttle body for it.
davylong86 - No problem, it is useful for me to document everything to keep track of the build, and it is always nice to look back on your build once it is "done"
Also I have my fuel system components in the mail, a 340LPH pump that is rated for E85 (just in case), a section of submersible fuel hose, 6 injector connectors for the Bosch EV14s, and 6 550cc (52Lbs) Bosch EV14 Injectors for an Audi S4 2.7 turbo motor. They are rated for 300 - 550 crank HP. I ordered some stock injector O-rings in case I need them but I think the ones that come with the injectors should suffice.
I think asides from some sensors, connectors, and crimping/depinning tools, I have everything I need asides from rod bearings and main bearings. I will also buy a new oil pump if I take this one apart and it doesn't look perfect. I guess I also need some sheet metal for bracket fabrication, I was thinking 3/16" for the motor and alternator mounts. And I guess I need some vacuum hose, fuel line, fuel filter, coolant hoses, etc. Odds and ends, but stuff I can find locally and do not need to order.
I have called around a little more and I think I am going to get my machine work done down in CT, the shop my friend uses has much better pricing than the shops by me, and they are legit. In addition to the resurfacing of the heads I am going to have them hot tank the block and replace all the freeze plugs, replace the cam bearings (cheaper than buying a tool), and have them recondition the big ends of the rods with the ARP bolts.
Hopefully they can machine the rods back to the stock size and not machine them oversized, seems like the .002 oversized bearings are out of stock. Maybe the machine shop will have their own source.
Edit to remind myself to order the cam to timing gear bolt for a 3500
Edit x 2 to say it has been ordered along with a new cam journal rear plug and 4 dowel pins for the heads.[This message has been edited by zkhennings (edited 03-16-2021).]
|
|
|
|
ericjon262
|
MAR 16, 10:36 PM
|
|
I would always expect the rear main bearing to have the most wear, because the load is applied on that end of the crankshaft. Modern, serpentine drive assemblies keep the load on the front bearings lower than older static tension V-belt drives, as the belt has a higher surface area, and therefor requires less tension to not slip, therefor applies less side load to the crank snout.
I wouldn't port the heads on the 3900 unless you, or the guy who is doing the port work is beyond pro level, the ports on these heads are really, really good out of the box, and I feel like they would be very easy to make worse. The quality of the casting I have here is miles better than anything I have ever seen stock. Hell, the seats are already cleanly blended into the bowls! I'm working on a custom intake manifold for an LZ9, but I'm nowhere near having a production part yet.
Check your PM's in a bit. ------------------
"I am not what you so glibly call to be a civilized man. I have broken with society for reasons which I alone am able to appreciate. I am therefore not subject to it's stupid laws, and I ask you to never allude to them in my presence again."
cognita semper
|
|
|
|
zkhennings
|
MAR 17, 07:57 AM
|
|
|
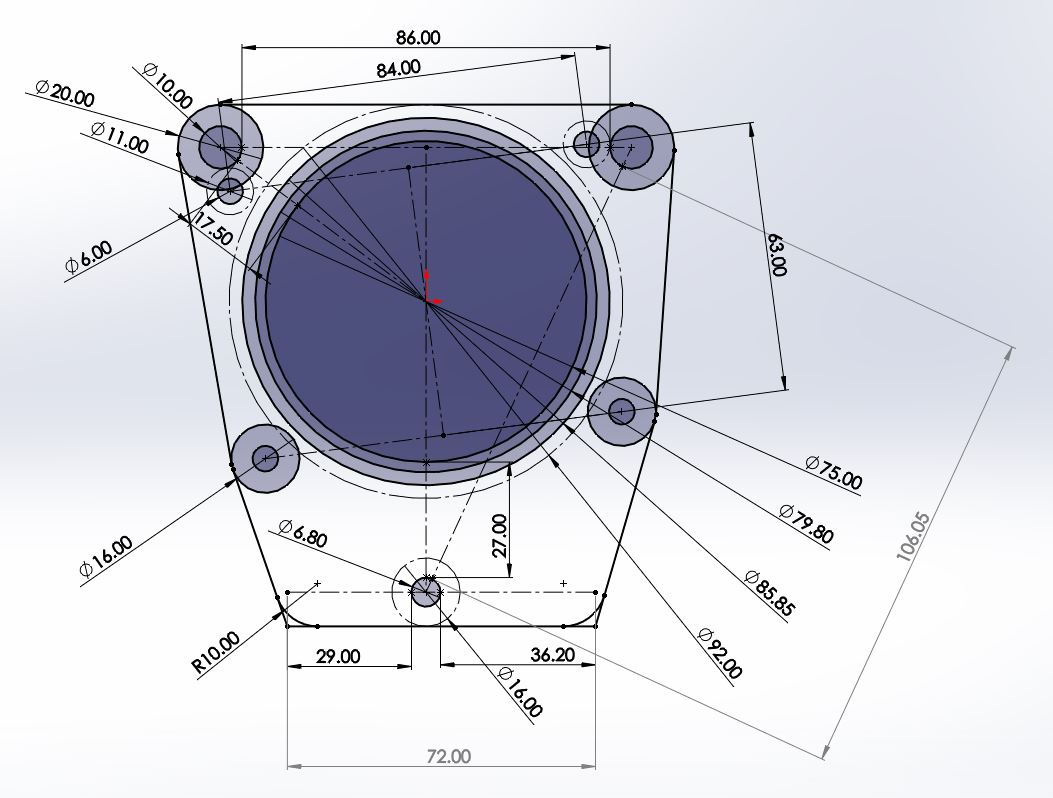
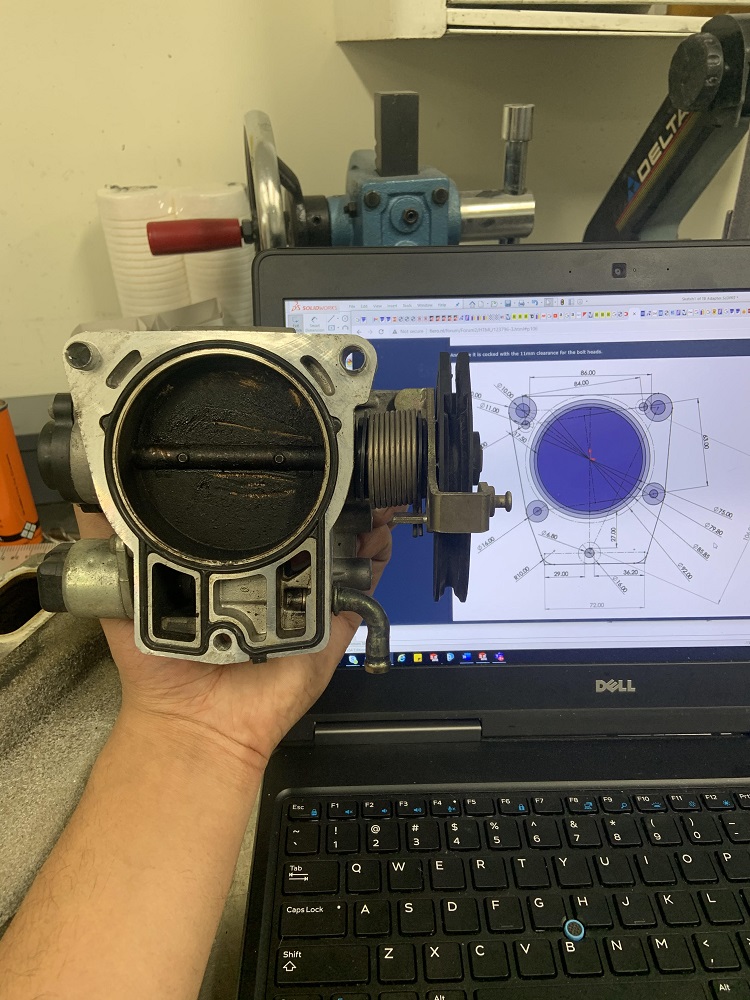
The castings are very good but not perfect, I have a lip on the intake ports, and theres definitely some area in the bowl I can take out. It’s minor compared to when I ported the iron heads, but there’s opportunity to clean it up and smooth out flow. I will not be doing anything drastic, just a simple smoothing, gasket matching, opening up the bowls, and polishing the exhaust side. I do plan to hog the lower intake manifold out as best as I can to the cross section of the gasket, and the upper LZ4 intake is very easy to increase port size to match. If I find I never hit 0 vacuum at WOT, I may end up modifying my upper intake manifold similarly to yourself, I have 3 feet of 3” aluminum tube sitting on a shelf staring at me. Some of that tubing will become a catch can, but the rest should be more than enough if it appears to be beneficial. Bonus is that the upper intake is so simple to remove when the motor is installed in the car. I will make sure to bolt the intake to some heavy steel square tubing during welding to keep everything flat if I do modify it.
|
|
|
|
zkhennings
|
MAR 17, 10:22 AM
|
|
I talked to the machine shop, he is confident that if the .002" oversized bearings exist (which they do) then he can find them. I also ordered main bearings since I will have him acquire the rod bearings.
I have been doing a lot of research into the components that could be used for forged internals, and there are many variations of these parts and a lot of conflicting information online, so I just decided to buy a few used components.
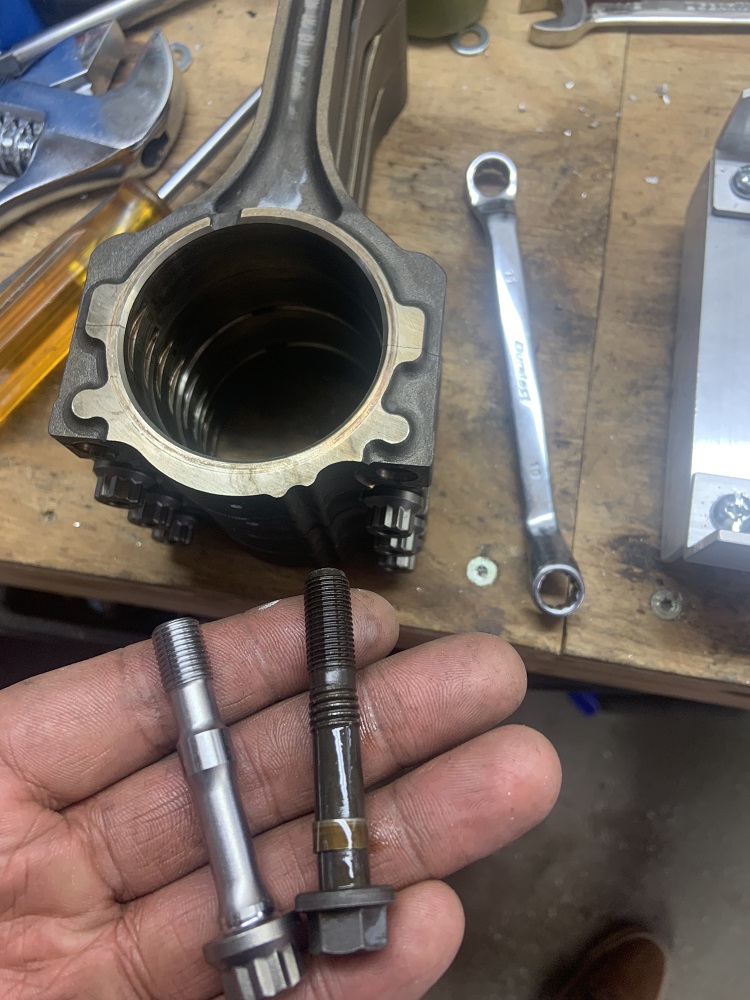
I order an LS1 piston and rod that has bearings in it already, and I ordered a 5.7" small block Chevy rod and I ordered bearings for it. I want to be able to compare the rod widths especially relative to the rod bearings if I need to get the rods narrowed, and I wanted to be able to see what the piston looks like in the bore and how it compares to the stock stuff. Now if I am looking at aftermarket variations of these parts I can check them against the stock parts. I want to be able to fit the longest rod I can without sacrificing stoke, I need to do some calculations and compare compression heights, and I need to calculate what the compression ratio would end up being. It seems like the LS1 pistons have much less dish than the LZ9 ones, which is good because it is easier to add dish than fill it in. I think I would prefer to use LS rods because they have a slightly larger big end than the SBC rods, but it probably does not matter.
I wanted to get these parts now while everything is apart so I can take pictures, measurements, and compare components to the stock components as well as check for clearances. Then I have a good knowledge base for figuring out what aftermarket parts I need to order before stage 2 of the build. I will post all the pictures and information here to make it easier for anyone who wants to build one of these. Machine work to make it all work would be relieving the valves in the piston tops, probably narrowing of the rods, and regrinding the crank journals to the correct diameter and offset to accommodate for any variations in rod length or compression height, but I will try and have the journal center remain where it currently is. Aftermarket pistons and rods all seem to use the .927" floating piston pins, regardless of LS or SBC, so no machine work needed to make that work.
Edit to say further research into things and further discussion with the machine shop has made me decide to balance the stock rotating assembly. I will be taking weight off pistons and rods to get them as close as possible to each other, and I will bring them with my crank to the machine shop to have the rotating assembly balanced to race spec. My younger brother made a pretty sweet DIY rod balancing setup when he rebuilt his Subaru's motor that I will use to balance the stock rods. I think the extra time and $250 is worth not throwing a rod through the block and trashing the whole motor possibly.[This message has been edited by zkhennings (edited 03-18-2021).]
|
|
|
|
zkhennings
|
MAR 18, 06:17 PM
|
|
|
|
|
ericjon262
|
MAR 20, 05:41 PM
|
|
| quote | Originally posted by zkhennings:
The castings are very good but not perfect, I have a lip on the intake ports, and theres definitely some area in the bowl I can take out. It’s minor compared to when I ported the iron heads, but there’s opportunity to clean it up and smooth out flow. I will not be doing anything drastic, just a simple smoothing, gasket matching, opening up the bowls, and polishing the exhaust side. I do plan to hog the lower intake manifold out as best as I can to the cross section of the gasket, and the upper LZ4 intake is very easy to increase port size to match. If I find I never hit 0 vacuum at WOT, I may end up modifying my upper intake manifold similarly to yourself, I have 3 feet of 3” aluminum tube sitting on a shelf staring at me. Some of that tubing will become a catch can, but the rest should be more than enough if it appears to be beneficial. Bonus is that the upper intake is so simple to remove when the motor is installed in the car. I will make sure to bolt the intake to some heavy steel square tubing during welding to keep everything flat if I do modify it. |
|
it's worth mentioning that anything in the plenum will be a lower pressure than ambient, physics demands it.
if you end up using the N* IAC, or even just the IAC port, you'll need to make sure to either put a hole in the inner wall of the TB, or mill a path for the valve to actually work. I ran into this problem with I used an LS1 TB on my LX9 years ago.
 ------------------
"I am not what you so glibly call to be a civilized man. I have broken with society for reasons which I alone am able to appreciate. I am therefore not subject to it's stupid laws, and I ask you to never allude to them in my presence again."
cognita semper
|
|
|
|
zkhennings
|
MAR 21, 01:08 AM
|
|
Yes I was planning to leave it blocked for now and get idle tuned with the MicroSquirt before deciding if I want to hook up that stepper motor. I need a special module to run the stepper motor.
I will give a full post later but I made this today. It is nearly complete here.

|
|
|
|
zkhennings
|
MAR 23, 09:26 AM
|
|
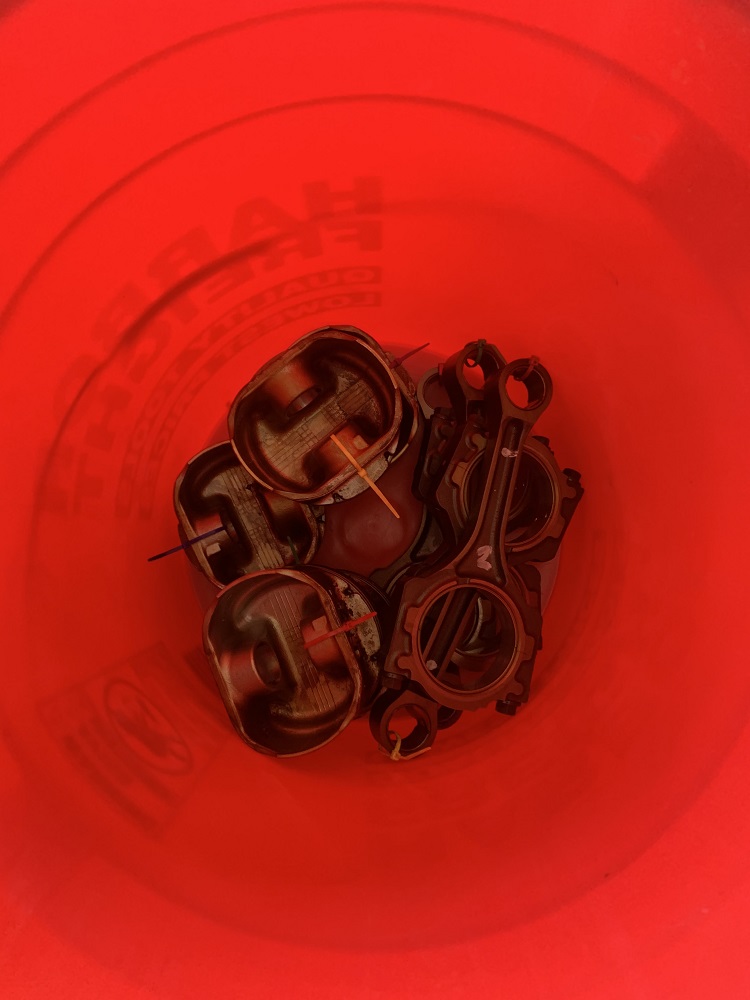
Brought my engine block, crank, rods, pistons, valves, crank pulley, cam bearings pressed into spacers, piston rings, and heads to CT to my friend's this weekend to get my internals balanced and bring the parts to the machine shop yesterday when they were open.
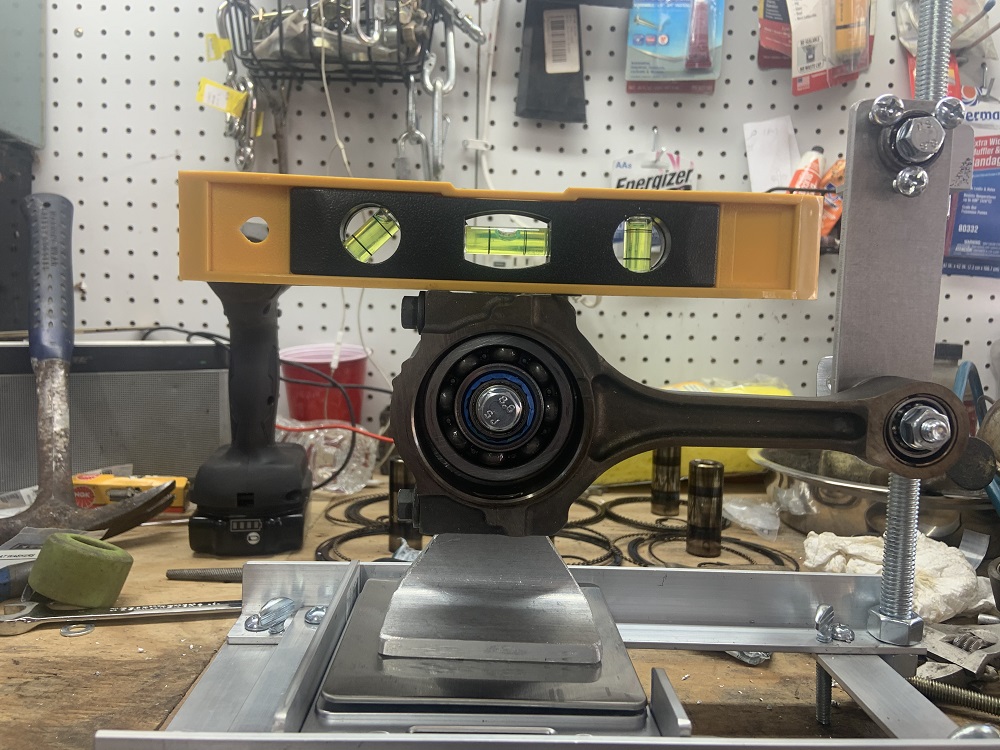
I brought with me my brother's rod balancing setup, but I wasn't getting consistent results so I made a version that would be more precise. I didn't plan to do this and it took a lot longer than I thought it would. But before I could balance anything I had to take everything apart and clean it all really well. Everything was decently dirty.

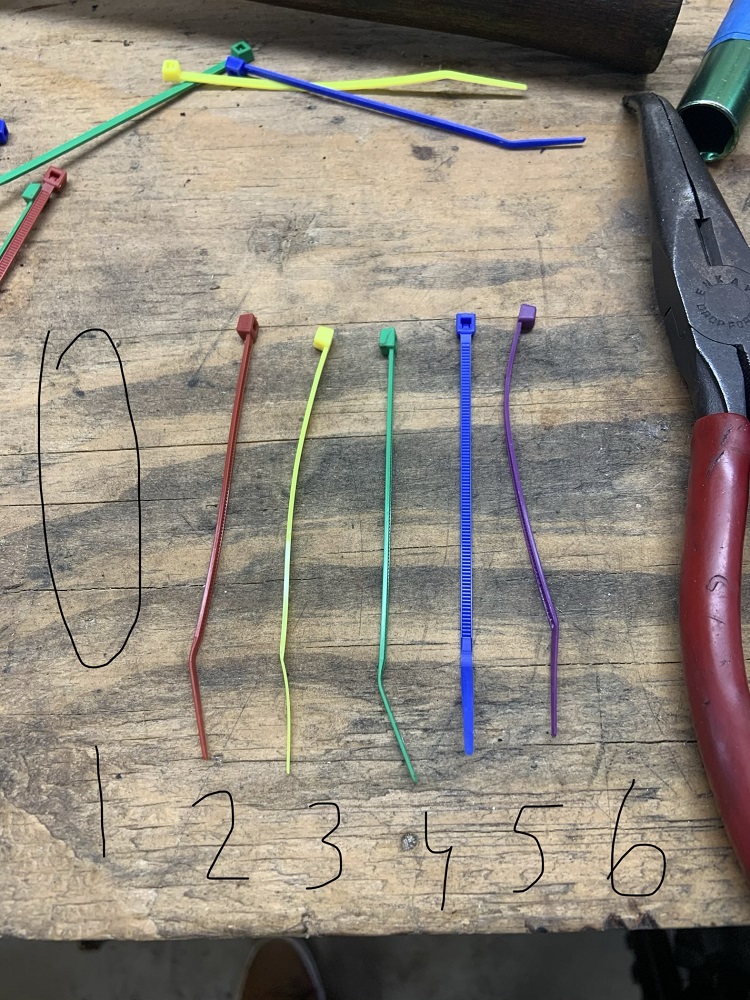
I also needed to keep track of what rod and piston were what and I was worried any markings I made would come off in the degreaser bath. I used various colored zip ties for this purpose.
My brother used this stuff for his build, he found some guy on a forum had used it. LAs Totally Awesome, it is dollar store degreaser concentrate, and if not diluted it does serious work, I was impressed.
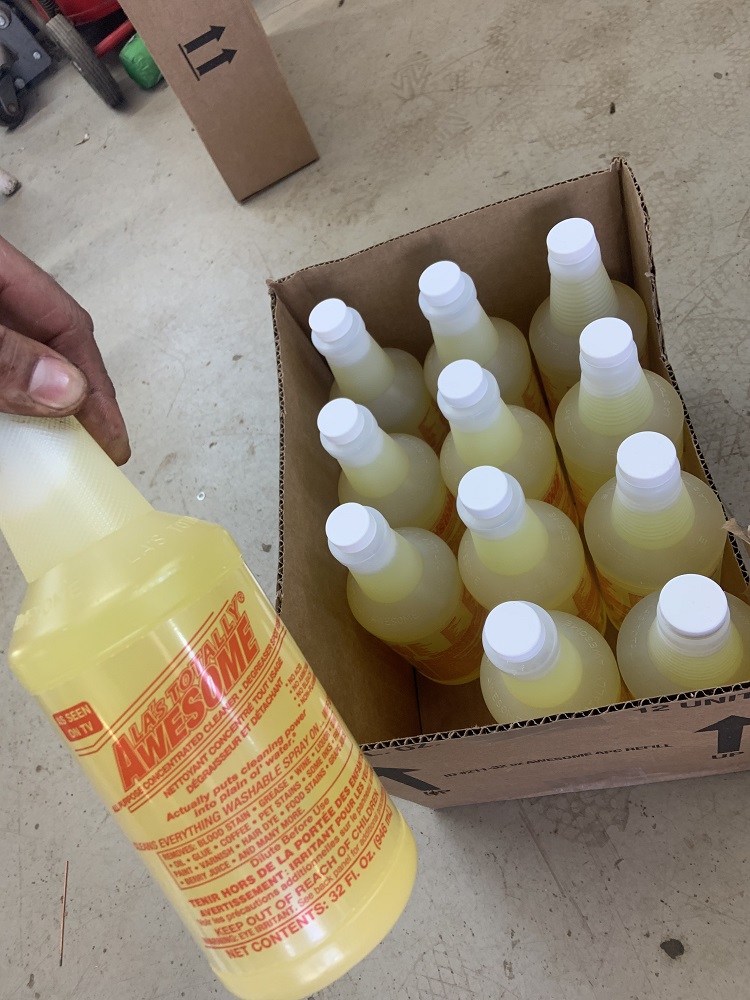
Ready to be covered.
Here they are at the halfway point where I scrubbed them with some plastic bristled brushes and really cleaned out the ring lands.
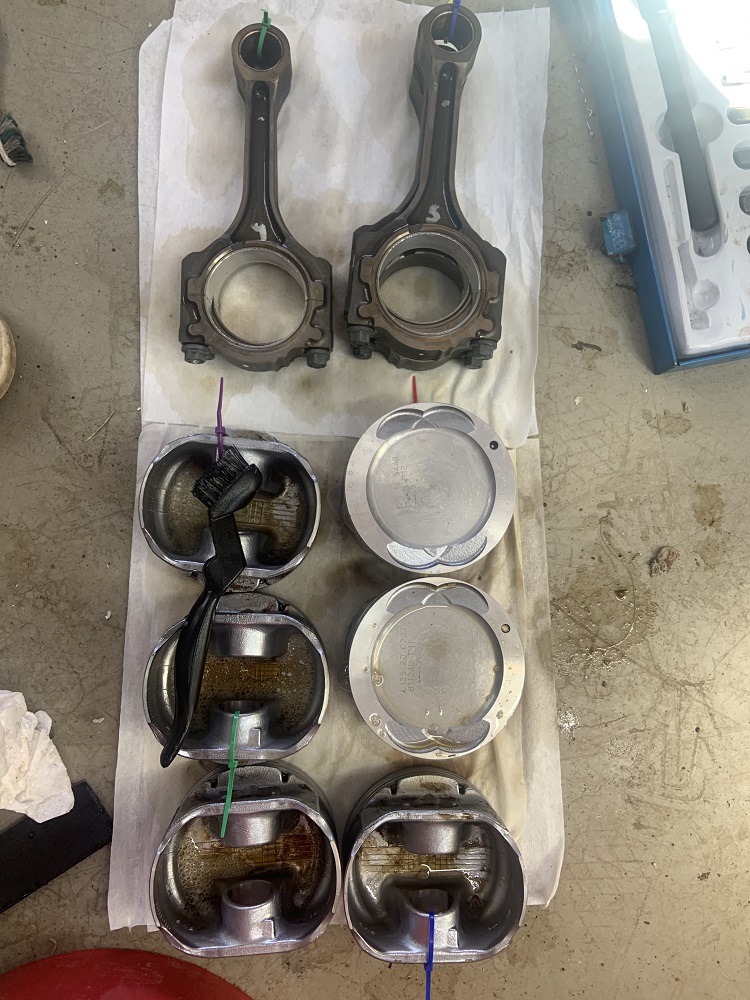
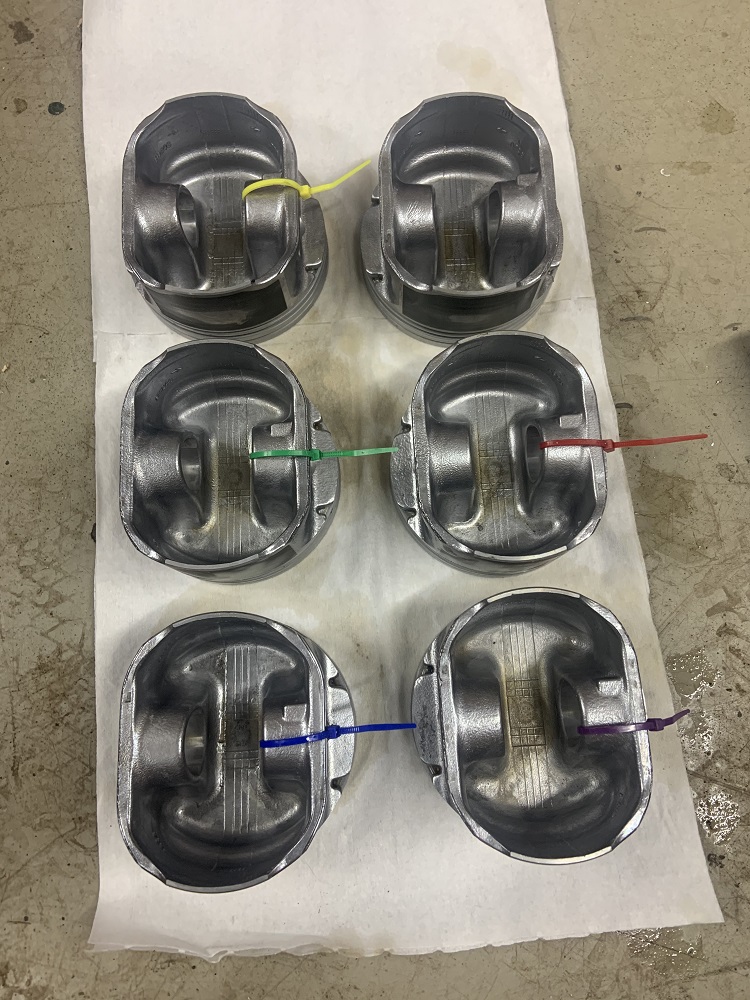
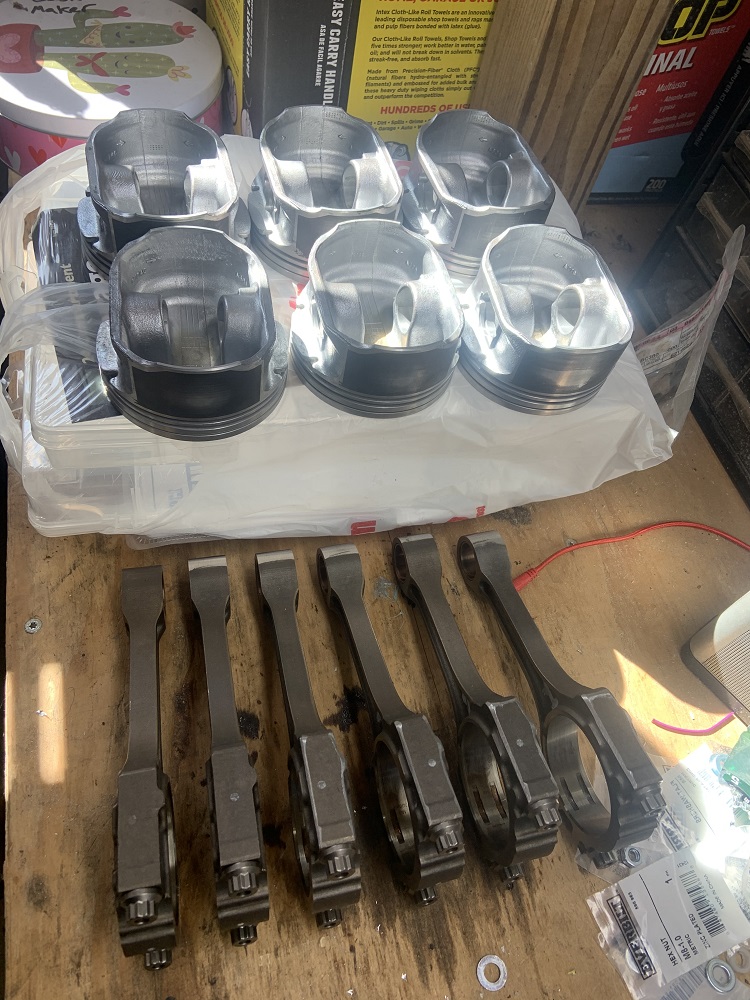
And here the pistons are nice and clean.
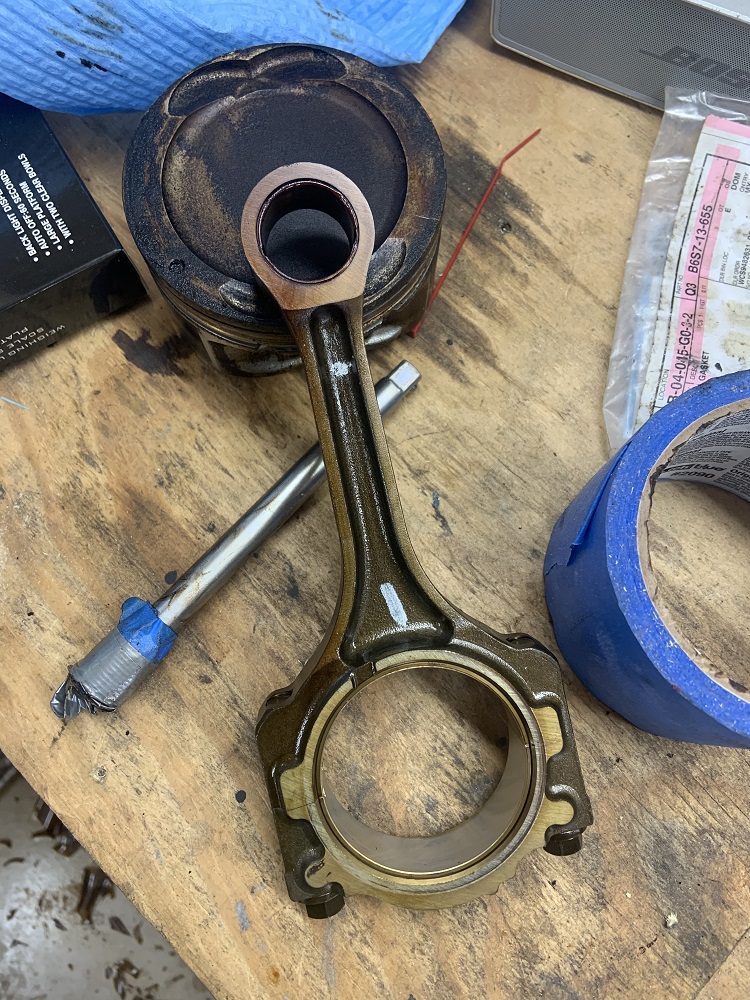
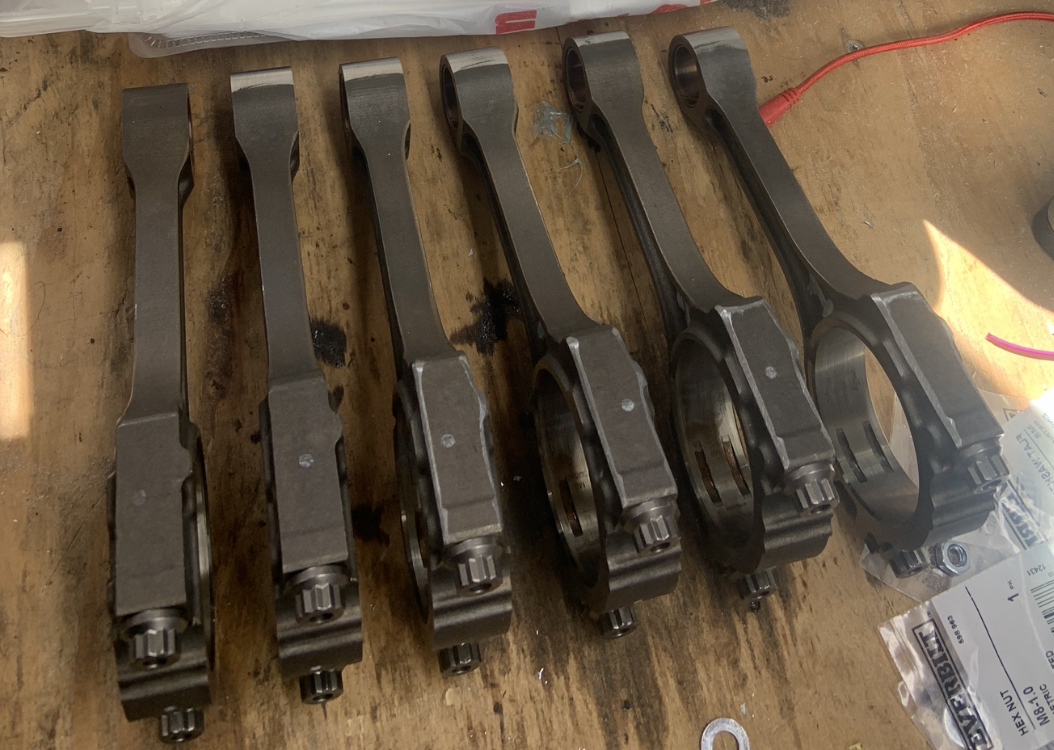
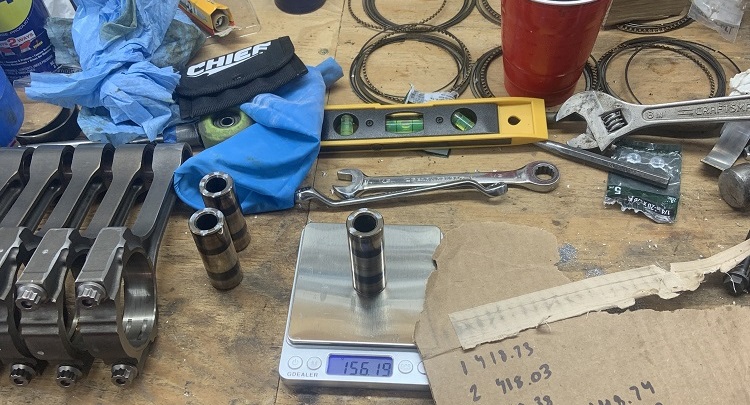
Then I put in the ARP rod bolts before starting to weigh the rods.
Here is the rod getting leveled, and I had two washers that were riding on bushings that allowed them to spin as the stops for the rod to make sure it was in the same place every time. But the rod could not be in contact with them and get an accurate measurement so I went for the smallest gap I could create.
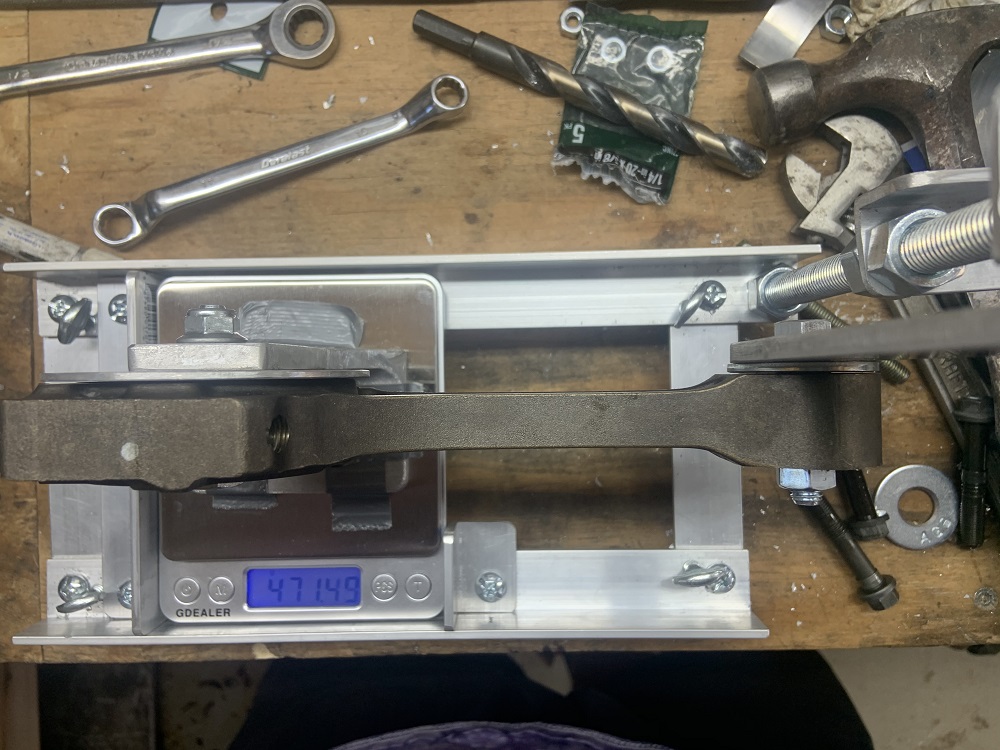
Measuring the rods went well, I asked the machine shop to tell me how close I got, because it takes some work to get the rods to measure consistently, but you get a feel for it. I was within 0.05 grams by my measurements.

Here is how the rods looked after making the small ends weigh the same and big ends weigh the same. I went and bought a belt sander to do this work.
Then I weighed the pistons and piston pins, and everything was pretty close except one piston that was a gram heavy. And then I weighed the last piston and it was 5 grams light! I couldn't take 5 grams out of every piston so I took the gram out of the one heavy piston and I am going with it. The machine shop said that it is ok, and that I would have a hard time finding a replacement piston that would be close, I would really need aftermarket pistons. They also said that because it is not the rotating mass that it has much less effect. Oh well.
The heavy piston with a gram of weight removed.

And here it is all done and ready to go to the shop.
The shop thought my project was pretty cool, I took everything to Eastwoods Machine, they had a large variety of builds. I wish I took some pics of all the different motors to post here, I will get one when I go back to pick it all up. It will probably run me close to $1000 in machine work but I think it is all worthwhile.[This message has been edited by zkhennings (edited 03-23-2021).]
|
|
|
|