
 
     |
| My DIY Sequential turn signals for under $100 (Page 3/5) |

|
liv4God
|
MAR 13, 04:00 AM
|
|
|
Thanks John and Kevin87FieroGT for the encouragement!
|
|

|
liv4God
|
MAR 13, 04:43 AM
|
|
I've had a few members asking some questions and showing interest about possibly doing this themselves, so I will post some instructions here as best as I can, so that anyone who may be interested now or in the future can have some more info. And also I can save myself time by writing it once instead of many times by PM lol 
First off though, use at your own risk! Bad things can happen when tampering with brake and turn signal lights. I am not responsible for any issues, injury, fines or whatever else could happen as a result of using this. Otherwise, have fun and make your lights cool!
What you will need:
Arduino board, I recommend the UNO for this case ($5-10 max): http://www.ebay.com/sch/i.h...Arduino+Uno&_sacat=0
Arduino relay module ($5-10): http://www.ebay.com/sch/i.h...elay+module&_sacat=0
Arduino connector wires ($5-15): http://www.ebay.com/itm/Kum...7:g:RtEAAOSwWxNYuq2c
I would recommend non China sellers, as the wait time can be a kill joy.
3 12V 4 pin relays: Any auto store should have them
Wire, 14-16 gauge should suffice (You'll want quite a bit, maybe 50-100 ft): Also sold at any auto or hardware store
I made a rough diagram of the wiring in Paint. Hopefully it is enough to explain the important wires.
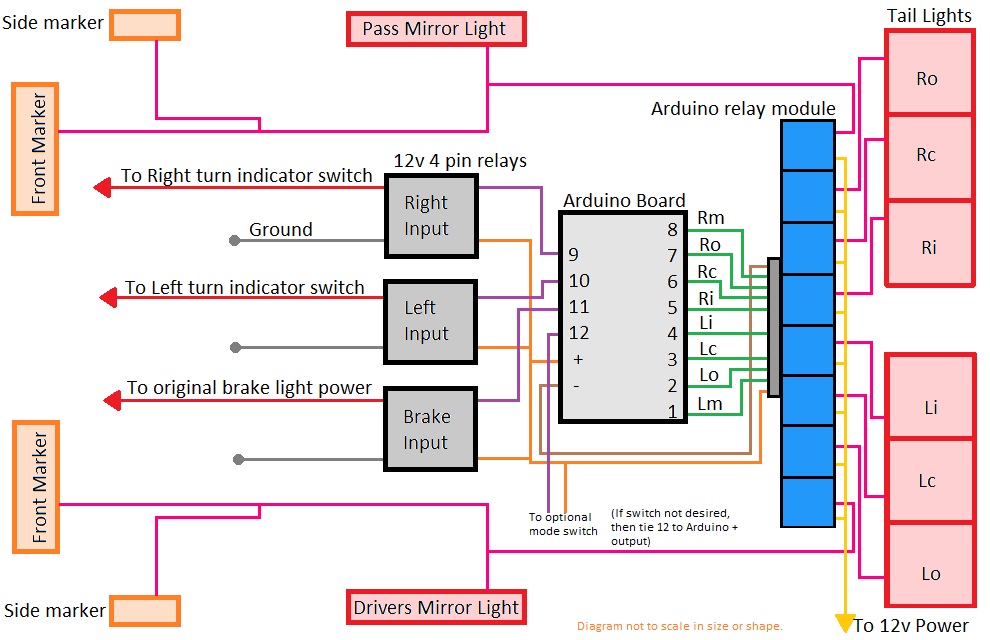
Code for the program as well as more instructions may be found in my GitHub repo here: https://github.com/jasonsaler/SequentialTL
The basics for the job are this:
1. Find the turn indicator wires under the dash.
2. Cut those and tap into the side going to the switch, cap the other side.
3. Remove the flasher unit, as well as the one for the emergency flasher and put a jumper wire in.
4. Disconnect the wire that powers the brake lights
5. Splice into the wire that goes to the third brake light.
6. Now you have your input wires for R/L turn and brake. These wires will go to the 3 12V relays
7. Connect the Arduino to the Arduino relay and to the 3 12V relays. It can be nice to make a mounting plate or box to put these in.
8. Choose a location to mount, I found the back trunk ideal so that the wires from unit to taillights are shorter. Although that does mean that the wires from the inputs have to be longer from under dash to back of the car.
9. Disconnect all the wires from the high power on the back lights, side marker and front marker lights. If this is not done then lights are still connected to each other and will ruin the sequential patter. (Note: do not disconnect the low power wires. if you turn your lights on, everything should still come on as intended, we do not mess with the running lights in any way. But turn signal and brake will do nothing at this point except 3rd brake light.)
10. Put wires from the Arduino relay to the back lights and marker lights in the place of the power wires that were disconnected in the previous step. This will require some extensive wire routing especially to the front markers, and if added a mirror marker light.
11. Add a way to power the Arduino. It is 3.5V-5V, so I found using a car USB charger a good option, especially because I can then quickly pull the USB, plug into my computer and upload another program if I ever want to change things.
That's pretty much it. The diagram will hopefully help things make better sense. I will try to get some pictures and what not for better detail.
And hopefully I didn't forget anything. It's been almost 4 years since I installed it, so there may be some things forgotten. I know its not the simplest way, but it is definitely a do-it-yourself method and really lets you do anything with your lights if you can program it.[This message has been edited by liv4God (edited 03-13-2017).]
|
|
|
|
Kevin87FieroGT
|
MAR 13, 08:10 AM
|
|
|
Great post. Very cool project. Many thank you for the parts sources and instructions. Well done!
|
|
|
|
LornesGT
|
MAR 15, 07:40 PM
|
|
|
Are the arduino learning kits the way to go for a newbie?
|
|
|
|
liv4God
|
MAR 16, 02:06 AM
|
|
| quote | Originally posted by LornesGT:
Are the arduino learning kits the way to go for a newbie? |
|
The learning kits would definitely be a good option, especially if you want to tinker, make other projects etc, since they come with a number of different modules, sensors and what not. You can do all kinds of fun stuff with Arduinos. I made an automatic sprinkler once that watered the lawn based on the moisture in the dirt instead of just a timer. That way it only watered the grass when it really needed it.
So anyway, the kit could be a lot of fun and comes with pretty much everything you will need Arduino wise, except for the relay module. However it is a little more pricy, so if you don't plan to try anything else with it you could probably be fine just getting the parts you need and then use an online tutorial to learn how to use it.
Feel free to ask me any questions too, I'm sure it can help others as well.
|
|
|
|
LornesGT
|
MAR 20, 10:30 PM
|
|
I guess it is easy to ask you than search for the answer. I appreciate the help offer.
The Aruduino has 6 inputs, can this be multiplied by say applying voltage to 2 inputs or various inputs to add a lighting mode?
|
|
|
|
liv4God
|
MAR 22, 07:42 PM
|
|
| quote | Originally posted by LornesGT:
The Aruduino has 6 inputs, can this be multiplied by say applying voltage to 2 inputs or various inputs to add a lighting mode? |
|
Yes, you can use any combo of input pins to make more options.
For example if there are only three input pins lets call them input1, input2 and input3.
You could do something like this:
code:
if(input1 == 1)
{
     if(input2 == 1)
     {
          if(input3 == 1)
               //do option 1
          else
               //do option 2
     }
     else if(input3 == 1)
          //do option 3
     else
          //do option 4
}
else if(input2 == 1)
{
     if(input3 == 1)
          //do option 5
     else
          //do option 6
}
else if(input3 == 1)
{
     //do option 7
}
else
     //do option 8
Which will give you 8 different combos from 3 inputs! Then you could use 3 toggle switches to control which inputs are high or low.
You could make up to 64 different options using 6 pins, although not recommended lol
You can also use the && operator in the if statement like:
code:
if(input1 == 1 && input2 ==1)
     //do option1
[This message has been edited by liv4God (edited 03-22-2017).]
|
|
|
|
LornesGT
|
MAR 22, 09:38 PM
|
|
Good because I really want to do something similar to this. Plan to get a Camaro this year if this new job comes about. I know they are using a different controller but I also figure it is not just one relay box because all of the separate lighting configurations.
Thanks for the help. Which tutorial do you recommend using? Are the relays noisy?
https://m.youtube.com/watch?v=tsGwPLLZRog[This message has been edited by LornesGT (edited 03-22-2017).]
|
|
|
|
liv4God
|
MAR 24, 06:34 PM
|
|
| quote | Originally posted by LornesGT:
Good because I really want to do something similar to this. Plan to get a Camaro this year if this new job comes about. I know they are using a different controller but I also figure it is not just one relay box because all of the separate lighting configurations.
Thanks for the help. Which tutorial do you recommend using? Are the relays noisy?
https://m.youtube.com/watch?v=tsGwPLLZRog
|
|
The relays are not too noisy, probably comparable to the ting-ting of the turning signal flasher. I have the Arduino and relays in the back trunk so I never hear them, but if they were inside I would assume you could hear them.
Years ago I had to use the Arduino as part of a class, so I learned there and thus never used a tutorial so I'm not sure which would be best.
The lighting in that video was pretty sweet, I'd love to see what you end up making!
|
|
|
|
liv4God
|
OCT 17, 02:34 AM
|
|
Hello all! A new update to my sequential turn signals! I added functionality for 1 tap to pass. This is where tapping on the turn signal lever once will cycle through the pattern 4 times. It's useful when changing lanes. Lots of new cars have this. Check it out in action on my video here!
[This message has been edited by liv4God (edited 10-20-2017).]
|
|
|
|