 
     |
| Kahines decklid vent install. Tips welcomed! (Page 3/5) |

|
IFLYR22
|
JUL 17, 10:17 AM
|
|
| quote | Originally posted by weloveour86se:
OK TYVM. sigh...back to hand sanding. I figured as much. Wet sanding with 200 wet/dry just to get all the flaking crap arse clear and take the red off. Then start going back with 600 then 2000 perhaps. Gonna be here awhile...
|
|
If your goal is to cut the paint to remove it quickly, why wet sand?
Hit it with 150 or 180, then move to 200 or 220, then 320 and high build primer. Then, WET 320 to 400 then base coat. Then WET 400 to 600 and clear coat.[This message has been edited by IFLYR22 (edited 07-17-2012).]
|
|
|
|
weloveour86se
|
JUL 17, 10:25 AM
|
|
| quote | Originally posted by IFLYR22:
If your goal is to cut the paint to remove it quickly, why wet sand?
Hit it with 150 or 180, then move to 200 or 220, then 320 and high build primer. Then, WET 320 to 400 then base coat. Then WET 400 to 600 and clear coat.
|
|
Sounds great! Will do. Dry sanding for the moment seems most effective. High build primer you say? Hmmm.. Honestly I'm an electrician and the most body work or painting I've ever done was on a 1:24 scale. Kinda the same but not really.
Maybe I can take a look at cutting the vent slots today. Scarey.
|
|
|
|
weloveour86se
|
JUL 17, 10:37 AM
|
|
|
High fill or high build primer huh? I'm really in over my head here. lol. Honestly I was thinking of doing most of the prep work then taking the decklid to a pro for paint. I was thinking the decklid would be a good starting point for a complete paint job. I don't have access to painting guns or booths. Just some sandpaper and a dream!
|
|
|
|
weloveour86se
|
JUL 21, 01:27 AM
|
|
1 step forward 2 steps back today.
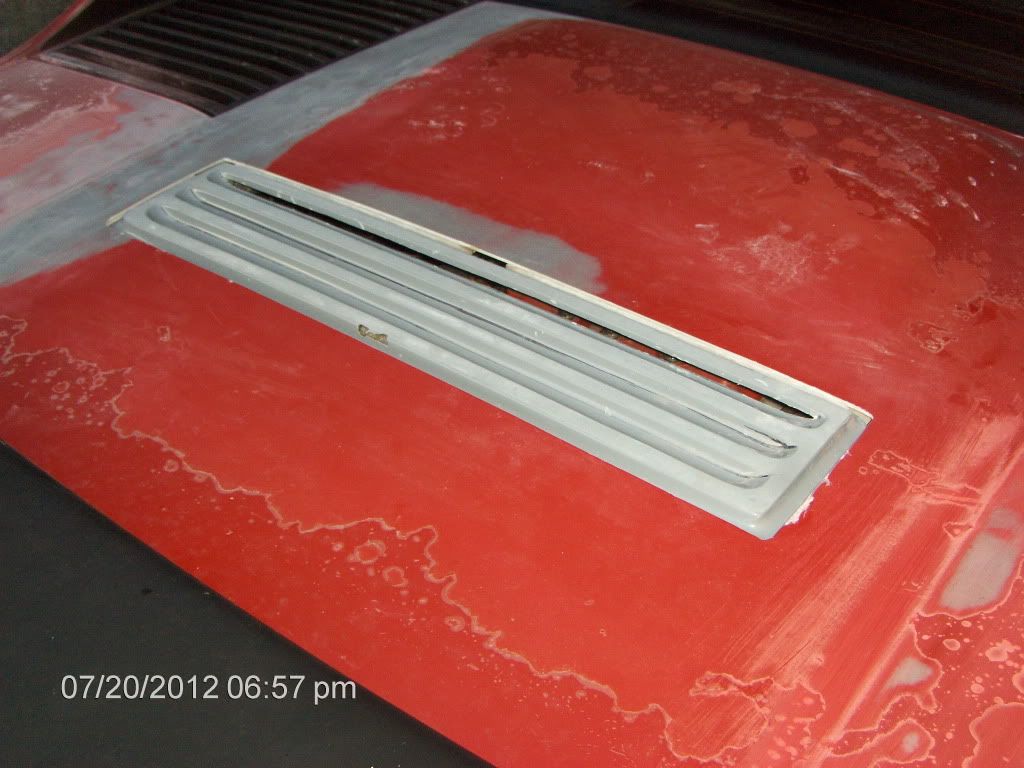
Cut the first vent. It came out nice IMO. I tried to leave more that way I can take if needed on the edges. They still need to be cleaned up.
My first concern is that the structrural qualities of the part have vastly deteriorated. If I cut the vents out on all rows the parts will be very fragile and prone to breakage. I might leave a small section of the middle vent for support. I wish I would have seen this coming because I would have left a small section unvented in the first row.
Chipped the vent. 2nd step back...Sigh.
|
|
|
|
jscott1
|
JUL 21, 05:17 PM
|
|
| quote | Originally posted by weloveour86se:
Installing Kahines decklid vent in my 86 notchie.
|
|
Subscribed. I have one of these in my parts room. Never got around to installing it. This should be interesting.
|
|
|
|
jscott1
|
JUL 21, 05:26 PM
|
|
| quote | Originally posted by weloveour86se:
Todays few precious minutes were spent measuring and drilling new holes 1" further back. It looks very nice. Might be able to go back a little bit more. The rear wing stand mounting bolts are inside the decklid and I will have to cut access holes later. We can get to that later. The key chain is from a spare decklid I had. It's a great reference. The lines have changed greatly and I personally like it very much. Might see if I can go a 1/2 in further back. The curve of the decklid there starts to concern me tho!
edit the last mock up pic is without wingstand gaskets. I have on hand 1 NIP OEM gasket just need 1 more. Might have to make my own... They are not easy to find I think.
|
|
Oh I can help you here. I moved my wingstands back as far as you can and the front bolt holes will end up over the trunk. Here's the thing, the wingstand gaskets I had were not a good fit and allowed rainwater into my trunk. Make sure the gaskets fit perfectly or put silicone into the bolt holes or else everything in your trunk will be ruined.
|
|
|
|
weloveour86se
|
JUL 22, 10:53 AM
|
|
| quote | Originally posted by jscott1:
Oh I can help you here. I moved my wingstands back as far as you can and the front bolt holes will end up over the trunk. Here's the thing, the wingstand gaskets I had were not a good fit and allowed rainwater into my trunk. Make sure the gaskets fit perfectly or put silicone into the bolt holes or else everything in your trunk will be ruined. |
|
Duely noted. The thought of a trunk full of water has crossed my mind. First I will try for the best seal I can get from the stand gaskets, then I can put the caulk right to her! 
No major breakthroughs or progress yet, just boring old sanding. Sanding at the beach, bikinis walking by, must stay focused, got to warn the others.....
edit; dang typos[This message has been edited by weloveour86se (edited 07-22-2012).]
|
|
|
|
Dennis LaGrua
|
JUL 22, 08:50 PM
|
|
|
I like the vent in that location. A custom pan underneath should solve the rain problem. I am considering using this vent on my Brisa / California convertible project. ------------------
" THE BLACK PARALYZER" -87GT 3800SC Series III engine, custom ZZP /Frozen Boost Intercooler setup, 3.4" Pulley, Powerlog manifold, Northstar TB, LS1 MAF, 3" Flotech Afterburner Exhaust, Autolite 104's, MSD wires, Custom CAI, 4T65eHD w. custom axles, HP Tuners VCM Suite.
"THE COLUSSUS"
87GT - ALL OUT 3.4L Turbocharged engine, Garrett Hybrid Turbo, MSD ign., modified TH125H
" ON THE LOOSE WITHOUT THE JUICE "
|
|
|
|
weloveour86se
|
JUL 24, 09:19 PM
|
|
| quote | Originally posted by Dennis LaGrua:
I like the vent in that location. A custom pan underneath should solve the rain problem. I am considering using this vent on my Brisa / California convertible project.
|
|
Yes a custom catch pan was something I had put some thought into, drain system and all. I did get stuck driving in the rain today and all seemed well. When in motion at speeds the rear decklid mostly stayed rain free. At traffics lights is a different story though. I guess I gotta try and just not get wet till I work it out.
Todays progress was just a bunch of boring hand sanding...sigh.
|
|
|
|
weloveour86se
|
AUG 12, 11:11 PM
|
|
More boring sanding....
2 points of interest.
1. Engine noise. It has increased alot!
2. Wet weather driving. Got caught twice now in the rain. No problems thus far. I know it can't be good in the long run but it's fine for now.
Perhaps a custom catch pan could serve more then one purpose. Cut engine noise and direct water away from the engine.
|
|
|
