
 
     |
| Reviving Rodney Dickman's Fastest Window motor upgrads (Page 2/3) |

|
82-T/A [At Work]
|
JAN 31, 01:45 PM
|
|
| quote | Originally posted by theogre:
⚠️ Warning: Changing or "upgrading" the motors is often not fixing your problem when windows or other things are slow to operate. "Dead" motors are a side effect of true cause of slow operation.
Iffy wiring, switches, and window mechanical can cause slow opening closing or both. Examples:
● Not just Fiero has full power to the motors going thru the switches and anything causing resistance will slow the motor.
Burn switches etc just adds way more resistance until they die but every joint adds some resistance even when new.
Just look @ heater blower and resistor pack that often have 1 or more resistors < 1Ω, even the Highest resistor is often < 2Ω, all majorly affecting blower speed.
That's ignoring other iffy power, ground or both covered my Cave, Electric Motors
● Window Rollers, counter weight spring, and more can bind and slow operation.
Rollers shrink on the ball over time and won't roll right even when you re-lube them. Often people use wrong grease here and make problems worse.
Big spring gets rust and dirt in the coil causing binding too. Is there to counter weight the glass so the crank doesn't see a big load on the end of the arms. If that the spring fails completely, hand crank or power motor will not raise the glass for even small windows and often break other parts.
So you change to NOS GM motors or anything else and do not fix the rest then the new motors can quickly have same problems too.
Because Low volts and Mech problems can quickly "eat" the brushes and coils in the new motor because motors pulls way more Amps to do its job.
Side Note: Avoid using PW when engine off for same reason. Battery Only you get < volts @ ~ 12.6 full charge vs. Engine and thus Alt Running that putting out 14-15 volts. Because many miss that After power passes thru all connections the motor gets 0.5 to 1 volt less then battery or alt output @ best.
HL and other heavy power users have same issue. Put a volt meter across HL Bulb to see this easy. If have iffy HL switches, crap grounds, etc then HL Bulbs can see 11 volt or less w/ alt pushing 14+ volts. (HL bulb plugged into the socket to read volt between black and color wires.)
|
|
Didn't want to detract from the main post, but this is some excellent advice. I remember my windows going up MUCH, MUCH, faster than they do now. Ignoring the fact that the car has been in storage for 12 years, but from what I remember back in 1996 when I got the car, to 2011 when I put it in storage.
|
|
|
|
George P Wood
|
FEB 01, 12:13 AM
|
|
I installed this.
Works great.
|
|
|
|
Quad GT
|
FEB 01, 04:11 PM
|
|
|
|
|
Trinten
|
MAR 06, 12:03 PM
|
|
I am expecting the wiring pigtails to show up in the next few weeks, so I bought a part for my drill press to open up the shaft hole on the back of the adapter plate for the side that will be using the Chinese motors.
Yesterday I went ahead and modified 5 of the adapters for that side. Took me longer than I had hoped, but I don't have a big enough need to invest in a bench lathe, so I will make due.
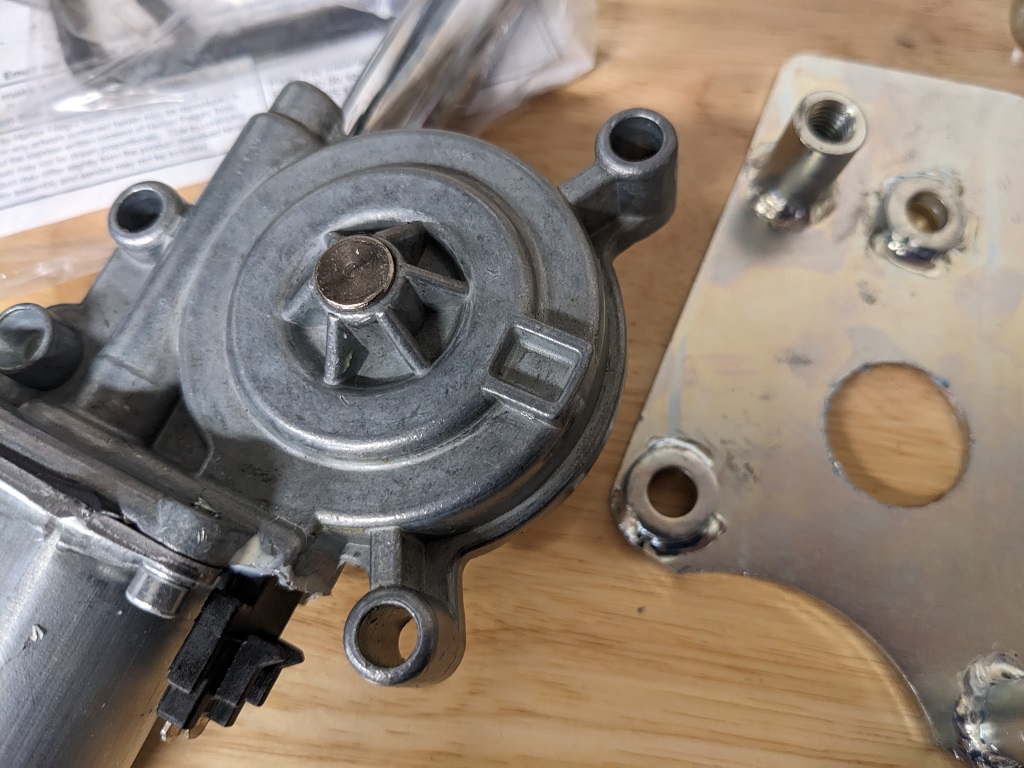
Here is the shot of the increased 'webbing' around the shaft on the back of the Chinese motors. This is what needed to be accounted for.

Here's a shot with one part way through being cut out on my drill press.
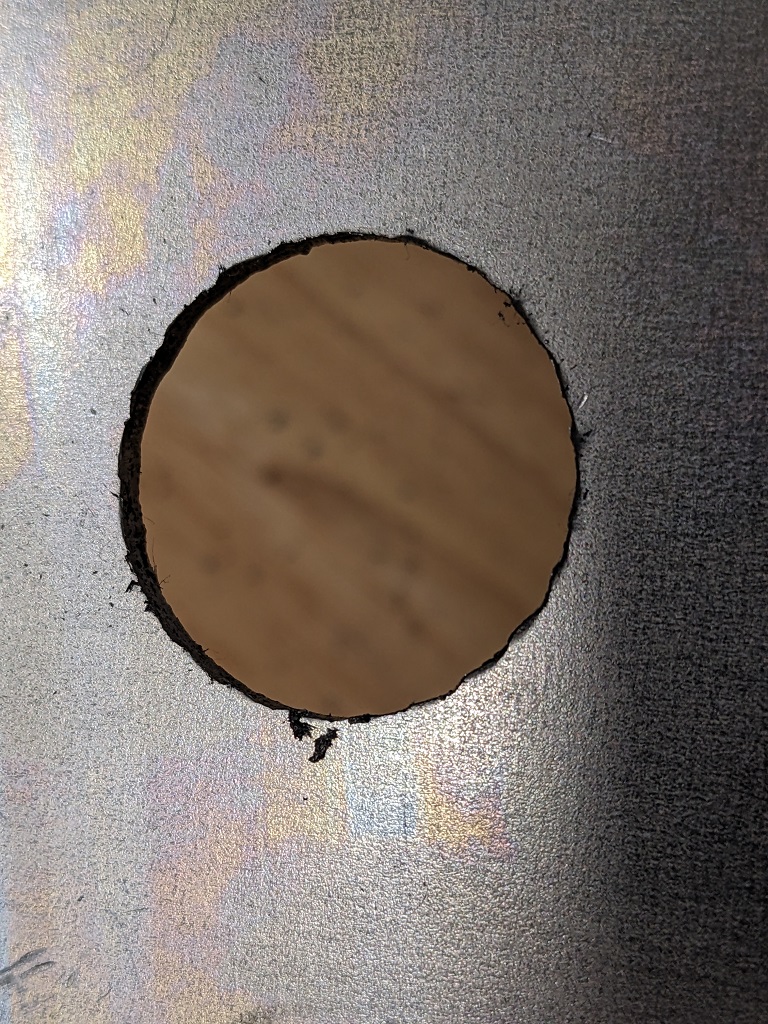
It was obviously going to have some rough edges and burrs, but I bought grinding stones just for that reason, and used them to smooth out the inside radius as well as the surface on both sides.
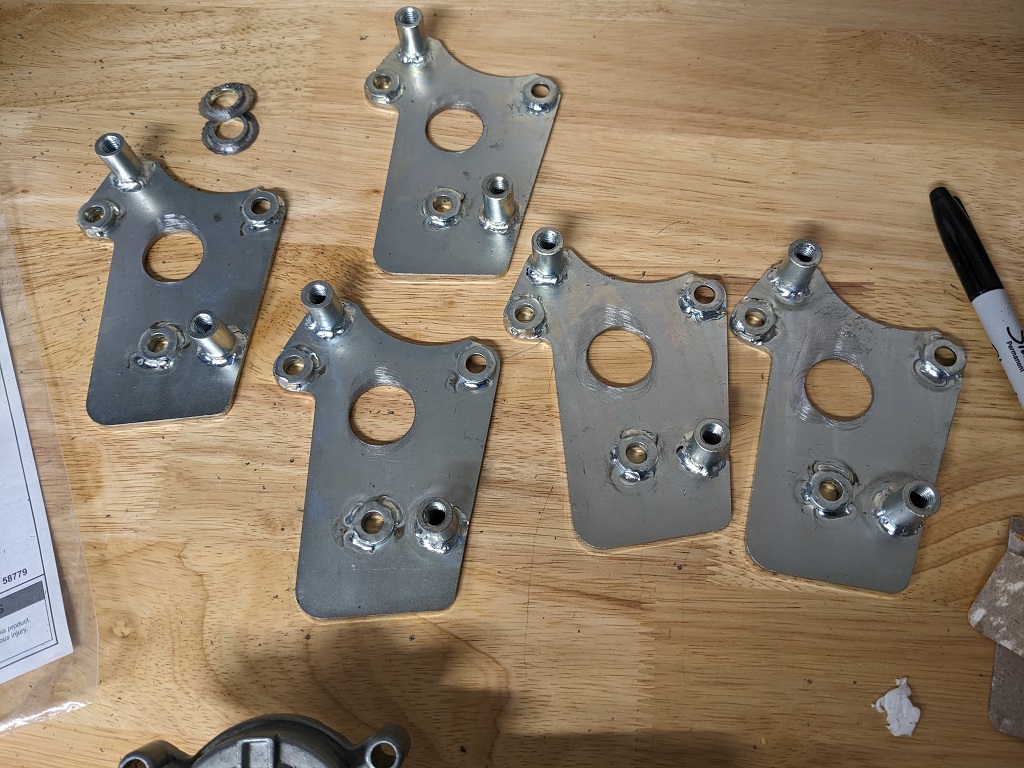
And here's a shot of the 5 of them now that they're set.
When I was reading Rodney's instructions on the website I was having a tough time following along, I hope I will understand them once I have everything in front of me. As I stumble through I will make notes and take more pictures. Because quite frankly, I often need to physically do a thing in order to learn it. And I just want to make sure that anyone who gets a kit from me is going to get all the right parts, and if they have questions, I'll be in a better position to answer them.
So I will ask Mike to let me use his car as my test bed to install a set of Rodney's adapters and go from there.
The machinist who is working on updated versions of the adapters is finished with the first set for testing. He's going to ship those to me sometime this week. I will then put the Fiero regulator I have laying around in a vice to do some test fitting and comparison to how everything mounts/measures against Rodney's design.
Once the bench setup is done, I'll use another Friends Fiero (probably one of Chugs Fieros) to install the new version of the adapter and again test everything. That will take some more time as I want to make sure everything works with both the J-nut method Rodney offered, as well as the weld-on method. And that will also let me document and ready a set of instructions for when / if I use up the stock I bought from Rodney, and need to start producing the new adapters.
I'm hoping that demand will eventually exceed the ~25 sets I can put together with Rodney's old stock adapters. I'm still exploring ways that I can reduce costs without reducing quality, some of it is where risk-reward comes in. Like with the various fasteners that are supplied, I can buy them in big-bulk and save considerably on cost-per-unit, but how long will it take me to sell 200 sets? Probably a long time. And that cost break would be offset slightly by shipping costs, so the overall reduction in retail price would have been around $20 bucks. So my out of pocket goes up and may never be recovered.
All that said, in order to make this a sustainable product, the price per set will need to stay at the $250 mark.
I will keep everyone posted as progress is made!
|
|
|
|
Richjk21
|
MAR 18, 01:13 PM
|
|
|
Will definitely be following this with interest.
|
|
|
|
Mike in Sydney
|
MAR 27, 12:55 AM
|
|
| quote | Originally posted by Trinten:
Here is the shot of the increased 'webbing' around the shaft on the back of the Chinese motors. This is what needed to be accounted for.
Here's a shot with one part way through being cut out on my drill press.
It was obviously going to have some rough edges and burrs, but I bought grinding stones just for that reason, and used them to smooth out the inside radius as well as the surface on both sides.
|
|
Our of curiosity, have you considered an HSS step drill. It would probably give you a cleaner cut and eliminate / reduce the grinding to smooth the rough edges. Also, if you're modifying an existing hole, the conical point is somewhat self-centering.
|
|
|
|
Trinten
|
MAR 27, 08:48 AM
|
|
Hi Mike,
I hadn't considered that. I appreciate the suggestion. I would need to either find a bit that has a steep angle to it's step, or figure out something else for holding the adapters in place. If there's too much travel before the diameter of the bit gets to where I need it to be, it'll drill through my drill press vise. 
On an update side of things, I received the first set of adapters from the machinist. Unfortunately there was an oversight caused by "I assumed..." on both of us. He said it was an easy fix that he could apply to that set, and incorporate into future sets. So I shipped them back along with a set of Rodney's adapters and a motor (all stuff he had before), and four of the spacers I've bought for this latest generation of adapters. It was a good learning opportunity for me when working with a remote supplier on something that is sneaky in it's complexity.
The pigtails should be here by mid-April now, assuming no delays or issues with customs/shipping. Next weekend I'm going to bust out the tap set and start tapping the motor mount channels and level-grinding the required areas. Given that Rodney supplied me with multiple jigs to do this part of the work, I suspect this is where he invested quite a bit of time as well.
|
|
|
|
Trinten
|
APR 02, 03:23 PM
|
|
Small update.
I started tapping the threads into the Chinese-side motors today. It's my first time doing this, so a bit of a learning curve.
Rodney had supplied me with the various jigs he used to prepare the adapters and motors, and they are all very clever. The one for this task holds the motor, centering it by the 'driveshaft' and a supporting collar, with a locking arm on top to clamp it into place.
I was worried about making sure the tap was square, and a quick internet search turned up the tactic of using a drill press (turning the chuck hand of course) to start the threads then moving to driving it by hand. This part went easy enough. The issue came in when moving to the hand driver.
The hand driver for the tap is a compression style sleeve/collar setup. So the sleeve has small vertical cuts in it to allow the sleeve to open up to accept the larger taps, and clamp down for smaller ones, based on how far you can tighten down the collar.
The downside is, the inside of the sleeve is otherwise still completely round/smooth. The taps all have a square head on them. The cuts in the sleeve are not big enough to 'bite' the corners of the tap head. No matter how hard I tightened down that sleeve (to the point I tried pliers for extra leverage, and the handle for turning the driver was flexing), it would start to spin on the tap when I was near the half-way point.
So... back to the drill press, where the chucks fingers would bite better on the tap head. This was not without it's own challenges.
1. The drill press vise I have is not big enough to let me orientate it and the jig to get to all three of the holes. So one of them I do in the vise, the others I have to lower the tray of the drill press and set the jig on top of the vise.
2. The learning curve of how much pressure to put down on the drill press arm, and how often you have to counter-turn the tap to clear out the threads, and how often you should add Tap Magic. A few times I was worried my tap was already getting dull, but turned out I was either putting too much or not enough pressure on the arm.
3. Turning the chuck by hand to drive the tap takes an annoying toll. It's a great forearm workout, but have some blisters and blood blisters. I probably should have put on padded gloves or something when my hands started to hurt (I just had on standard disposable work gloves). I thought about putting an alan key in the chuck keyway, but I decided against it for now - I'm worried about marring up the keyway. I need to see if there's something out there I can put onto the chuck that engages the keyway in a solid/stable way and lets me turn it by hand.
All in all, it took me longer than I hoped to get the handful of motors tapped today, but the last one went quicker as I dialed in that turn/counter-turn and arm pressure ordeal. So I hope it'll go quicker next time. I also need to buy a shop vac or something to make it easier to clean up all these tiny aluminum shavings.
In other news, the latest revision of the next generation of adapters are on their way back to me. I'm looking forward to doing a test run with them.
The manufacturer for the pigtails reached out to me late last week to apologize that they were a little behind schedule, and they're estimating I should get my order in the last week of April or first week of May. Fingers crossed there.
One thing I realized I needed to source still were the really good crimp butt-connectors, similar to what Rodney provided. Mike showed me a clever butt connector - besides the crimp and having an overlay of clear shrink-tubing on it, it also had a small amount of a "low melting point" solder in it, so when you hit it with the lighter to seal up the shrink tube, that solder inside would melt into the strands of the wire, too. I thought that was kind of neat. So you had the twisted wire, metal crimp, and solder all working to ensure a good connection, and shrink tube to protect it![This message has been edited by Trinten (edited 04-02-2023).]
|
|
|
|
Larryinkc
|
APR 02, 05:25 PM
|
|
This tap handle should work better for you.

[URL=https://www.ebay.com/itm/165184071873?hash=item2675bce8c1:g:fBYAAOSwT7NhknWu&amdata=enc%3AAQAHAAAAwBdOVIVErz%2BxybBwdQYpb2w6x7jNn4gyWU92cFYhzqeo4VrIKOUvI27a9YGLUIeZdpRVx8xfBc9z6VXZQ2lLwS1C%2Frnmy8c%2B%2BPs7ax1oXUX%2FD8A0%2Bfyeocv%2FjB5Pi6ckZdmc1WV3Y2B HVvf1]https://www.ebay.com/itm/16...i6ckZdmc1WV3Y2BHVvf1[/URL] u9F6VY804knrc9iUtgbHq7cqJdu6GSWepjUfdL%2BOJGthB2UNbZaYI0OwwlNokk%2BcmayXLddWOBqXtiHgtjcdk%2F4laEW6Wj15rRNa946VXa7otMfl7g%3D%3D%7Ctkp%3ABk9SR7Kom73oYQ
ACE Hardware has a similar tap handle made by Irwin
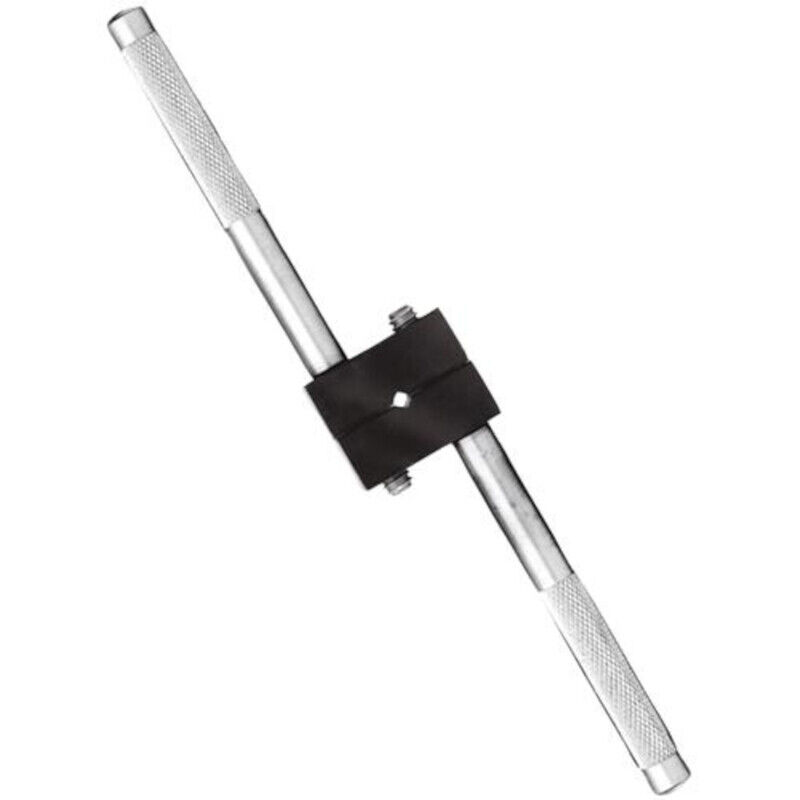
https://www.acehardware.com...ALw_wcB&gclsrc=aw.ds[This message has been edited by Larryinkc (edited 04-02-2023).]
|
|
|
|
Trinten
|
APR 02, 05:46 PM
|
|
Nice!
Thanks Larry! I will get one of those right away.
|
|
|
|