|
| Kahines decklid vent install. Tips welcomed! (Page 2/5) |

|
weloveour86se
|
JUL 09, 07:42 PM
|
|
TY lets just hope it doesn't look all ricey in the end.
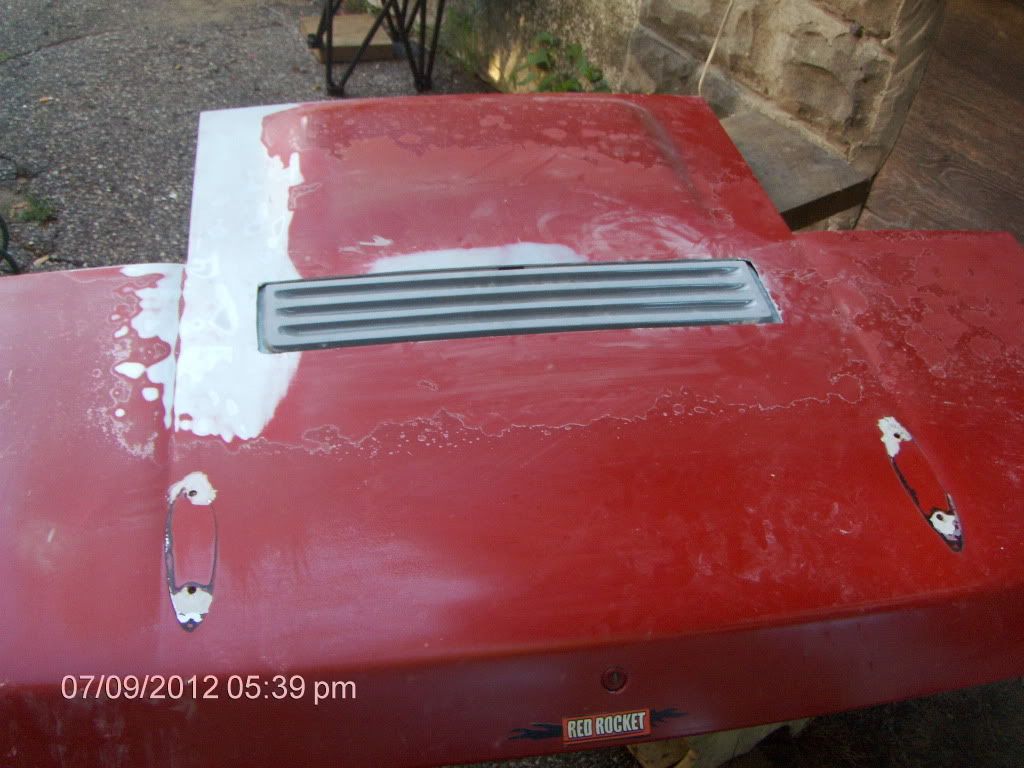
Cutting the vents....oh boy that is gonna be nerve racking. Lines are just reference at this point.

srry edit..heres a better look at how it will be
 [This message has been edited by weloveour86se (edited 07-09-2012).]
|
|
|
|
weloveour86se
|
JUL 10, 10:52 PM
|
|
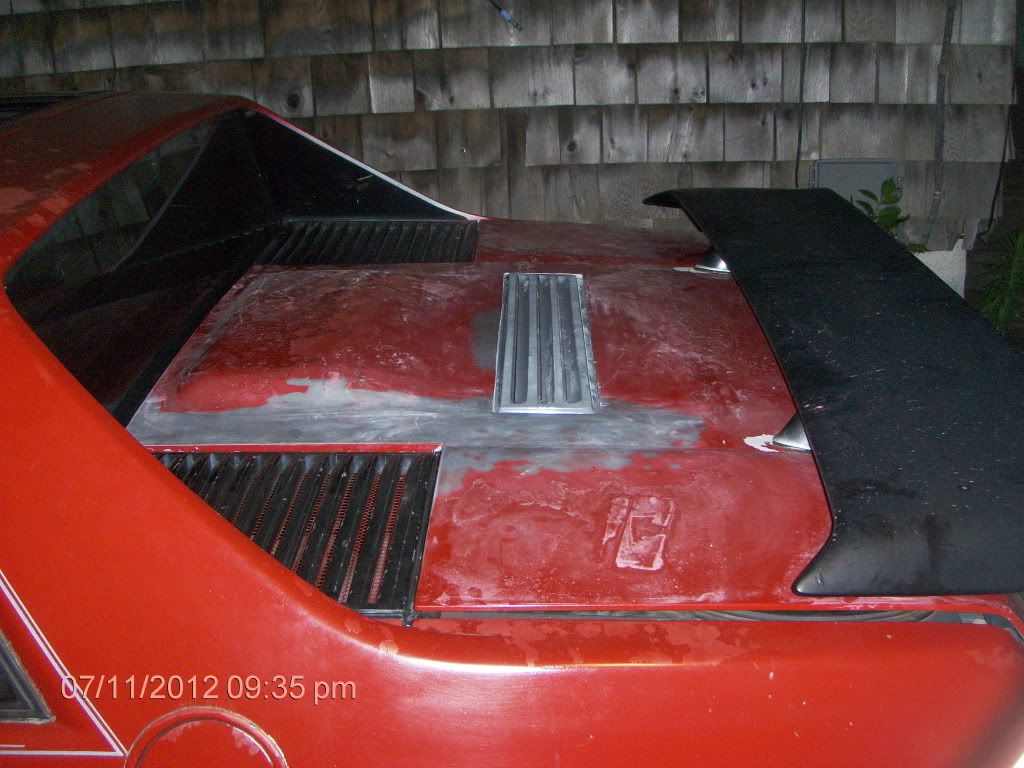
Todays few precious minutes were spent measuring and drilling new holes 1" further back. It looks very nice. Might be able to go back a little bit more. The rear wing stand mounting bolts are inside the decklid and I will have to cut access holes later. We can get to that later. The key chain is from a spare decklid I had. It's a great reference. The lines have changed greatly and I personally like it very much. Might see if I can go a 1/2 in further back. The curve of the decklid there starts to concern me tho!


I like it and in the end I guess thats all that matters. My only concern is all the reading about filling the holes and how bad some have turned out scares me!
edit the last mock up pic is without wingstand gaskets. I have on hand 1 NIP OEM gasket just need 1 more. Might have to make my own... They are not easy to find I think.[This message has been edited by weloveour86se (edited 07-10-2012).]
|
|
|
|
Australian
|
JUL 11, 07:14 AM
|
|
|
My tip would be not just glass or bondo it into place. Use nuts and bolts as well or rivots so it expands and contracts together better when hot and cold.
|
|
|
|
weloveour86se
|
JUL 11, 09:53 AM
|
|
| quote | Originally posted by Australian:
My tip would be not just glass or bondo it into place. Use nuts and bolts as well or rivots so it expands and contracts together better when hot and cold. |
|
Thats kinda what I been thinking about exzactly. Plus I think the edges look good, if I can mimic the factory lines. I don't think I want to glass the seams smooth on the outside. I want those edges.
edit oops forgot to say TY Aussie if i may...[This message has been edited by weloveour86se (edited 07-11-2012).]
|
|
|
|
weloveour86se
|
JUL 11, 10:58 PM
|
|
|
|
|
weloveour86se
|
JUL 12, 12:48 AM
|
|
Man my photo editing skills chomp a hog... Finally, peep this edited pic. My puter bites and photobucket bogs it down.

The left hand green mark shows how the lines are more even now. Those two corners line up better now. The right hand green line shows the trailing edge of the wing better. If you stand where you typically would with your key and look down the lines are perfect IMHO! The trailing edge of the wing lines up exzactly with the top edge of the tail lights! This wing movement has made a HUGH difference in the look of the decklid! It Looks great IMO.
|
|
|
|
weloveour86se
|
JUL 16, 10:30 AM
|
|
Man, honestly there is NO way I'm gonna wanna do all this sanding by hand! Dreaded PO and his cursed crappy VIP Discount Auto Parts store spray paint cans...
What kind of sander would be ideal? A DA? Electric or pnuematic? I don't own a compressor, I do own extension cords though.
TYVM for any and all advice!
|
|
|
|
87antuzzi
|
JUL 16, 11:24 AM
|
|
|
you're gonna wanna sand it by hand, one direction and dont switch. If tasteful body mods could be done over night with nothing but power tools everyone would have a 1 off car. Careful how hard you press when doing it by hand as I have seen "straight" bodys show finger marks where people press to hard when hand sanding. You are playing on a surface that has multiple curves so taking it down to SMC can be done in the blink of an eye and you will be pissed when that happens. Avoid bondo if you can. Also, there is no need to go down to factory primer, just take off the rattle can paint and the clear on the factory paint and throw some primer. When you start hitting black and yellow you've gone way to far. At this point high build primer is gonna be your friend.
|
|
|
|
weloveour86se
|
JUL 16, 12:56 PM
|
|
| quote | Originally posted by 87antuzzi:
you're gonna wanna sand it by hand, one direction and dont switch. If tasteful body mods could be done over night with nothing but power tools everyone would have a 1 off car. Careful how hard you press when doing it by hand as I have seen "straight" bodys show finger marks where people press to hard when hand sanding. You are playing on a surface that has multiple curves so taking it down to SMC can be done in the blink of an eye and you will be pissed when that happens. Avoid bondo if you can. Also, there is no need to go down to factory primer, just take off the rattle can paint and the clear on the factory paint and throw some primer. When you start hitting black and yellow you've gone way to far. At this point high build primer is gonna be your friend. |
|
OK TYVM. sigh...back to hand sanding. I figured as much. Wet sanding with 200 wet/dry just to get all the flaking crap arse clear and take the red off. Then start going back with 600 then 2000 perhaps. Gonna be here awhile...
|
|
|
|
Australian
|
JUL 17, 04:30 AM
|
|
| quote | Originally posted by weloveour86se:
OK TYVM. sigh...back to hand sanding. I figured as much. Wet sanding with 200 wet/dry just to get all the flaking crap arse clear and take the red off. Then start going back with 600 then 2000 perhaps. Gonna be here awhile...
|
|
You don't need to get the red off or all the paint for that matter your trying to achieve a hard flat surface it isnt a metal car you just need good high fill primer for painting.
|
|
|