
 
     |
| mini wide body (Page 12/20) |

|
bjc 350
|
APR 30, 02:04 AM
|
|
|
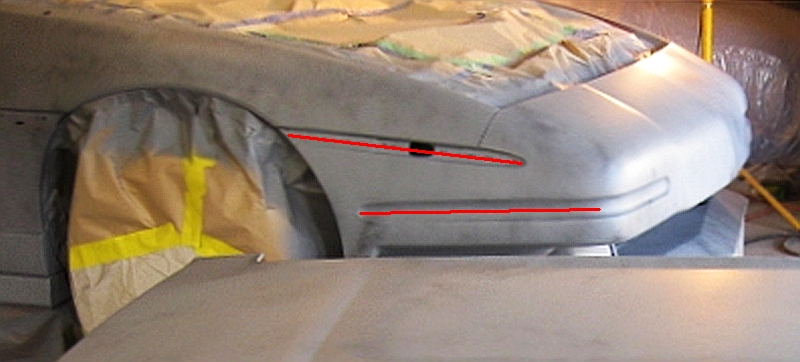
I've done a few custom facias, and each time I find something I don't like. This one will look pretty good once the grill and lights are installed. But, I would never again try to design a facia around a Prius grill that I took a liking to! What I see, now that it is nearly finish, is the wrap around indent on each side does not flow correctly with the stance of the car. It points downward as it flows along the side toward the rear of the facia. I did not realize that until after we got primer on the car. But thanks for looking and I know it's not everyone's cup of tea as I have said before.
|
|

|
Patrick
|
APR 30, 03:28 AM
|
|
| quote | Originally posted by bjc 350:
What I see, now that it is nearly finish, is the wrap around indent on each side does not flow correctly with the stance of the car.
|
|
It's interesting that you should say that, as there was something about this which caught my attention as well. Is it possible that it's these two angles that are conflicting with each other?
If so, how would it look to delete the upper one?
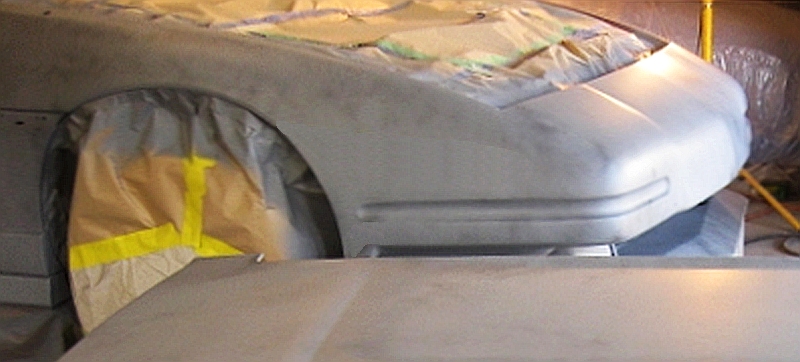
Heck, you could even relocate the front side reflector/light within the new lower channel. 
I am in no way trying to diminish what you've done with the car. It's impressive!
|
|
|
|
bjc 350
|
APR 30, 09:26 PM
|
|
Patrick , I think it is two factors. Trying to keep the factory style facia moldings accentuated the top seam. And, by my error, the lower groove points slightly downward as it trails toward the rear of the facia. Creates a bit of incongruity that, at this point, I will likely live with. When the moldings are installed, It may help. My V8 car looks better from the side profile, because we did not use the factory molding, like you are suggesting. The V8 car has a problem with the bottom platform/base angling upward at a different angle than the rake of the car. I was able to mask it to some extent by adding the lower aero valance in black "rubber base" molding! That is why real automotive designers get paid the big bucks. 

|
|
|
|
Patrick
|
APR 30, 10:06 PM
|
|
| quote | Originally posted by bjc 350:
My V8 car looks better from the side profile, because we did not use the factory molding, like you are suggesting.
|
|
Cool... I don't think I've ever seen a picture of this Fiero before.  Interesting that the front side reflector/light has also been re-located to where I thought it might be able to go. Great minds think alike! Interesting that the front side reflector/light has also been re-located to where I thought it might be able to go. Great minds think alike! 
|
|
|
|
bjc 350
|
APR 30, 10:50 PM
|
|
|
I'm hoping to install LED lights in the groove. I have purchased two different 24" sets, but neither gives a very finished look. They work as day time running lights and orange turn signal lights. Hope to find just the right ones, but so far not very good luck. They would wrap all the way around showing both from the front and the side as shown in a previous mock up.
|
|
|
|
DotTC
|
MAY 01, 02:04 PM
|
|
| quote | Originally posted by bjc 350:
I've done a few custom facias, and each time I find something I don't like. This one will look pretty good once the grill and lights are installed. But, I would never again try to design a facia around a Prius grill that I took a liking to! What I see, now that it is nearly finish, is the wrap around indent on each side does not flow correctly with the stance of the car. It points downward as it flows along the side toward the rear of the facia. I did not realize that until after we got primer on the car. But thanks for looking and I know it's not everyone's cup of tea as I have said before. |
|
I think it is what Patrick is talking about. The two different angles don't match. Overall tho, I like it.
|
|
|
|
Yorgle
|
MAY 01, 03:50 PM
|
|
|
I like it! Here's a suggestion, though- when you're making the grill, do something to visually carry the lines of the hood bulge down into the lower area.
|
|
|
|
bjc 350
|
MAY 09, 08:21 PM
|
|
|
Yorgle, I had never thought of accenting the upper hood into the lower valance area. If I ever do another one, I may try that idea. I think it would work well. Been in Vegas for a week so not a lot to report. Richard spent two partial days block sanding everything while we were gone. Today he came by and finished blocking the rear deck/spoiler area. Then he added a bit of glazing filler to some problem areas and will be back tomorrow to smooth them out. We have several areas along the front and rear moldings that need to have the lines finalized where they transition to the regular body surface. Also, the front groove in the facia needs to have the lines defined where they transition from the concave groove to the facia surface. Been hard for me to get them straight and defined. Richard will get it. Then, spot prime, sand again, and finally move on to sealer/base coat and clear. It is happening, just slower than we would like.
|
|
|
|
bjc 350
|
JUN 02, 03:08 PM
|
|
Been a while since the last post. Work has been slowed because Richard is dealing with his health issues a bit and visits from his family. Likely will see him this coming week. We have a few lines to finish up, spot prime them and finally get some color on this thing. We finalized the front molding lines on both sides. But we still have a few other lines to get right.
Passenger side looks good, but concave area just below the front point of molding needs to be straightened a bit.
_1.jpg)
Driver side good to go except for spot priming.
.jpg)
Both rear quarter side marker moldings need the upper fender extended slightly downward to close the excess gap
.jpg)
_1.jpg)
This molding line behind driver door needs to be straightened. Slight rise just past halfway.
.jpg)
Couple pictures of infamous rear lighting panel with recessed LED backup lights added. Very close to final here, just need to add those six Caddy tail lights!
.jpg)
.jpg)
|
|
|
|
bjc 350
|
JUN 20, 02:03 PM
|
|
Finally finished the rear lighting panel to our liking. That is the good news. Not so good, is that Richard who has really been doing the final detail work before paint, has had to head back to California to see his medical specialist. His health is more important than getting the car finished, by far! Not sure how long he will be gone. I may try to clean up the final lines and spot prime while he is away. Not real confident about the base coat clear coat painting though. I've only really done single stage paints before, with just OK results.
Anyway, pictures of finished lighting panel: 1 1/2" lights in center are LED backup lighting.
.jpg)
.jpg)
.jpg)
|
|
|
|