Edit to add: Whatever pump you get make sure it has a metal impeller. The plastic impellers fail prematurely in Fiero applications.
I just did this Tuesday, though not hard it is tedious.
First, drain the system by removing the hex socket plug in the passenger side coolant tube, it takes a 3/16" hex bit. This will remove most coolant from the block but you will still have a pint or so come out when you pull the lower left big bolt out of the water pump.
While it is not absolutely neccessary to remove the wheel and wheel liner to do this, it is easier to access parts of the gasket surface for scraping/cleaning through the wheel well.
To make things easier remove the battery and battery shield. Disconnect the ground wire that is on the battery tray next to the screw holding the battery shield in place. Now is a good time to clean this ground, BTW. Disconnect the wiring at the power distribution block next to the C-500 connector and then remove and separate the C-500 connector. Flip all wiring back up over the motor. This gives you an unobstructed view and access to the water pump. Up to now you're about 15 minutes into the repair. Remove the double vacuum line from the EGR solenoid, unbolt and disconnect the solenoid and flip it back out of the way. Remove the EGR bracket and wiring harness support. Remove the two nuts holding the wiring shield to the lower right of the water pump. Loosen and remove the four bolts holding the water pump pulley in place. There is no need to loosen the alternator belt. Once the four pulley bolts are out tap the back of the pulley and it will pop off the front of the pulley. Set it out of the way and move the belt out of the way.
Now you're ready to attack the water pump bolts. Here's a pic of what it will look like:

As you remove each bolt place it into the corresponding hole in the new pump nearby. Once done use a large screwdriver in the notch between the pump and the timing cover immediately right of the rightmost upper alternator bracket. Twist the driver in this cap to pry the water pump loose. Warning! If you put any pulling force on the timing cover it will probably pull loose from the block. At this point you will need to replace the timing cover gasket and crank seal because once the timing cover seal is broken coolant will leak into the oil and destroy the engine bearings in a few hundred feet. The replacement water pump will have instructions for fabricating a bracket to hold the timing cover in place, use it.
Once the pump is off clean all surfaces being careful not to score or scratch the aluminum. A power rotary wire brush can be used
very carefully here, but be aware that too much use will destroy the gasket sealing surface. As a final step wipe all sealing surfaces down with a good residue free solvent such as brake cleaner. Set the old pump down and transfer all of the bolts from the old pump to the new pump in their corresponding holes. This allows you to not worry about which bolts went where.
Apply a good sealer to both sides of the gasket very sparingly and spread evenly. Stick the gasket to the water pump first and then the pump/gasket assembly to the block. Make sure your bolt threads are clean and rust-free. On my Formula the only bolt that extended into the water jacket was the large lower left bolt, you can inspect yours to see if it's different. Any holes that extend into the water jacket require that the bolt have a liberal amount of RTV on the end to seal the bolt threads. All other bolts should have a very light coating of engine oil. The small bolts going into the timing cover itself should have a thin coat of anti-seize to prevent electrolytic corrosion.
Here are the torque specifications:
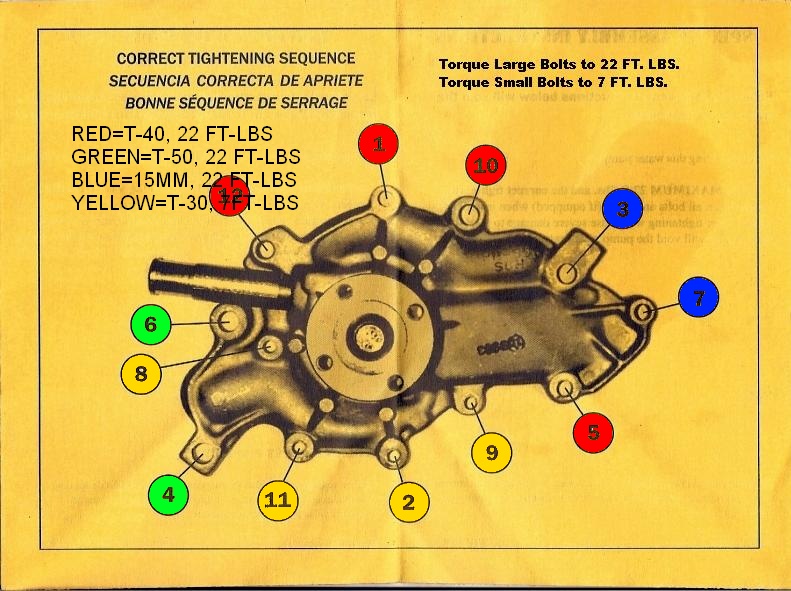
Keep in mind that with anti-seize on the bolts into aluminum the torque specification should not be exceeded at all since the anti-seize reduced friction and allows the bolt to be tightened much tighter for a given amount of torque reading.
Once the pump is reinstalled and torqued assembly is the reverse of disassembly. Put the alternator belt back on the alternator and put the water pump pulley inside the belt. Move the pulley over the mounting plate and get the top bolt started and turned in a few turns. Once done turn the pulley and get the next bolt started. Repeat. The last bolt will be hard, but once you turn the pulley so that the first bolt is pointed direclty at the alternator then the last bolt will go in. Tighten the bolts evenly and carefully and the pulley will seat on the mounting flange. This way you don't have to adjust the alternator at all.
Finish reassembling the electrical, taking time to clean the power distribution terminals and ground points.
Allow the RTV to cure for an hour or two before installing new coolant. Fill and burp the system per instructions published elsewhere on the forum. Look for leaks.
That about covers the basics, hope this makes sense.
JazzMan


