Pennock's Fiero Forum
  FAQs & HowTos
  Fuel Pump Replacement How-To (56K beware) (Page 1)

Post New Topic  Post A Reply
Email This Page to Someone! | Printable Version

This topic is 2 pages long:  1   2 
Previous Page | Next Page
next newest topic | next oldest topic
Fuel Pump Replacement How-To (56K beware) by Brocephus
Started on: 12-02-2008 11:59 PM
Replies: 50 (14247 views)
Last post by: richard in nc on 07-09-2023 08:41 AM
Brocephus
Member
Posts: 617
From: Franklin, NY, USA
Registered: Mar 2006


Feedback score: N/A
Leave feedback


Total ratings: 63
Rate this member

Report this Post12-02-2008 11:59 PM Click Here to See the Profile for BrocephusSend a Private Message to BrocephusEdit/Delete MessageReply w/QuoteDirect Link to This Post
Ok, this is somewhat of a continuation thread that finishes telling the tale of how I fixed the problems I was experiencing with my stock '84 4-spd. But I decided to create a new thread so as to make it more compatible with the search function. Now, on with the show.


My engine was cutting out and missing badly. When under a load and the gas pedal on the floor, the rpms would flatten out at roughly 3000 and without careful manipulation of the throttle, it would go no higher. I changed all vacuum lines, tested all sensors, removed and thoroughly cleaned the intake manifold and changed the intake manifold gasket (it was sucking air). I changed the throttle body mounting gasket while I had it off to eliminate it as a source of vacuum leakage. I swapped the distributor for a known good one. I swapped out all sensors with known good ones. I reset the timing and double checked it countless times. I performed a compression test. I did a vacuum test. I tested the output of my alternator and verified battery voltage. Everything was in great condition but the engine ran like complete garbage. I even hired a priest, a rabbi and two voodoo masters and all I ended up with was a fondled Fiero with a kosher miss and a shrunken head. Nothing I did seemed to work and I was quickly becoming frustrated until I posted here and Frizlefrak reminded me to be a troubleshooter, not a trouble-guesser.....


quote
Originally posted by Frizlefrak:They need 3 things to run correctly;

1. Suitable compression
2. The correct mixture of fuel and air for a given engine speed and load.
3. A suitably strong spark delivered at the correct time.
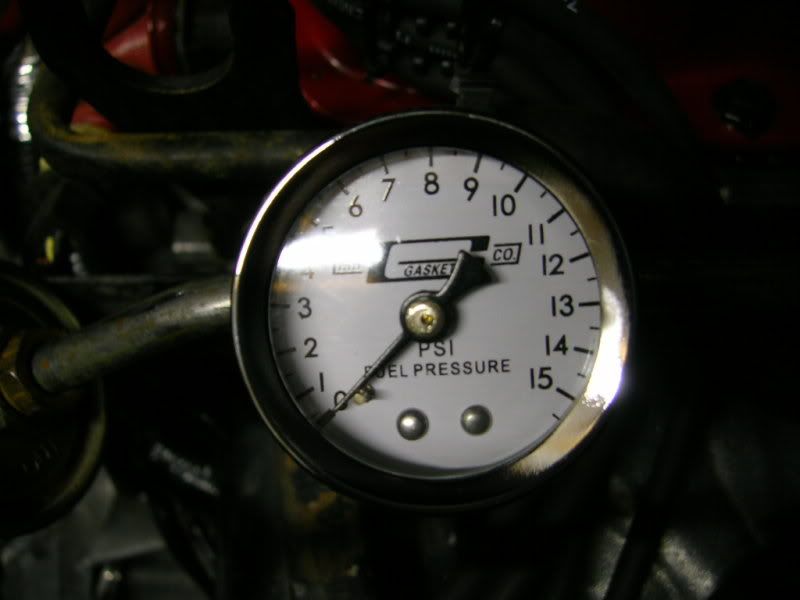
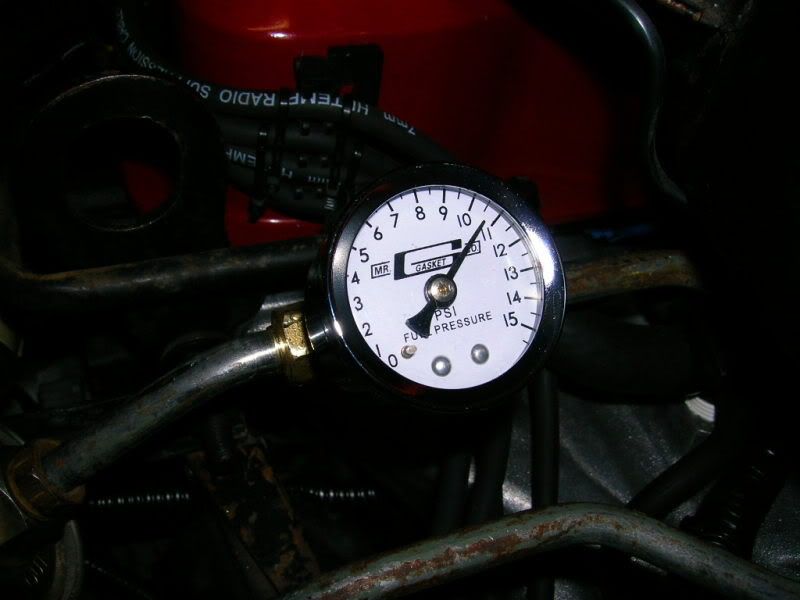

The only test I hadn't done was a fuel pressure test. Reading my gauge with the key on/engine off, it was only 4.5 psi. Engine running, it was still less than 7 psi. These cars MUST have no less than 8-13 psi fuel pressure in order to run correctly. So my hat is off to Friz and the PFF crew and my a$$ is off to the parts house and The Man Palace.


------------------------------------------------------------------------------------------


This how-to is more for complete Fiero noobs. We were all Fiero noobs at one time and the only way to ensure the heart of the Pegasus will continue to beat after us old farts are gone is to ensure the acceptance and proper mentoring of tomorrow's old farts.

Estimated time of fuel pump replacement: 2 hours (includes making coffee and recommended breaks)

Before you leave the parts house with your new fuel pump and filter screen (had to buy mine seperately as the fuel pump did not come with one), open all boxes and packages. Ensure proper fitment of the filter screen to the pump. Ensure you have the necessary O-ring, rubber hose, nuts and lock washers. Nothing worse than getting halfway through a repair and realizing you have the wrong part. Amazing how you only realize this exactly 5 minutes after the parts house closed.

Once you get back to your shop/driveway/parking lot/side of road, you need to gather some things that will make the job much more tolerable. First, a cup of coffee always makes any job more enjoyable. As if they really need be told, our European brothers should just skip the coffee and brew a pot of tea. Second, since neither coffee or tea can put out a gasoline fire, go in the kitchen and grab the ABC fire extinguisher and set it within easy reach of your car. If you have two of them, even better. Set one up close and another 15 or so feet away. Next up, comfort. Find a radio (other than the one in your car) and turn it on. Then, grab a piece of cardboard to lay on, if you can. It'll help soak up any gas you might spill and keep you from swimming in a puddle of it. Most of us will never be so lucky as to change a fuel pump on a car with little to no gas in it. Spilling a little bit is inevitable anyway because of the way the lines have to be taken apart. As for tools, in addition to the below, you'll also need a pair of pliers or Channellocks, a 10mm and a 7mm socket.


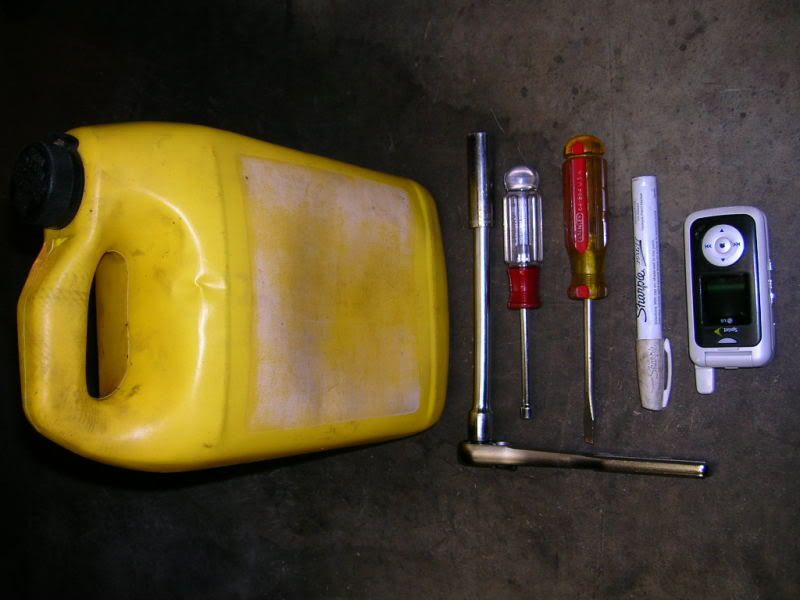
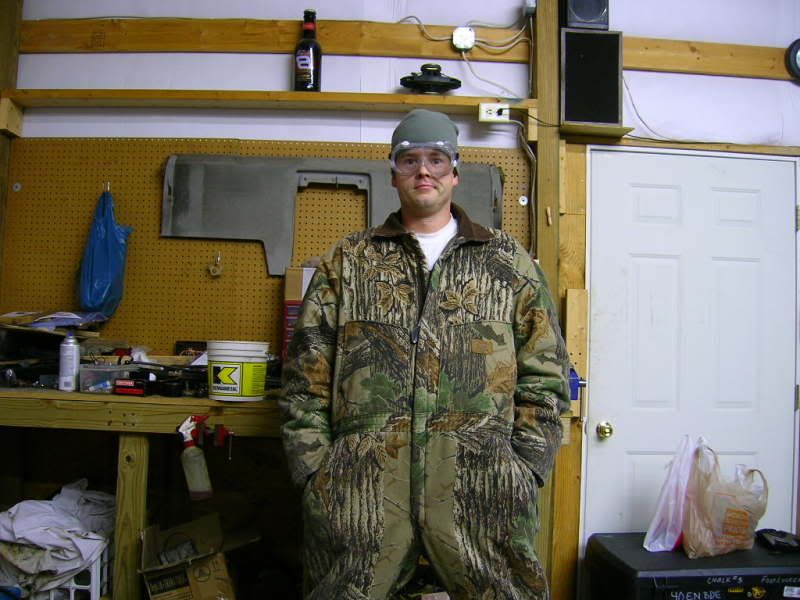
Yes, that's an empty coolant bottle and no it's not for gasoline I use it to lay my head on when working under cars. The cell phone is there for when I'm out in "The Man Palace". It's a 24'x44' insulated shop and no one will hear me scream if I do something stupid.

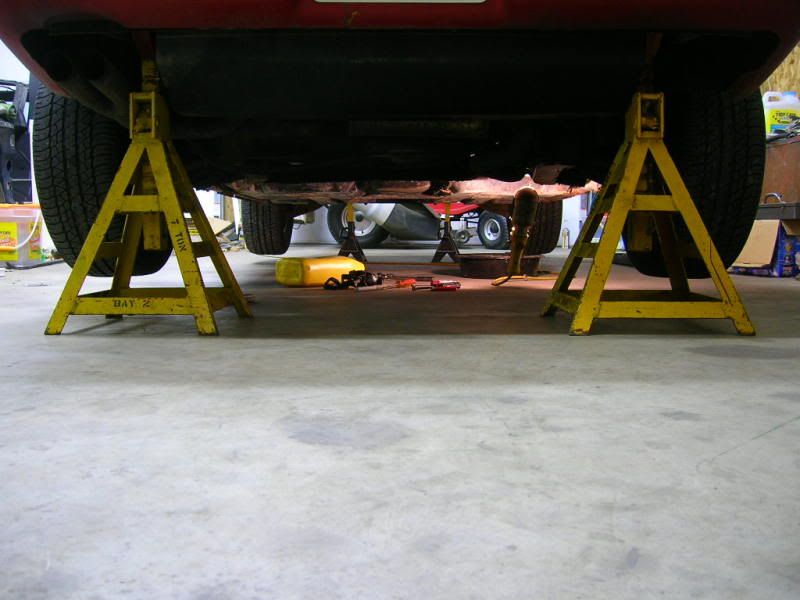
Time to get your Pegasus in the air. I lift mine front and back and put jackstands in for support. I trusted a jack to support a car for me for just a couple minutes....once. My arm was fine after a couple days, but the plastic bumper of the car had to be replaced.


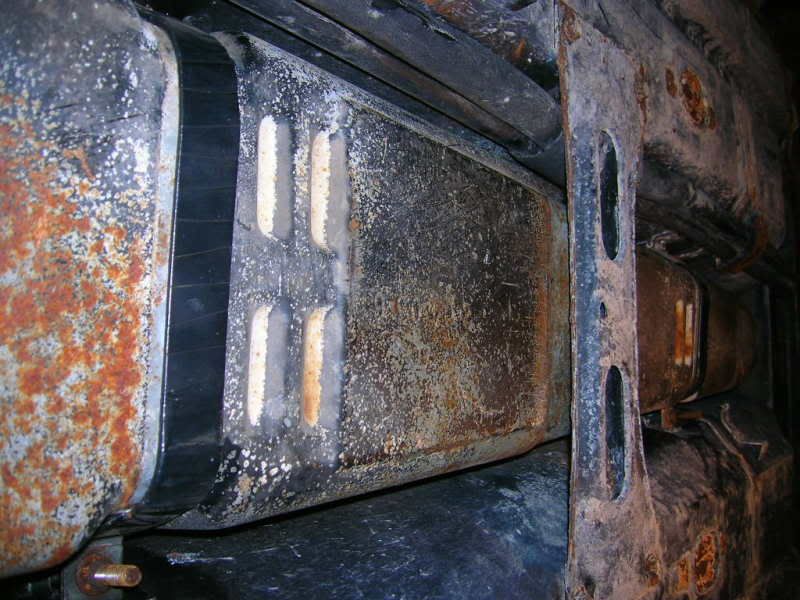
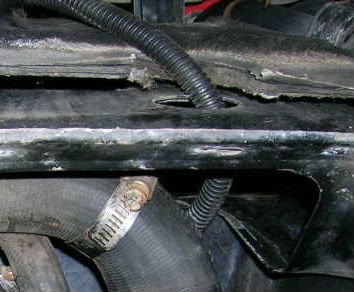
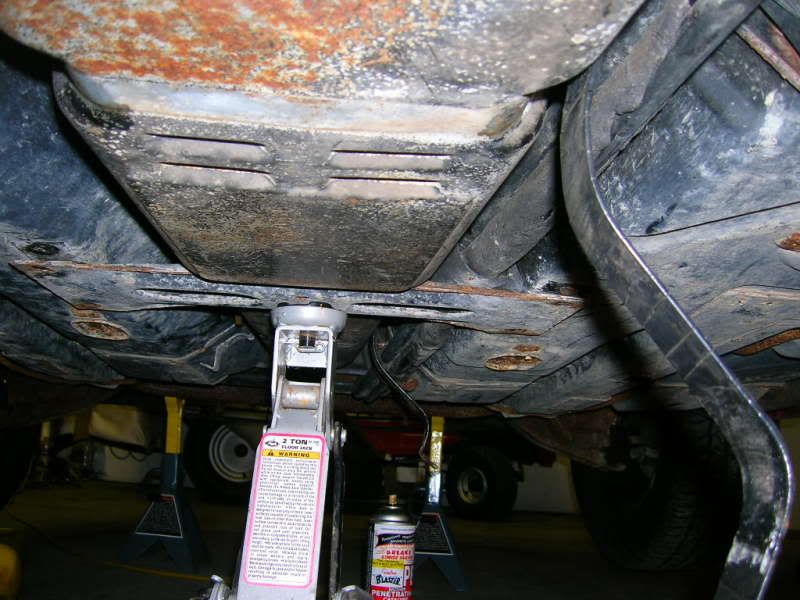
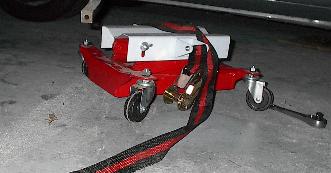
Ok, it's in the air you're underneath it. Let's see what you're lookin' at. Looking from rear to front, you should something similar to this. That crossmember with the four 13mm bolts in it, is the last thing I pull out before dropping the tank.


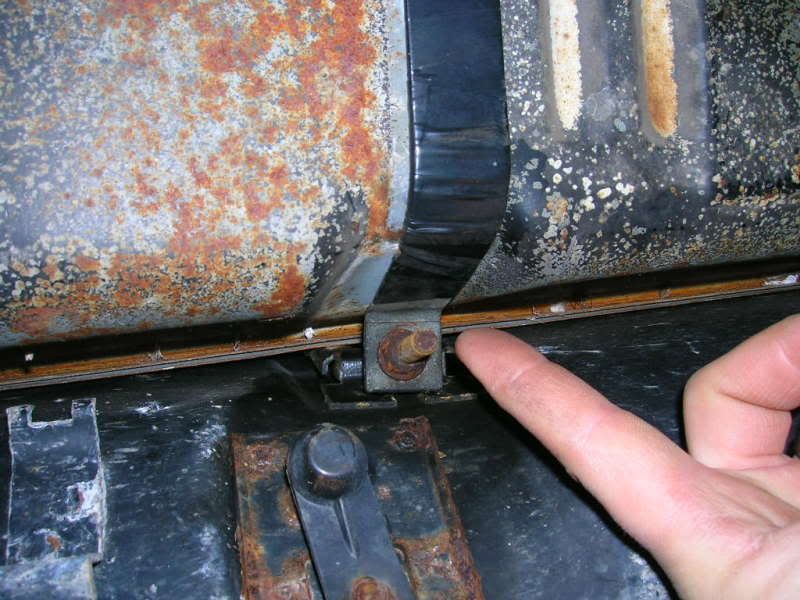
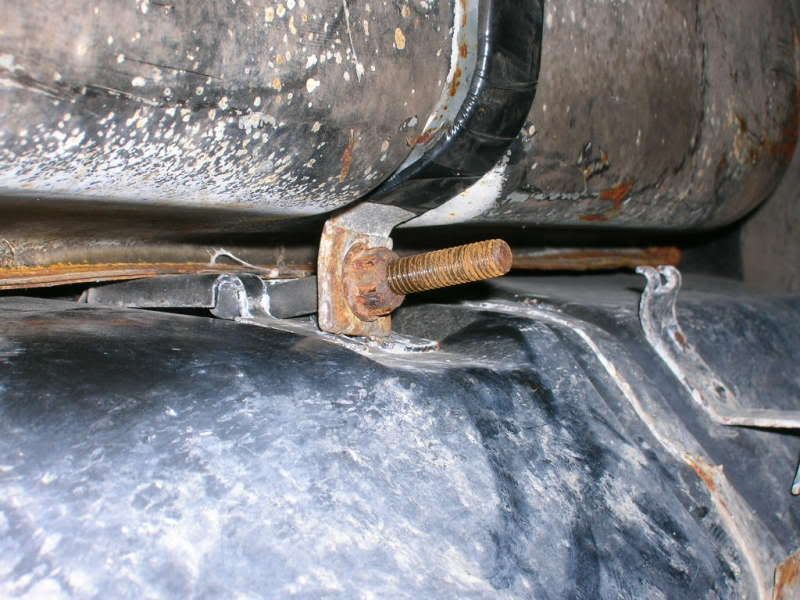
These straps are the only thing holding your fuel tank aloft. They're held in place by one 13mm nut. Don't pop 'em off of there until you've removed the rubber hoses from their fittings as you'll need the tank to sit still while you're pryin' on 'em.


One last thing, while your under the car, locate the wiring harness that runs from atop the tank, through the firewall and up the back of the passenger compartment. This will need to come out with the tank.


Now get out from under the car, gather your tools and lay 'em next to the car where you can get to 'em. Pop the engine cover and locate the fuel pump wires. Disconnect the two plugs and make sure they're not held in with any wiring harness retainer clips.


Now, dust yourself off and jump in your car. Crank the engine. It might start, it might not. What you're doing is bleeding off the remaining fuel pressure in the fuel lines. Once this is done, head to the back to the engine compartment.


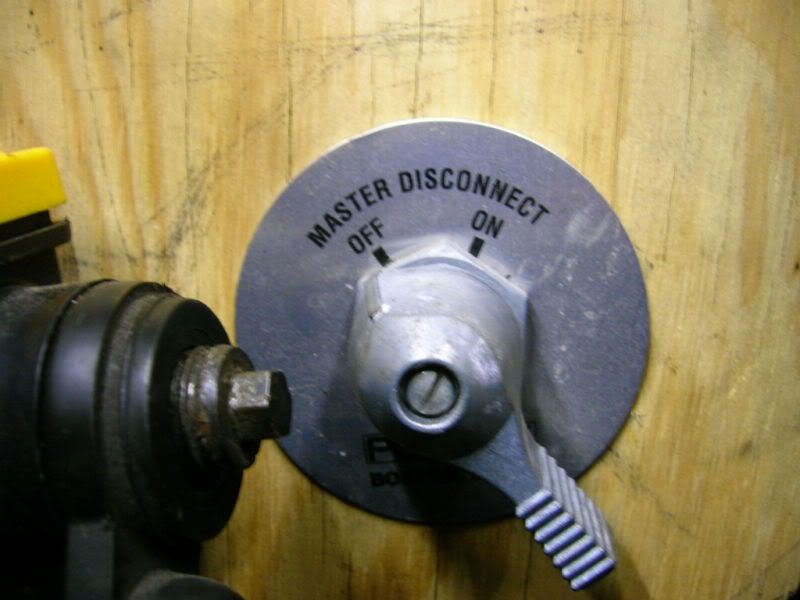
At this point, you need to disconnect the negative power cable from the battery. You're going to be messing with gasoline and let's not kid ourselves; sh!t happens. It doesn't need to happen with gasoline and you under a car. I got tired of doing this with my Fiero, so I installed a master power switch on the negative cable.


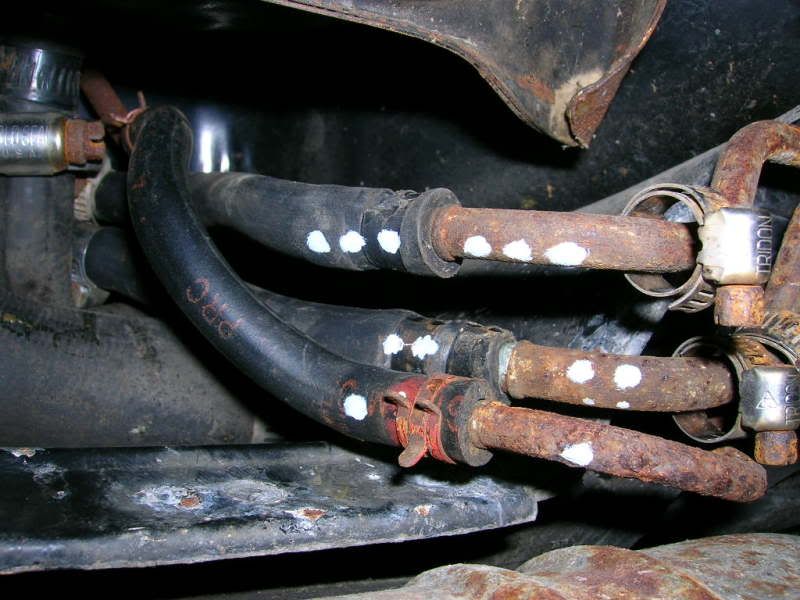
Now your ready. Among the pictured tools above was a paint pen. I marked each of my hoses with a series of dots to let me know where they came from and where they'll need to go back to.


Take a second to squirt these bolt threads with some PB Blaster, WD-40, or even 3-in-1 will work. If nothing else, pull your dipstick out and use some oil from the end of it. You'll thank yourself in about 15 minutes.


Grab a 10mm socket and take the screw out of the bracket that holds your fuel lines in place. This will make pulling the hoses off of the lines much easier.


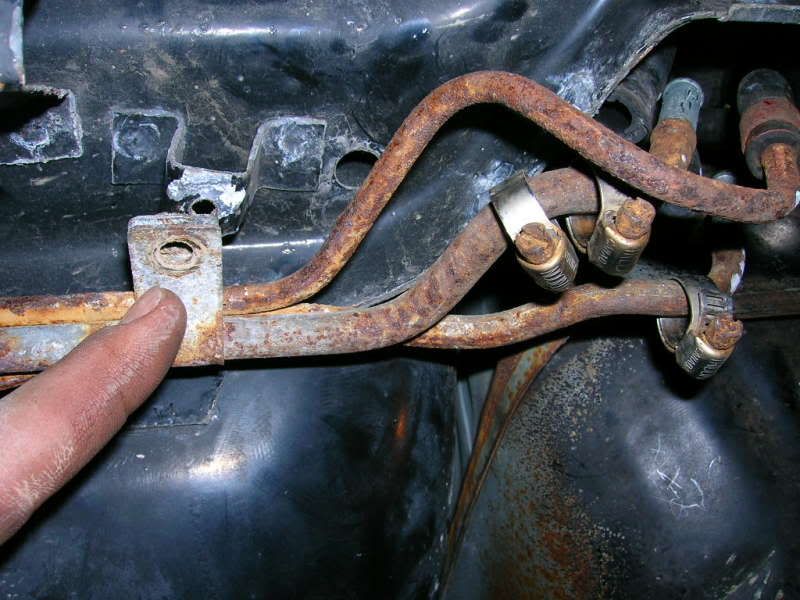
Then grab a 7mm socket and remove the bottom two screws that hold your heat shield against the firewall. Again, this will make getting to your fuel lines MUCH easier. Put a Zip-Tie through one of the screw holes and tie it around your cat (if you have one).


Grab a pair of safety glasses or if you're lucky enough to have a full face shield, that's even better. Yes, this means you. Gasoline in the eyes sucks total a$$. And for you heroes out there, working with gas with your eyes closed isn't the smartest idea either.


Begin seperating your hoses from your lines by first loosening 5 Hi-Torque hose clamps and a red, what I call, pinch ring clip. When removing the hoses from the lines, fuel WILL drip out of one or two of them. Have a drip pan or a good sized rag handy to catch the river and drips.


While you're waiting for the hoses to quit bleeding, put your jack under that crossmember under the tank. Then slide the drip pan or gas-soaked rag out of the way and remove the two nuts securing the tank straps. Once they swing down, they can be bent to stay out of the way. Don't get too carried away with the bending though as they're most likely rusty and bending them will only weaken them.


Remove the four bolts holding the crossmember in place. I didn't take any pictures of this process as I had my hands full of tank, hehe. Also, do not forget to pull the wiring harness through the hole in the firewall.

Your jack will be holding the entire weight of your tank at this point. If there's an easy way to do this next part, I'm not aware of it. I got under the tank, supported its weight with my arms and knees while lowering the jack to free the crossmember. Be very careful not to slosh the fuel too much or it can gush out of the back and make those around you painfully aware of your presence for the next couple of days. On the way down, the edges of the tank will catch on everything you can think of. Be patient and work it out. If you can, slide it towards the back of the car a little and this will make things a bit easier. Once it's free of the car, begin rolling out from underneath the tank while keeping the tank upright. Once you get the tank on the ground, slide it, and yourself, out from under the car.

Take five and smoke 'em if you got 'em. Well...not too close to the tank.


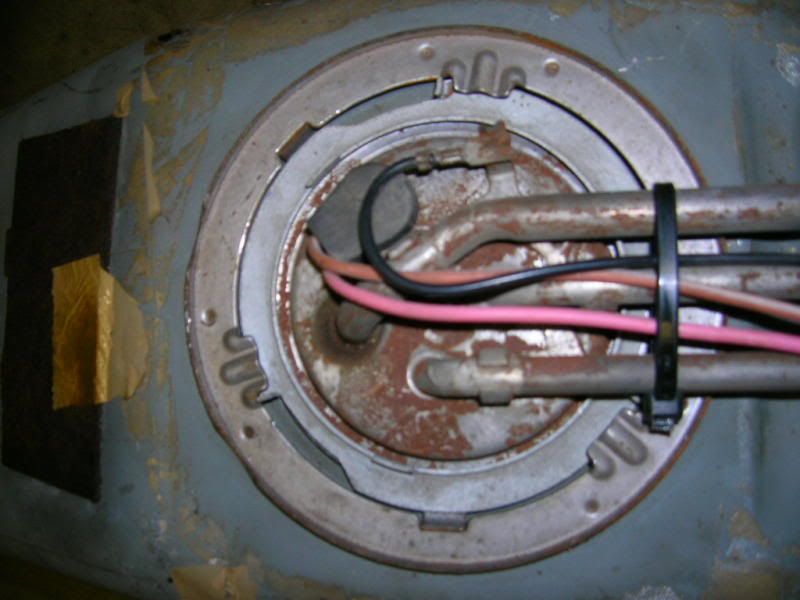
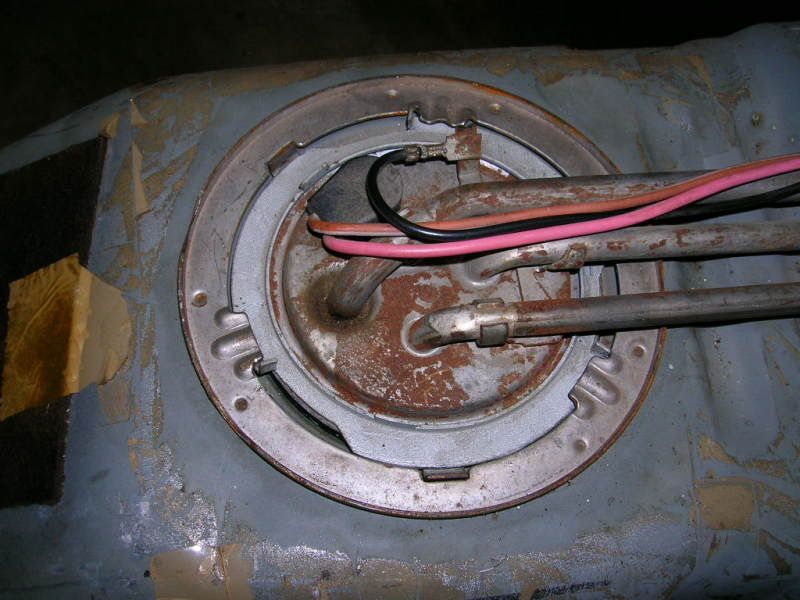
Ok, you see this. This is the top of your fuel pump and float assembly. It is held in with a lock ring that needs to come off.


Don't do this to remove it.


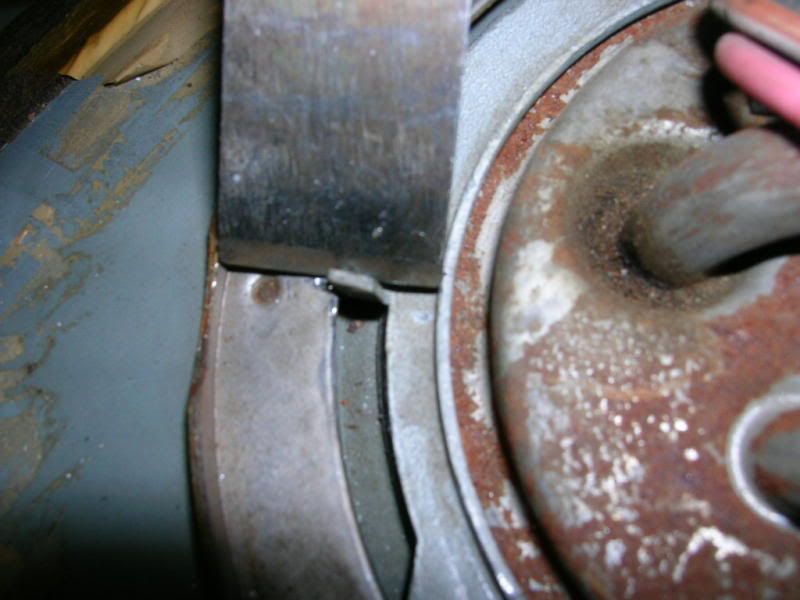
Do this instead and your lock ring will still like you.


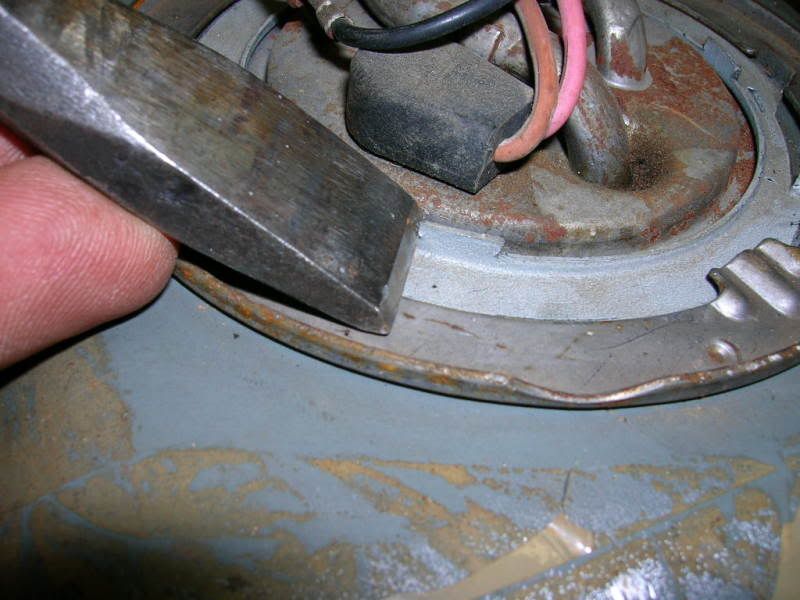
Tap your lock ring until it lines up something like this.


Pull it off and slide it out of the way.


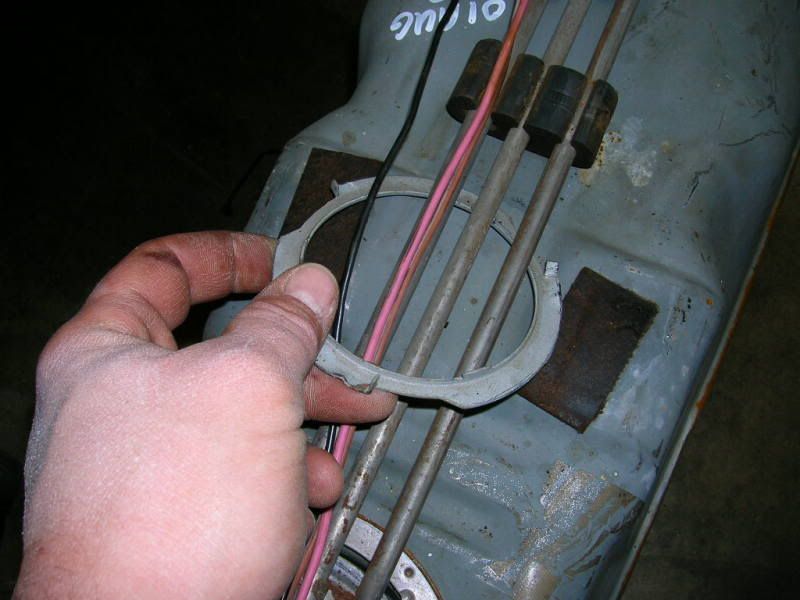
Be careful here. Do not force anything here unless you want to buy a new assembly.


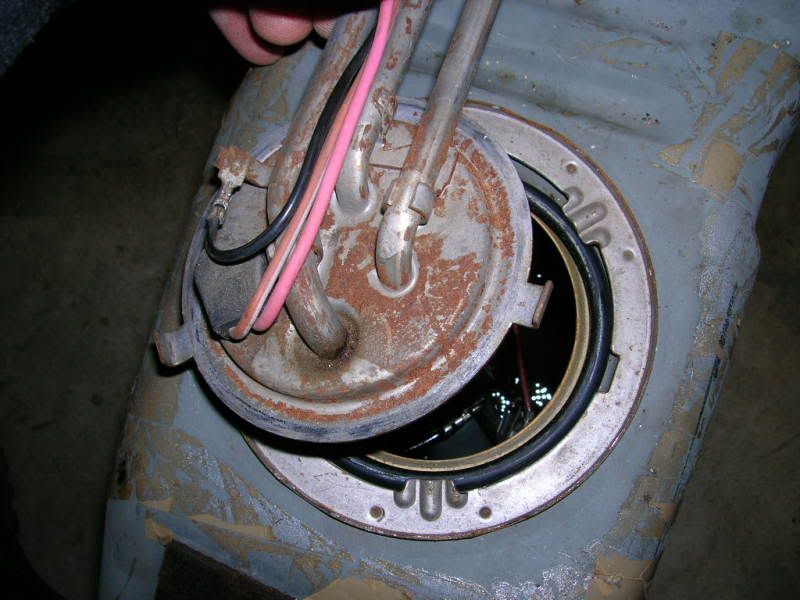
You have to twist, turn, cajole and fondle this thing to get it out of there, but it does come out, I assure you.


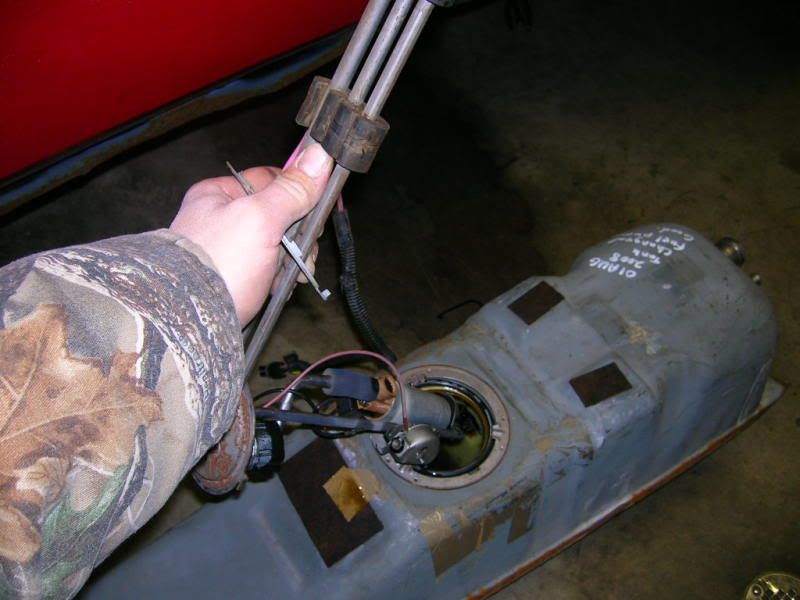
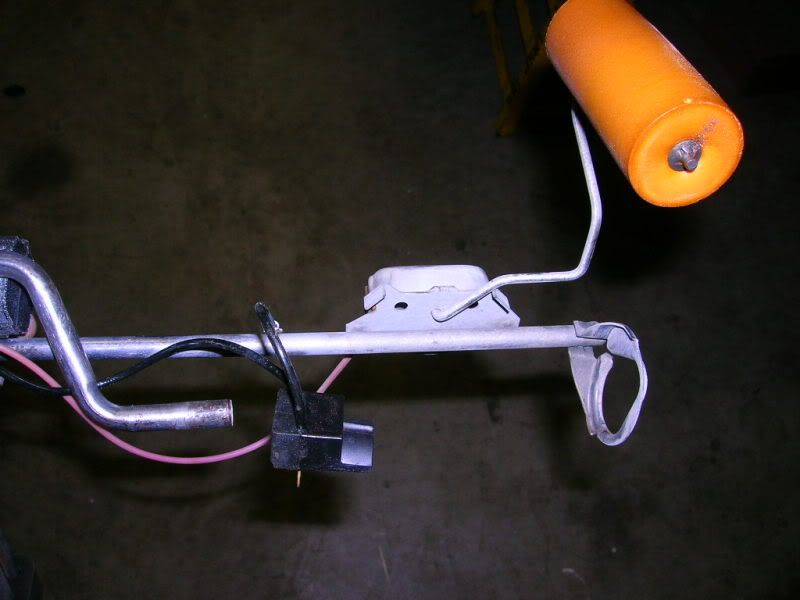
That big, honkin' orange thing is the light at the end of the tunnel. It's also the float part of your float arm; the thing that controls your gas gauge.


Removal of the old fuel pump is pretty straight forward. Make note of the position of the filter strainer on the bottom of the asembly and then, holding the fuel pump itself, tear it off. I cut the rubber hose that connected the fuel pump to the hard line to facilitate easy removel of the fuel pump. Otherwise, I would have had to push and shove on the fuel pump and yadda yadda yadda....cut it if your kit came with a replacement. Remove the nuts holding the plug onto the fuel pump and chuck 'em in the trash...if your kit came with replacements.

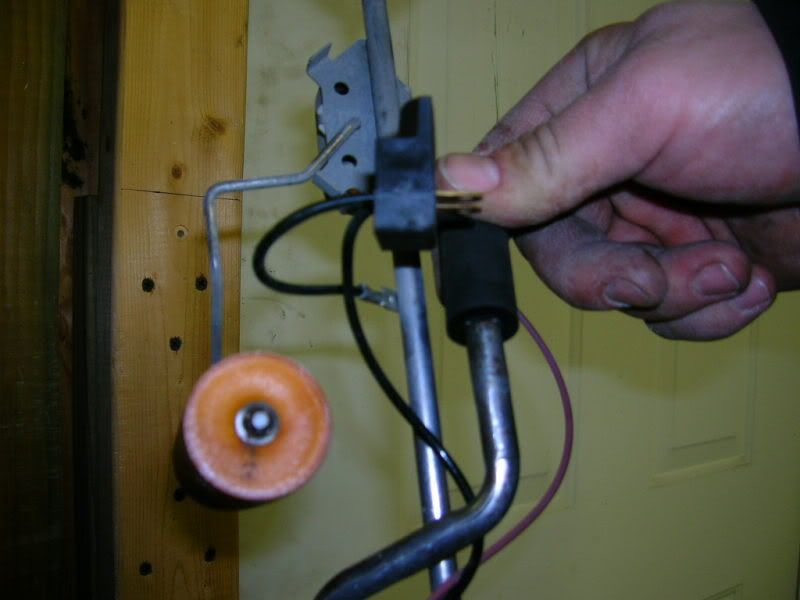
Once free of the old fuel pump, your assembly should look similar to mine.


Slide the new rubber hose connector onto the hard line.


Place the fuel pump with rubber grommet into the carriage and slide the rubber hose connector down onto the fuel pump nipple. My kit came with these cute little clamps for the rubber hose connector.


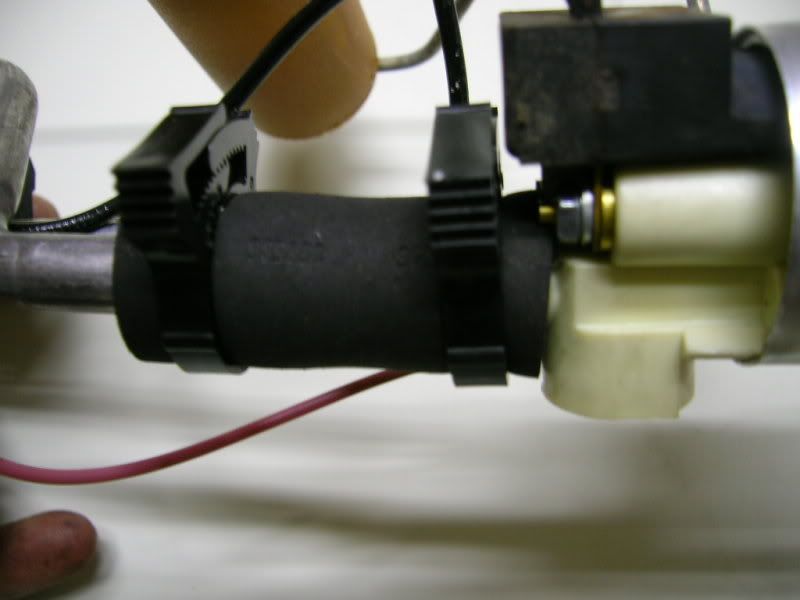
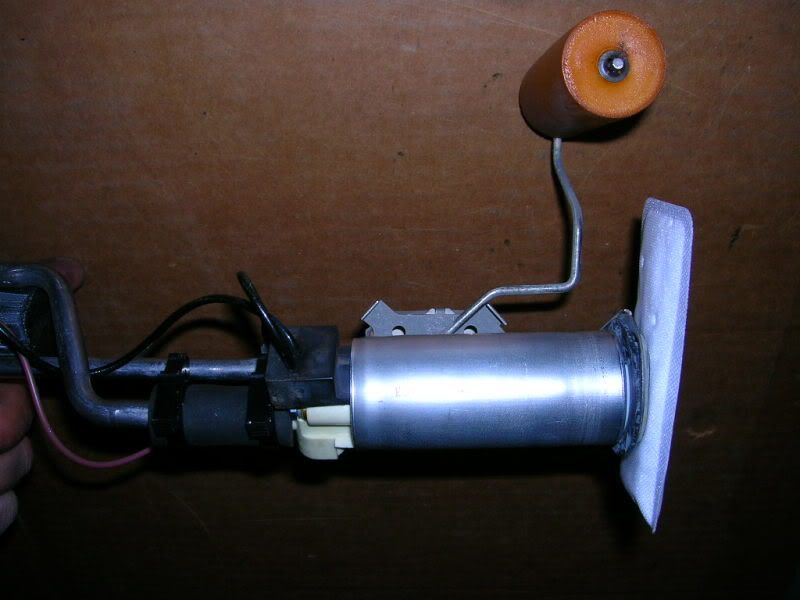
Attach your filter screen the same way the old one was before you tore it off, and your fuel pump assembly should look like mine.


Some of the old timers might yell at me for this, but I coated my O-ring with a light coat of new engine oil prior to installing it so it would have a better chance at sealing correctly. But before you place that O-ring, make certain you wipe all dust and dirt off of the sealing surface. And don't drop the O-ring into the gas tank when your trying to wiggle your fuel pump assembly back into the hole. If you do, wipe it off, reapply the oil and go for take two.


Reinstall your lock ring and make certain you drive it all the way home. The tabs I told you not to hit? Your lock ring needs to turn until those are fully seated against the tank-mounted portion of the lock ring.


You have the tank out and the fuel pump replaced. Time to put it back in yet? Hehe...yeah right. Now is a great time to take a look at your fuel hoses. Are they dry-rotted? Split, Cut? Hard as Bill Clinton in a roomful of interns? Replace them! Even if it means another trip to the parts house. That's better than another trip through this thread ain't it? Sure, you can replace 'em with the tank in the car, but you have to jack it up, spill gas, get dirty, and blah blah blah. Piss on that crap. Replace 'em now. You'll thank yourself later. Before you get under the car, set some lightweight oil where you can get to it. Not grease, oil. Not brake fluid, oil. Grease will make your lines too slippery and increase the chance of them coming off under pressure and brake fluid will eat your rubber lines.


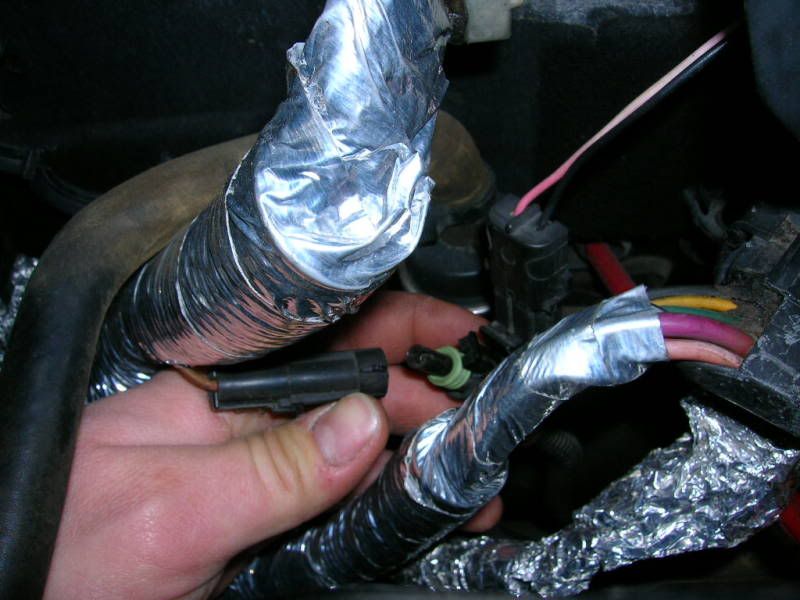
After you get your tank back under the car, make certain the wires running to the fuel pump are where they're supposed to be: within the protective confines of these rubber pieces and not flopping around to get smashed and cut when you put your tank back up in the hole.


Guess what? I have just as many pics of the tank going back in as I did of it coming out. You got it down so that means you're more than qualified to put it back up. One thing though, I didn't put the crossmember back in first to support the tank as it couldn't be done with one hand. Instead, I put the rear strap back on and threaded a nut onto it. That was sufficient to hold the half empty tank until I could get the front one buttoned up. Then I installed the four bolts in the crossmember.

Caution: Don't tighten anything yet. You might think you'll want to, but you don't need to and when it comes time to slide those lines back on, you may wish you could jostle the tank a bit for some added leverage.

Once you get your tank loosely back in place, reach over and grab that lightweight oil you put where you could easily reach it. Get a little bit on your finger and put a very light coat of oil on the nipples stickin' out of the back of your tank. This will make your life much more pleasant and may just save your hoses a gory death of being forced onto a nipple with a pair of needlenose or whatever else you can find to grip them with. I suggest doing the smaller of the top two first. Put it on and tighten the hose clamp. Then the big one. Put it on and tighten the hose clamp.

The pressure, return and ventilation lines don't really need any oil on them unless you just feel like coating them as a rust preventive. They're fairly easy to slide onto the hardlines and as soon as you get them together, tighten the clamps. With this done, put the metal screw back into the fuel line bracket and drive it home. Then cut your zip tie and screw your heat shield back into place. Cram the wiring harness (that you already poked through the firewall) back up where it belongs, or at least get it as high as you can. Hold your breath and try not to get any falling fiberglass dust in your face. Slide forward a little bit and tighten the crossmember bolts. Before tightening your tank straps however, make sure the tank is positioned exactly as it was before you took it down. This can be done by sliding the tank fore and aft until the clean spots on the tank line back up with the straps. It ain't gotta be perfect, but you want it as close as you can get it. Snug the nuts on your straps, shove your tools out from under the car and...

Take a break. Smoke 'em if you got 'em.


You're almost done. Reach down behind the engine and find your long lost fuel pump wiring. Plug it in.

Reconnect the negative battery cable.

Hook up your fuel pressure gauge if you wish, and turn the ignition to on. Verify pressure. If no pressure is present, turn key off and then back on. You should have pressure.

Check underneath your car for new wet spots indicating a leak. Do not allow yourself to get so excited that you just fire it up and take off. This is not a Yugo. People will care if you burn your Fiero to the ground (especially if you're in it.) Good mechanics discipline themselves to do it right or stupid things happen.

Once you have verified that you have no leaks, fire it up. There's a good chance you may not have a good charge on your battery if you spent any amount of time troubleshooting and attempting to start your car before you diagnosed the fuel pump. As a result, your pump will not pump at its full capacity. Once it's running and the fuel pump is being powered by the alternator, guess what? Check for leaks again! My car made 9.5 psi with just the key on. It made almost 12 psi with the engine running. That extra 2.5 psi might be enough to spring a leak that 9 psi couldn't.

This is what you want to see.


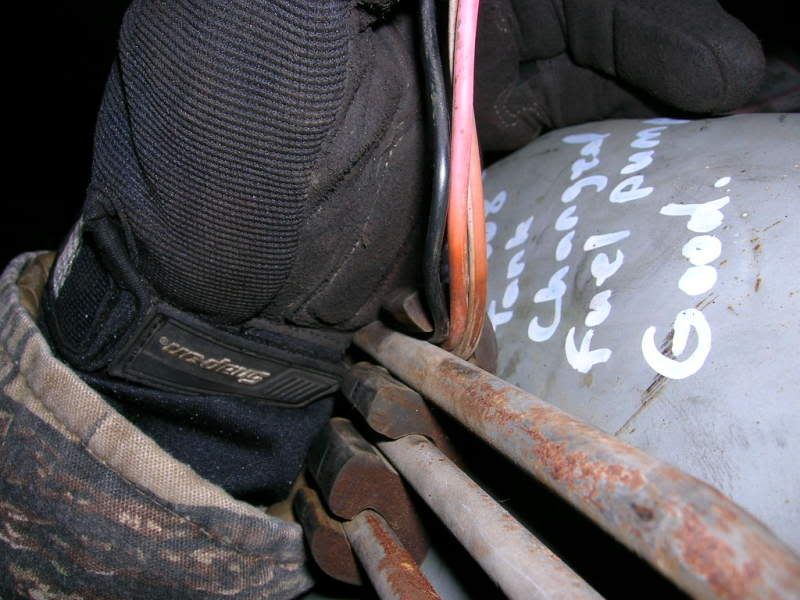
After I made damn sure I had no fuel leaks, I pulled it out of the garage....


...and it runs like a raped ape.

I was at the end of my rope with this problem and thanks to PFF, it rides again. Enjoy this How-to and I hope it helps you out.


If anyone has anything that they feel needs to be added to this how-to, PM me and I'll edit to taste.

[This message has been edited by Brocephus (edited 10-08-2009).]

IP: Logged
PFF
System Bot
sjmaye
Member
Posts: 2468
From: Hendersonville, TN USA
Registered: Jun 2003


Feedback score:    (13)
Leave feedback

Rate this member

Report this Post12-03-2008 03:46 AM Click Here to See the Profile for sjmayeSend a Private Message to sjmayeEdit/Delete MessageReply w/QuoteDirect Link to This Post
Nice post. Although deceptively simple your idea for marking the small lines to the tank is great. I took pics and struggled to make sure I had it right. I should have used your method.
IP: Logged
Frizlefrak
Member
Posts: 2921
From: El Paso, Texas
Registered: Aug 2003


Feedback score: (5)
Leave feedback


Total ratings: 72
Rate this member

Report this Post12-03-2008 04:02 AM Click Here to See the Profile for FrizlefrakSend a Private Message to FrizlefrakEdit/Delete MessageReply w/QuoteDirect Link to This Post
Well, if there was an Oscar for tech tips, this one would win it. Excellent write up Bro....ya did good.

Glad to hear all things are well again.

I forgot how rusty things get up north. If you saw the undercarriages of our Southern cars you would hate us.

OH....almost forgot....I love your master cut off switch on the battery. That just made it very close to the top of my to-do list.

[This message has been edited by Frizlefrak (edited 12-03-2008).]

IP: Logged
Frizlefrak
Member
Posts: 2921
From: El Paso, Texas
Registered: Aug 2003


Feedback score: (5)
Leave feedback


Total ratings: 72
Rate this member

Report this Post12-03-2008 04:21 AM Click Here to See the Profile for FrizlefrakSend a Private Message to FrizlefrakEdit/Delete MessageReply w/QuoteDirect Link to This Post

Frizlefrak

2921 posts
Member since Aug 2003
Oh.....before I forget, here's one tool you might add to your Man Palace next time you're out stimulating the economy....


I paid $45 for this bad boy at Harbor Freight Tools. It's a good soldier and has served me well. So far it has...

1. Helped drop three Fiero gas tanks (once on the same car twice in the same week....when yours truly neglected to replace the pulsator the first time)

2. installed a kitchen full of new cabinets during our last remodel. Makes installing wall cabinets a one man job.

3....oh, and it's even pulled a transmission once...imagine that.

So far, I've never had the good fortune to have a fuel pump fail with an empty tank. Bad karma or something....anyhow, the trans jack is a godsend. I've loaned it out twice, and both times had to beg to get it back. It has come in very handy, especially considering I'm only slightly better than 5 and a half feet and weigh a buck and a half dripping wet...and for some reason don't seem to be getting any stronger in my advanced age. Having a mechanical buddy doing the lifting is a big help.

I've never run out of uses for it.
IP: Logged
Brocephus
Member
Posts: 617
From: Franklin, NY, USA
Registered: Mar 2006


Feedback score: N/A
Leave feedback


Total ratings: 63
Rate this member

Report this Post12-03-2008 08:19 AM Click Here to See the Profile for BrocephusSend a Private Message to BrocephusEdit/Delete MessageReply w/QuoteDirect Link to This Post
 
quote
Originally posted by Frizlefrak:

Well, if there was an Oscar for tech tips, this one would win it. Excellent write up Bro....ya did good.

Glad to hear all things are well again.

I forgot how rusty things get up north. If you saw the undercarriages of our Southern cars you would hate us.

OH....almost forgot....I love your master cut off switch on the battery. That just made it very close to the top of my to-do list.


Well Friz I thank you for the kind words and hope to provide another write up as soon as something else breaks.

I specifically searched for a car south of the mason/dixon line because it doesn't take a genius to figure out why the north is called "the rust belt". I won this car for $177.50, drove to Clarksville, TN to get it only to discover that they guy had just moved to TN from Michigan...


Take I-10 to 54.
Go north til you hit Cassidy.
Make a right and talk to the nice men with guns.

That's where I'm from, hehe. I spent 372 days in El Paso and I loved it as much as other hated it. On Fridays and Saturdays, I'd go to Graham's Country Dance Bar and sing karaoke but when I wanted a smaller crowd, I'd go to Incredibles over off of Alabama, just west of Willie Beaumont Hospital.

Well Friz, I need to go start my day and get some coffee. You take care and I'll talk at ya later.

[This message has been edited by Brocephus (edited 12-03-2008).]

IP: Logged
Brocephus
Member
Posts: 617
From: Franklin, NY, USA
Registered: Mar 2006


Feedback score: N/A
Leave feedback


Total ratings: 63
Rate this member

Report this Post12-03-2008 08:34 AM Click Here to See the Profile for BrocephusSend a Private Message to BrocephusEdit/Delete MessageReply w/QuoteDirect Link to This Post

Brocephus

617 posts
Member since Mar 2006
 
quote
Originally posted by sjmaye:

Nice post. Although deceptively simple your idea for marking the small lines to the tank is great. I took pics and struggled to make sure I had it right. I should have used your method.


You know, I'm not altogether sure how I came up with that idea, but it's been a huge help while doing my Nissan to Fiero swap. I had to mark all the wiring harness connectors like that because I can't speak Japanese, hehe.
IP: Logged
ltlfrari
Member
Posts: 5356
From: Wake Forest,NC,USA
Registered: Jan 2002


Feedback score: (4)
Leave feedback


Total ratings: 127
Rate this member

Report this Post12-03-2008 08:51 AM Click Here to See the Profile for ltlfrariClick Here to visit ltlfrari's HomePageSend a Private Message to ltlfrariEdit/Delete MessageReply w/QuoteDirect Link to This Post
Great write up, gotta love this picture:

------------------
Dave

www.ltlfrari.com

IP: Logged
Curlrup
Member
Posts: 2590
From: Havre De Grace, MD
Registered: Apr 2007


Feedback score:    (6)
Leave feedback

Rate this member

Report this Post12-03-2008 08:55 AM Click Here to See the Profile for CurlrupSend a Private Message to CurlrupEdit/Delete MessageReply w/QuoteDirect Link to This Post
+ for you very nice.
IP: Logged
Frizlefrak
Member
Posts: 2921
From: El Paso, Texas
Registered: Aug 2003


Feedback score: (5)
Leave feedback


Total ratings: 72
Rate this member

Report this Post12-03-2008 02:09 PM Click Here to See the Profile for FrizlefrakSend a Private Message to FrizlefrakEdit/Delete MessageReply w/QuoteDirect Link to This Post
 
quote
Originally posted by Brocephus:

Take I-10 to 54.
Go north til you hit Cassidy.
Make a right and talk to the nice men with guns.

That's where I'm from, hehe. I spent 372 days in El Paso and I loved it as much as other hated it. On Fridays and Saturdays, I'd go to Graham's Country Dance Bar and sing karaoke but when I wanted a smaller crowd, I'd go to Incredibles over off of Alabama, just west of Willie Beaumont Hospital.

Well Friz, I need to go start my day and get some coffee. You take care and I'll talk at ya later.


Ever get over to Roscoes for a burger? I won't ask about Chicos, that much is a given....it's part of a GI's initiation package to Ft. Bliss. If you ever get back, stay on 54 to the Sun Valley exit, take the exit, and my humble abode is a stone's throw away. Be proud to sip a couple of cold beverages and swap lies with ya.

IP: Logged
flimbob
Member
Posts: 642
From: Plano, Texas, USA
Registered: May 2008


Feedback score:    (20)
Leave feedback

Rate this member

Report this Post12-03-2008 02:14 PM Click Here to See the Profile for flimbobSend a Private Message to flimbobEdit/Delete MessageReply w/QuoteDirect Link to This Post
Great Post! I'll be doing this to fix the lying guage soon.
IP: Logged
Larryh86GT
Member
Posts: 1757
From: Near sunny Buffalo NY
Registered: Jan 2008


Feedback score: (1)
Leave feedback

Rate this member

Report this Post12-03-2008 02:35 PM Click Here to See the Profile for Larryh86GTSend a Private Message to Larryh86GTEdit/Delete MessageReply w/QuoteDirect Link to This Post
Very nicely done. Educational and entertaining.
IP: Logged
PFF
System Bot
fieroboom
Member
Posts: 2132
From: Hayden, AL (BFE)
Registered: Oct 2008


Feedback score: (2)
Leave feedback


Total ratings: 81
Rate this member

Report this Post12-03-2008 04:19 PM Click Here to See the Profile for fieroboomClick Here to visit fieroboom's HomePageSend a Private Message to fieroboomEdit/Delete MessageReply w/QuoteDirect Link to This Post
Superb writeup. I'd love to see a lot more of the awesome detailed how-to's crop up on here, so we can convince Cliff to make us a "How-Tos, Tips, and Tricks" forum.
+ for you, great job!

------------------
Journal of a concept: http://southeastfieros.com

IP: Logged
Brocephus
Member
Posts: 617
From: Franklin, NY, USA
Registered: Mar 2006


Feedback score: N/A
Leave feedback


Total ratings: 63
Rate this member

Report this Post12-03-2008 04:58 PM Click Here to See the Profile for BrocephusSend a Private Message to BrocephusEdit/Delete MessageReply w/QuoteDirect Link to This Post
 
quote
Originally posted by flimbob:

Great Post! I'll be doing this to fix the lying guage soon.


Yeah, wish like hell I had the time to do it when I was in there, but I need the car for a new job and didn't want to risk screwin' something up. Besides, my fuel gauge isn't really all that far off. And with a gas station close enough I could hit it with a rock, I rarely, if ever, put it away without a full tank.

The thanks I've been getting for this write-up is makin' me wanna do more of 'em. Too bad most mods cost money or I'd do it full time, hehe. Your appreciation is appreciated and "tanks" for the +'s.
IP: Logged
fieroboom
Member
Posts: 2132
From: Hayden, AL (BFE)
Registered: Oct 2008


Feedback score: (2)
Leave feedback


Total ratings: 81
Rate this member

Report this Post12-03-2008 05:12 PM Click Here to See the Profile for fieroboomClick Here to visit fieroboom's HomePageSend a Private Message to fieroboomEdit/Delete MessageReply w/QuoteDirect Link to This Post
 
quote
Originally posted by Brocephus:
Yeah, wish like hell I had the time to do it when I was in there, but I need the car for a new job and didn't want to risk screwin' something up. Besides, my fuel gauge isn't really all that far off. And with a gas station close enough I could hit it with a rock, I rarely, if ever, put it away without a full tank.

The thanks I've been getting for this write-up is makin' me wanna do more of 'em. Too bad most mods cost money or I'd do it full time, hehe. Your appreciation is appreciated and "tanks" for the +'s.


I felt the same way about my door disassembly how-to. Made me wish I'd made more of them before I got the car completely torn apart!
IP: Logged
kwagner
Member
Posts: 4257
From: Pittsburgh, PA
Registered: Apr 2005


Feedback score: (3)
Leave feedback


Total ratings: 62
Rate this member

Report this Post12-13-2008 12:27 PM Click Here to See the Profile for kwagnerClick Here to visit kwagner's HomePageSend a Private Message to kwagnerEdit/Delete MessageReply w/QuoteDirect Link to This Post
Thanks for this how-to, it was just what I was looking for!
IP: Logged
ForceFedFlesh
Member
Posts: 184
From: Cedarhurst,NY
Registered: Aug 2007


Feedback score: (3)
Leave feedback

Rate this member

Report this Post01-16-2009 06:15 AM Click Here to See the Profile for ForceFedFleshSend a Private Message to ForceFedFleshEdit/Delete MessageReply w/QuoteDirect Link to This Post
guys make sure you clean the connecter AT the fuel pump if it looks the least bit crudsy. will save you the trouble of a non working fuel pump after all that work.


with that little bit of crud on there it may look like the connecter MIGHT still work....but it did NOT.


FFF
IP: Logged
h.d.fire
Member
Posts: 989
From: Minooka, IL
Registered: Sep 2006


Feedback score:    (28)
Leave feedback

Rate this member

Report this Post03-20-2009 04:25 PM Click Here to See the Profile for h.d.fireSend a Private Message to h.d.fireEdit/Delete MessageReply w/QuoteDirect Link to This Post
One of the best tech articles I've read! NICE JOB!! I'm changing the pump in my 87' this weekend!

------------------
84' Indy Pace Car (car #2000)
86' G.T.
87' Coupe (daily driver)
88' Formula (V8 project)
Member: NIFE

IP: Logged
Brocephus
Member
Posts: 617
From: Franklin, NY, USA
Registered: Mar 2006


Feedback score: N/A
Leave feedback


Total ratings: 63
Rate this member

Report this Post03-20-2009 04:46 PM Click Here to See the Profile for BrocephusSend a Private Message to BrocephusEdit/Delete MessageReply w/QuoteDirect Link to This Post
 
quote
Originally posted by h.d.fire:

One of the best tech articles I've read! NICE JOB!! I'm changing the pump in my 87' this weekend!


Well I'm glad you enjoyed it, hehe. Best of luck on the pump and make sure ya come back and let us know how it went!
IP: Logged
1MohrFiero
Member
Posts: 4363
From: Paducah, Ky
Registered: Apr 2003


Feedback score:    (37)
Leave feedback


Total ratings: 157
Rate this member

Report this Post12-24-2009 05:05 PM Click Here to See the Profile for 1MohrFieroSend a Private Message to 1MohrFieroEdit/Delete MessageReply w/QuoteDirect Link to This Post
Back on top

------------------

IP: Logged
tbone42
Member
Posts: 8477
From:
Registered: Apr 2010


Feedback score:    (23)
Leave feedback


Total ratings: 128
Rate this member

Report this Post11-18-2010 12:16 AM Click Here to See the Profile for tbone42Send a Private Message to tbone42Edit/Delete MessageReply w/QuoteDirect Link to This Post
Bump.. because this is the best tech post I have ever seen.
IP: Logged
OldsFiero
Member
Posts: 405
From: Franklin,NY USA
Registered: Dec 2009


Feedback score: N/A
Leave feedback

Rate this member

Report this Post11-18-2010 09:19 PM Click Here to See the Profile for OldsFieroSend a Private Message to OldsFieroEdit/Delete MessageReply w/QuoteDirect Link to This Post
Good job Bro. I'm sure it will help lots of folks. I'm sure glad mine dosen't look like that underneath-guess that's we dont drive the ones we want to keep nice up here in the winter. I haven't seen ya much lately-hope all is well. BTW,if I see you drivin that nice T-top you got when the salt gets laided down,you could be talkin with a much higher voice.
Marc
IP: Logged
PFF
System Bot
Wam3
Member
Posts: 77
From: Reno NV, USA
Registered: Jan 2011


Feedback score: (1)
Leave feedback

Rate this member

Report this Post03-30-2011 07:27 PM Click Here to See the Profile for Wam3Send a Private Message to Wam3Edit/Delete MessageReply w/QuoteDirect Link to This Post
BUMP - I have to replace my pump :-(
IP: Logged
Brocephus
Member
Posts: 617
From: Franklin, NY, USA
Registered: Mar 2006


Feedback score: N/A
Leave feedback


Total ratings: 63
Rate this member

Report this Post04-03-2011 10:59 AM Click Here to See the Profile for BrocephusSend a Private Message to BrocephusEdit/Delete MessageReply w/QuoteDirect Link to This Post
Funny to think that this old how-to is still helpin' folks 3 years after I wrote it, haha! Information is so timeless....
IP: Logged
ALJR
Member
Posts: 3765
From: Massachusetts
Registered: Jul 2009


Feedback score:    (18)
Leave feedback

Rate this member

Report this Post04-03-2011 03:09 PM Click Here to See the Profile for ALJRSend a Private Message to ALJREdit/Delete MessageReply w/QuoteDirect Link to This Post
Nother + for you!

I didn't fear this project, but seeing pictures and haveing some pointers will make my FP replacement go that much smoother...

Nice well-documented How-to!

EDIT to add:
I think the only thing I would have dun different, would be to empty the tank first; assuming you have at least some fuel pressure from the bad pump...

[This message has been edited by ALJR (edited 04-03-2011).]

IP: Logged
HI-TECH
Member
Posts: 1697
From: manteca, california
Registered: Jul 2005


Feedback score: N/A
Leave feedback


Total ratings: 123
Rate this member

Report this Post04-09-2011 07:25 PM Click Here to See the Profile for HI-TECHClick Here to visit HI-TECH's HomePageSend a Private Message to HI-TECHEdit/Delete MessageReply w/QuoteDirect Link to This Post
my pumps out... i printed this thread out and its gonna go into my own how to manual. awesome write up.
IP: Logged
Frizlefrak
Member
Posts: 2921
From: El Paso, Texas
Registered: Aug 2003


Feedback score: (5)
Leave feedback


Total ratings: 72
Rate this member

Report this Post04-09-2011 11:36 PM Click Here to See the Profile for FrizlefrakSend a Private Message to FrizlefrakEdit/Delete MessageReply w/QuoteDirect Link to This Post
 
quote
Originally posted by Brocephus:

Funny to think that this old how-to is still helpin' folks 3 years after I wrote it, haha! Information is so timeless....


Yep....fondly remember this one
IP: Logged
crashyoung
Member
Posts: 1333
From: Lowell, Michigan, USA
Registered: May 2012


Feedback score: N/A
Leave feedback

Rate this member

Report this Post05-18-2012 05:30 PM Click Here to See the Profile for crashyoungSend a Private Message to crashyoungEdit/Delete MessageReply w/QuoteDirect Link to This Post
 
quote
Originally posted by ltlfrari:

Great write up, gotta love this picture:


Michigan lounge wear...
I prefer mine in black tho, a little more formal...
You have documented this task very well, I have done it once, and it looks like I need to do it again, unless I can get the dry tank to flow again!
IP: Logged
firejo24
Member
Posts: 651
From: Redmond, WA
Registered: Feb 2012


Feedback score: N/A
Leave feedback

Rate this member

Report this Post05-18-2012 11:19 PM Click Here to See the Profile for firejo24Send a Private Message to firejo24Edit/Delete MessageReply w/QuoteDirect Link to This Post
If you’re not careful with the cigarette you might wind up with this!
All kidding aside, great post. Thanks!

IP: Logged
Dennis LaGrua
Member
Posts: 15136
From: Hillsborough, NJ U.S.A.
Registered: May 2000


Feedback score:    (13)
Leave feedback


Total ratings: 328
Rate this member

Report this Post05-19-2012 10:55 AM Click Here to See the Profile for Dennis LaGruaSend a Private Message to Dennis LaGruaEdit/Delete MessageReply w/QuoteDirect Link to This Post
Nice job on the write up and the procedure is correct. The only thing that I would insure is that the small hose that connects the fuel pump to the supply tube in the tank is certified as S.A.E. J30R10 submersible fuel injection hose. Standard J30R9 fuel injection hose will fail within a year. Other than that I would prefer to use fuel injection hose clamps. Those plastic pinch clamps may work but I feel safer with fuel injection hose clamps.

------------------
" THE BLACK PARALYZER" -87GT 3800SC Series III engine, custom ZZP /Frozen Boost Intercooler setup, 3.4" Pulley, Powerlog manifold, Northstar TB, LS1 MAF, 3" Flotech Afterburner Exhaust, Autolite 104's, MSD wires, Custom CAI, 4T65eHD w. custom axles, HP Tuners VCM Suite.
"THE COLUSSUS"
87GT - ALL OUT 3.4L Turbocharged engine, Garrett Hybrid Turbo, MSD ign., modified TH125H
" ON THE LOOSE WITHOUT THE JUICE "

IP: Logged
jameejamz
Member
Posts: 33
From: Diggs, Virginia, United States
Registered: May 2012


Feedback score: N/A
Leave feedback

Rate this member

Report this Post06-02-2012 04:56 PM Click Here to See the Profile for jameejamzClick Here to visit jameejamz's HomePageSend a Private Message to jameejamzEdit/Delete MessageReply w/QuoteDirect Link to This Post
Wish I had known this forum was out there before I decided to drop my tank. Currently the tank is lying about, and I am dreading figuring out which fuel line goes where. Shouldn't be OVERLY difficult, but just enough pain to make my day unpleasant. And that Trans jack would have come in SO helpful!
IP: Logged
Alex4mula
Member
Posts: 7403
From: Canton, MI US
Registered: Dec 1999


Feedback score:    (11)
Leave feedback


Total ratings: 153
Rate this member

Report this Post06-02-2012 06:07 PM Click Here to See the Profile for Alex4mulaSend a Private Message to Alex4mulaEdit/Delete MessageReply w/QuoteDirect Link to This Post
Nice write up. This is the type of contribution that deserves a + The FP replacement was one of the biggest thing I ever did in my car back around 1992-3. After paying $200 for a replacement job it failed after one month. So with no $$ I had to do it myself in an apartment parking lot. After doing about 4-5 by now I think the hardest part of all is just removing and re-installing all the upper hoses.
IP: Logged
PFF
System Bot
Ponnari
Member
Posts: 565
From: Seattle,WA, USA
Registered: Dec 2011


Feedback score:    (8)
Leave feedback

Rate this member

Report this Post09-23-2014 09:07 PM Click Here to See the Profile for PonnariSend a Private Message to PonnariEdit/Delete MessageReply w/QuoteDirect Link to This Post
After reading this great write up by "crashyoung" NOW I AM READY! It's been about 15 years since I have done this job and I wanted to make sure I wasn't remembering it being easier than it was.

Thanks Much "crashyoung"
IP: Logged
Patrick
Member
Posts: 36180
From: Vancouver, British Columbia, Canada
Registered: Apr 99


Feedback score: (1)
Leave feedback


Total ratings: 458
Rate this member

Report this Post09-23-2014 09:24 PM Click Here to See the Profile for PatrickSend a Private Message to PatrickEdit/Delete MessageReply w/QuoteDirect Link to This Post
 
quote
Originally posted by Ponnari:

After reading this great write up by "crashyoung" NOW I AM READY!


I'm sure crashyoung is a wonderful fella, but it's Brocephus who did this great write-up... one of the best ones ever presented here.
IP: Logged
Lou and Blue
Member
Posts: 1349
From: Baldwin,NY,USA
Registered: Dec 2013


Feedback score:    (8)
Leave feedback

Rate this member

Report this Post04-03-2015 10:08 AM Click Here to See the Profile for Lou and BlueSend a Private Message to Lou and BlueEdit/Delete MessageReply w/QuoteDirect Link to This Post
I'm about to change my fuel ump to prepare for my 3800sc swap. I will be following this thread.
Thanks !

------------------
===Always trying to find time to work on cars===
Louis Duet
Baldwin, Long Island, NY
~~~~~~~~~~~~~~~~~~~~~~~~~~~~~~~~~~~~~~~
"Blue" <= '85 Fiero GT
3800sc series 2 swap in progress
~~~~~~~~~~~~~~~~~~~~~
"Boo" <= '81 Delorean DMC-12
VIN #5835
Stock PRV engine
Peugot 604 Intake manifold
Exhaust headers
Anti-3rd brake light

IP: Logged
Detainabull
Member
Posts: 193
From: Durham, NC
Registered: Jan 2015


Feedback score: (3)
Leave feedback

Rate this member

Report this Post05-23-2015 09:52 PM Click Here to See the Profile for DetainabullSend a Private Message to DetainabullEdit/Delete MessageReply w/QuoteDirect Link to This Post
I'll be replacing the fuel pump on my next few days off...find this thread very informative. Nice to know what your getting into and how to prepare for things like this. Great write up
IP: Logged
fieroguy75
Member
Posts: 66
From: Winchester
Registered: Apr 2014


Feedback score: N/A
Leave feedback

Rate this member

Report this Post07-20-2015 08:50 PM Click Here to See the Profile for fieroguy75Click Here to visit fieroguy75's HomePageSend a Private Message to fieroguy75Edit/Delete MessageReply w/QuoteDirect Link to This Post
The tank on my 85 by is already out and the yutz who took it out didn't Mark anything,now whAt
IP: Logged
fieroguy75
Member
Posts: 66
From: Winchester
Registered: Apr 2014


Feedback score: N/A
Leave feedback

Rate this member

Report this Post07-20-2015 08:51 PM Click Here to See the Profile for fieroguy75Click Here to visit fieroguy75's HomePageSend a Private Message to fieroguy75Edit/Delete MessageReply w/QuoteDirect Link to This Post

fieroguy75

66 posts
Member since Apr 2014
I have no clue where the lines go
IP: Logged
Adjustso3
Member
Posts: 453
From: Depew, New York , USA
Registered: May 2014


Feedback score:    (13)
Leave feedback

Rate this member

Report this Post07-21-2015 02:05 AM Click Here to See the Profile for Adjustso3Send a Private Message to Adjustso3Edit/Delete MessageReply w/QuoteDirect Link to This Post
This was an awesome How-To. I will be doing a FP in the near future and assumed it wasn't going to be too difficult. Match marking the fuel lines is an awesome idea and totally eliminates the chance of mixing them up. Thanks for taking the time to do this write up.
IP: Logged
CJB118
Member
Posts: 273
From: Rindge NH USA
Registered: Jul 2015


Feedback score: (5)
Leave feedback

Rate this member

Report this Post07-02-2016 09:05 PM Click Here to See the Profile for CJB118Send a Private Message to CJB118Edit/Delete MessageReply w/QuoteDirect Link to This Post
Excellent posting, just the right combo of tech, safety nags and humor. We did the FP and fuel filter today on the CJB, using this write up. THANK YOU and +1.

------------------
1988 Pontiac Fiero Formula, Yellow, original. (CJB #118)
1977 Pontiac Le Mans Can-Am W72, original, unrestored.
1977 Pontiac Grand LeMans
2003 Pontiac Grand Prix GTP L67/MN7 (Parts Car)

IP: Logged
RWDPLZ
Member
Posts: 15010
From: Michigan
Registered: May 2002


Feedback score:    (11)
Leave feedback


Total ratings: 303
Rate this member

Report this Post07-02-2016 09:13 PM Click Here to See the Profile for RWDPLZClick Here to visit RWDPLZ's HomePageSend a Private Message to RWDPLZEdit/Delete MessageReply w/QuoteDirect Link to This Post
I used this thread to help me replace the fuel pump on my 84 ~5 years ago, thanks!
IP: Logged
Previous Page | Next Page

This topic is 2 pages long:  1   2 
next newest topic | next oldest topic

All times are ET (US)

Post New Topic  Post A Reply
Hop to:

Contact Us | Back To Main Page

Advertizing on PFF | Fiero Parts Vendors
PFF Merchandise | Fiero Gallery | Ogre's Cave
Real-Time Chat | Fiero Related Auctions on eBay


Copyright (c) 1999, C. Pennock