Pennock's Fiero Forum
  FAQs & HowTos
  [Tutorial] How to remove the drip guards from above the side windows

Post New Topic  Post A Reply
Email This Page to Someone! | Printable Version


next newest topic | next oldest topic
[Tutorial] How to remove the drip guards from above the side windows by JohnWPB
Started on: 06-10-2009 05:21 PM
Replies: 10 (3127 views)
Last post by: JohnWPB on 07-20-2020 10:22 PM
JohnWPB
Member
Posts: 5181
From: West Palm Beach, Florida
Registered: May 2009


Feedback score:    (21)
Leave feedback


Total ratings: 144
Rate this member

Report this Post06-10-2009 05:21 PM Click Here to See the Profile for JohnWPBClick Here to visit JohnWPB's HomePageSend a Private Message to JohnWPBEdit/Delete MessageReply w/QuoteDirect Link to This Post
I was trying to remove the rain drip guard from my Fiero in preparation for painting but was not sure how they came off. I got a great tip from Mike Murphy on how to do this, and though I would do a simple tutorial on how to do it.

Removing the rain drip guards is actually very easy. The drip guard is made from metal, so it can not be chipped or cracked, but it can be dented or bent quite easily if you are not careful. I used a paint stirring stick, which are free at just about every paint / hardware store. You will also need a safe place to store them, as again, they bend VERY easily.

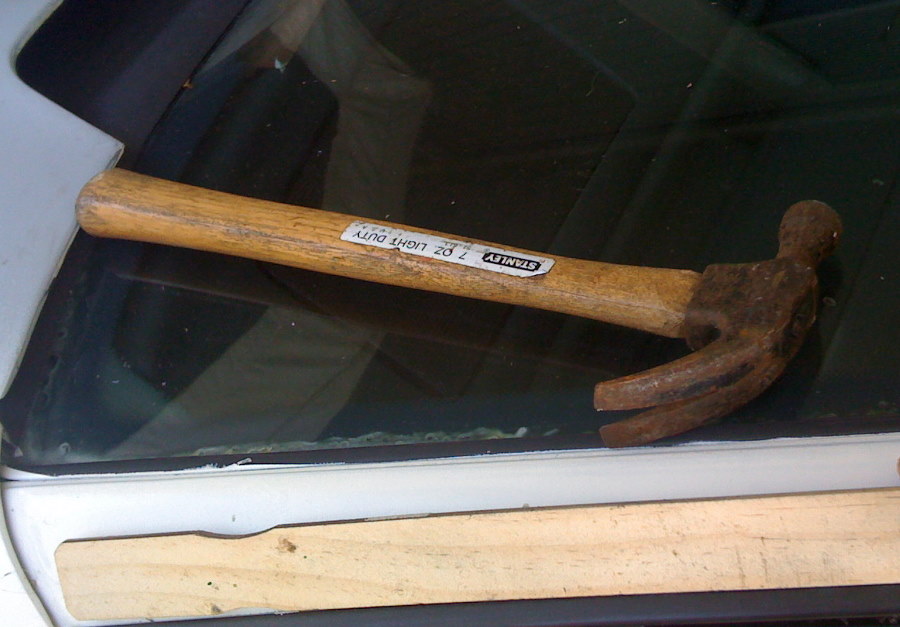
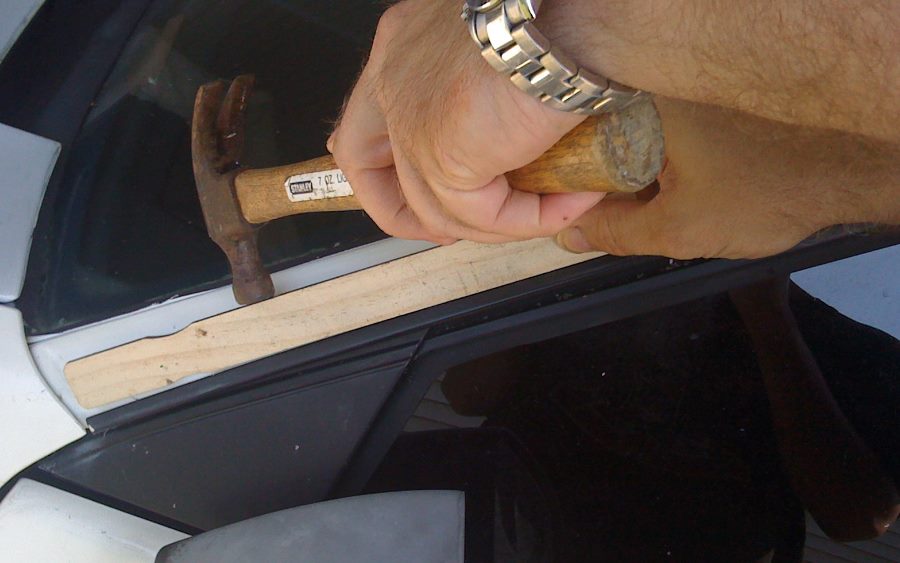
You will need a small piece of wood, and a hammer. (You can also use a metal spatula / putty spreader)


Place the strip of wood even against the rain guard. Lightly tap the hammer against the wood:

Work your way back with the wood and hammer till you get to the very back of the railing.


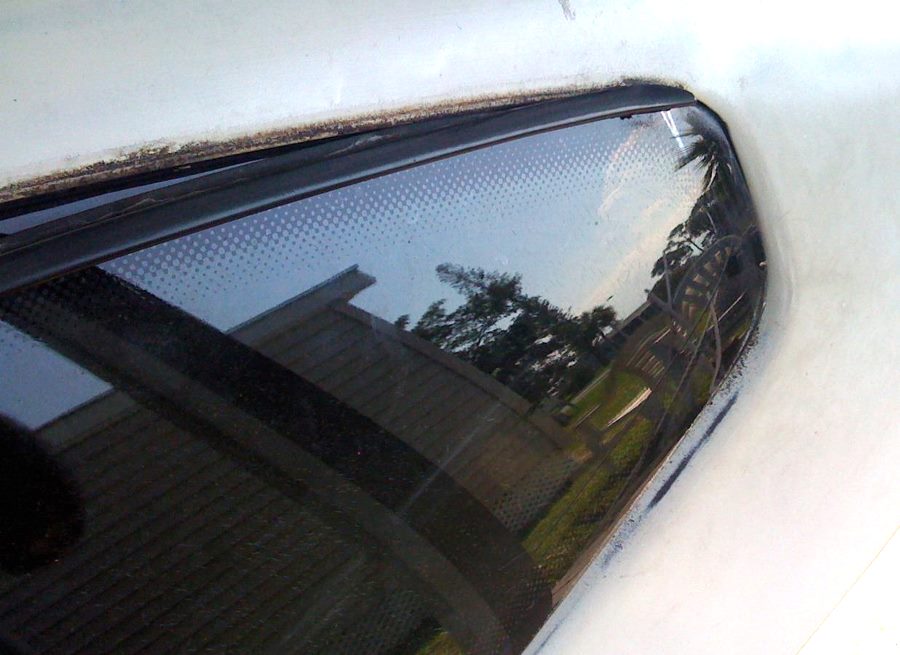
On the Fastback, There is a small metal clip at the very back, it does not have a screw or any hardware holding it in place. It is probably just extra support for holding the end of the drip rail in place:


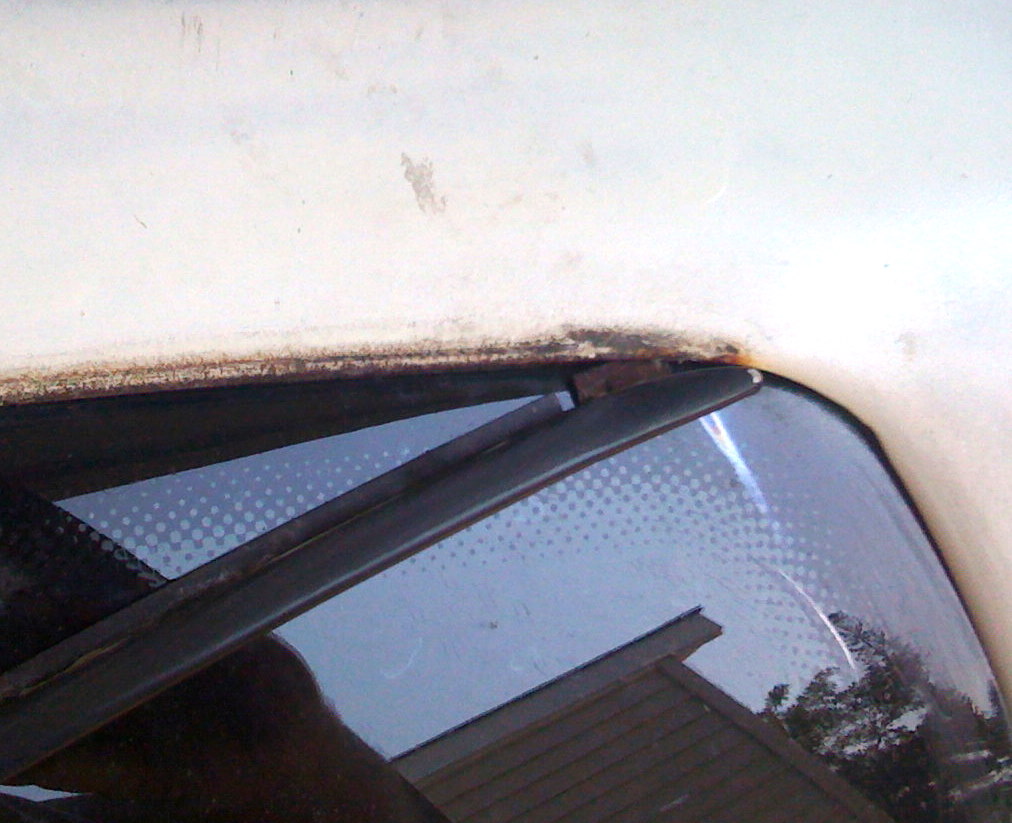
This clip will probably prevent the drip guard from moving straight down while tapping, as the sail panel's rolled edge is in the way. Simply pick up the rest of the now loose drip guard, and angle it, pulling lightly to release the end of the drip guard.

That's all there is to it! I intend on having them painted the same color as my car, but wanted to remove them so I could sand correctly behind them, as well as sand them, before putting them back on.

KEYWORDS: Rain Guard Drip Molding Remove Removal Take Off Tutorial

[This message has been edited by JohnWPB (edited 04-18-2019).]

IP: Logged
PFF
System Bot
americasfuture2k
Member
Posts: 7131
From: Edmond, Oklahoma
Registered: Jan 2006


Feedback score: (3)
Leave feedback


Total ratings: 105
Rate this member

Report this Post06-10-2009 05:31 PM Click Here to See the Profile for americasfuture2kSend a Private Message to americasfuture2kEdit/Delete MessageReply w/QuoteDirect Link to This Post

------------------
First LX9 Fiero GT, 1987 | My Fiero Fuel Economy | MPG Display for OBD I
Youtube Videos of My GT | 87 GT Inside Test Run | 3500 Fiero GT Test Run 01
3500 Fiero GT Test Run 02 | 3500 Fiero GT Test Run 03 | 3500 Fiero GT Test Run 04
If you can't fix it with a hammer, you've got an electrical problem
Fiero's are people too. We pay just as much attention to them, if not more than our loved ones
screw paying those bastards. im not going to become rich by paying for things.....

IP: Logged
Dennis LaGrua
Member
Posts: 15136
From: Hillsborough, NJ U.S.A.
Registered: May 2000


Feedback score:    (13)
Leave feedback


Total ratings: 328
Rate this member

Report this Post06-10-2009 05:34 PM Click Here to See the Profile for Dennis LaGruaSend a Private Message to Dennis LaGruaEdit/Delete MessageReply w/QuoteDirect Link to This Post
Just removed a set today. Used a large scraper, inserted them in the gutter groove and tapped lightly with a hammer. They came right out.

------------------
" THE BLACK PARALYZER" -87GT 3800SC Series III engine, 3.4" Pulley, N* TB, LS1 MAF, Flotech Exhaust Autolite 104's Custom CAI 4T65eHD w. custom axles, HP Tuners VCM Suite.
"THE COLUSSUS"
87GT - ALL OUT 3.4L Turbocharged engine, Garrett Hybrid Turbo, MSD ign., modified TH125H
" ON THE LOOSE WITHOUT THE JUICE "

[This message has been edited by Dennis LaGrua (edited 06-10-2009).]

IP: Logged
JohnWPB
Member
Posts: 5181
From: West Palm Beach, Florida
Registered: May 2009


Feedback score:    (21)
Leave feedback


Total ratings: 144
Rate this member

Report this Post06-18-2009 09:42 AM Click Here to See the Profile for JohnWPBClick Here to visit JohnWPB's HomePageSend a Private Message to JohnWPBEdit/Delete MessageReply w/QuoteDirect Link to This Post
Yea, a wide paint scraper should do the trick as well.... Nice tip!
IP: Logged
Larryh86GT
Member
Posts: 1757
From: Near sunny Buffalo NY
Registered: Jan 2008


Feedback score: (1)
Leave feedback

Rate this member

Report this Post06-18-2009 09:57 AM Click Here to See the Profile for Larryh86GTSend a Private Message to Larryh86GTEdit/Delete MessageReply w/QuoteDirect Link to This Post
Nice tip. I'll be pulling mine off in a couple weeks to put replacement sail panels on.
Larry

------------------

IP: Logged
88FieroGT TTops
Member
Posts: 710
From: Woodbridge,Va USA
Registered: Mar 2012


Feedback score: (4)
Leave feedback

Rate this member

Report this Post03-01-2013 08:11 PM Click Here to See the Profile for 88FieroGT TTopsSend a Private Message to 88FieroGT TTopsEdit/Delete MessageReply w/QuoteDirect Link to This Post
Hmmm--I have T-Tops---no drip guards for me---look at all the stuff that collected behind them

------------------
Pat Jones

IP: Logged
JohnWPB
Member
Posts: 5181
From: West Palm Beach, Florida
Registered: May 2009


Feedback score:    (21)
Leave feedback


Total ratings: 144
Rate this member

Report this Post10-30-2017 09:14 PM Click Here to See the Profile for JohnWPBClick Here to visit JohnWPB's HomePageSend a Private Message to JohnWPBEdit/Delete MessageReply w/QuoteDirect Link to This Post
All the images in the first post were broken links. I was able to find them tonight and replace them.
IP: Logged
AtkRWC
Member
Posts: 25
From: South Texas(RGV)
Registered: Apr 2016


Feedback score: N/A
Leave feedback

Rate this member

Report this Post09-15-2018 11:52 PM Click Here to See the Profile for AtkRWCSend a Private Message to AtkRWCEdit/Delete MessageReply w/QuoteDirect Link to This Post
Very timely tip. Was wondering how to do this. Thanks so much for the info.
IP: Logged
Rick6375
Member
Posts: 13
From: New Castle, In.
Registered: Mar 2019


Feedback score: N/A
Leave feedback

Rate this member

Report this Post04-17-2019 06:38 AM Click Here to See the Profile for Rick6375Send a Private Message to Rick6375Edit/Delete MessageReply w/QuoteDirect Link to This Post
Planning to buff the paint on my recently purchased 84 SE and this is going to be helpful, more so because the right side drip edge has a small, 1" long dent in it I will try to fix before reinstalling.

------------------
84Fiero SE 4 cylinder auto

IP: Logged
smaisy
Junior Member
Posts: 1
From:
Registered: Jul 2020


Feedback score: N/A
Leave feedback

Rate this member

Report this Post07-20-2020 04:19 PM Click Here to See the Profile for smaisySend a Private Message to smaisyEdit/Delete MessageReply w/QuoteDirect Link to This Post
I got mine done with some paint scrapers! Thanks for the advice though!
IP: Logged
JohnWPB
Member
Posts: 5181
From: West Palm Beach, Florida
Registered: May 2009


Feedback score:    (21)
Leave feedback


Total ratings: 144
Rate this member

Report this Post07-20-2020 10:22 PM Click Here to See the Profile for JohnWPBClick Here to visit JohnWPB's HomePageSend a Private Message to JohnWPBEdit/Delete MessageReply w/QuoteDirect Link to This Post

Glad it helped. Got a notification of this post, it has been a long time ago since I revisited this post hahaha
IP: Logged
PFF
System Bot

next newest topic | next oldest topic

All times are ET (US)

Post New Topic  Post A Reply
Hop to:

Contact Us | Back To Main Page

Advertizing on PFF | Fiero Parts Vendors
PFF Merchandise | Fiero Gallery | Ogre's Cave
Real-Time Chat | Fiero Related Auctions on eBay


Copyright (c) 1999, C. Pennock