Pennock's Fiero Forum
  FAQs & HowTos
  Removing a V-6 Engine - By The Numbers (Page 1)

Post New Topic  Post A Reply
Email This Page to Someone! | Printable Version

This topic is 6 pages long:  1   2   3   4   5   6 
Previous Page | Next Page
next newest topic | next oldest topic
Removing a V-6 Engine - By The Numbers by Toddster
Started on: 01-01-2008 07:31 PM
Replies: 211 (31345 views)
Last post by: Toddster on 11-11-2020 05:20 PM
Toddster
Member
Posts: 20871
From: Roswell, Georgia
Registered: May 2001


Feedback score:    (41)
Leave feedback


Total ratings: 503
Rate this member

Report this Post01-01-2008 07:31 PM Click Here to See the Profile for ToddsterSend a Private Message to ToddsterEdit/Delete MessageReply w/QuoteDirect Link to This Post
Many of you know I am clearing out my excess inventory of Fiero cars and parts so I thought it be a good idea to document the process for posterity. In each thread I will share my tricks and ideas. Some you may already know, others hopefully will be Eureka! moments for some of you. My first thread is removing the V-6 engine.

If you are in need of a new engine for your Fiero the first obvious step is to take out the old one. There are several ways to do this and you should feel free to post your own experiences here as well. The method I am going to show you is the easiest and fastest for those of you with limited tools on hand. I did this in 2 hours and 10 minutes including time taken to photograph the procedure. In fact, it took longer to write this thread than to do the job.

You do NOT need a car lift, special tools, or any particular skills. If you understand the 'righty tighty, lefty loosey' concept then you know enough. Read on!
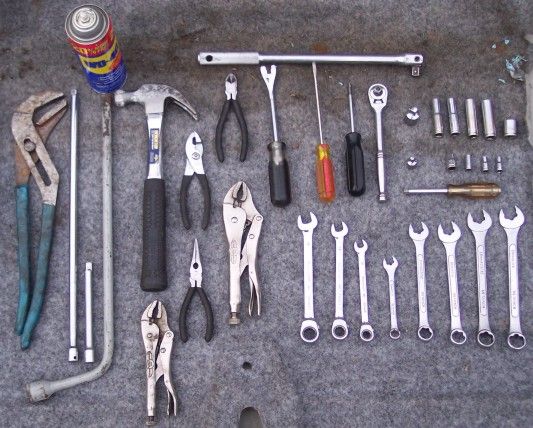
STEP 1:

Gather the tools. Obviously air tools and car lifts make life easier. I have both. However, I am doing this the old fashioned way for the benefit of those of you with nothing more than a typical tool box. You will need the following hand tools:


(1) large pair of channel locks
(1) 18 inch 3/8 inch extension
(1) 6 inch 3/8 inch extension
(1) Fiero Tire Iron
(1) Spray can of penetrating lube or WD-40
(1) Hammer
(2) Vise Grip Style Pliers
(1) Standard pliers
(1) Needle Nose Pliers
(1) Wire Cutters (for cutting zip ties, etc.)
(1) 1/2 inch Breaker Bar
(1) Plastic Push Pin Removal Tool
(1) Standard Screw Driver (long thin electrical style)
(1) Philips Screw Driver
(1) 3/8 inch Ratchet
(1) 1/2 inch to 3/8 inch adaptor
(1) 3/8 inch to 1/4 inch adaptor
(1) 6mm 1/4 inch socket
(1) 7mm 1/4 inch socket
(1) 8mm 1/4 inch socket
(1) 10mm 3/8 inch socket (shorty)
(1) 10mm 3/8 inch socket (long)
(1) 11mm 3/8 inch socket (long)
(1) 13mm 3/8 inch socket (long)
(1) 15mm 3/8 inch socket (long)
(1) 18mm 3/8 inch socket (shorty)
(1) 1/4 inch socket screw driver
(1) 10mm Box Wrench (ratchet style if available)
(1) 11mm Box Wrench
(1) 13mm Box Wrench (ratchet style if available)
(1) 15mm Box Wrench (Standard AND ratchet style if available)
(1) 16mm Box Wrench
(1) 18mm Box Wrench
(1) 19mm Box Wrench

BIG TIP #1: I use Metrinch Brand tools which work on either Metric or SAE nuts and bolts. Since a few of the Fiero nuts, mostly in the electrical system, are SAE, these tools make it much easier to work on everything without having to keep extra tools on hand.

BIG TIP #2: A rolling ‘crash cart’ is a convenient way to keep the tools handy and accessible when you are standing in the trunk


In addition to the above mentioned hand tools you will need the following items:


(1) Set of Jack Stands
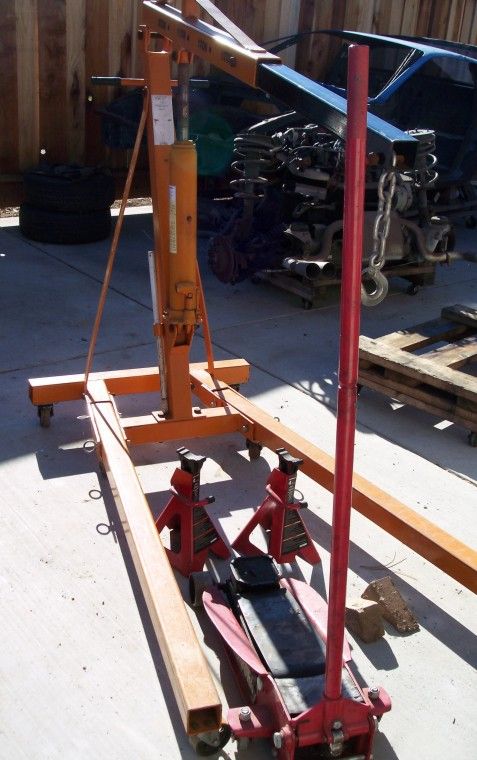
(1) Cherry Picker
(1) Set of wheel chocks
(1) 2 ton or larger Floor Jack
(1) Engine Dolly

Most of these items are available for purchase at your local Auto Parts store and the prices are surprisingly affordable. If you are on a really tight budget I might suggest looking for used tools on Craig's List or borrow from a friend.

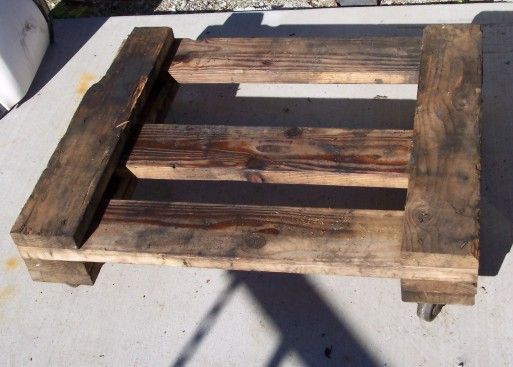
The engine dolly is the one item not available over the counter in the size you will want. It is best to build your own. The measurements are 28x36. This is how to build your own:

Parts List:
(16) 5/16 T-Nuts
(16) 5/16 4" bolts
(4) heavy duty wheel casters
(3) 8' lengths of 2x6 #2 (minimum, #1 is better) Douglas Fir (make sure they are unwarped!) Each board will make (2) 28" lengths and (1) 36" length with 4 inches to spare.
(1) Box of 4" wood screws
(1) Box of 2.5" or 3" wood screws

Assembly:
1) take (2) 28" lengths of 2x6 wood and double them up with a couple of 2.5 or 3" wood screws to create one 4x6x28 block. repeat this step to end up with two blocks.
2) place wheel casters rated to 150 lbs each or better about 2 inches from the ends and centered. Drill through holes.
3) place bolts through and tighten using t-nuts. cut off excess threads flush with boards
4) Take (3) 36" lengths and use (2) 4" wood screws per board to mount them between the two blocks (predrill 1/16" pilot holes to avoid splitting the wood)
5) take (2) 28" lengths and secure them to the top of the dolly with (2) 4" wood screws per board (be sure they are out of synch with the previous 2 wood screws on the lower level)

See reference picture below:


STEP 2:

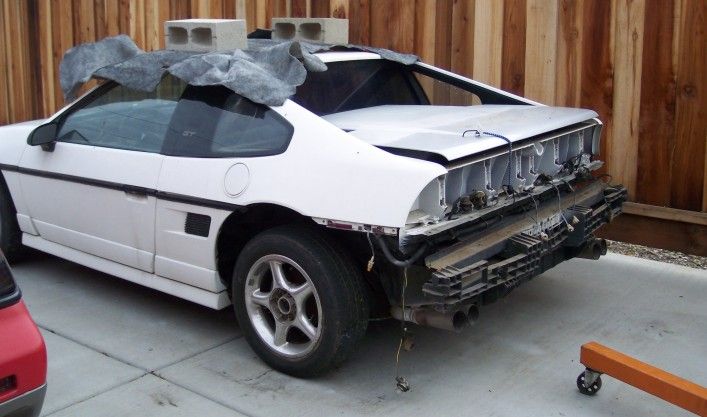
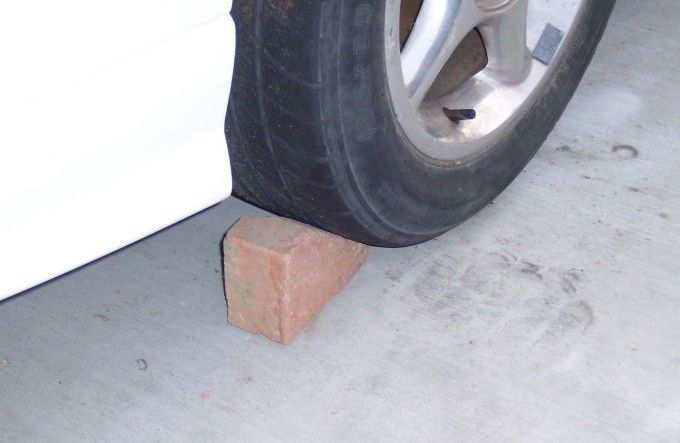
Place the car on a level solid surface. Make sure that you have plenty of space around the rear and sides and chock the front wheels


STEP 3:

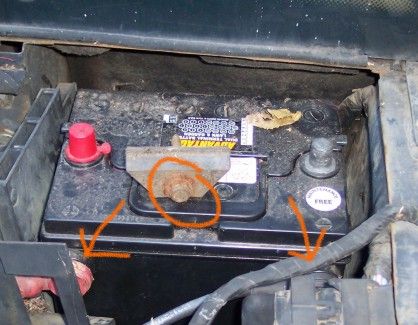
Remove the passenger side vent then disconnect the battery and remove it. Using an 8mm (5/16th actually) socket remove the side post terminals starting with the NEGATIVE terminal first. Then using a 13mm socket remove the battery hold down bolt and rubber mount.

BIG TIP #3: Bolts, screws, and nuts are easy to find if you put them back in the hole you took them out of. For the rest of the odds and ends, bag and tag. Take pictures too for later reference.
BIG TIP #4: A battery post wrench with an insulated rubber grip is a good cheap investment.
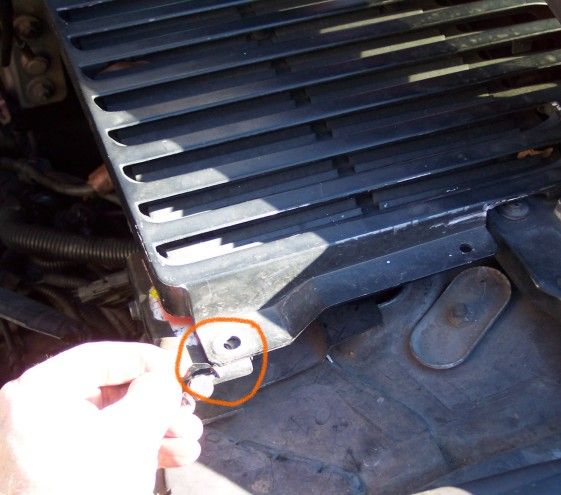


STEP 4:

Now move to the interior of the car before you start getting greasy. Remove the 2 long screws holding the center console in place with your 7mm socket.


STEP 5:

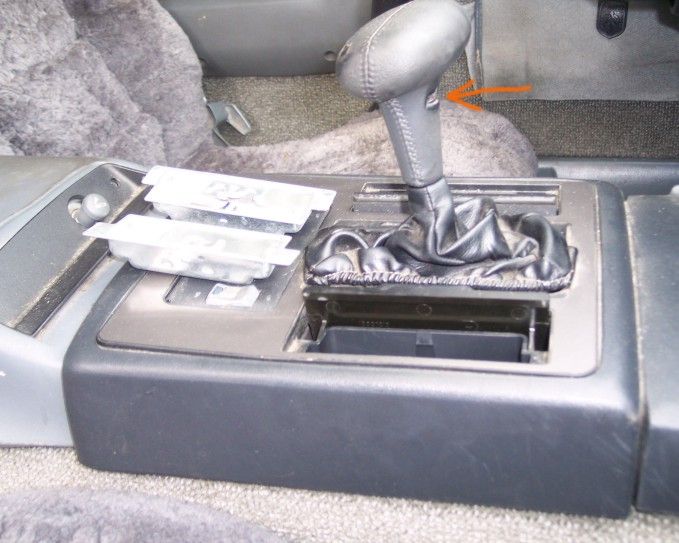
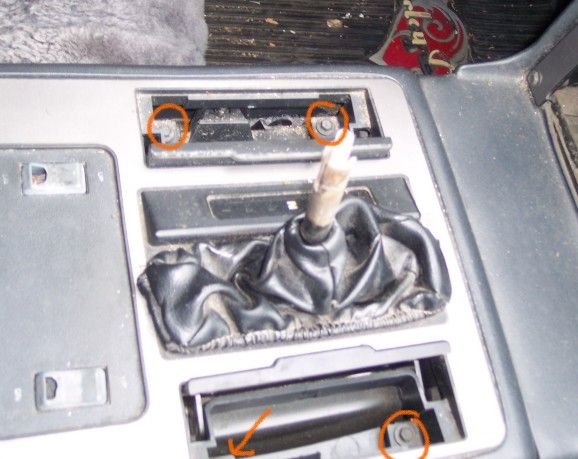
Remove the ash trays and using your screw driver to pry out the retainer clip holding the shifter in place (for manual trannys, just unscrew the shifter knob). The auto shifter will now pull straight off with a good tug.


STEP 6:

Using the 7mm socket unscrew the 4 small screws holding the shift surround in place. The surround will lift off easily. Set it aside with the installation hardware.


STEP 7:

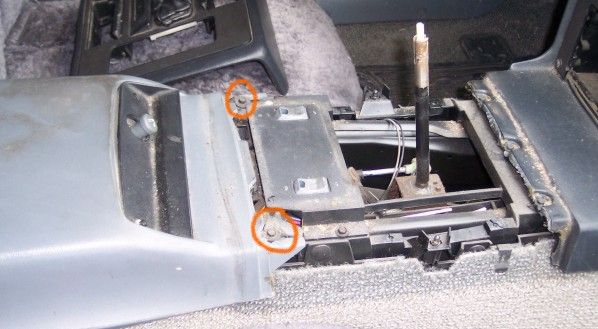
Using the 7mm socket remove the 2 screws with the large washers holding the front of the center console in place.


STEP 8:

Pull the center console up and turn it to expose the cigarette lighter assembly. Using the screw driver pry the tabs connecting the electrical connectors from the cigarette lighter then twist and pull out the light. Alternatively, you can use a Philips head screw driver to unscrew the lighter from the console and simply slide the entire unit out.


STEP 9:

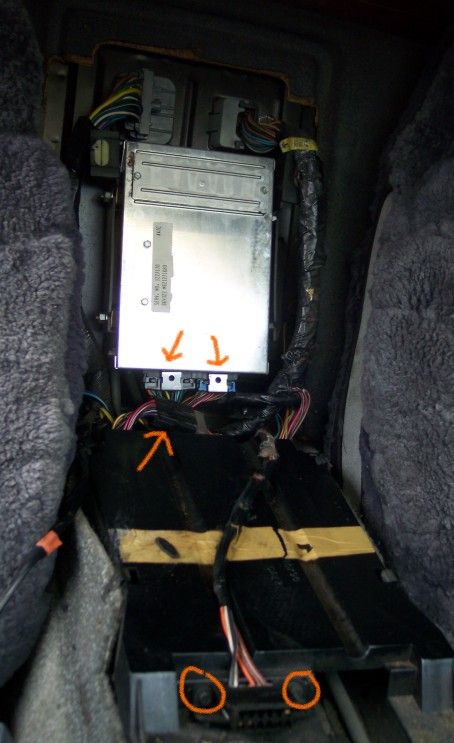
Next, you need to use the 7mm socket to remove the ALDL connector. Then use the screwdriver to pry apart the two connectors to the ECM and the two plugs from the EGI to main harness (plug # C200 in your manual). Do this bysqueezing the metal tabs on the ECM side while prying up on the plug side. It should pull right out. Although not necessary, you may want to remove the ECM to make removal easier, just loosen the four 10mm nuts on the sides. You do not need to remove the nuts completely. Finally, slide the firewall retainer clip to the left to loosen the harness.


STEP 10:

The entire assembly is now ready to push through the firewall. Move around to the engine bay to finish-up.


STEP 11:

From the driver side of the engine bay remove the vent with a standard screw driver.


STEP 12:

Remove the air cleaner by first unplugging the Air Intake Temperature (AIT) sensor on the side of your air cleaner. Then remove the 13mm nut on top of the air cleaner and unscrew the air inlet hose from the Throttle body and remove the entire assembly and set aside. Then remove the two 7mm screws holding the fuel relay in place against the firewall.


STEP 13:

Now loosen the 10mm screw holding the wiring harness to the firewall. You can now pull the harness through the hole and lay the wiring on top of the engine. Now remove the radio suppression wire from the clip on the decklid and remove the two 13mm screws shown on both sides of the decklid.


STEP 14:

Now on the passenger side remove the two 13mm bolts from the decklid as you did for the driver side. Also, remove the 13mm nut holding the engine grounding strap to the decklid hinge (replace the nut but just finger tighten it) and unplug the 4-pin decklid connector. Now, standing in the trunk, grab the decklid from under each side and lift straight up. If you have a helper then each of you standing on either side of the car can do the same and set it aside.


STEP 15:

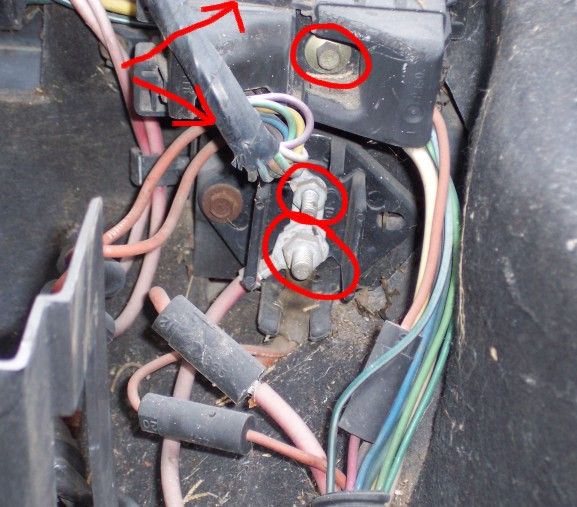
Staying on the passenger side let's begin with the battery wires. Use a 10mm socket to remove the top nut and an 11mm socket to remove the lower nut on the power distribution box. These are SAE nuts but you can get by with your metric set. Next use your 6mm socket to remove the plug hold-down screw and use a screw driver to pry up the tabs while you are unscrewing the screw. Now pull the plug off.


STEP 16:

Now remove the battery splash guard by loosening the 7mm screw under the decklid hinge and the 7mm screw in front of the water pump. Remove the 10mm screw holding the chassis ground wire and pull the entire wiring assembly over the engine to keep out of the way. Now using your 16mm and 19mm box wrenches loosen the fuel inlet and return line connectors. It is a good idea to plug the ends with some old bottle caps or plugs to keep debris out. Pull the little vacuum hose off the end of the EGR solenoid too.


STEP 17:

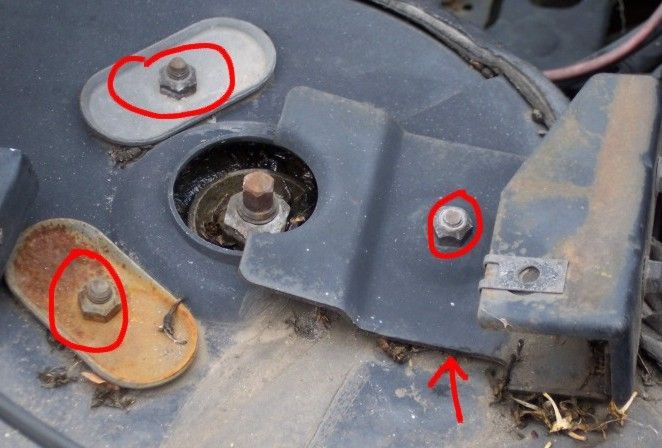
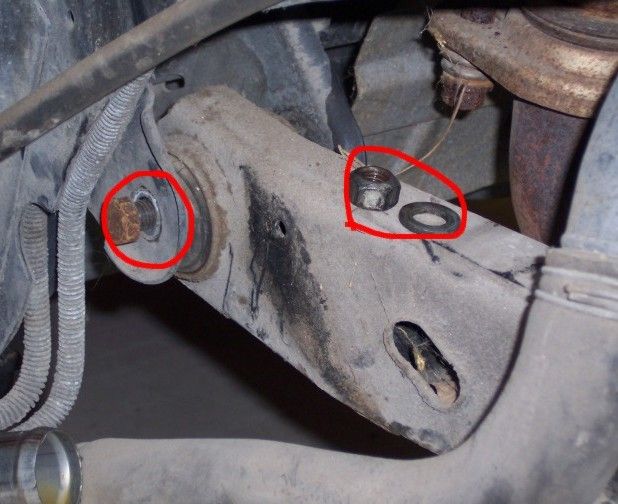
Now loosen the four (3 on top 1 under the vent bracket) 13mm nuts on the strut tower and remove the washers and vent hold down bracket. Now replace one of the three screws to finger tight for the time being, as in the second picture.


STEP 18:

Now remove the 8mm hose clamp screw and remove the heater core return hose from the water pump (Note: this step is not necessary if you have a 1988 model Fiero as the heater core hose is connected to the coolant pipe under the battery and can remain connected for engine removal).

BIG TIP #5: For removing the hose use the large channel locks to break the seal. But to keep from maring the hose wrap a small piece of rubber hose or a cloth around the end where the jaws will clamp on.
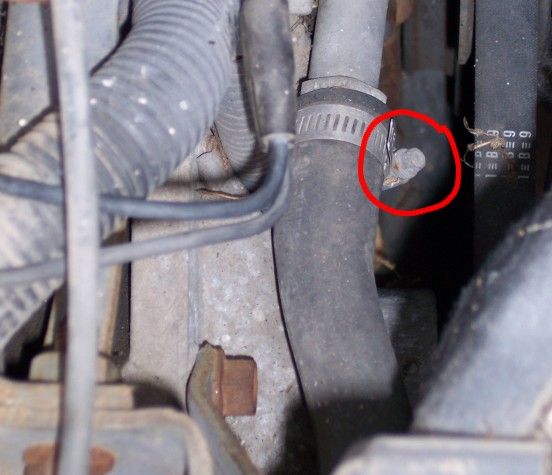


STEP 19:

Remove the brake booster vacuum line with a pair of pliers. Simply squeeze the spring clip together and slide the clamp back a few inches and remove the hose.


STEP 20:

OK, we are done with the upper passenger side for the time being. Let's move to the rear and climb into the trunk. Use your 15mm socket and wrench to loosen the engine side Dog Bone bolt and pull it back out of the way. Pull off the two vacuum hoses below the dog bone.


STEP 21:

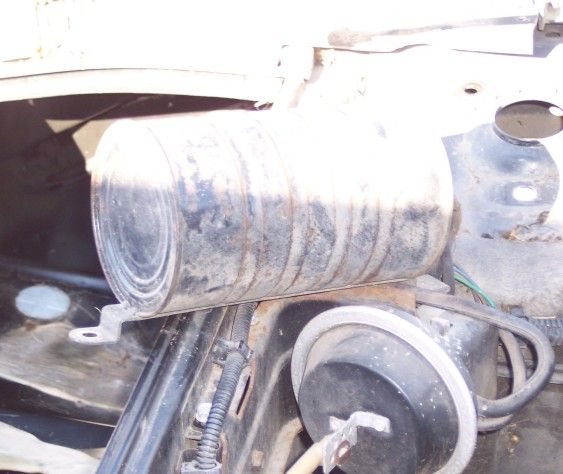
If you have a 1988 Fiero then you can skip this step but for those of you with earlier GTs and SEs you will have the infamous blower assembly to deal with. Although it is possible to pull the engine out without completely removing the tubes it is not recommended. You have very little room and are likely to tear or scratch something for no reason. Start by removing the Cruise Control Vacuum Canister. It is held in by just one 10mm screw. Just twist it out of the way. You don’t need to disconnect the hoses unless you want to. Then remove the three 10mm nuts and screws holding the blower tube. Then remove the three 10mm screws holding the heat shield in place. Then remove the two 10mm screws holding the Alternator blower tube in place and set aside.


STEP 22:

For AUTOMATIC TRANSMISSIONS
Next you will want to remove the 10mm Cruise Control cable screw from the rear firewall and disconnect the transmission cable by pulling up on the c-clip with your pliers and using a screw driver to pry up the cable from the selector arm.


For MANUAL TRANSMISSIONS
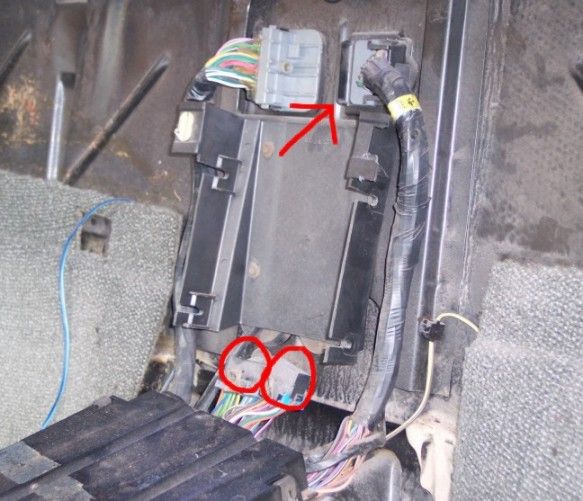
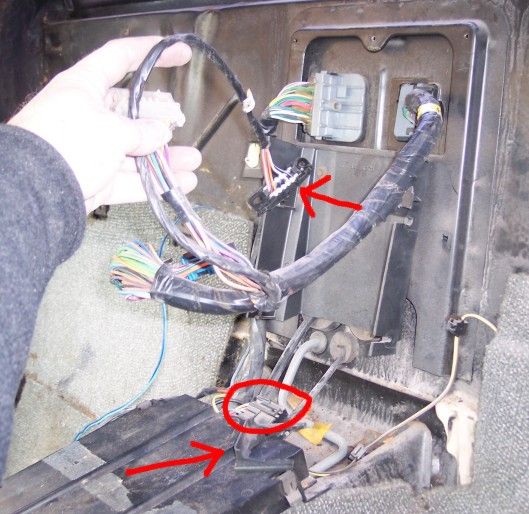
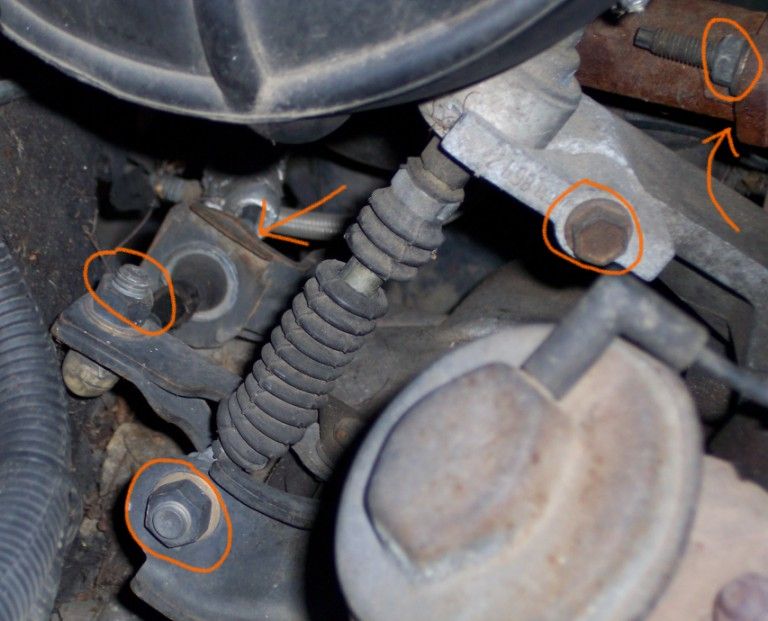
4-Speeds and 5-Speeds are not that very different but the pictures below are of a Getrag 5-Speed. You need to remove the 15mm nut from the gear selector switch and the 15mm nut from the shift selector arm. You also need to remove the c-clips from each and pull the cables out of the way (behind the deck lid hinge is a good place). Remove the two 13mm nuts holding the Clutch Slave Cylinder in place.


STEP 23:

As we move around the car to the driver side we want to disconnect the tranny to chassis ground wire. It is held to the frame rail under the air cleaner by a 10mm screw. Remove it and pull the wire out of the way. If you prefer you can just loosen the 15mm nut on the block end of the wire; your call.


STEP 24:

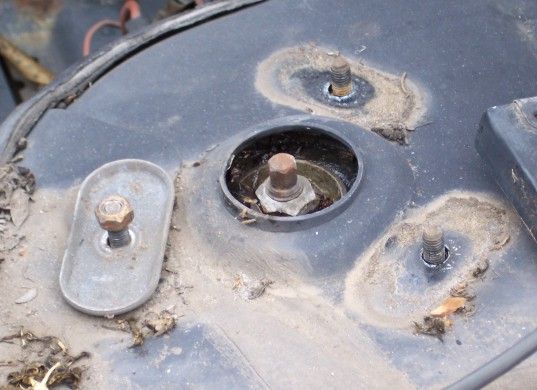
Remove the strut tower nuts and brackets as you did for the passenger side leaving one nut and washer behind finger tight for the time being.


STEP 25:

Disconnect the accelerator cable from the Throttle Body by pressing the plastic tabs together and sliding the cable through the bracket hole. Then pull the small metal clip off the tab allowing you to slide the cable off. Do the same with the cruise control cable if you have Cruise Control. You can leave the transmission kick-down cable alone. Be sure to slide the other cables up out of the clip on the coolant fill pipe.


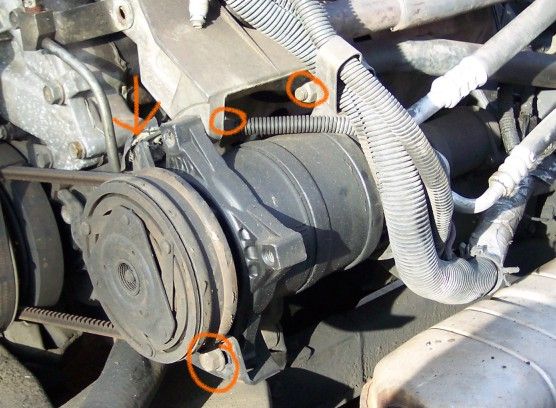
STEP 26:

If your AC is not discharged and you do not wish to discharge it you will need to disconnect the AC compressor from the engine. Skip Step 26 in this case.
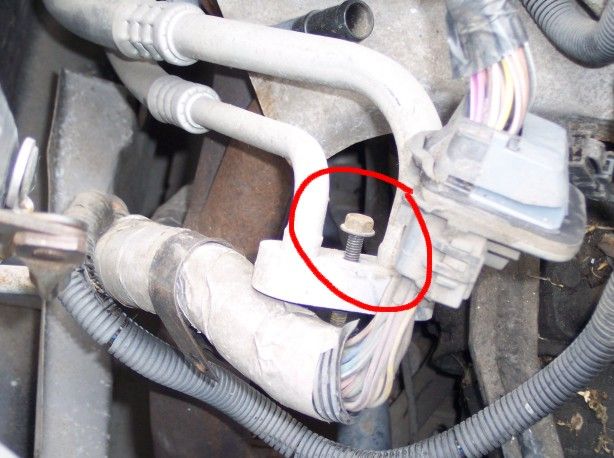
Well, you may not believe it but you are almost done with the top side of the car. You have to disconnect the AC next. This can be done in two ways and the method you choose has more to do with environmental concerns than convenience. If your AC is discharged already then this is the easiest method: using your 18" extension, remove the 10mm screw holding the AC compressor hose to the lineal chassis hose bib and pull the hose over to the engine and out of the way.


STEP 27:

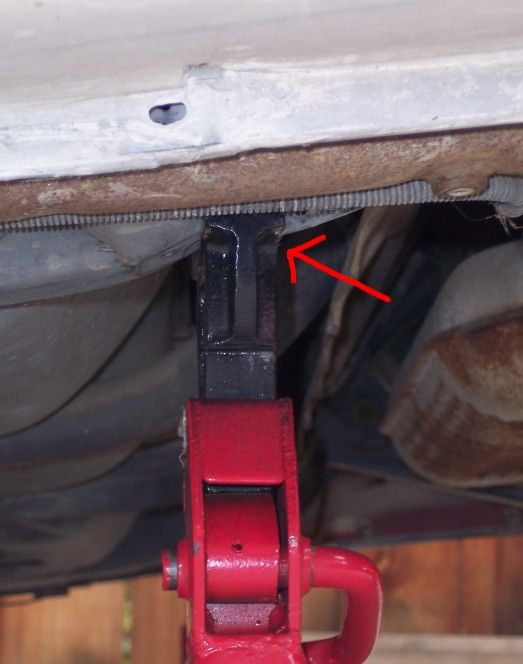
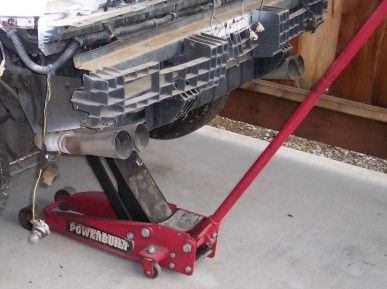
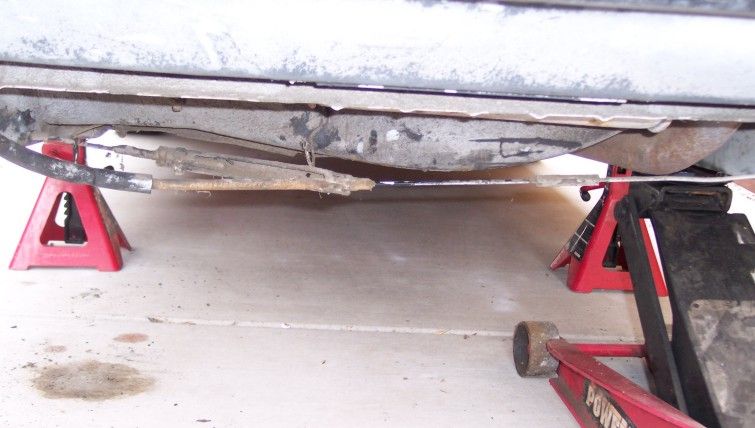
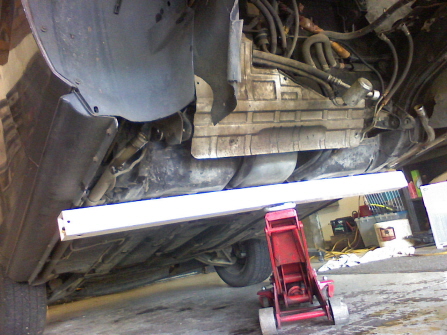
Loosen the rear wheel lug nuts just enough to break them free. Place the jack under the rear cross member of the K-frame and jack the car up as high as your jack will go. Place jack stands under the notched area of the floor pan jacking points. Let the car rest on the jack stands but LEAVE THE JACK UNDER THE CROSS MEMBER BEFORE GETTING UNDER THE CAR! Never take your safety for granted when working under a car. Chocks, jack stands, and a jack in combination are a good support system. Loosen the lug nuts all the way now and remove the rear wheels.


STEP 28:
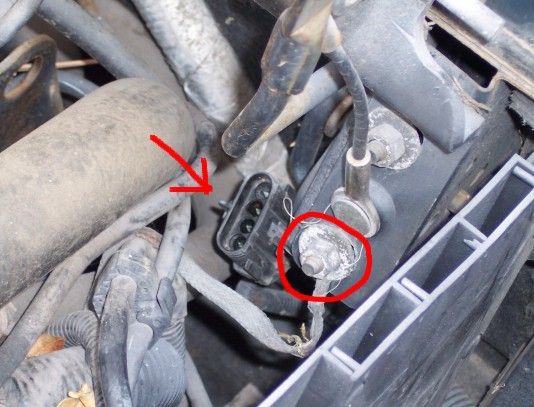
If you skipped Step 26 then you will need to crawl under the passenger side of the car and remove the AC compressor from the engine. To do this you must first remove the two 10mm screws holding the AC heat shield in place above the exhaust hanger springs and set the heat shield aside. Now unplug the compressor wire and using your 15mm socket and 15mm box wrench you need to remove the three bolts holding the compressor to the brackets. Once removed you will not have enough room to lift it aside so for now just use a bungy cord or rope or a wire hanger to hold it against the firewall (I hang it on the passenger deck lid hinge).


STEP 29:

Now you want to get a bucket or pan because you need to remove the coolant hoses and drain the coolant. Remove the coolant fill cap the use your 8mm socket and loosen the hose clamp on the lineal tube end. Do this on both sides of the car. (Note: I have removed the wheel wells to make photographs easier but you do not need to do this)


STEP 30:

Now you need to separate the mud skirts from the K-frame. They are held in by plastic rivets which don’t like being removed. If you have the "pop-pin" style rivets then just use your removal tool to pull the centers out then the entire rivet will pull out easily. If you have the type with the phillips head center pin then use your screwdriver to slowly turn the center screw out. This is more of an art than a science to you might want to work the bas of the pin with the removal tool or a screwdriver with one hand while working the screw with the other. You don't need to remove them all but take out enough to make sure that anything coming through the skirts like axles and so on can drop away. Personally, I usually remove the whole thing because if gives better access to other bolts and I can remove years of caked-up mud more easily while it is out. Again, Its your call.


STEP 31:

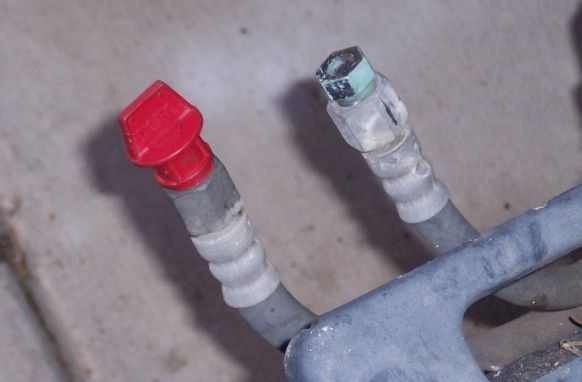
Now disconnect the transmission cooler lines. The best way to do this is to disconnect the lower line from the tranny side and the upper line from the frame side. NOW (to keep fluid from leaking everywhere) take the upper line that you disconnected from the frame side and just shove it on the lower tranny side tube. Then take the lower tube and connect the free end to the upper frame side tube. Don't tighten the clamps. This is how you will know which goes where. You will have two loops, one on the frame and one on the tranny. The loose ends just swap with each other when you re-install.
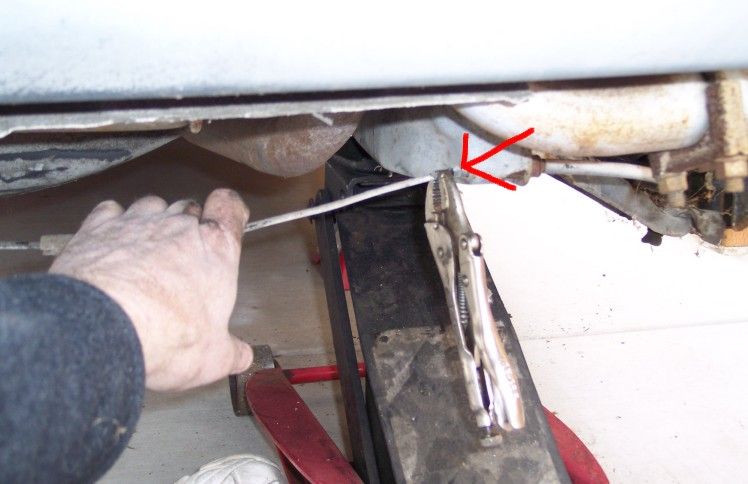
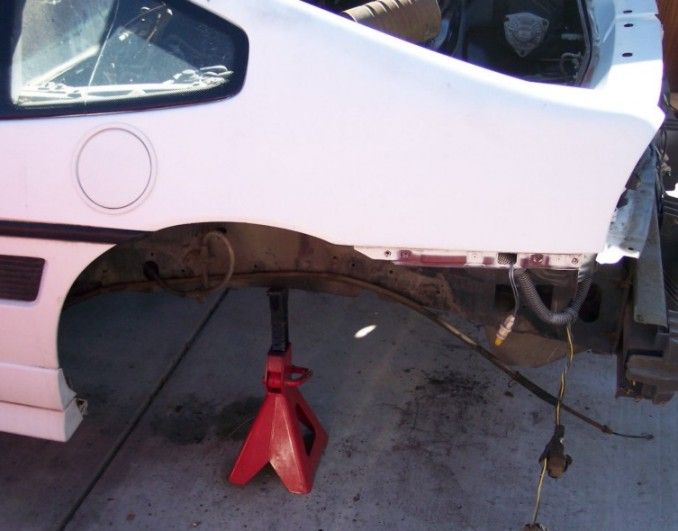


STEP 32:

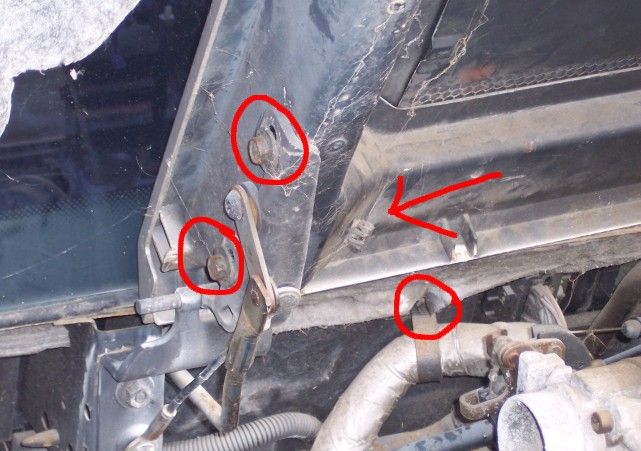
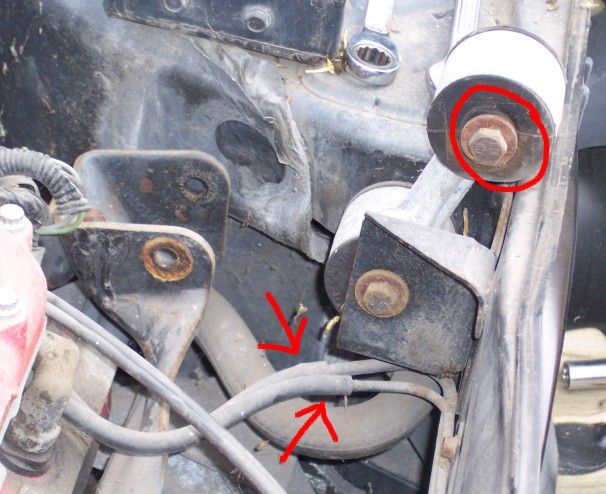
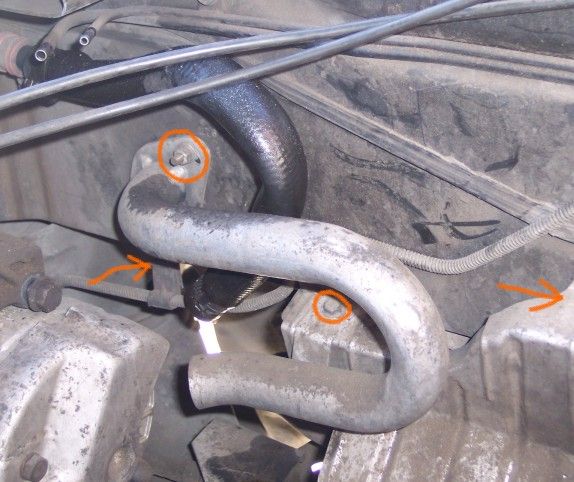
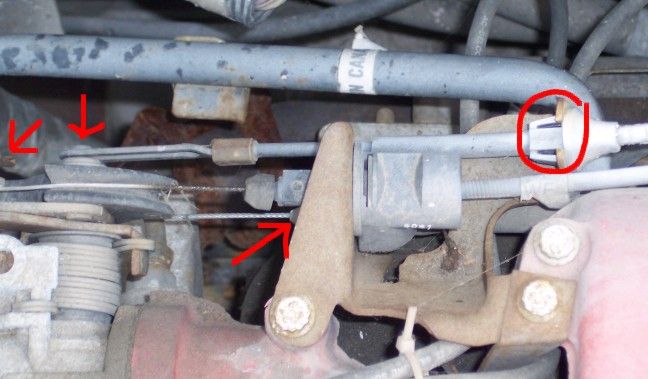
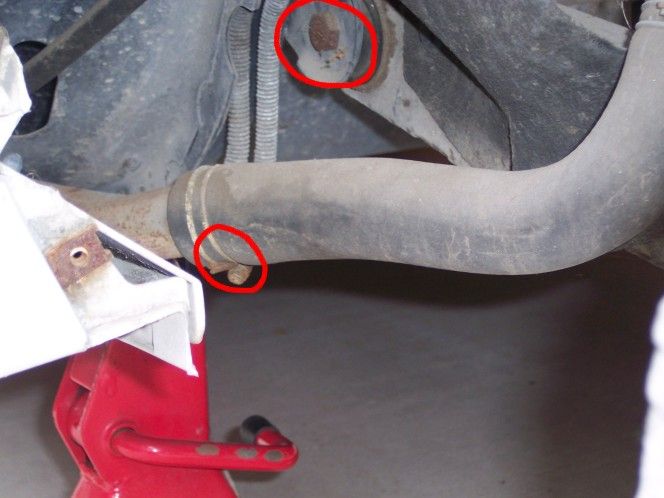
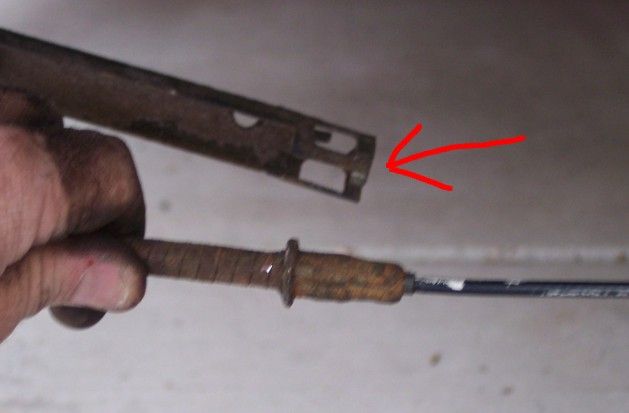
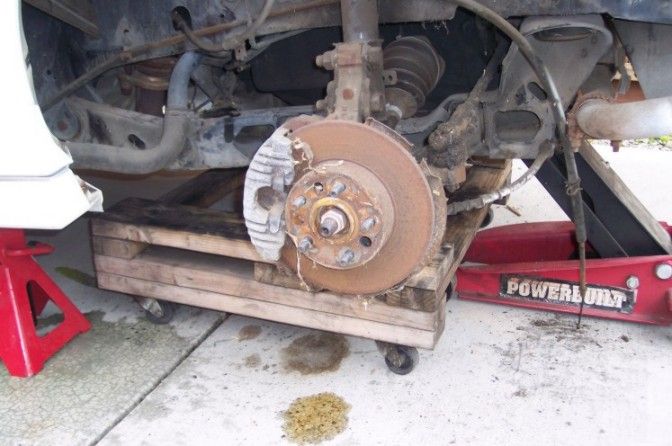
Now for the brakes. I prefer to simply remove the bleeder cable since most cars I pull the engines from need a good hydraulic fluid bleed anyway so first use your 13mm box wrench to remove the hose from the strut bracket indicated by the arrow. Then use your 11mm box wrench to loosen the hose nut from the caliper. There are two compressed brass washers on either end of the hose end that you will want to replace. Now set the hose aside. There is a great hole in the frame rail that is perfect for this if you removed your wheel well. If not, just loop it behind itself.


BIG TIP #6: If you can, get yourself a set of hose clamps to keep the fluid from leaking out. If you don't have any clamps, use your vise grips with some rubber tips or cloth to keep from marring the hose. Also, an old set of brake hoses make a GREAT temporary plug to keep debris out while cleaning.
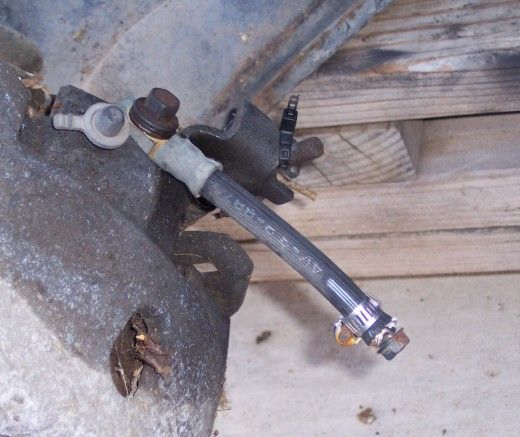


STEP 33:

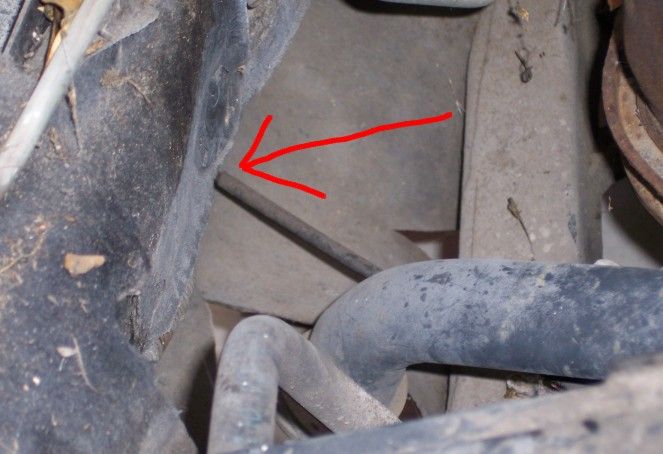
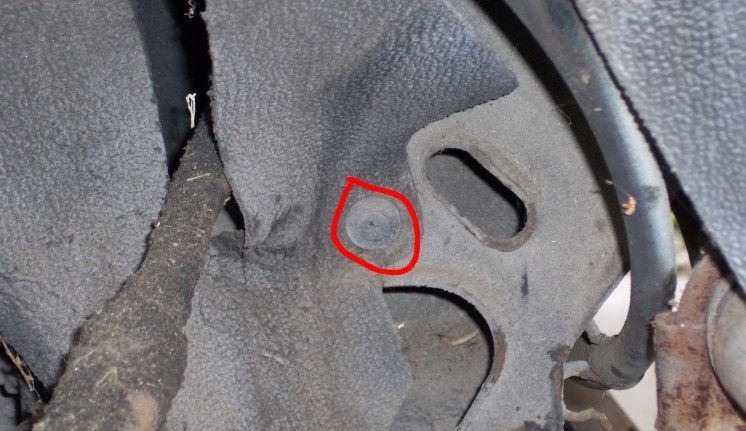
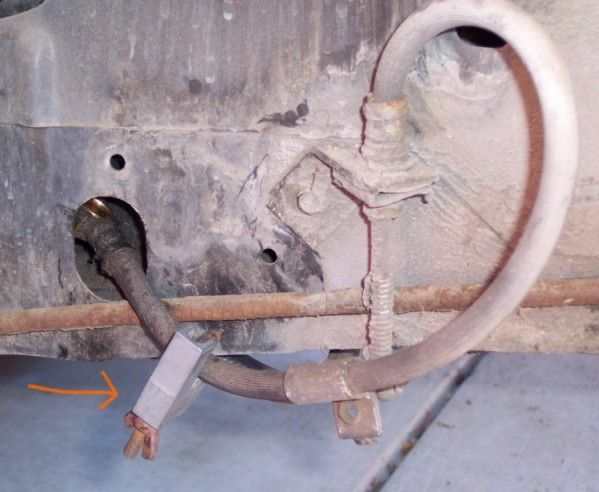
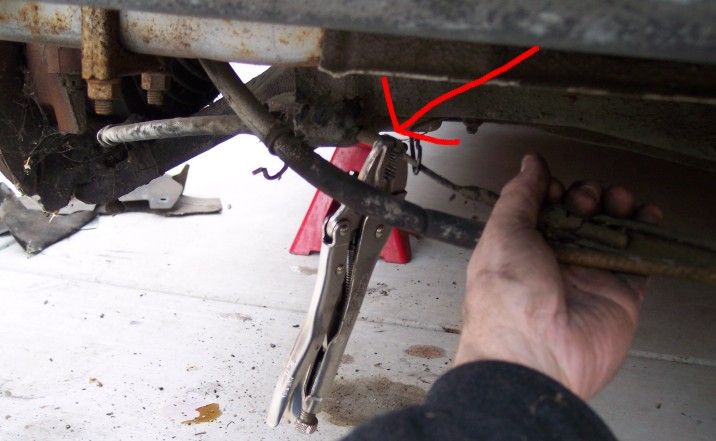
Now comes one the easiest yet most complained about steps of all, disconnecting the brake cable. The pictures below describe the 85-87 cable. 1988 Fiero owners skip to the description below. First, make sure the parking brake is OFF. Then pull the cable off the support clips shown:


Now for my favorite trick to easy removal, grab the cable on the passenger side and pull it until it is fully extended, then clamp one of your vise grips onto the cable at the end of the tube so that it remains in tension.


Do the same on the driver side.


Now rotate the cable splice around to reveal a small tab that holds the cable ends in place. Use your thin screw driver to pry up VERY VERY slightly. Too much will snap it off, not that that matters too much since under tension it won't come apart on you down the road. But I hate breaking things and you don't need to bend the tab much at all to make the cable end slide free. Now just slide the cable end out!


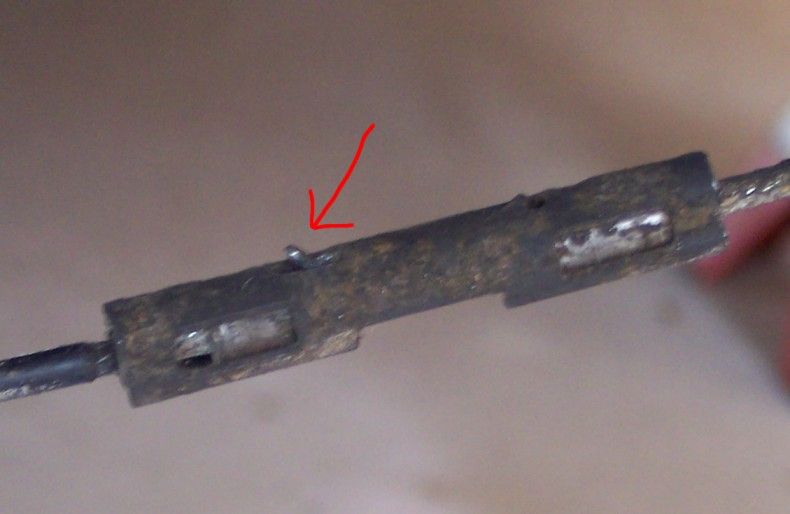
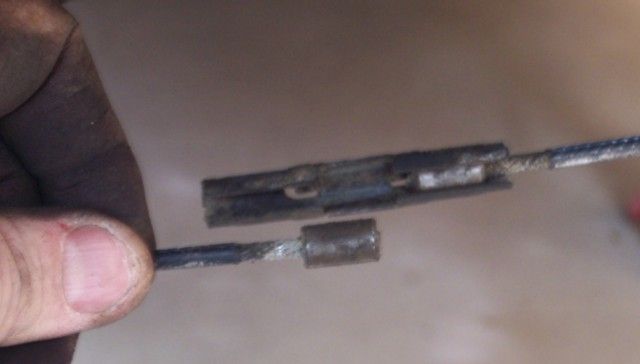
And finally push the whole cable through the adjustment wheel. Remove the vise grips. This method took me just 48 seconds. The beauty of it is that when you put the engine back in you don't have to adjust your brake. It is already set exactly where it was before!
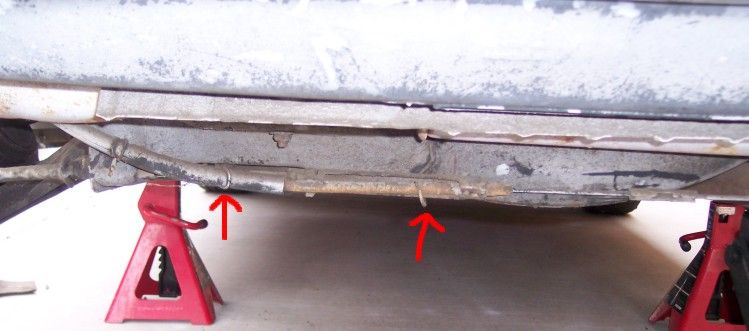
STEP 34:

WE ARE CLOSE! Next you want to use your 15mm socket with the breaker bar to loosen the rear cradle bolts. If you live in dry climates you can use a little penetrating lube or WD-40 and you'll be fine. If you live in the rust belt then you may not be able to remove the bolt without breaking the nut loose on the other side. In this case, try SAXMAN's method listed on Page 2 of the thread. Then you want to use your 18mm socket and box wrench to remove the front cradle nuts and tap the bolt through part way. Use plenty of penetrating lube or WD-40 here. This is the part where you are going to wish you had compressed air!
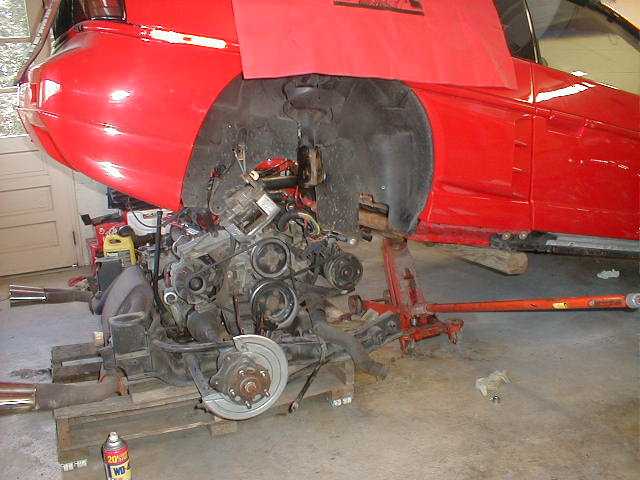


STEP 35:

Now you want to place the dolly under the K-frame. Make sure you push it far enough forward to not interfere with the floor jack when you lower it but no further. Now lower the car onto the dolly.
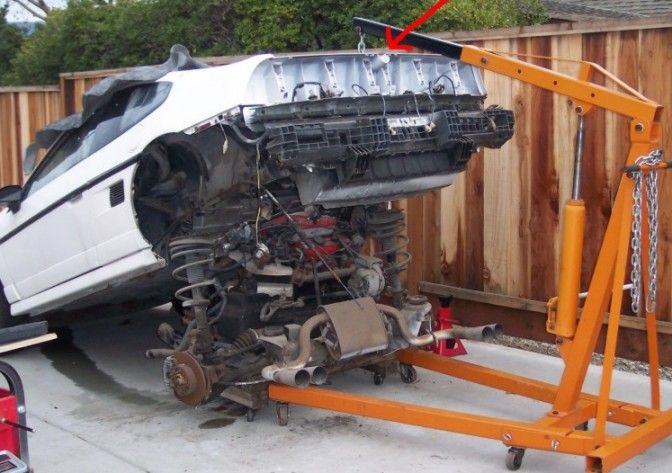


STEP 36:

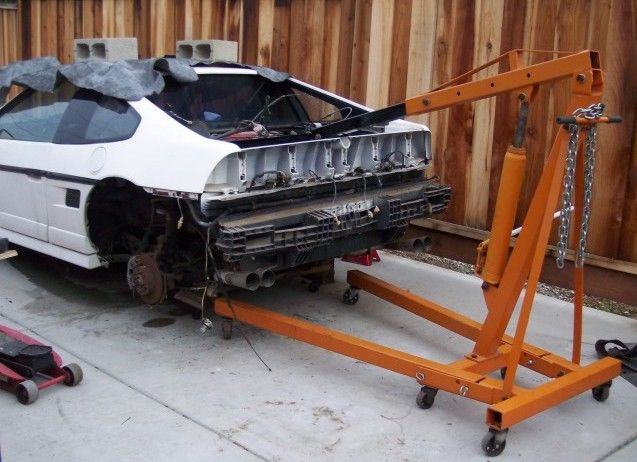
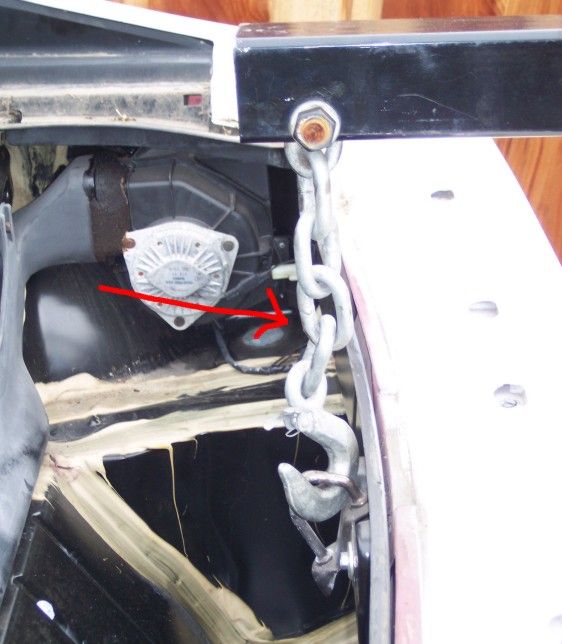
Place your cherry picker in back of the car and connect it to your trunk latch. Make sure you give yourself enough slack (about 5 or 6 links) because when you lift the car you do not want the boom arm to crack the fiberglass of your rear clip.


BIG TIP #7: I have heard of only one failure of a latch being ripped out by the weight of the car before, thrid party. So I do not know if it actually happened or not or what the circumstances of the failure might have been. However, aside from the anecdotal evidence that my Golden Gate Fiero Club colleagues and I have collectively done this about 50 times without incident, I did a few calcs and here is the math;
The latch is made of 1/4" round steel with a solid pressed button to the base plate. The shear strength on this piece is not known but it MUST be more that the shear strength of the surrounding sheet metal which is as follows: the shear strength for the average spot weld of .8 mm sheet metal is 900 lbs each. The rear trunk support bracket of the Fiero has no less than 8 spot welds. Then you have the two Grade 8 M6 bolts rated to 1,600 lbs each or 3,200 lbs for a 2,860 pound car. In theory, you could lift the entire car up off the ground by this latch. And with the engine out and the front wheels on the ground the weight you are actually lifting is considerably less. The only ill effects of this procedure are that the latch tends to bend up slightly making the decklid stick up when closed. The solution is quite simply a single hammer blow to the latch. The mounting screws also allow for some adjustment. If you want to do this more than once you can also just do as I do and keep a spare latch that I use just for lifting so I don't care that it is bent.

Further reading for the safety conscious:
http://www.esabna.com/EUWeb...dbook/592mig11_9.htm
http://www.rigging.net/Bolts.html

Now having said all this I should also point out that the world is not a uniform place, if your car has fewer spot welds than my car, rust, latch defect from the factory, or if you are struck by a bolt of lightning I AM NOT RESPONSIBLE!
Any automotive work involves an element of risk and this procedure is no different. You will read some posts by other forum members in the thread who offer alternative lifting procedures and you should treat each one the same as mine, with sober consideration before choosing one and attempting it. And you should exercise all due common sense and safety protocols.


STEP 37:

Now is the time to remove those two strut tower nuts and washers you left on earlier. Next, remove the cradle bolts. Start with the rear bolts then move to the front. You can start lifting the car with the cherry picker just a few inches to take the weight off the cradle bolts so they come out easily. I often lift the car up with the cherry picker and then grab the notchie or GT roof line and pull down with one hand while twisting the bolt free with vise grips. Be patient. They will come out.
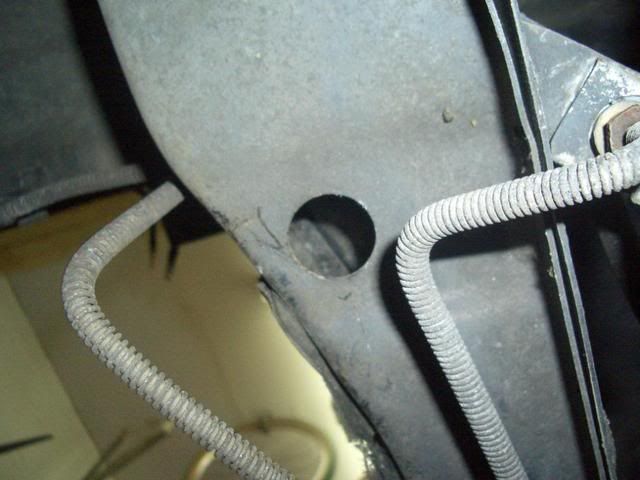
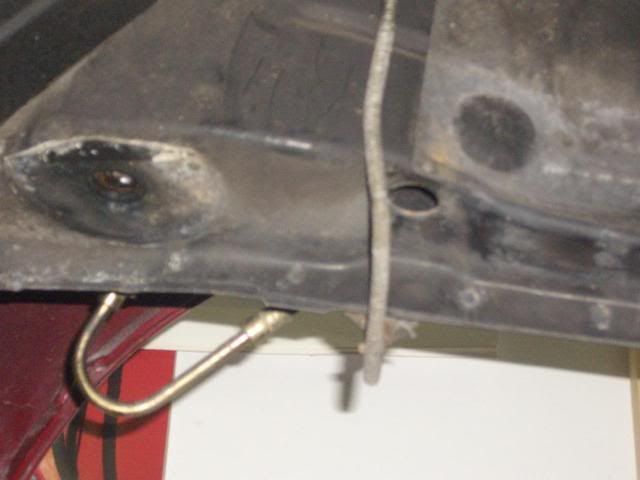
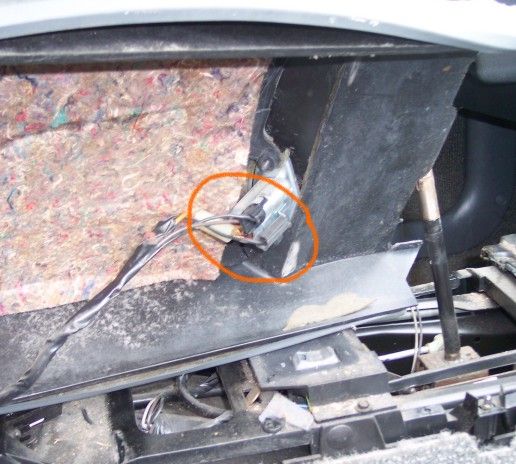
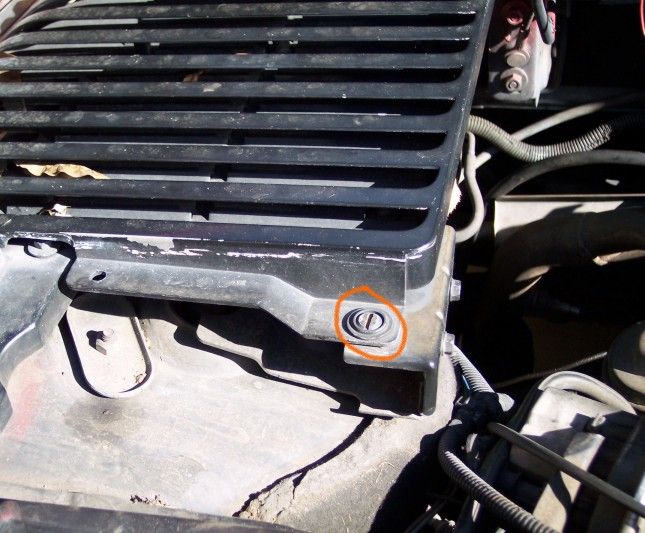
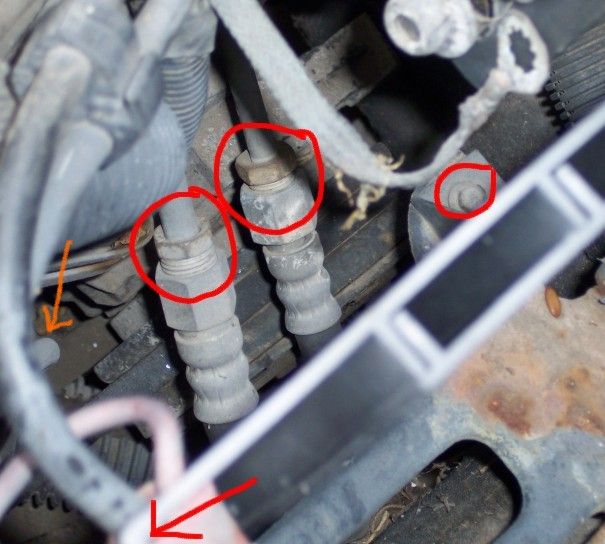
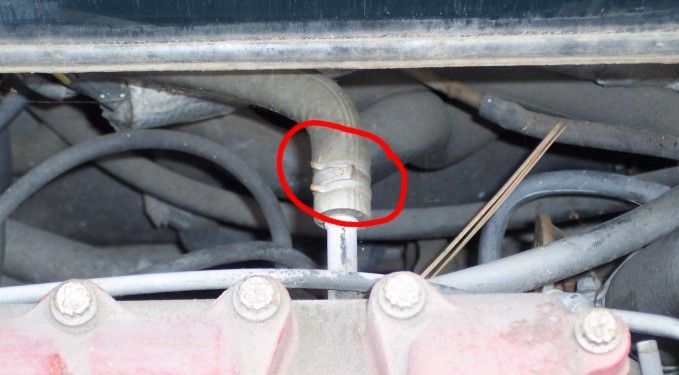
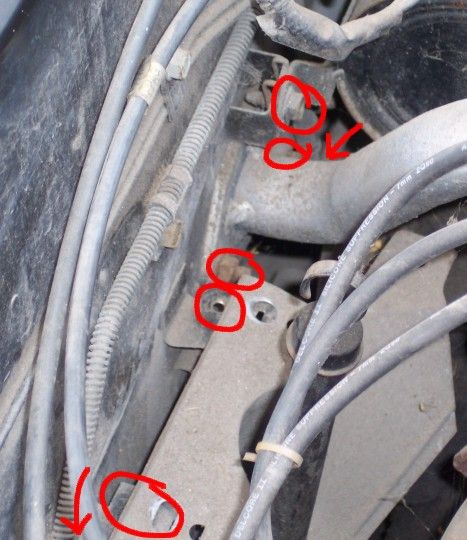
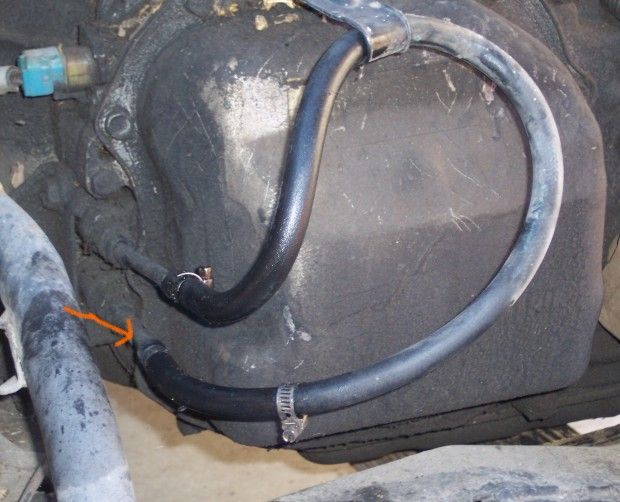
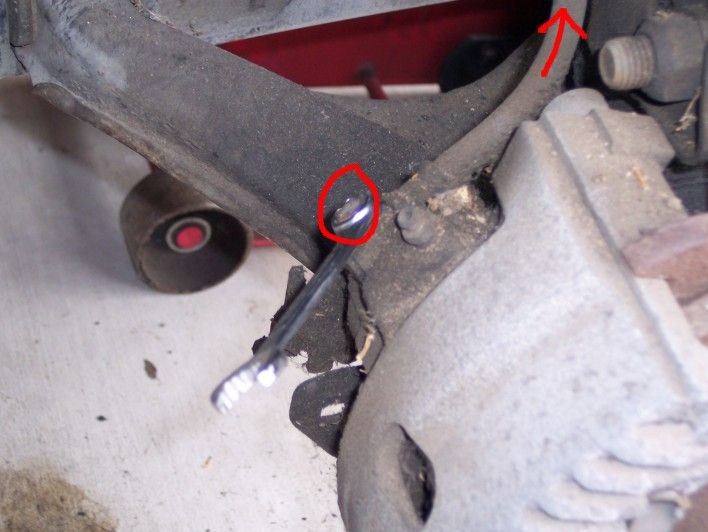
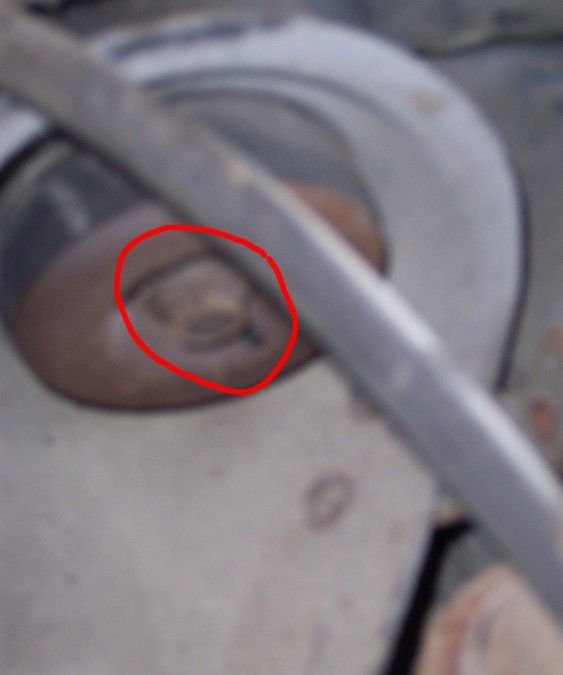
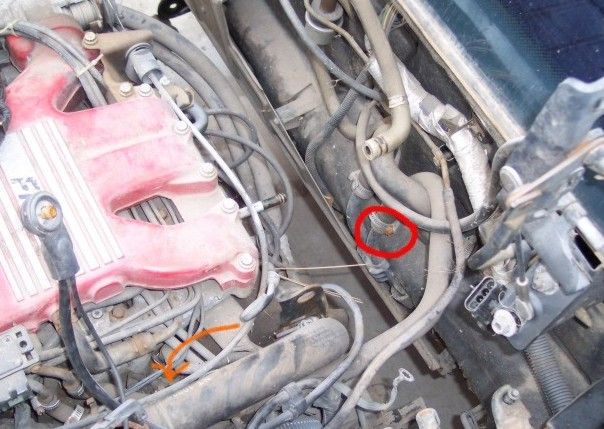
STEP 38:

Now you want to lift the car about 1 foot off the engine cradle and remove ONE last hose. In GM's infinite wisdom they placed one hose right under another on the coolant fill pipe making access impossible without removing everything around it. So I prefer to just wait to this stage of the process and disconnect it from the firewall. The arrow points to the impossible to reach location and the circle points to the now easily accessible location. NOW is also a great time to move the AC compressor aside if you removed it earlier. Hoist it up out of the way and strap it off to the deck lid hinge mount.


STEP 39:

The last thing to do is double check all of your hoses and wires to make sure nothing is still connected.

STEP 40:

Jack that sucker up making occasional checks for clearance and obstructions.
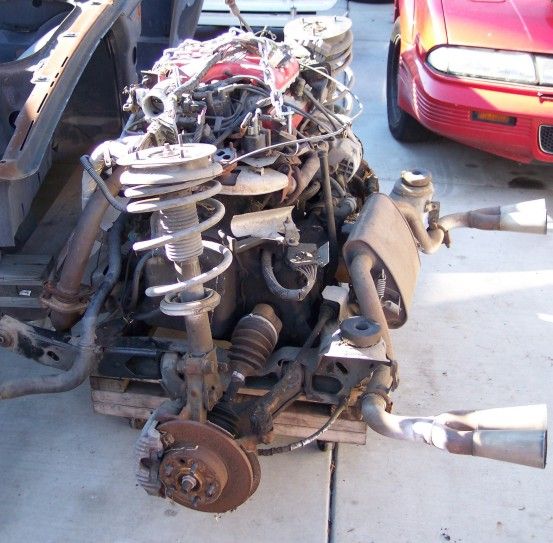
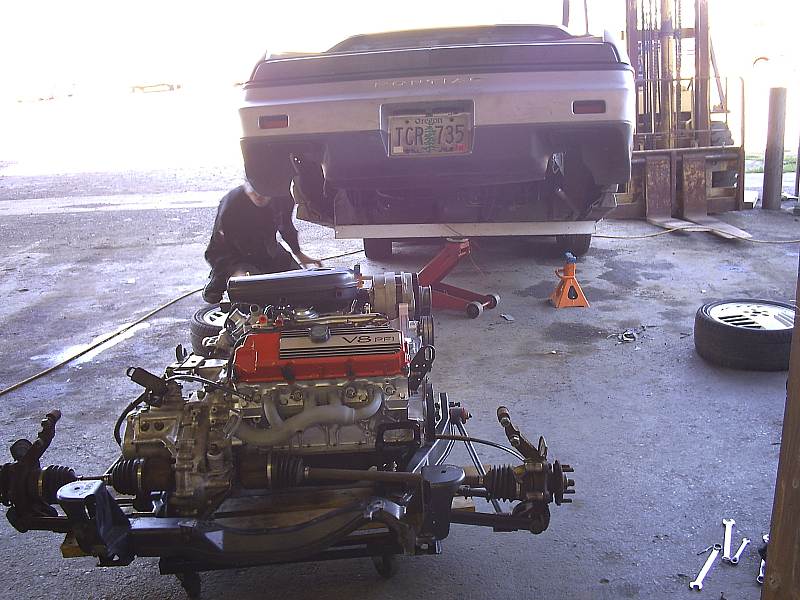


STEP 41:

Wheel the engine out the side. Move the jack stands further back along the frame rail and lower the car onto them.


STEP 42:

Have a beer!

[This message has been edited by Toddster (edited 09-28-2019).]

IP: Logged
PFF
System Bot
Austrian Import
Member
Posts: 3919
From: Monterey, CA
Registered: Feb 2007


Feedback score: N/A
Leave feedback

Rate this member

Report this Post01-01-2008 08:02 PM Click Here to See the Profile for Austrian ImportSend a Private Message to Austrian ImportEdit/Delete MessageReply w/QuoteDirect Link to This Post
Wow!! Great step-by-step thread. Quick add: What's the time this procedure takes (range obviously, since beginners will take longer than veterans. )
IP: Logged
Toddster
Member
Posts: 20871
From: Roswell, Georgia
Registered: May 2001


Feedback score:    (41)
Leave feedback


Total ratings: 503
Rate this member

Report this Post01-01-2008 08:19 PM Click Here to See the Profile for ToddsterSend a Private Message to ToddsterEdit/Delete MessageReply w/QuoteDirect Link to This Post
 
quote
Originally posted by Austrian Import:

Wow!! Great step-by-step thread. Quick add: What's the time this procedure takes (range obviously, since beginners will take longer than veterans. )


I did this in just over 2 hours but if I was a newbie or just taking my sweet time I still wouldn't take more than 4 hours to do it. The secret is having all the right tools laid out and handy. The one thing that slows a project up more than anything else is looking for tools.
IP: Logged
Xanth
Member
Posts: 6886
From: Massachusetts
Registered: May 2006


Feedback score:    (18)
Leave feedback


Total ratings: 174
Rate this member

Report this Post01-01-2008 08:49 PM Click Here to See the Profile for XanthSend a Private Message to XanthEdit/Delete MessageReply w/QuoteDirect Link to This Post
Excellent Article, very well done! I am sure a lot of people will appreciate it.

If you'd like to publish the full version with larger images I can host it on FieroDomain for you, linking the small images with their larger counterparts.
IP: Logged
buddycraigg
Member
Posts: 13576
From: kansas city, mo
Registered: Jul 2002


Feedback score: (5)
Leave feedback


Total ratings: 478
Rate this member

Report this Post01-01-2008 09:18 PM Click Here to See the Profile for buddycraiggSend a Private Message to buddycraiggEdit/Delete MessageReply w/QuoteDirect Link to This Post
good job.

two small points
i didn't see where you drained the coolant.

step 14. those are SAE nuts

step 31, i use channel locks to "squeeze" one cable end out of the holder instead of bending up the tab.

[This message has been edited by buddycraigg (edited 01-01-2008).]

IP: Logged
sardonyx247
Member
Posts: 5032
From: Nevada, USA
Registered: Jun 2003


Feedback score:    (88)
Leave feedback


Total ratings: 218
Rate this member

Report this Post01-01-2008 10:47 PM Click Here to See the Profile for sardonyx247Click Here to visit sardonyx247's HomePageSend a Private Message to sardonyx247Edit/Delete MessageReply w/QuoteDirect Link to This Post
 
quote
Originally posted by buddycraigg:

good job.

two small points
i didn't see where you drained the coolant.

step 14. those are SAE nuts

step 31, i use channel locks to "squeeze" one cable end out of the holder instead of bending up the tab.


Totally.
And step 40 usally needs repeating

Great write up
IP: Logged
Saxman
Member
Posts: 5151
From: Melbourne, FL
Registered: May 2005


Feedback score:    (8)
Leave feedback


Total ratings: 114
Rate this member

Report this Post01-01-2008 10:51 PM Click Here to See the Profile for SaxmanClick Here to visit Saxman's HomePageSend a Private Message to SaxmanEdit/Delete MessageReply w/QuoteDirect Link to This Post
Excellent! I'm surprised this hasn't been done in such detail before. I can't say that any more!

Now, I'll be watching the rest of the engine removal since I am about to strip everything off and move it to a different cradle.

Much appreciated!
IP: Logged
Toddster
Member
Posts: 20871
From: Roswell, Georgia
Registered: May 2001


Feedback score:    (41)
Leave feedback


Total ratings: 503
Rate this member

Report this Post01-02-2008 12:42 AM Click Here to See the Profile for ToddsterSend a Private Message to ToddsterEdit/Delete MessageReply w/QuoteDirect Link to This Post
 
quote
Originally posted by buddycraigg:

good job.

two small points
i didn't see where you drained the coolant.


DOH'

I usually do that by placing a pan under the hoses when I disconnect them. I see an edit in my future.

 
quote

step 14. those are SAE nuts


Good point again. I use a Metwrench set and so I get used to being able to mix and match SAE and Metric. I'll modify that too.

 
quote

step 31, i use channel locks to "squeeze" one cable end out of the holder instead of bending up the tab.


I tried that once but couldn't get the edge in the groove very easily. Then I tried the tab and presto, slips right out.
IP: Logged
Toddster
Member
Posts: 20871
From: Roswell, Georgia
Registered: May 2001


Feedback score:    (41)
Leave feedback


Total ratings: 503
Rate this member

Report this Post01-02-2008 12:48 AM Click Here to See the Profile for ToddsterSend a Private Message to ToddsterEdit/Delete MessageReply w/QuoteDirect Link to This Post

Toddster

20871 posts
Member since May 2001
 
quote
Originally posted by Xanth:

Excellent Article, very well done! I am sure a lot of people will appreciate it.

If you'd like to publish the full version with larger images I can host it on FieroDomain for you, linking the small images with their larger counterparts.


Will do 'Xan'.
I want to wait a couple of days and consolidate the feedback of the forum to tighten-up the article and then I'll shoot you a copy.
IP: Logged
Toddster
Member
Posts: 20871
From: Roswell, Georgia
Registered: May 2001


Feedback score:    (41)
Leave feedback


Total ratings: 503
Rate this member

Report this Post01-02-2008 12:54 AM Click Here to See the Profile for ToddsterSend a Private Message to ToddsterEdit/Delete MessageReply w/QuoteDirect Link to This Post

Toddster

20871 posts
Member since May 2001
 
quote
Originally posted by sardonyx247:


Totally.
And step 40 usally needs repeating

Great write up


Looks Like I did Step 40 too soon. I forgot one other thing; the 88 brake cable removal procedure!

Oh well, I wrote this on New Year's Eve so I have an excuse.

I'll get to it this weekend...along with a spell check!

[This message has been edited by Toddster (edited 01-02-2008).]

IP: Logged
whadeduck
Member
Posts: 8907
From: Aventura, FL
Registered: Jul 2004


Feedback score:    (7)
Leave feedback


Total ratings: 103
Rate this member

Report this Post01-02-2008 01:41 AM Click Here to See the Profile for whadeduckSend a Private Message to whadeduckEdit/Delete MessageReply w/QuoteDirect Link to This Post
Too many step 40's and you'll be using a chell speck instead.

------------------
Whade' "The Duck Formerly Known As Wade" Duck
'87 GT Auto
'88 Ferrario
'84 Indy

IP: Logged
PFF
System Bot
Pyrthian
Member
Posts: 29569
From: Detroit, MI
Registered: Jul 2002


Feedback score: (5)
Leave feedback


Total ratings: 342
Rate this member

Report this Post01-02-2008 08:40 AM Click Here to See the Profile for PyrthianSend a Private Message to PyrthianEdit/Delete MessageReply w/QuoteDirect Link to This Post
I hoisted by the trunk latch last time I dropped my cradle. the latch started the bend outwards slightly - I can see in your pic that yours has also. this scared me ALOT, and made me think I should try something else for when I put the cradle back in. I was think of making something to bolt to the strut tower holes, but that would put the cherry picker legs way to far under the car, and interfere with the cradle dolly.


I guess that slight bend is what to expect, and it'll be fine....
IP: Logged
skitime
Member
Posts: 5765
From: Akron, PA, USA
Registered: Aug 2000


Feedback score:    (10)
Leave feedback


Total ratings: 332
Rate this member

Report this Post01-02-2008 11:06 AM Click Here to See the Profile for skitimeSend a Private Message to skitimeEdit/Delete MessageReply w/QuoteDirect Link to This Post
 
quote
Originally posted by Pyrthian:

I hoisted by the trunk latch last time I dropped my cradle. the latch started the bend outwards slightly - I can see in your pic that yours has also. this scared me ALOT, and made me think I should try something else for when I put the cradle back in. I was think of making something to bolt to the strut tower holes, but that would put the cherry picker legs way to far under the car, and interfere with the cradle dolly.


I guess that slight bend is what to expect, and it'll be fine....


You could use the method in the factory manual. No danger of damage and you don't need a engine hoist. It also lifts the nose so even with my chin spoiler it is not even close to the ground.

I want to say that this is an excellent post and do not want to detract from it but let me add the way the factory manual shows. They lift the car from just behind the middle of the car. They have even created clearances for the lifting 4x4 under the car and can be seen under the rocker panels. To move the engine around when it is on the floor, I just use a skid cut to the size of the cradle. I mount a inexpensive set of refrigerator rollers to the skid. On smooth concrete you can easily slide the assembly in any direction with the engine on it. It sure works great. I only need one floor jack and two jack stands to remove an engine. Just put the jack under a 4x4 under the middle. Lower the cradle onto the skid. Unbolt cradle. Raise car up until the engine and cradle clear. Use jack stands under the 4x4 if you ever get under the car. I never even had help to do it. Always did it by myself. I roll it out the side usually so I don’t have to have the car up very high. My garage ceiling is only 7' high. You really don't have to have the car very high. No need to raise the front of the car even with the spoiler I have on the front. Reinstall in the opposite order.

Note this picture shows the rocker panel removed but that was for a different reason not because I was removing the engine.

Notice how much lower my car is to remove the engine than the photos using the engine hoist. Also notice how the hoist pushes the nose down hard which is why some people have to block the front wheels up wich adds to the danger of the car falling off the front blocks.

[This message has been edited by skitime (edited 01-02-2008).]

IP: Logged
Pyrthian
Member
Posts: 29569
From: Detroit, MI
Registered: Jul 2002


Feedback score: (5)
Leave feedback


Total ratings: 342
Rate this member

Report this Post01-02-2008 11:35 AM Click Here to See the Profile for PyrthianSend a Private Message to PyrthianEdit/Delete MessageReply w/QuoteDirect Link to This Post
 
quote
Originally posted by skitime:
You could use the method in the factory manual. No danger of damage and you don't need a engine hoist. It also lifts the nose so even with my chin spoiler it is not even close to the ground.


which is?
IP: Logged
Toddster
Member
Posts: 20871
From: Roswell, Georgia
Registered: May 2001


Feedback score:    (41)
Leave feedback


Total ratings: 503
Rate this member

Report this Post01-02-2008 11:49 AM Click Here to See the Profile for ToddsterSend a Private Message to ToddsterEdit/Delete MessageReply w/QuoteDirect Link to This Post
 
quote
Originally posted by Pyrthian:

I hoisted by the trunk latch last time I dropped my cradle. the latch started the bend outwards slightly - I can see in your pic that yours has also. this scared me ALOT, and made me think I should try something else for when I put the cradle back in. I was think of making something to bolt to the strut tower holes, but that would put the cherry picker legs way to far under the car, and interfere with the cradle dolly.


I guess that slight bend is what to expect, and it'll be fine....


Yeah, the bending is normal. The lower part of the latch is cantilevered so bending is just a natural consequence. There are several other methods for lifting the car and I hope other readers post their methods here. I just wanted to list one method that anyone could do without buying special strut tower bars, or hoists, etc.

There is more than one way to skin a cat...although why anyone would want to skin cats is another thread.
IP: Logged
Richjk21
Member
Posts: 2228
From: Central Square NY, USA
Registered: Feb 2006


Feedback score:    (9)
Leave feedback

Rate this member

Report this Post01-02-2008 12:09 PM Click Here to See the Profile for Richjk21Send a Private Message to Richjk21Edit/Delete MessageReply w/QuoteDirect Link to This Post
 
quote
Originally posted by Pyrthian:

I hoisted by the trunk latch last time I dropped my cradle. the latch started the bend outwards slightly - I can see in your pic that yours has also. this scared me ALOT, and made me think I should try something else for when I put the cradle back in. I was think of making something to bolt to the strut tower holes, but that would put the cherry picker legs way to far under the car, and interfere with the cradle dolly.


I guess that slight bend is what to expect, and it'll be fine....


I did it using a setup between the strut towers, and you can see how i worked it from my pics in the link below. Instead of coming in from the rear my cherry picker comes in from the side, and the legs fit perfectly around the dolly. Not saying the trunk latch thing doesn't work, just not comfortable with it myself.

http://home.comcast.net/~rrisc21/drop.htm

Truely though, this is a great thread..... chock full of great info.

Rich
IP: Logged
skitime
Member
Posts: 5765
From: Akron, PA, USA
Registered: Aug 2000


Feedback score:    (10)
Leave feedback


Total ratings: 332
Rate this member

Report this Post01-02-2008 12:23 PM Click Here to See the Profile for skitimeSend a Private Message to skitimeEdit/Delete MessageReply w/QuoteDirect Link to This Post
 
quote
Originally posted by Pyrthian:


which is?


To answer this I updated my last post above.

IP: Logged
Pyrthian
Member
Posts: 29569
From: Detroit, MI
Registered: Jul 2002


Feedback score: (5)
Leave feedback


Total ratings: 342
Rate this member

Report this Post01-02-2008 12:35 PM Click Here to See the Profile for PyrthianSend a Private Message to PyrthianEdit/Delete MessageReply w/QuoteDirect Link to This Post
 
quote
Originally posted by skitime:
To answer this I updated my last post above.


yes, thats how I've done it my first 2 1/2 times.
on the cradle instertion for the 2.5 - 3rd time - which I liked ALOT was to rig a come-along to my garage ceiling, and use the come-along to lift the car by the strut towers. this worked GREAT - except my garage REALLY didnt like this. maybe if I setup some more support, I will try this again. but, it also puts the come-along right in the way of the garage door, so, I need to get it done to open the door again, and the back hood needs to be off......
the cherry pickers works pretty good sofar - but keeping the legs out of the way of my dolly is the hard part. my dolly is just a low fridge appliance dolly.

I think it was Jazzman that uses 2 HUGE floor jacks, and just hoists away with them monsters.
IP: Logged
Toddster
Member
Posts: 20871
From: Roswell, Georgia
Registered: May 2001


Feedback score:    (41)
Leave feedback


Total ratings: 503
Rate this member

Report this Post01-02-2008 01:06 PM Click Here to See the Profile for ToddsterSend a Private Message to ToddsterEdit/Delete MessageReply w/QuoteDirect Link to This Post
 
quote
Originally posted by skitime:

I want to say that this is an excellent post and do not want to detract from it but let me add the way the factory manual shows.


On the contrary, I want people to post their other ideas. That is how I learned to do it this way, by collecting various ideas and lumping them together into one really efficient method. And yours is certainly a value add for this thread.

I should just point out that like with any other system everything is related. As such, the dolly I show you how to build above will not work with Skitime's method since it elevates the engine 8 inches off the ground. For me, the dolly is an essential tools for engine mobility and storage. That is because at any given time I have 4 or 5 Fieros in the back in various stages of parting or restoration. As such, I am often swapping one engine for another, as is the case in this thread. The white 86 GT this engine came out of has frame damage and I'm just parting the whole thing. But right next to it is a Red 86 GT with a blown head gasket. I'm just going to swap this motor and so I need to move lots of engines around. If you don't need to move your engine from one car to another or you have just one project you are doing then Skitime's method is very doable. If you tend to have more than one car however, it will limit your mobility. Just keep that in mind when making a choice.
IP: Logged
Mister
Member
Posts: 1975
From: Calgary, Alberta, Canada
Registered: Aug 2004


Feedback score: (2)
Leave feedback


Total ratings: 56
Rate this member

Report this Post01-02-2008 01:08 PM Click Here to See the Profile for MisterSend a Private Message to MisterEdit/Delete MessageReply w/QuoteDirect Link to This Post
Great detailed thread Toddster, Thanks and +4U

------------------

T-Top Conversion~Dual HUD~LED Setup~Red Fieros~Montreal Club

IP: Logged
Isurus
Member
Posts: 31
From: Jacksonville, Fl USA
Registered: Dec 2007


Feedback score: (1)
Leave feedback

Rate this member

Report this Post01-02-2008 01:11 PM Click Here to See the Profile for IsurusSend a Private Message to IsurusEdit/Delete MessageReply w/QuoteDirect Link to This Post
I am new to the forum but have been reading it for sometime now. This has to be one of the most informative and well documented articles I've read yet! Thank you...

BTW I will definately be reviewing this shortly when I do my swap!
IP: Logged
PFF
System Bot
skitime
Member
Posts: 5765
From: Akron, PA, USA
Registered: Aug 2000


Feedback score:    (10)
Leave feedback


Total ratings: 332
Rate this member

Report this Post01-02-2008 01:30 PM Click Here to See the Profile for skitimeSend a Private Message to skitimeEdit/Delete MessageReply w/QuoteDirect Link to This Post
 
quote
Originally posted by Toddster:

If you don't need to move your engine from one car to another or you have just one project you are doing then Skitime's method is very doable. If you tend to have more than one car however, it will limit your mobility. Just keep that in mind when making a choice.


Not sure what the difference is??? I have two skids ready to go. This engine was being dropped for the 3800SC engine off camera on another skid. I like the skid because they are free and I don't have to build them and the fridge rollers are very cheap . As long as the skids are on the concrete the hard roller wheels slid easily in any direction. I also have found I can roll the car around easily with the floor jack in any direction which helps a lot in alligning things or just moving the car away from the workbench.

[This message has been edited by skitime (edited 01-02-2008).]

IP: Logged
JazzMan
Member
Posts: 18612
From:
Registered: Mar 2003


Feedback score:    (7)
Leave feedback


Total ratings: 653
User Banned

Report this Post01-02-2008 01:34 PM Click Here to See the Profile for JazzManSend a Private Message to JazzManEdit/Delete MessageReply w/QuoteDirect Link to This Post
On the '88 a trick is to remove one of the bolts holding the longitudinal link to the cradle at the front, this allows the strut to easily lean outwards and clear the rear chassis frame horns as the car is lifted off the cradle. Otherwise, due to the sharp angle that the struts are tilted inwards the upper strut caps will drag hard against the inner well sheet metal and scar it all up.

Also, if removing the motor with the intent of putting it back together, you can unbolt the brake calipers from the cradle and leave them hung with wire from the chassis, that way you don't have to bleed anything upon reassembly and not worry about stripping a bleeder screw.

On cars with the aero nose you'll probably need to put blocking under the front wheels to get the nose high enough that the bumper cover doesn't hit the ground while lifting the rear.

Sidepost battery terminal screws are 5/16", at least that's what's marked on my Snap On sidepost battery wrench.

On the '84s and I believe the '85s the main power fusible links to the car's power system are attached to the starter, instead of to the terminal block adjacent to C500 as in the later models.

On step 10 you show the picture of the connector behind the ALDL but don't call out for it to be disconnected. I think it's the C-2 hundred something.

In step 12, the sensor is called the IAT, or Intake Air Temperature sensor.

BTW, it's not necessary to remove the decklid to do this. I prefer not to because working alone the decklid is hard to handle and easy to damage while maneuvering it on and off the car.

Note: C-500 is a split connector. One half has the body wiring in it and half has the engine wiring. The small screw holds one half of the connector in place and that half has ears that hold the other half in place. Split the connector to separate the engine from the body harnesses.

The 5-speed transmission shown is a Getrag, the Isuzu 5-speed cables are routed similarly to the 4-speed transmissions. Though the Isuzu was only used on the L4 cars it's not that unusual to see one behind a V6 because of an engine or tranny swap.

Step 23: Technically the throttle body is only a TB, as a TBI has in injector in it.

Also, you probably want to break loose the main axle nut on each side before starting because once everything's apart it's a major PITA to get it loose.

It is not a good idea to crimp a brake line shut, especially old lines like ours, as it may damage the liner and crack the outer shell.

On the emergency brake cable, it's a good idea to soak everything down with PB Blaster a day or two before beginning.

That's all I noticed on the first run through aside from spelling and grammer which I'm not worried about.

Good writeup!

JazzMan
IP: Logged
Toddster
Member
Posts: 20871
From: Roswell, Georgia
Registered: May 2001


Feedback score:    (41)
Leave feedback


Total ratings: 503
Rate this member

Report this Post01-02-2008 01:36 PM Click Here to See the Profile for ToddsterSend a Private Message to ToddsterEdit/Delete MessageReply w/QuoteDirect Link to This Post
 
quote
Originally posted by skitime:


Not sure what the difference is???


Well, in my case, I often have to move stuff from one part of my yard to another, over door threasholds, across uneven or cracked pavement, even across the lawn on occassion (don't tell the Mrs.)
IP: Logged
skitime
Member
Posts: 5765
From: Akron, PA, USA
Registered: Aug 2000


Feedback score:    (10)
Leave feedback


Total ratings: 332
Rate this member

Report this Post01-02-2008 01:54 PM Click Here to See the Profile for skitimeSend a Private Message to skitimeEdit/Delete MessageReply w/QuoteDirect Link to This Post
 
quote
Originally posted by Toddster:


Well, in my case, I often have to move stuff from one part of my yard to another, over door threasholds, across uneven or cracked pavement, even across the lawn on occassion (don't tell the Mrs.)


You definitey would need bigger wheels for that.

IP: Logged
Toddster
Member
Posts: 20871
From: Roswell, Georgia
Registered: May 2001


Feedback score:    (41)
Leave feedback


Total ratings: 503
Rate this member

Report this Post01-02-2008 02:04 PM Click Here to See the Profile for ToddsterSend a Private Message to ToddsterEdit/Delete MessageReply w/QuoteDirect Link to This Post
 
quote
Originally posted by JazzMan:

On the '88 a trick is to remove one of the bolts holding the longitudinal link to the cradle at the front, this allows the strut to easily lean outwards and clear the rear chassis frame horns as the car is lifted off the cradle. Otherwise, due to the sharp angle that the struts are tilted inwards the upper strut caps will drag hard against the inner well sheet metal and scar it all up.


True, this is a good thing to note for those with buddies. If you have a couple of guys who can pull on the struts while raising the cradle this helps. If, as in this thread, you are a one man show, you can wrap the top of the strut with an old shop towel and some duct tape to keep from scratching things up.

 
quote

Also, if removing the motor with the intent of putting it back together, you can unbolt the brake calipers from the cradle and leave them hung with wire from the chassis, that way you don't have to bleed anything upon reassembly and not worry about stripping a bleeder screw.


I'll post some pics and add this alternative

 
quote

On cars with the aero nose you'll probably need to put blocking under the front wheels to get the nose high enough that the bumper cover doesn't hit the ground while lifting the rear.


True. But if you are short of additional blocking or ramps I'll add one other idea I have used...an old bath mat. Just slip the bath mat under the nose and it won't get scratched-up.

 
quote

Sidepost battery terminal screws are 5/16", at least that's what's marked on my Snap On sidepost battery wrench.


I use a terminal post remover myself. It has a rubber handle grip and I highly recommend it to anyone working on electrical systems. I'll post a pic.

 
quote

On the '84s and I believe the '85s the main power fusible links to the car's power system are attached to the starter, instead of to the terminal block adjacent to C500 as in the later models.
[/QUOTE

I'm going to do another thread like this next week when I pull the engine out of my parts Indy. The '84 was so different that it really needs it's own procedural thread.

[QUOTE]
On step 10 you show the picture of the connector behind the ALDL but don't call out for it to be disconnected. I think it's the C-2 hundred something.


I actually call it the ECI but good point. I'll try to put in the User Manual Terms to make things more clear to people following along with the manual.

 
quote

In step 12, the sensor is called the IAT, or Intake Air Temperature sensor.


Check, I'll edit that for clarity too.

 
quote

BTW, it's not necessary to remove the decklid to do this. I prefer not to because working alone the decklid is hard to handle and easy to damage while maneuvering it on and off the car.


If you are working outside you are absolutely correct. If you are doing this inside your garage, your ceiling height will mandate that you remove the decklid. But for the sake of removing 4 bolts I find the added light, and access to the front side of the engine worth the trouble in either event.

 
quote

Note: C-500 is a split connector. One half has the body wiring in it and half has the engine wiring. The small screw holds one half of the connector in place and that half has ears that hold the other half in place. Split the connector to separate the engine from the body harnesses.


Another excellent point. I'll add that too.

 
quote

The 5-speed transmission shown is a Getrag, the Isuzu 5-speed cables are routed similarly to the 4-speed transmissions. Though the Isuzu was only used on the L4 cars it's not that unusual to see one behind a V6 because of an engine or tranny swap.


I figured I'd add that to the 4-Banger thread.

 
quote

Step 23: Technically the throttle body is only a TB, as a TBI has in injector in it.


TYPO! Thats my story and I'm sticking to it.

 
quote

Also, you probably want to break loose the main axle nut on each side before starting because once everything's apart it's a major PITA to get it loose.


Indeed. It shall be noted.

 
quote

It is not a good idea to crimp a brake line shut, especially old lines like ours, as it may damage the liner and crack the outer shell.


If you have a new set of Vice Grips then I agree. In my case the ends are so worn that they are unlikely to do much damage but there is a damger of overtightening that should be mentioned.

 
quote

That's all I noticed on the first run through aside from spelling and grammer which I'm not worried about.


I'll be cleaning up the spelling as I go through and add content. I was just too tired to bother with the spell checker.

IP: Logged
Arns85GT
Member
Posts: 11159
From: London, Ontario, Canada
Registered: Jul 2003


Feedback score: (1)
Leave feedback


Total ratings: 202
Rate this member

Report this Post01-02-2008 02:52 PM Click Here to See the Profile for Arns85GTSend a Private Message to Arns85GTEdit/Delete MessageReply w/QuoteDirect Link to This Post
When we pulled my 2.8, we took off the deck lid, the alternator w/bracket, undid the tranny bolts, (and engine mount) slid the engine forward 2" and pulled it up. We then rolled the cherry picker with engine on it, over to the motor stand, attached it. We even swapped the clutch. No wrestling the engine.

One more way.

Arn

[This message has been edited by Arns85GT (edited 01-02-2008).]

IP: Logged
Toddster
Member
Posts: 20871
From: Roswell, Georgia
Registered: May 2001


Feedback score:    (41)
Leave feedback


Total ratings: 503
Rate this member

Report this Post01-02-2008 02:54 PM Click Here to See the Profile for ToddsterSend a Private Message to ToddsterEdit/Delete MessageReply w/QuoteDirect Link to This Post
 
quote
Originally posted by Arns85GT:

When we pulled my 2.8, we took off the deck lid, the alternator w/bracket, undid the tranny bolts, (and engine mount) slid the engine forward 2" and pulled it up. We then rolled the cherry picker with engine on it, over to the motor stand, attached it. We even swapped the clutch. No wrestling the engine.

One more way.

Arn


Out the Top?

Heathen.
IP: Logged
Fieroseverywhere
Member
Posts: 4242
From: Gresham, Oregon USA
Registered: Mar 2006


Feedback score:    (14)
Leave feedback


Total ratings: 89
Rate this member

Report this Post01-02-2008 09:11 PM Click Here to See the Profile for FieroseverywhereSend a Private Message to FieroseverywhereEdit/Delete MessageReply w/QuoteDirect Link to This Post
I also remove the motor like skidtime. Just make sure to block the front wheels to keep the car from rolling forward. The cart we lower the cradle onto is just a bread cart from a local Franz bakery with some 2x4's accross for a brace.


Though we have a engine hoist there just is no real reason to use it IMO. A couple jacks and some stands is all we've ever needed. The next one will be about the 20th time I've had a motor out like this. Too many fieros makes you very good at this.


One other detail is that instead of unbolting the struts from the towers I just scribe the lower mounting bolts and take those out instead leaving the strut still in the strut tower. This allows about 3 inches less height you have to raise the car to clear. With the bolts scribed you can put your allignment back to where is was before removal very easily.


As soon as we get them together these will be the new tools of choice for engine removal.


Pallet jack for the cradle to sit on and a long frame floor jack to lift the car.

[This message has been edited by Fieroseverywhere (edited 01-02-2008).]

IP: Logged
Fierofreak00
Member
Posts: 4221
From: Martville, NY USA
Registered: Jun 2001


Feedback score:    (20)
Leave feedback


Total ratings: 170
Rate this member

Report this Post01-03-2008 07:17 AM Click Here to See the Profile for Fierofreak00Send a Private Message to Fierofreak00Edit/Delete MessageReply w/QuoteDirect Link to This Post
This may be asking alot but, maybe you should add where to cut the frame when the rear cradle bolts spin instead of coming out( I've got that part down pat). Not all of us live in sunny (rust free) California .
Good job! -Jason

[This message has been edited by Fierofreak00 (edited 01-03-2008).]

IP: Logged
kyote
Member
Posts: 1232
From: Germantown, Wisconsin - Metro Milwaukee Area
Registered: Sep 2001


Feedback score: N/A
Leave feedback

Rate this member

Report this Post01-03-2008 07:51 AM Click Here to See the Profile for kyoteClick Here to visit kyote's HomePageSend a Private Message to kyoteEdit/Delete MessageReply w/QuoteDirect Link to This Post
 
quote
Originally posted by skitime:


You could use the method in the factory manual. No danger of damage and you don't need a engine hoist. It also lifts the nose so even with my chin spoiler it is not even close to the ground.

I want to say that this is an excellent post and do not want to detract from it but let me add the way the factory manual shows. They lift the car from just behind the middle of the car. They have even created clearances for the lifting 4x4 under the car and can be seen under the rocker panels. To move the engine around when it is on the floor, I just use a skid cut to the size of the cradle. I mount a inexpensive set of refrigerator rollers to the skid. On smooth concrete you can easily slide the assembly in any direction with the engine on it. It sure works great. I only need one floor jack and two jack stands to remove an engine. Just put the jack under a 4x4 under the middle. Lower the cradle onto the skid. Unbolt cradle. Raise car up until the engine and cradle clear. Use jack stands under the 4x4 if you ever get under the car. I never even had help to do it. Always did it by myself. I roll it out the side usually so I don’t have to have the car up very high. My garage ceiling is only 7' high. You really don't have to have the car very high. No need to raise the front of the car even with the spoiler I have on the front. Reinstall in the opposite order.

Note this picture shows the rocker panel removed but that was for a different reason not because I was removing the engine.

Notice how much lower my car is to remove the engine than the photos using the engine hoist. Also notice how the hoist pushes the nose down hard which is why some people have to block the front wheels up wich adds to the danger of the car falling off the front blocks.


You need to use the hoist if you want to keep your struts intact... no need to do a realignment.. the extra height is needed to uncompress the struts to clear the body...
Your picture is minus the struts.....is why yours isn't as high... I have done both ways.. the hoist is alot faster....and easier...

------------------

'86 Fastback SE 5 spd -'94 HD Electra Glide Cassic -'99 Chevy K-1500 Z-71

IP: Logged
PFF
System Bot
maddoggie
Member
Posts: 19
From: Salem, KY USA
Registered: Dec 2007


Feedback score: N/A
Leave feedback

Rate this member

Report this Post01-03-2008 08:55 AM Click Here to See the Profile for maddoggieSend a Private Message to maddoggieEdit/Delete MessageReply w/QuoteDirect Link to This Post
Great resource, excellent write-up and pics.
IP: Logged
Saxman
Member
Posts: 5151
From: Melbourne, FL
Registered: May 2005


Feedback score:    (8)
Leave feedback


Total ratings: 114
Rate this member

Report this Post01-03-2008 09:10 AM Click Here to See the Profile for SaxmanClick Here to visit Saxman's HomePageSend a Private Message to SaxmanEdit/Delete MessageReply w/QuoteDirect Link to This Post
 
quote
Originally posted by Fierofreak00:

This may be asking alot but, maybe you should add where to cut the frame when the rear cradle bolts spin instead of coming out( I've got that part down pat). Not all of us live in sunny (rust free) California .
Good job! -Jason


If you need a photo of this, I have one posted at //www.fiero.nl/forum/Forum2/HTML/082616.html

You can see the original small hole where I cut mine. That small hole was to hold down the wheel liner.
IP: Logged
tjm4fun
Member
Posts: 3781
From: Long Island, NY USA
Registered: Feb 2006


Feedback score: N/A
Leave feedback


Total ratings: 141
Rate this member

Report this Post01-03-2008 10:56 AM Click Here to See the Profile for tjm4funSend a Private Message to tjm4funEdit/Delete MessageReply w/QuoteDirect Link to This Post
You don;t need to use a hoist to keep the struts on.


as an option, for those that may have the materials to make something like this, a simple fram works very well to lift the car, tho I did mine originally with a simple floor jack:


As for the 88 struts binding, remove the sway bar bolts, and the struts will flop out. that is what holds them in to that steep angle. you can see that on the right strut in the pic. the assembly came out the wheel well, not the back, I just rolled it there. the dolly is a standard furniture dolly turned on a slight angle to hit all the cradle sides. works on pre 88;s too.

Just as a note, I know it has been done many times, but don't count on that trunk latch. Bolt strengths do not add in lifitng, the lowest rated part is the maximum strength you can lift safely. I ma very paranoid on lifting things just for personal safety issues.
(We rig and lift boats with a crane, and every piece on that frame exceeds the weight of the heaviest boat in it;s rating, even tho there are 4 points or attachment, any one failing would be disasterous)
IP: Logged
Rodrv6
Member
Posts: 1908
From: Ball Ground, Ga.
Registered: Nov 1999


Feedback score: (2)
Leave feedback


Total ratings: 76
Rate this member

Report this Post01-03-2008 11:39 AM Click Here to See the Profile for Rodrv6Send a Private Message to Rodrv6Edit/Delete MessageReply w/QuoteDirect Link to This Post
GREAT THREAD!!
Thank you, Todd, for doing the writeup with the good pictures!
I'll add my twist on engine removal. I use Skitimes method with the 4x4 and a floor jack to lift the car. My cradle dolly is a welded up frame made from 2 inch angle iron with casters on the corners. I take the calipers off and hang them in the wheel well, then I remove the entire strut assembly (which is a bit more of a pain on my 88 than it was on my 84) as a unit and lay them aside. That leaves one less thing to get in the way and so far it hasn't disturbed the alignment when it goes back together.

****This thread would be a good one to "sticky" so it never gets lost! Cliff?????

------------------
Rod Schneider, Woodstock, Ga.
"You can't have too many toys!"
1988 Fiero GT
1966 Porsche 911
Van's RV-6 airplane-under construction

[This message has been edited by Rodrv6 (edited 01-03-2008).]

IP: Logged
skitime
Member
Posts: 5765
From: Akron, PA, USA
Registered: Aug 2000


Feedback score:    (10)
Leave feedback


Total ratings: 332
Rate this member

Report this Post01-03-2008 06:27 PM Click Here to See the Profile for skitimeSend a Private Message to skitimeEdit/Delete MessageReply w/QuoteDirect Link to This Post
 
quote
Originally posted by kyote:


You need to use the hoist if you want to keep your struts intact... no need to do a realignment.. the extra height is needed to uncompress the struts to clear the body...
Your picture is minus the struts.....is why yours isn't as high... I have done both ways.. the hoist is alot faster....and easier...


So not true! Please don't mislead people with that misinformation. Only talk about things you know. I use this same method with the struts on. In the earlier post I was swapping complete cradles and converting to a manual trans so I did not want the struts on those axles. That is why the struts were removed. THEY WERE NOT REMOVED SO I COULD REMOVE THE ENGINE.


This picture was the first time I ever dropped a Fiero engine to fix leaking front manifold. No need to remove the struts or hoist the car higher.

[This message has been edited by skitime (edited 01-03-2008).]

IP: Logged
p8ntman442
Member
Posts: 1747
From: portsmouth RI
Registered: Sep 2003


Feedback score: N/A
Leave feedback


Total ratings: 157
Rate this member

Report this Post01-03-2008 07:38 PM Click Here to See the Profile for p8ntman442Click Here to visit p8ntman442's HomePageSend a Private Message to p8ntman442Edit/Delete MessageReply w/QuoteDirect Link to This Post
Leaving the calipers attached saves having to bleed the brakes. Just hang them from the strut tower with bungee cords. Big time saver if your not doing new pads and rotors and dont need to compress the calipers much. Deffinatly worth flushing the brake lines and bleeding if you havent done it yet.
IP: Logged
buds
Member
Posts: 621
From: Waterdown, Ontario
Registered: Jul 2000


Feedback score: (4)
Leave feedback

Rate this member

Report this Post01-03-2008 08:34 PM Click Here to See the Profile for budsSend a Private Message to budsEdit/Delete MessageReply w/QuoteDirect Link to This Post
I myself would never trust the trunk latch.... Safe way is to use a 3' Pc. of chain with a hook on each end....Use to lower the motor unto your cart then hook the hooks into the holes under your frame and lift the car...I really think that is what these holes are intended for.


IP: Logged
buddycraigg
Member
Posts: 13576
From: kansas city, mo
Registered: Jul 2002


Feedback score: (5)
Leave feedback


Total ratings: 478
Rate this member

Report this Post01-03-2008 11:41 PM Click Here to See the Profile for buddycraiggSend a Private Message to buddycraiggEdit/Delete MessageReply w/QuoteDirect Link to This Post
 
quote
Originally posted by buds:
I myself would never trust the trunk latch.... Safe way is to use a 3' Pc. of chain with a hook on each end....Use to lower the motor unto your cart then hook the hooks into the holes under your frame and lift the car...I really think that is what these holes are intended for.


that's a neat idea, but i've never seen those holes on any car.
and they look like they were made with a holesaw.
i'm going to guess they were added.
but it's still a really cool lifting point.

[This message has been edited by buddycraigg (edited 01-04-2008).]

IP: Logged
TK
Member
Posts: 10013
From:
Registered: Aug 2002


Feedback score: (2)
Leave feedback


Total ratings: 200
Rate this member

Report this Post01-03-2008 11:55 PM Click Here to See the Profile for TKSend a Private Message to TKEdit/Delete MessageReply w/QuoteDirect Link to This Post
 
quote
Originally posted by Toddster:
Out the Top?

Heathen.


I turned mine upside and used a butter knife in the engine bay until it dropped out.
IP: Logged
Previous Page | Next Page

This topic is 6 pages long:  1   2   3   4   5   6 
next newest topic | next oldest topic

All times are ET (US)

Post New Topic  Post A Reply
Hop to:

Contact Us | Back To Main Page

Advertizing on PFF | Fiero Parts Vendors
PFF Merchandise | Fiero Gallery | Ogre's Cave
Real-Time Chat | Fiero Related Auctions on eBay


Copyright (c) 1999, C. Pennock