Pennock's Fiero Forum
  FAQs & HowTos
  How to replace the rear bearing hubs, with pics.

Post New Topic  Post A Reply
Email This Page to Someone! | Printable Version


next newest topic | next oldest topic
How to replace the rear bearing hubs, with pics. by fierohoho
Started on: 06-20-2005 02:26 PM
Replies: 31 (5909 views)
Last post by: fierobear on 07-10-2019 02:52 PM
fierohoho
Member
Posts: 3494
From: Corner of No and Where
Registered: Apr 2001


Feedback score: (3)
Leave feedback


Total ratings: 221
Rate this member

Report this Post06-20-2005 02:26 PM Click Here to See the Profile for fierohohoSend a Private Message to fierohohoEdit/Delete MessageReply w/QuoteDirect Link to This Post
What I offer here is for Fieros owners who want to do the work themselves and try to keep the costs down

I welcome any comments from others to help cover any mistakes I make or to offer an easier or cheaper way for this to be done.

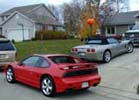
In my pics you will notice I have done the Grand Am brake upgrade so I have no e-brake cables to deal with, you will of course have to detach the cable from the caliper if you still have the stock brake set-up.

My vehicle is a 1984 SE

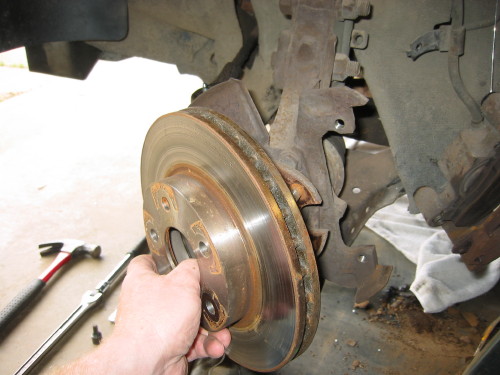
I will start with the assumption that you have the car safely supported, the rear wheels off and you've purchased the rear bearing hubs.

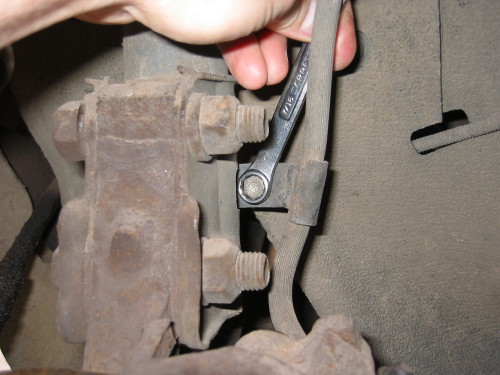
Start by disconecting the brake line from the strut.
As I have done the GA upgrade I have 7/16" nuts and bolts, I'm not sure what the stock bolt size is.

Next remove the caliper bolts, mine needed the T-47 TORX bit.

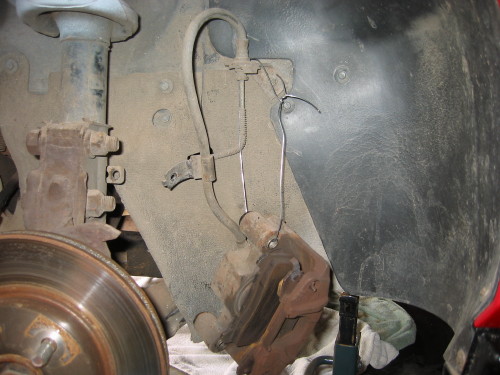
With the caliper off support it out of the way with a piece of wire.

Now remove the rotor and set it aside.

IP: Logged
PFF
System Bot
fierohoho
Member
Posts: 3494
From: Corner of No and Where
Registered: Apr 2001


Feedback score: (3)
Leave feedback


Total ratings: 221
Rate this member

Report this Post06-20-2005 02:28 PM Click Here to See the Profile for fierohohoSend a Private Message to fierohohoEdit/Delete MessageReply w/QuoteDirect Link to This Post
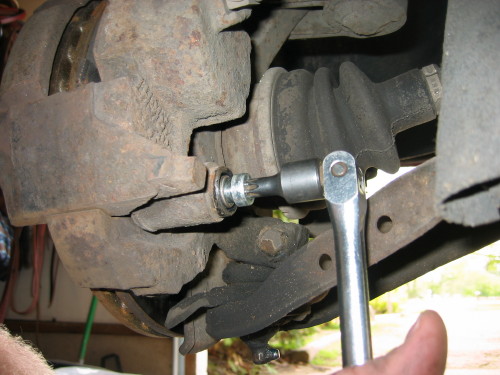
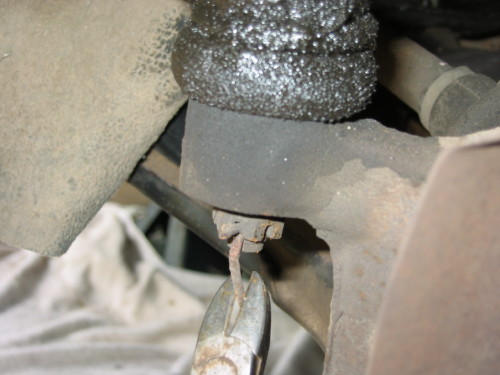
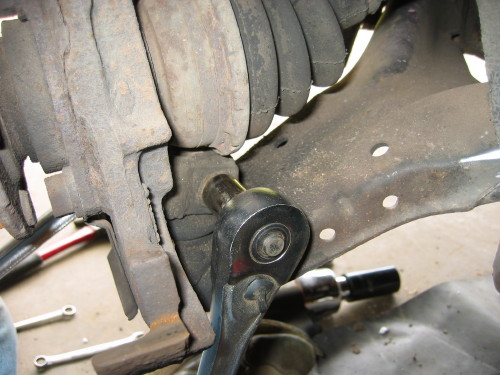
Remove the cotter pin from the castle nut on the bottom of the toe link rod where it connects to the knuckle assembly.

Using an 18mm socket partly remove the nut.

To get the tapered shaft to pop loose I hit up on the castle nut with a hammer several times, leaving the nut on helps protect the threads.
Yes you can get a special tool to do this also.

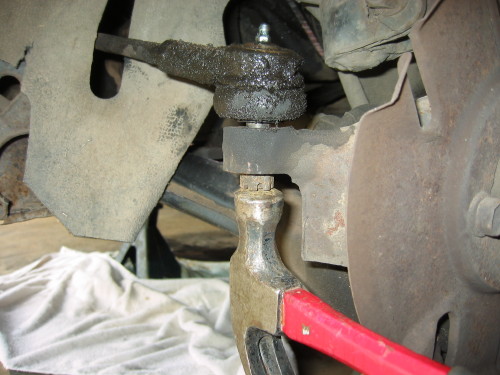
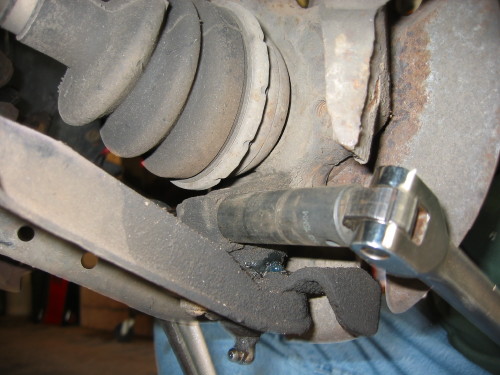
Now remove the nut and bolt that holds the lower ball joint to the knuckle assembly, this takes a 15mm socket on each side.

[This message has been edited by fierohoho (edited 06-20-2005).]

IP: Logged
fierohoho
Member
Posts: 3494
From: Corner of No and Where
Registered: Apr 2001


Feedback score: (3)
Leave feedback


Total ratings: 221
Rate this member

Report this Post06-20-2005 02:29 PM Click Here to See the Profile for fierohohoSend a Private Message to fierohohoEdit/Delete MessageReply w/QuoteDirect Link to This Post

fierohoho

3494 posts
Member since Apr 2001
Using a small pry bar loosen the ball joint from the knuckle assembly but don't pop it out just yet.
Leaving it in will help stabilize the strut for the next step.

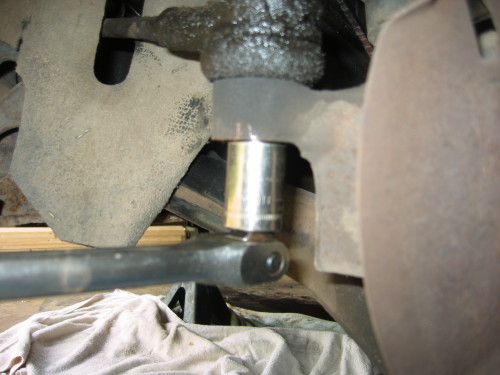
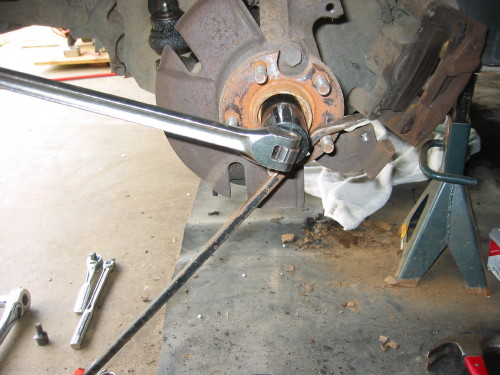
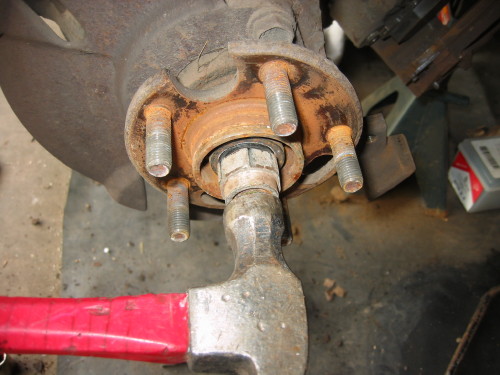
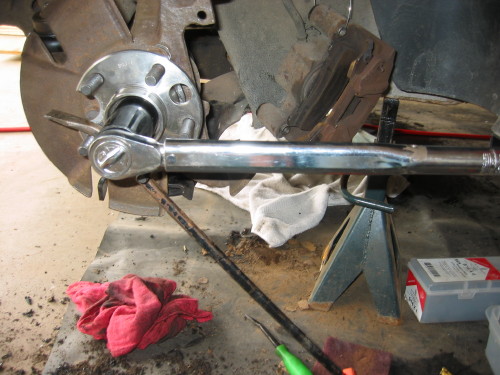
Using a 30mm socket partly remove the nut on the end of the axel shaft, I used a long pry bar in the studs on the hub to keep the hub from spinning.

Once again hit the nut with a hammer to pop the axel shaft loose from the hub.
The new bearing hub has a new 30mm nut, discard the old one but save the washer that was behind the nut as this will be re-used

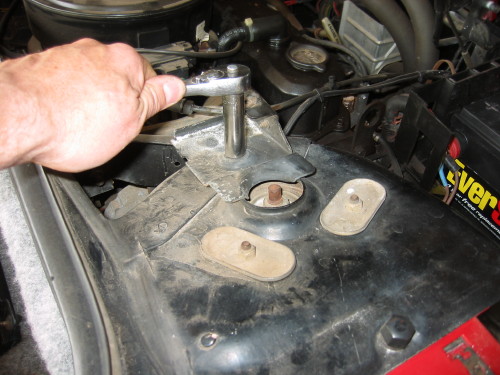
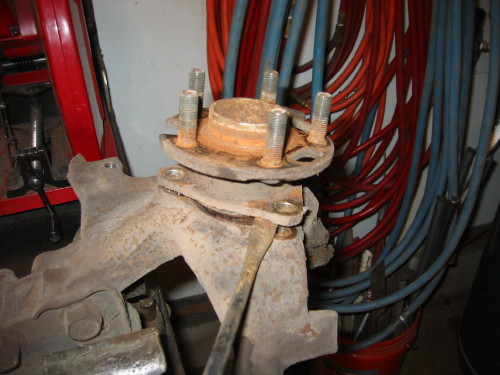
Now up into the engine compartment and using a 13mm socket remove the nuts from the top of the strut.

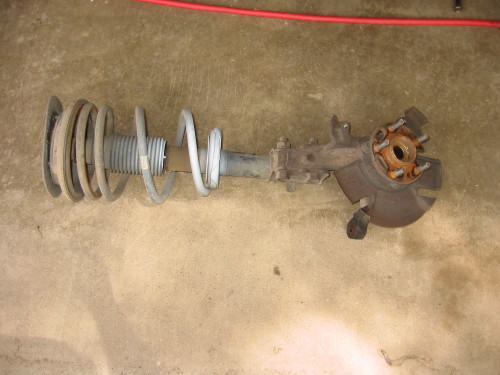
Now pry the lower A-arm down to get the ball joint stud out of the knuckle assembly, pull the strut toward you to get the axel shaft out of the hub assembly and lower the strut out of the wheelwell.

[This message has been edited by fierohoho (edited 06-20-2005).]

IP: Logged
fierohoho
Member
Posts: 3494
From: Corner of No and Where
Registered: Apr 2001


Feedback score: (3)
Leave feedback


Total ratings: 221
Rate this member

Report this Post06-20-2005 02:30 PM Click Here to See the Profile for fierohohoSend a Private Message to fierohohoEdit/Delete MessageReply w/QuoteDirect Link to This Post

fierohoho

3494 posts
Member since Apr 2001
Take the strut assembly to the work bench and using an 18mm socket remove the three bolts that hold the bearing hub to the knuckle assembly.

Take the dust shield off and set it aside.

Pry the bearing hub loose from the knuckle.

[This message has been edited by fierohoho (edited 06-20-2005).]

IP: Logged
fierohoho
Member
Posts: 3494
From: Corner of No and Where
Registered: Apr 2001


Feedback score: (3)
Leave feedback


Total ratings: 221
Rate this member

Report this Post06-20-2005 02:31 PM Click Here to See the Profile for fierohohoSend a Private Message to fierohohoEdit/Delete MessageReply w/QuoteDirect Link to This Post

fierohoho

3494 posts
Member since Apr 2001
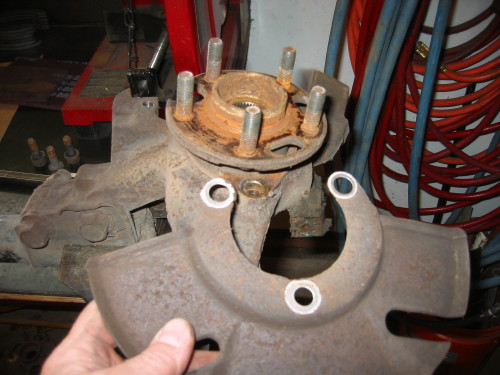
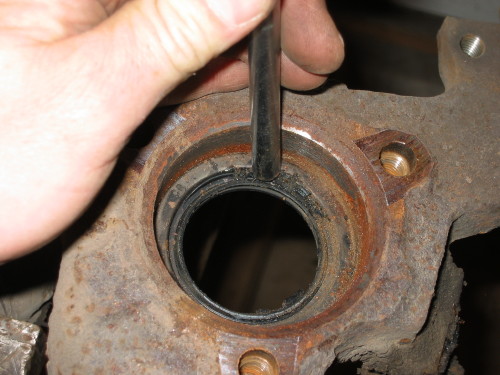
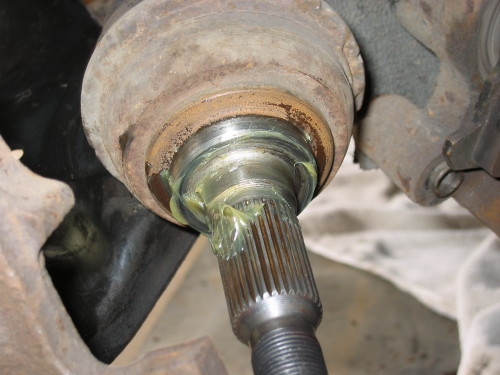
Remove the old seal, (note how and where it sits in the hole), and then clean the the inner area where the seal sits.

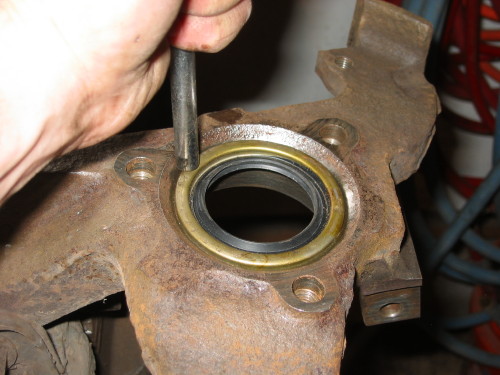
Install the new seal that comes with the bearing hub, I used a small punch and went around the outside tapping it in with a hammer, I left lots of little dents in the seal case but it didn't seem to distort the seal itself, if you have a seal installer tool use that, my way works but it's not the best.

[This message has been edited by fierohoho (edited 06-20-2005).]

IP: Logged
fierohoho
Member
Posts: 3494
From: Corner of No and Where
Registered: Apr 2001


Feedback score: (3)
Leave feedback


Total ratings: 221
Rate this member

Report this Post06-20-2005 02:32 PM Click Here to See the Profile for fierohohoSend a Private Message to fierohohoEdit/Delete MessageReply w/QuoteDirect Link to This Post

fierohoho

3494 posts
Member since Apr 2001
Now put some axel grease on the back of the bearing hub, inside the seal area and on the seal itself.
There is also a round o-ring that goes on the bearing hub, install it now.

Clean the end of the axel shaft and put a little grease on it as well.

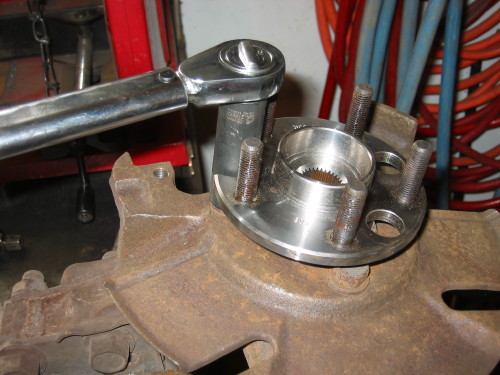
Install the bearing hub into the knuckle, replace the dust shield and start the three bolts.
Using a torque wrench torque these bolts to 55-70 FT. LB.

Re-install the strut into the vehicle in the reverse order you removed it.

The nuts at the top of the strut should be torqued to 18 FT. LB.

The toe link rod castle nut should be torqued to 30-39 FT. LB. and the cotter pin replaced with a new one.

The nut and bolt that holds the ball joint stud to the knuckle assembly should be torqued to 30-36 FT. LB.

The worst part I had here was getting the ball joint stud to pop back into the knuckle.
The grove in the ball joint stud must be aligned with the hole in the knuckle assembly before insertion.

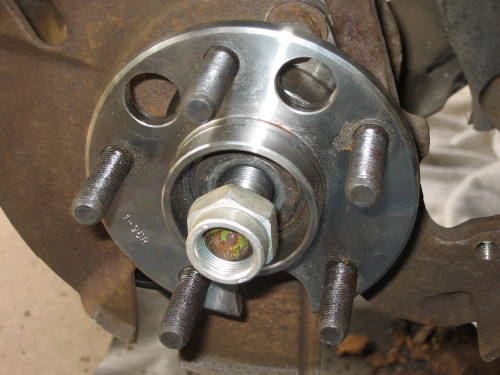
Put the old washer and then the new 30mm nut that came with the bearing hub onto the axel shaft.

Now the hard part, the axel nut has to be torqued to 200 FT. LB.
I went to 150 FT. LB. that my tourque wrench maxed out at and later hit the nut with an air impact wrench to give it a little more.

Now re-install the rotor and caliper and re-attach the brake line to the strut.

I replaced both sides on my Fiero as the drivers side had developed a slight howl at highway speed, all's good now.

Wrench on dudes.

HoHo

[This message has been edited by fierohoho (edited 06-20-2005).]

IP: Logged
Bigfieroman
Member
Posts: 2416
From: Pleasant Hills, PA, near Pittsburgh
Registered: Nov 2000


Feedback score: N/A
Leave feedback


Total ratings: 116
Rate this member

Report this Post06-20-2005 05:59 PM Click Here to See the Profile for BigfieromanClick Here to visit Bigfieroman's HomePageSend a Private Message to BigfieromanEdit/Delete MessageReply w/QuoteDirect Link to This Post
I don't understand....why did you remove the strut/spindle assembly from the car? I removed my rear bearings to install longer lugs by just removing the rotor, removing the axle nut, and undoing the 3 bolts attaching it to the spindle/upright. Took ~30 minutes per side including stud removal and install time.

BTW, I replaced my axle nuts at the same time. These must be replaced ANY TIME THEY ARE REMOVED!

------------------
Thanks Aus!
More info at: //www.fiero.nl/forum/Forum1/HTML/043357.html

IP: Logged
maryjane
Member
Posts: 69629
From: Copperas Cove Texas
Registered: Apr 2001


Feedback score: (4)
Leave feedback


Total ratings: 441
Rate this member

Report this Post06-20-2005 09:17 PM Click Here to See the Profile for maryjaneSend a Private Message to maryjaneEdit/Delete MessageReply w/QuoteDirect Link to This Post
I'm guessing he did it that way because he likes to do the precision work out on a workbench, where everything is easily accessible for cleaning. Consider it a 2fer1 deal. How to change a hub bearing assy and how to remove the strut.

Or, maybe he's like I am and hate squattin down on my wore out knees for that long.

IP: Logged
maryjane
Member
Posts: 69629
From: Copperas Cove Texas
Registered: Apr 2001


Feedback score: (4)
Leave feedback


Total ratings: 441
Rate this member

Report this Post06-20-2005 09:18 PM Click Here to See the Profile for maryjaneSend a Private Message to maryjaneEdit/Delete MessageReply w/QuoteDirect Link to This Post

maryjane

69629 posts
Member since Apr 2001
Forgot to say:
Good writeup fierohoho!!
IP: Logged
Whuffo
Member
Posts: 3000
From: San Jose, CA
Registered: Jul 2003


Feedback score: N/A
Leave feedback


Total ratings: 154
Rate this member

Report this Post06-20-2005 10:59 PM Click Here to See the Profile for WhuffoClick Here to visit Whuffo's HomePageSend a Private Message to WhuffoEdit/Delete MessageReply w/QuoteDirect Link to This Post
 
quote
Originally posted by Bigfieroman:

I don't understand....why did you remove the strut/spindle assembly from the car? I removed my rear bearings to install longer lugs by just removing the rotor, removing the axle nut, and undoing the 3 bolts attaching it to the spindle/upright. Took ~30 minutes per side including stud removal and install time.

BTW, I replaced my axle nuts at the same time. These must be replaced ANY TIME THEY ARE REMOVED!

Replacing the knuckle seal is kinda difficult if you don't remove the knuckle...

IP: Logged
2000RagTop
Member
Posts: 3999
From: Sussex, (Milwaukee) Wi. USA, Earth
Registered: Jun 2003


Feedback score: (2)
Leave feedback


Total ratings: 140
Rate this member

Report this Post06-21-2005 12:23 AM Click Here to See the Profile for 2000RagTopSend a Private Message to 2000RagTopEdit/Delete MessageReply w/QuoteDirect Link to This Post
nice work........

------------------
88GT/Auto/Beechwood Leather/SunRoof/Wing/JVC-CD-Sub-Woofer/225/45/17 Michelin Pilots/All Opts Ex.T-Tops

<<< <<< <<< <<< < Pix of my GT /-
-/ Pix of my Vettes> >>> >>> >>> >>>
*** *** *** *** *** * "If you appreciate my contribution, please rate me. Thanks"* *** *** *** *** ***

IP: Logged
PFF
System Bot
fierohoho
Member
Posts: 3494
From: Corner of No and Where
Registered: Apr 2001


Feedback score: (3)
Leave feedback


Total ratings: 221
Rate this member

Report this Post06-21-2005 12:55 AM Click Here to See the Profile for fierohohoSend a Private Message to fierohohoEdit/Delete MessageReply w/QuoteDirect Link to This Post
 
quote
Originally posted by Bigfieroman:

I don't understand....why did you remove the strut/spindle assembly from the car? I removed my rear bearings to install longer lugs by just removing the rotor, removing the axle nut, and undoing the 3 bolts attaching it to the spindle/upright. Took ~30 minutes per side including stud removal and install time.

BTW, I replaced my axle nuts at the same time. These must be replaced ANY TIME THEY ARE REMOVED!

I did it this way as I replaced the seals also.

The strut removal made it easier to get to them.

Thanks for the compliments fellas.

[This message has been edited by fierohoho (edited 06-21-2005).]

IP: Logged
Patrick
Member
Posts: 36367
From: Vancouver, British Columbia, Canada
Registered: Apr 99


Feedback score: (1)
Leave feedback


Total ratings: 458
Rate this member

Report this Post06-21-2005 02:58 AM Click Here to See the Profile for PatrickSend a Private Message to PatrickEdit/Delete MessageReply w/QuoteDirect Link to This Post

I always appreciate it when people go the extra step and take a whole bunch of pictures to help explain a procedure. Very well done!

One question though - What's the secret to keeping your camera from getting filthy when you use it while pulling wrenches?

IP: Logged
fierohoho
Member
Posts: 3494
From: Corner of No and Where
Registered: Apr 2001


Feedback score: (3)
Leave feedback


Total ratings: 221
Rate this member

Report this Post06-21-2005 07:28 AM Click Here to See the Profile for fierohohoSend a Private Message to fierohohoEdit/Delete MessageReply w/QuoteDirect Link to This Post
 
quote
Originally posted by Patrick:


I always appreciate it when people go the extra step and take a whole bunch of pictures to help explain a procedure. Very well done!

One question though - What's the secret to keeping your camera from getting filthy when you use it while pulling wrenches?


Thanks for the compliment.

No secret really, it gets filthy.

Pretty easy camera to clean up afterwards though.

[This message has been edited by fierohoho (edited 06-21-2005).]

IP: Logged
RCR
Member
Posts: 4397
From: Shelby Twp Mi
Registered: Sep 2002


Feedback score:    (7)
Leave feedback


Total ratings: 102
Rate this member

Report this Post06-21-2005 08:10 AM Click Here to See the Profile for RCRSend a Private Message to RCREdit/Delete MessageReply w/QuoteDirect Link to This Post
Good write-up, man. + for you....

Bob

IP: Logged
Paul Prince
Member
Posts: 2935
From: Kansas City, MO
Registered: Dec 2002


Feedback score: N/A
Leave feedback


Total ratings: 110
Rate this member

Report this Post06-21-2005 08:17 AM Click Here to See the Profile for Paul PrinceSend a Private Message to Paul PrinceEdit/Delete MessageReply w/QuoteDirect Link to This Post
Nice pics, good write up. Thanks.............Paul
IP: Logged
Grim001
Member
Posts: 273
From: Lompoc CA
Registered: Mar 2005


Feedback score: N/A
Leave feedback

Rate this member

Report this Post06-22-2005 01:46 AM Click Here to See the Profile for Grim001Send a Private Message to Grim001Edit/Delete MessageReply w/QuoteDirect Link to This Post
When putting in new bearing seals I try to find a socket(or other tool) about the same diameter, to hammer it in the hub. That way there are no small dents or other type of damage and it will usually seat smoother. Great write up.
IP: Logged
fierohoho
Member
Posts: 3494
From: Corner of No and Where
Registered: Apr 2001


Feedback score: (3)
Leave feedback


Total ratings: 221
Rate this member

Report this Post06-22-2005 07:44 AM Click Here to See the Profile for fierohohoSend a Private Message to fierohohoEdit/Delete MessageReply w/QuoteDirect Link to This Post
 
quote
Originally posted by Grim001:

When putting in new bearing seals I try to find a socket(or other tool) about the same diameter, to hammer it in the hub. That way there are no small dents or other type of damage and it will usually seat smoother. Great write up.


I couldn't find a socket that big so...

My next tool purchase will be a bearing race/seal installer tool.

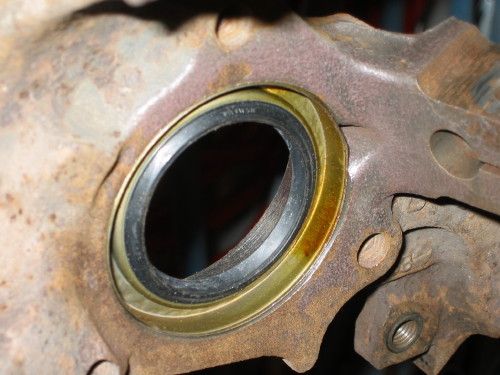
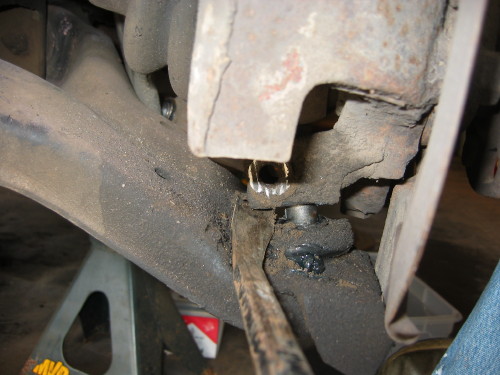
I wasn't too concerned about this seal as it seems to be set up to keep as much dirt/moisture off the rear of the beariong hub as possible.

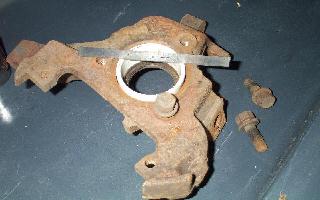
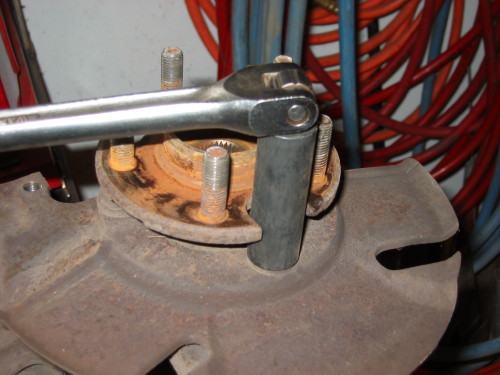
If you ever do one you'll see there is a drain indent at the bottom of the knuckle assembly to allow some air movement to the back of the bearing hub, I suppose to keep it dry and give any water that gets in there a way out.

You can see it at the right of the bearing seal in this pic:

As you look at this pic the bottom of the knuckle assembly is at the right.

IP: Logged
opm2000
Member
Posts: 1347
From: Versailles, Ky USA Heart of the Bluegrass
Registered: Dec 2000


Feedback score: N/A
Leave feedback


Total ratings: 58
Rate this member

Report this Post06-22-2005 12:53 PM Click Here to See the Profile for opm2000Click Here to visit opm2000's HomePageSend a Private Message to opm2000Edit/Delete MessageReply w/QuoteDirect Link to This Post
A 2 1/8" Craftsman socket fits the backside perfectly, and allows driving in from the back, or inside.

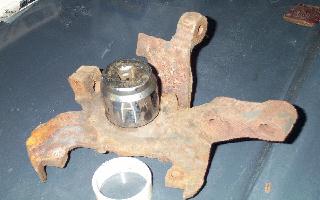
Before removing the old, I use a piece of pvc pipe which fits thru the front side perfectly. I cut it off to kie flush whith the three bearing bolt landings. Now you have a perfect depth guage.

Pics tonight.

David Breeze

------------------

Pantera Rebody Kits

IP: Logged
opm2000
Member
Posts: 1347
From: Versailles, Ky USA Heart of the Bluegrass
Registered: Dec 2000


Feedback score: N/A
Leave feedback


Total ratings: 58
Rate this member

Report this Post06-23-2005 08:07 AM Click Here to See the Profile for opm2000Click Here to visit opm2000's HomePageSend a Private Message to opm2000Edit/Delete MessageReply w/QuoteDirect Link to This Post

From the backside, a 2 1/8" socket for driving in the seal.
Also, the pvc pipe section is shown.
You can put the pipe in the hub, set it on a table top, and drive the seal down to the pipe.

From the outside, the pvc pipe in place, against the seal.
Check for depth by using a straitedge across the bolt landings.

David Breeze

IP: Logged
fierohoho
Member
Posts: 3494
From: Corner of No and Where
Registered: Apr 2001


Feedback score: (3)
Leave feedback


Total ratings: 221
Rate this member

Report this Post06-23-2005 08:20 AM Click Here to See the Profile for fierohohoSend a Private Message to fierohohoEdit/Delete MessageReply w/QuoteDirect Link to This Post
Good idea David, I'll have more to do in the future so I think I'll make one of the PVC deapth gages, thanks.

Steve

IP: Logged
PFF
System Bot
twodogjohnny
Member
Posts: 163
From: reston, va, usa
Registered: Oct 2002


Feedback score: N/A
Leave feedback

Rate this member

Report this Post07-30-2005 12:49 PM Click Here to See the Profile for twodogjohnnyClick Here to visit twodogjohnny's HomePageSend a Private Message to twodogjohnnyEdit/Delete MessageReply w/QuoteDirect Link to This Post
any special place to buy the bearing/hub assembly? or is it off to napa/autozone?
-john
IP: Logged
theogre
Member
Posts: 32237
From: USA
Registered: Mar 99


Feedback score: N/A
Leave feedback


Total ratings: 568
Rate this member

Report this Post07-30-2005 01:41 PM Click Here to See the Profile for theogreClick Here to visit theogre's HomePageSend a Private Message to theogreEdit/Delete MessageReply w/QuoteDirect Link to This Post
It is a good writeup. You're doing a bunch of things you don't really need to.

Guys....

You don't have to take off the knuckle. It's best if you don't and far faster...

You need a section of 1.5 inch PVC pipe with a straight coupler. If you have a small sledge, use the side of that to drive the seal. (You want the area of the mini sledge, don't need to pound it hard.) If you only have small hammer you'll need a wood block to keep from breaking the pipe.

To make it a bit easier... have someone hold the axle for you. Push in on the axle as well to clear the seal while you drive it in.

There is nothing you need to measure on the seal. The edge of the seal should be flush with the back of the knuckle as hoho shows it and as shown earlier above... the seal is driven from the front of the axle.

there are more notes in my cave.

------------------
Dr. Ian Malcolm: Yeah, but your scientists were so preoccupied with whether or not they could, they didn't stop to think if they should.
(Jurasic Park)

The Ogre's Fiero Cave (It's also at the top of every forum page...)

IP: Logged
JazzMan
Member
Posts: 18612
From:
Registered: Mar 2003


Feedback score:    (7)
Leave feedback


Total ratings: 653
User Banned

Report this Post07-30-2005 02:29 PM Click Here to See the Profile for JazzManSend a Private Message to JazzManEdit/Delete MessageReply w/QuoteDirect Link to This Post
On using PVC pipe to drive the seal, get an end cap for the pipe, glue it in place, and you have a great surface to whack with the hammer. Use Sch.40 pipe and cap, it's the strongest you'll find in a regular home store.

JazzMan

IP: Logged
theogre
Member
Posts: 32237
From: USA
Registered: Mar 99


Feedback score: N/A
Leave feedback


Total ratings: 568
Rate this member

Report this Post07-30-2005 02:35 PM Click Here to See the Profile for theogreClick Here to visit theogre's HomePageSend a Private Message to theogreEdit/Delete MessageReply w/QuoteDirect Link to This Post
Cap probably would help... I just used leftover stuff I had from house repairs. Tapping with the side of my mini sledge it went right in.
IP: Logged
Stainless1911
Member
Posts: 981
From: Davisburg Michigan
Registered: Apr 2012


Feedback score: (2)
Leave feedback

Rate this member

Report this Post12-01-2012 05:37 PM Click Here to See the Profile for Stainless1911Send a Private Message to Stainless1911Edit/Delete MessageReply w/QuoteDirect Link to This Post
Does the Axl nut and seal come with the hub? I just placed the order from Rock Auto this morning.

Will I need an alignment after this job?
IP: Logged
Dennis LaGrua
Member
Posts: 15143
From: Hillsborough, NJ U.S.A.
Registered: May 2000


Feedback score:    (13)
Leave feedback


Total ratings: 328
Rate this member

Report this Post12-08-2012 08:25 PM Click Here to See the Profile for Dennis LaGruaSend a Private Message to Dennis LaGruaEdit/Delete MessageReply w/QuoteDirect Link to This Post
 
quote
Originally posted by Stainless1911:

Does the Axl nut and seal come with the hub? I just placed the order from Rock Auto this morning.

Will I need an alignment after this job?


The hubs sometimes come with the seal and other times they don't. Hubs should include the axle nut. You need not go for an alignment unless you remove the strut assembly. While this is a good write-up, I always replace hubs with the strut attached to both the spindle and upper wheel well.
I can change them in under an hours time this way but we use a lift, impact wrenches and a hub puller. .

------------------
" THE BLACK PARALYZER" -87GT 3800SC Series III engine, custom ZZP /Frozen Boost Intercooler setup, 3.4" Pulley, Powerlog manifold, Northstar TB, LS1 MAF, 3" Flotech Afterburner Exhaust, Autolite 104's, MSD wires, Custom CAI, 4T65eHD w. custom axles, HP Tuners VCM Suite.
"THE COLUSSUS"
87GT - ALL OUT 3.4L Turbocharged engine, Garrett Hybrid Turbo, MSD ign., modified TH125H
" ON THE LOOSE WITHOUT THE JUICE "

IP: Logged
Stainless1911
Member
Posts: 981
From: Davisburg Michigan
Registered: Apr 2012


Feedback score: (2)
Leave feedback

Rate this member

Report this Post12-08-2012 08:57 PM Click Here to See the Profile for Stainless1911Send a Private Message to Stainless1911Edit/Delete MessageReply w/QuoteDirect Link to This Post
Thanks. I've been having enough trouble getting alignments done correctly on this car. I see no real reason to take the struts out.
IP: Logged
KillerFrogg
Member
Posts: 202
From: Flint, Michigan
Registered: Apr 2013


Feedback score: N/A
Leave feedback

Rate this member

Report this Post05-14-2015 01:59 AM Click Here to See the Profile for KillerFroggSend a Private Message to KillerFroggEdit/Delete MessageReply w/QuoteDirect Link to This Post
I replaced both of the bearing on my car today. One thing I did was to pull the center caps off of the wheel, set the park brake and chocked the wheels, put my deep well socket through where the center cap was, and then brake the axle nut on both sides free before doing anything else.

Not sure if the socket fits with stock wheels. I have a set of Subaru wheels on my car.

Putting the new axle nuts on was the reverse. Got the axle nut snug, bolt wheels on, and torque to 200 and hope I don't blow a hernia.

I also have gotten away from hammering on the tie-rod-end castle nut. I have noticed that most knuckles have a flat spot on the side of where the tie rod bolts in. A few good hits with a hammer normally frees the tie rod up.

Notes. Stock cars should have 30mm axle nuts I believe, but I am not sure. My car had the bearings replaced at some point, and had 29mm nuts on the car (1 1/8in socket fit snug but it fit) and the new bearings came with 29mm nuts.
IP: Logged
fierofool
Member
Posts: 12810
From: Auburn, Georgia USA
Registered: Jan 2002


Feedback score:    (13)
Leave feedback


Total ratings: 154
Rate this member

Report this Post10-19-2015 11:45 PM Click Here to See the Profile for fierofoolClick Here to visit fierofool's HomePageSend a Private Message to fierofoolEdit/Delete MessageReply w/QuoteDirect Link to This Post
Good how-to. Well explained and understandable even though I can't see the pictures any more.

I do have a question about installing the axle nut. Everything I've read says to pre-torque the axle nut to 75 lb/ft with the suspension unloaded. Then lower the vehicle onto the wheel and finish the torque to 200 lb/ft.

Which is the correct procedure. Torque in two steps or in one? Suspension loaded or unloaded?

Edit: Now, as I back out of the thread, the pictures show up. Working on replacing my brother's hub, so I will leave this online all night for reference tomorrow.

[This message has been edited by fierofool (edited 10-20-2015).]

IP: Logged
TopNotch
Member
Posts: 3537
From: Lawrenceville, GA USA
Registered: Feb 2009


Feedback score:    (7)
Leave feedback


Total ratings: 60
Rate this member

Report this Post10-28-2015 09:55 PM Click Here to See the Profile for TopNotchClick Here to visit TopNotch's HomePageSend a Private Message to TopNotchEdit/Delete MessageReply w/QuoteDirect Link to This Post
 
quote
Originally posted by KillerFrogg:

I replaced both of the bearing on my car today. One thing I did was to pull the center caps off of the wheel, set the park brake and chocked the wheels, put my deep well socket through where the center cap was, and then brake the axle nut on both sides free before doing anything else.

Not sure if the socket fits with stock wheels. I have a set of Subaru wheels on my car.


Yes it does, and it's far easier to do it that way. And when you put it back together, put the breaker bar and socket on the nut (wheel back on), with the breaker bar horizontal, and stand on it. If you weigh 200 pounds, stand one foot out on the breaker bar, and you will exert 200 foot pounds of torque. Stand closer or farther depending on your weight (for example, 1.5 feet out if you weigh 150 pounds). Easy as pie.
IP: Logged
PFF
System Bot
fierobear
Member
Posts: 27075
From: Safe in the Carolinas
Registered: Aug 2000


Feedback score: (2)
Leave feedback


Total ratings: 383
Rate this member

Report this Post07-10-2019 02:52 PM Click Here to See the Profile for fierobearSend a Private Message to fierobearEdit/Delete MessageReply w/QuoteDirect Link to This Post
I slip a long pipe over the breaker bar as a “torque multiplier”. I also use the donut spare...put it on with a couple of lug nuts, drop the car on the ground and use its weight to help. Do the same for tightening the new nut.
IP: Logged

next newest topic | next oldest topic

All times are ET (US)

Post New Topic  Post A Reply
Hop to:

Contact Us | Back To Main Page

Advertizing on PFF | Fiero Parts Vendors
PFF Merchandise | Fiero Gallery | Ogre's Cave
Real-Time Chat | Fiero Related Auctions on eBay


Copyright (c) 1999, C. Pennock