As I recently replaced my dew wipe I had the door apart so I took a ton of pics.
What I offer here is for the new Fiero owners who want to do the work themselves.
I welcome any comments from others to help cover any mistakes I make or to offer an easier way for the beginer to do this.
The pics are from my '84 with power windows, locks and mirrors.
I will try to add a pic later on the easy way to remove the manual window crank.
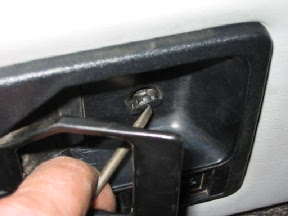
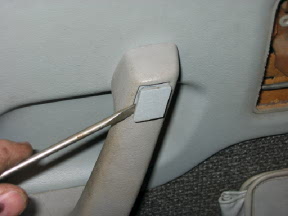
First use a small flat blade screwdriver to remove the covers over the two philips head screws.
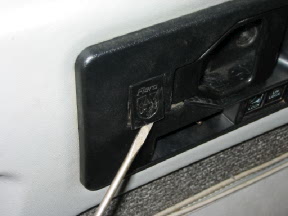
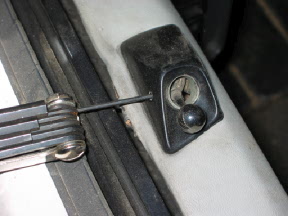
Next you need to remove the button from the lock rod, this can be done by gently pulling the case away from the door panel and using a small flat blade screwdriver pry the button away from the lock rod at the rear.
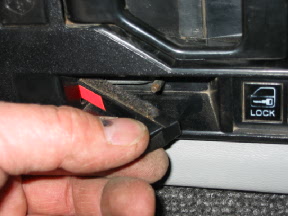
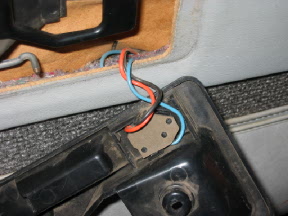
Now pull the door handle out and work the case off over the handle. If you don't have power locks that's it, if you do you now need to unplug the wiring from the case, do this by gently bending the two lock tabs away from the plug and then pry the plug up off the pins, it may help to have a friend help you with this as three hands make it easier.
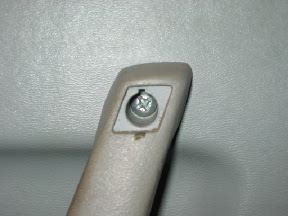
Now to remove the arm rest first use a small flat blade screwdriver to pop out the screw cover.
Then remove the three philips head screws from the arm rest, these are fairly big so use a bigger screw driver.
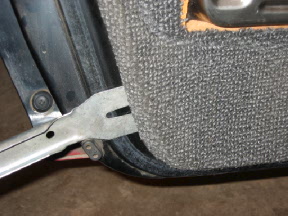
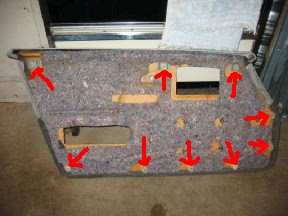
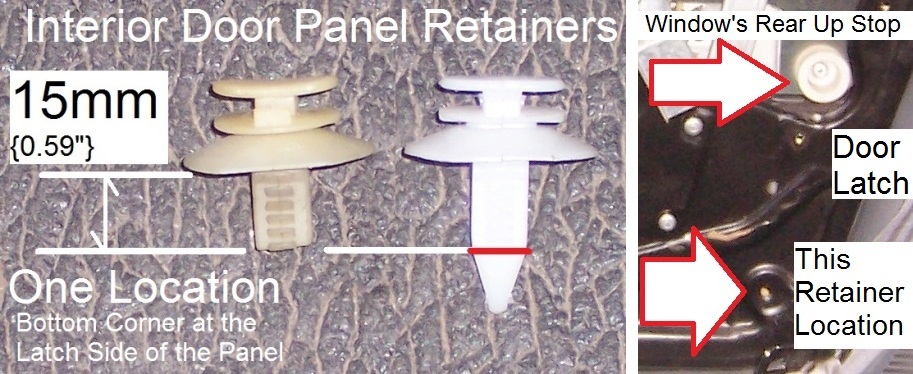
Lastly, using a tool like pictured or anything suitable pry out the "christmas tree" push pins that attach the panel to the door itself, take your time and use the tool to feel around the edge for the pins, there is also one fastener just behind the door handle through that opening.
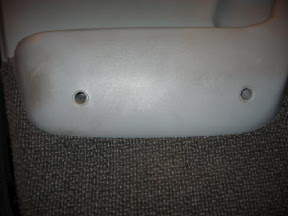
There are a total of 9 fasteners on the door panel, this pic shows their location. Don't go at these too hard as they are held to the door by little tabs and it doesn't take much to trash the hole in the door panel where they mount.
One other thing, if you have manual mirrors there is a small allen head set screw that holds the adjuster inside the small housing mounted to the door panel, loosen this and it should push through with no problems.
Also see my follow up post "How to remove outer door panel, with pics"
fierohoho, do you think you could post how to replace dew wipes with pics if you have em? That would be AWESOME. I took off my door panels to do the door locks, and I also have to do the dew wipes. you have to take the outer door panel to do the wipes, right? Thanks man, -Andre
I plan on doing another thread on removing the outer door skin soon, I will try to incorporate doing the dew wipe with pics in that one. I found it's a little easier to do the wipes with the skin off, it's also a good time to clean and regrease the lock mechanism which frees up any sticky power locks.
I just replace both new wipes on an 89 GTA restoration job. What a pain in the azz. GM shoulda made a little flange so you could just stick a screwdriver in pointed downward to take out the screws after holding the rubber out slightly.
Originally posted by rogergarrison: I just replace both new wipes on an 89 GTA restoration job. [snip]
Excuse me? What was that you said? It's not that I don't believe you, but perhaps you could shed some digital photography on any particular issues you ran into? Or just some picks to show what exactly you are working on?
Just an addition to the manual mirror removal and the manual window crank handle removal.
To remove the control cable from the housing use a small allen wrench to loosen the set screw on the window side and the control head will slide through.
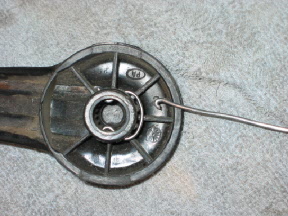
To remove a manual window handle you need to make a small hook out of a piece of wire or a paper clip, then just reach behind the handle as shown and hook the "c" clip and pull it off, you should then be able to wiggle the handle loose.
Originally posted by Daniel87GT: Excuse me? What was that you said? It's not that I don't believe you, but perhaps you could shed some digital photography on any particular issues you ran into? Or just some picks to show what exactly you are working on?
Oh boy. HoHo look what you started, now everyone is going to want great pictures of everything done. "I had my tires changed today" "Did you take pics?" "I went to start my car today" "Did you take pics?"
And it only gets worse.... "I scratched my..." "Honey what did you do while I was out?"
Originally posted by andguent: Oh boy. HoHo look what you started, now everyone is going to want great pictures of everything done.[cut]
EXCUSE ME! Perhaps I was being a little too subtle for you. I think that what Fierohoho is doing is great. It lets people that have not done their dew wipes before have some visual instructions available to go with the ton of written stuff out there. Keep it up hoho. My reply was directed at roger garrison who claimed to be doing his dew wipes on an 89 GTP. What I was kindly trying to say was, you're working on an 89 GTP? Prove it. Pictures?
I've done my dew wipes before. I wanted pictures of this 89 GTP he claims to be working on.
Jerk.
[This message has been edited by Daniel87GT (edited 11-01-2002).]
You can buy a tool for removing the manual window handles fairly cheaply... AND it also works great for removing the "christmas tree" puch pins that hold the inner dool panel in place.
Thanks to fierohoho, this saved my sanity this afternoon
quote
Originally posted by fierohoho:
To remove a manual window handle you need to make a small hook out of a piece of wire or a paper clip, then just reach behind the handle as shown and hook the "c" clip and pull it off, you should then be able to wiggle the handle loose.
I have a question. Behind the inner door handle there is a black plastic "plate" or "shield" about the size of the door handle that covers the view to the inner door (I don't know what it is called). How is that installed? When I removed my inner door panel it just came off and I did't see how it was attached. Thanks
If you look at the very first picture you can see where it sits just to the upper left of my knuckle and behind the door latch handle, it mounts to the handle mechanism and is installed before the outer surround goes on.
It does not attach very securely to the handle mechanism.
The outer case sits over it and it does not attach to that.
Hope that helps.
[This message has been edited by fierohoho (edited 02-20-2014).]
I just started the tedious job of replacing the outer dew strip on my 86 Fiero. I am positive it has never been torn apart before as some of the plastic christmas trees broke off :-( Does anyone know where you can get the right style of replacement? And, how do you get them to stay in the pre-cut hole they mount in on the interior door panel itself? I was thinking of glue to help hold them in place?
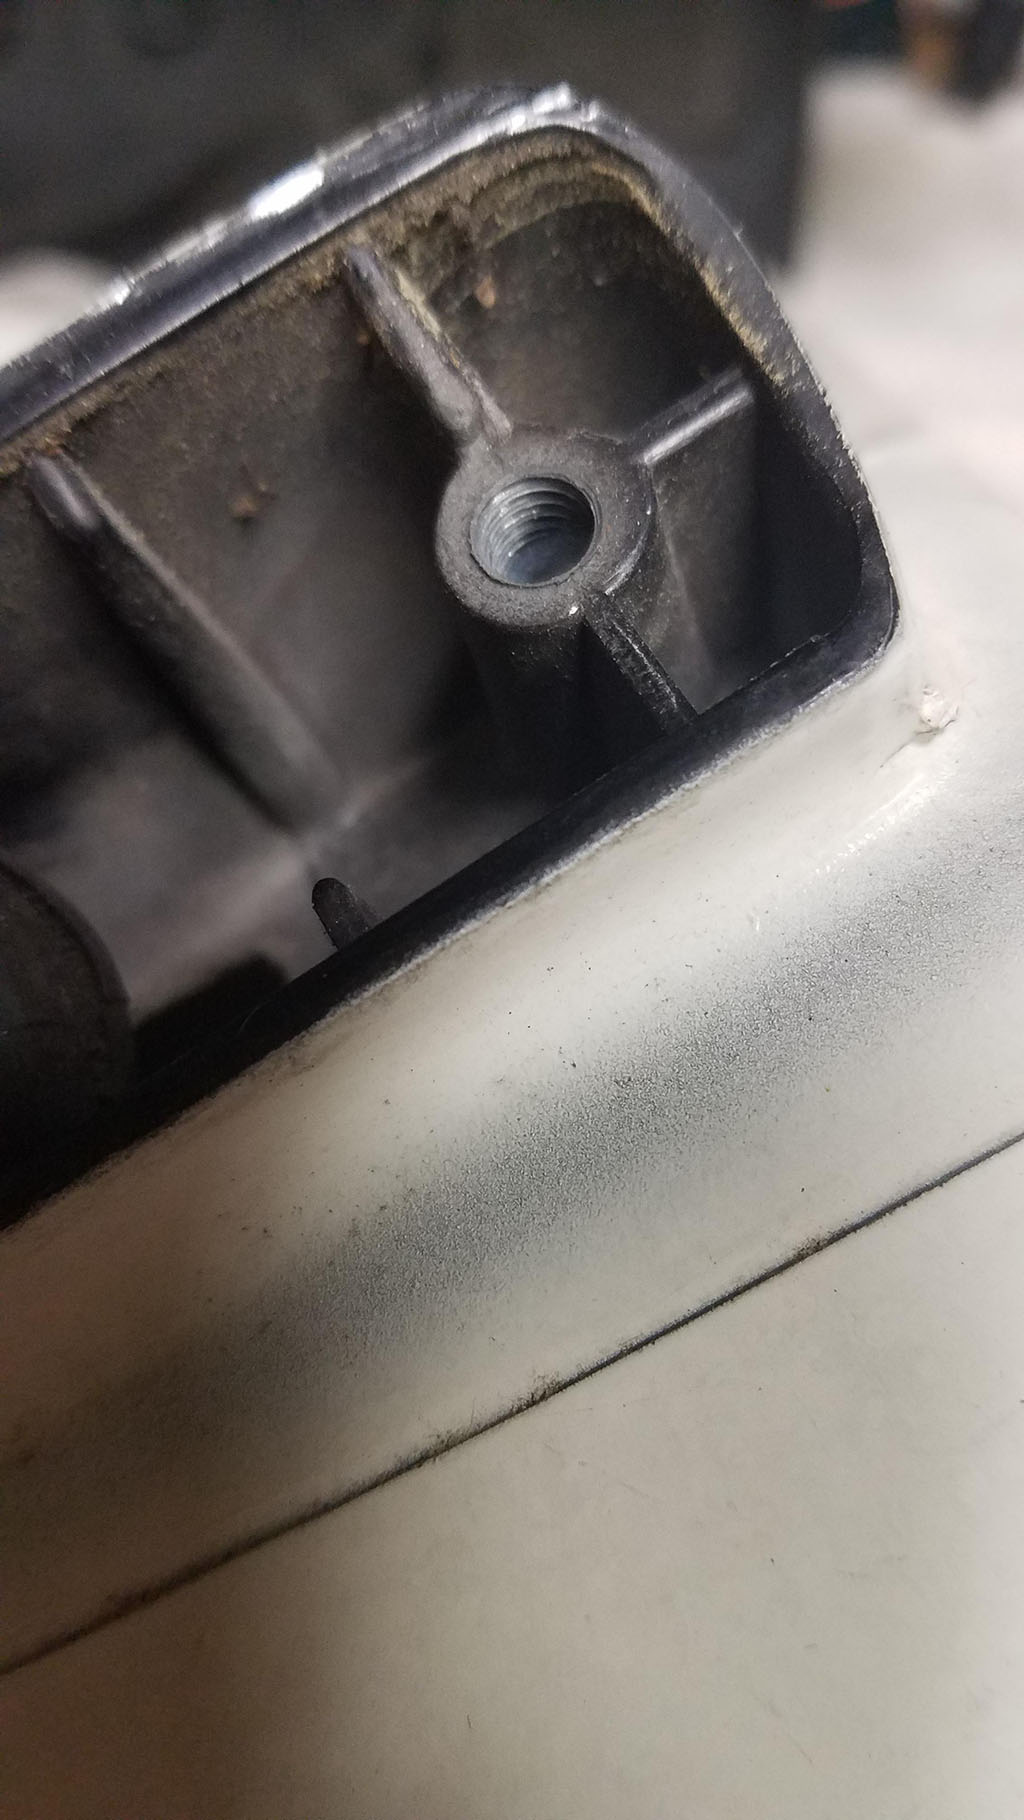
Also, the passenger mirror was not mounted on the car and the blots that hold it on are also not with the car. Does anyone know the specific size they are so I can go buy them?
I just started the tedious job of replacing the outer dew strip on my 86 Fiero. I am positive it has never been torn apart before as some of the plastic christmas trees broke off :-( Does anyone know where you can get the right style of replacement? And, how do you get them to stay in the pre-cut hole they mount in on the interior door panel itself? I was thinking of glue to help hold them in place?
Also, the passenger mirror was not mounted on the car and the blots that hold it on are also not with the car. Does anyone know the specific size they are so I can go buy them?
Thank you. I ordered some things from Rodney Dickman so I added some new christmas trees to my order. The temps took a dump here in Ohio so I have suspended my work on the dew strips until I can feel my fingers again!
As for the mirror.... Now I see why it was just sitting in the trunk. I guess I am going to have to order some missing parts to be able to reattach it to the car.
Well, after looking at a picture online, it seems the studs are not on the passenger mirror.... :-( So, is it possible to just fix this one or do I need to try and find a replacement?
Well, after looking at a picture online, it seems the studs are not on the passenger mirror.... :-( So, is it possible to just fix this one or do I need to try and find a replacement?
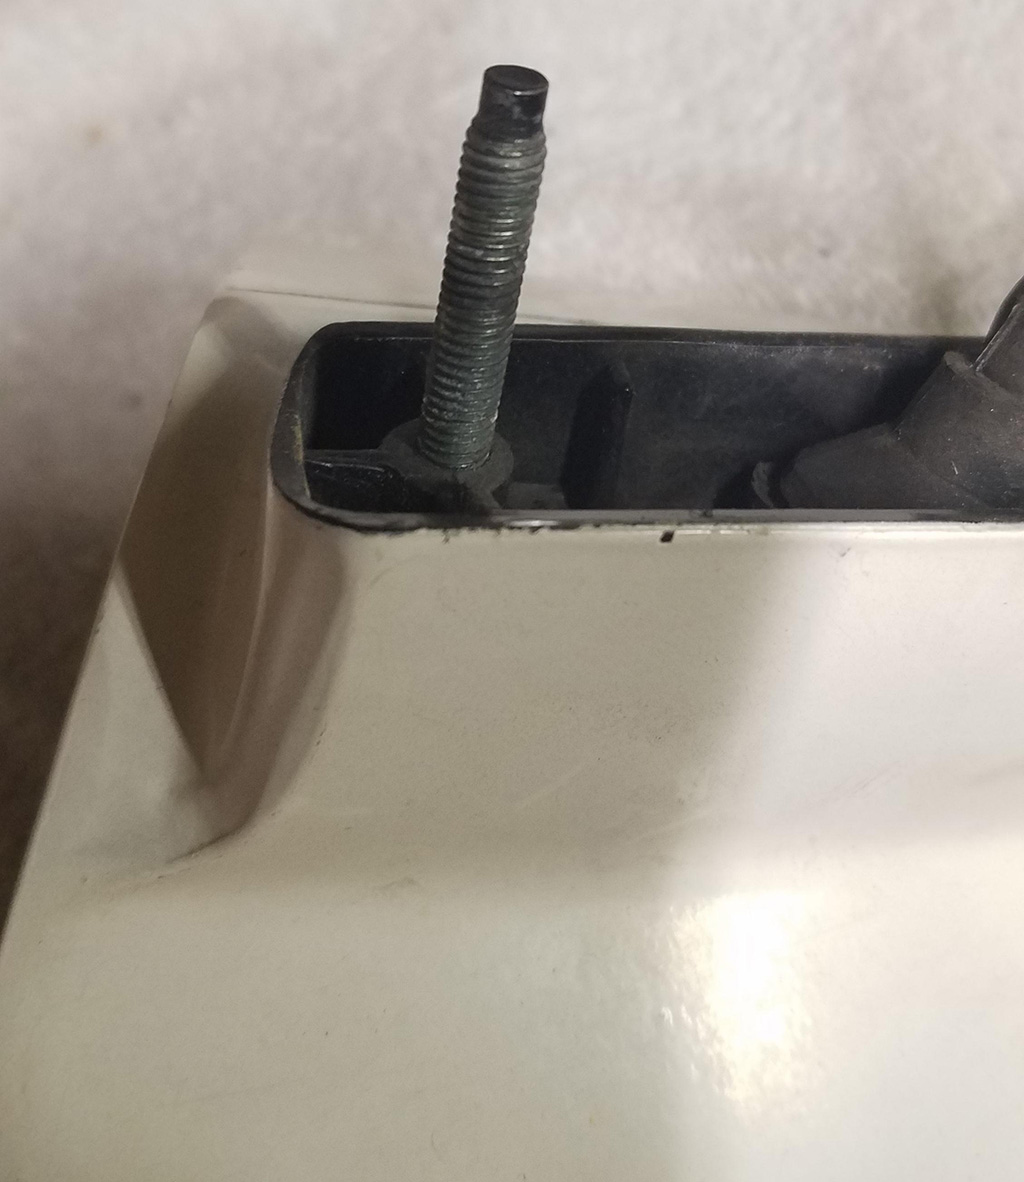
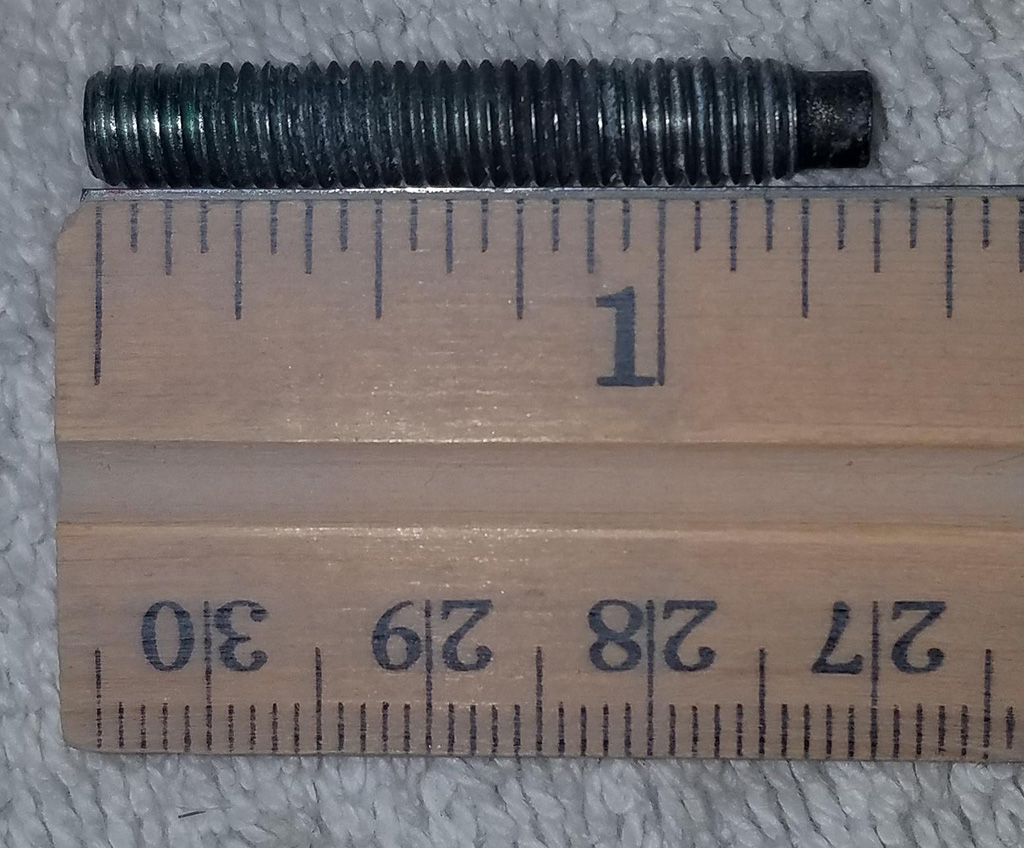
I just went out and removed the stud from my mirror. I assume your mirror is simply missing the bolts....or are they broken off? Here is what they should look like:
I need to post a thread in General about this. I believe they are 6mm but I don't know the thread spacing.
I just went out and removed the stud from my mirror. I assume your mirror is simply missing the bolts....or are they broken off?
I need to post a thread in General about this. I believe they are 6mm but I don't know the thread spacing.
They are missing on mine. Thank you so much, this is extremely helpful! I will head to the hardware store today or tomorrow and see if I can get two new ones!
I did finally get the studs out of the Fiero I am gutting in the field and mounted the passenger mirror. Thank you guys for this great article and all your help!