Pennock's Fiero Forum
  FAQs & HowTos
  HOW TO: Install an MSD Blaster Coil on an 84 Fiero

Post New Topic  Post A Reply
Email This Page to Someone! | Printable Version


next newest topic | next oldest topic
HOW TO: Install an MSD Blaster Coil on an 84 Fiero by RWDPLZ
Started on: 11-15-2005 03:42 PM
Replies: 10 (3408 views)
Last post by: RWDPLZ on 12-09-2023 09:53 AM
RWDPLZ
Member
Posts: 15010
From: Michigan
Registered: May 2002


Feedback score:    (11)
Leave feedback


Total ratings: 303
Rate this member

Report this Post11-15-2005 03:42 PM Click Here to See the Profile for RWDPLZClick Here to visit RWDPLZ's HomePageSend a Private Message to RWDPLZEdit/Delete MessageReply w/QuoteDirect Link to This Post
For those of you who don't know, the 84 Fiero uses a different coil than the rest of the Fieros (one of the MANY differences between the 84 and other years). As a result, noone makes a performance coil for the car. However, the later year Fieros have a decent selection of performance coils, including the MSD Blaster Coil (part # 8226), available at most auto parts stores and online. Although not so straightforward, upgrading the stock coil to the later-style coil isn't so difficult.

I would like to appologize for the lack of pictures, I don't own a camera. If anyone would like to contribute pictures of the areas in the install, I'd be more than happy to give you credit.

FIRST: Taking out the old coil

The old coil bracket is held in by a 13mm nut on top and a 13mm bolt on bottom. I got these off with a 13mm deep socket and a 6 inch extension. The top bracket is under the fuel filter bracket, just slide that bracket out far enough off the bolt you can slip the top bracket down through and off the bolt. Disconnect the connector and coil wire.

Next, you can either re-use the old bracket, or get one off an 85-86 iron duke. The 84 bracket will not fit the 85+ coil, as the 84 coil is larger. Until I can find the earlier bracket, I just bent the top ends of the bracket toward each other and put the two top screws in If you choose to re-use the original bracket, you'll likely need to drill out the factory pins holding it in, unless the coil has ben replaced before. My car of course still had the original coil.

SECOND: The wiring.

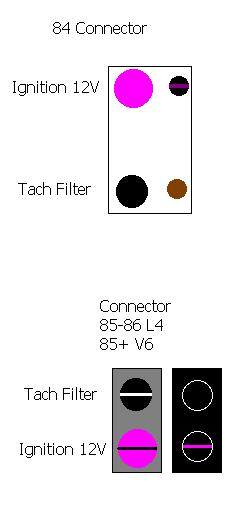
The connectors are different. And at least on my car, so are the wire colors. To figure out which wires go where, I consulted the factory wiring diagrams:

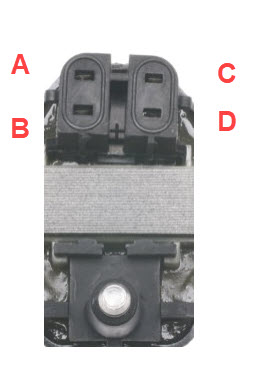
The connectors look (something) like this:

First the grey connector: Obviously, the large pink ignition wires need to be connected together. Next, you'll notice a wire that goes along with the pink wire, back into the engine bay. This wire connects to the tach filter. Connect this wire to the black wire with the white stripe on the grey connector.

Next, the black connector. The black connector and the original harness both havea black wire with a pink stripe. These wires go together. That should only leave the original harness'es brown wire, and the black wire on the black connector. Connect these together.

Now plug the connectors onto the coil (they only go on one way, black connector first), reconnect the coil wire, and fire it up. It should start and run the first time. Take it around the block and try it out.

------------------

1984 Fiero SE

[This message has been edited by RWDPLZ (edited 11-15-2005).]

IP: Logged
PFF
System Bot
Jax184
Member
Posts: 3524
From: Vancouver, Canada
Registered: Jun 2005


Feedback score: N/A
Leave feedback


Total ratings: 111
Rate this member

Report this Post11-15-2005 04:48 PM Click Here to See the Profile for Jax184Click Here to visit Jax184's HomePageSend a Private Message to Jax184Edit/Delete MessageReply w/QuoteDirect Link to This Post
Thanks for posting this. I've been meaning to do the same thing, but dont have an '85 manual or the new coil/coil connector yet.
This saved me a fair bit of wire tracing.
Notice any performance differances with the new coil? What's the seat-of-the-pants meter say?
IP: Logged
RWDPLZ
Member
Posts: 15010
From: Michigan
Registered: May 2002


Feedback score:    (11)
Leave feedback


Total ratings: 303
Rate this member

Report this Post11-15-2005 07:56 PM Click Here to See the Profile for RWDPLZClick Here to visit RWDPLZ's HomePageSend a Private Message to RWDPLZEdit/Delete MessageReply w/QuoteDirect Link to This Post
'Seat of the pants' says there's a small but NOTICEABLE improvement. Worth the time and effort.

There aren't any 85+ Fieros in the yards around here, so I went through about 40 different cars looking for the connectors. FInally found them in a V6 Firebird with the 2.8L, got them for $5. The only place locally I could find that carried them wanted $20 for EACH connector!

IP: Logged
Jax184
Member
Posts: 3524
From: Vancouver, Canada
Registered: Jun 2005


Feedback score: N/A
Leave feedback


Total ratings: 111
Rate this member

Report this Post11-15-2005 08:03 PM Click Here to See the Profile for Jax184Click Here to visit Jax184's HomePageSend a Private Message to Jax184Edit/Delete MessageReply w/QuoteDirect Link to This Post
That's good to hear.
Do you fanaticly measure your gas mileage? I'd be interested to see if there's an improvement. Makes sense to me that there would be a small one from better fuel burning.
IP: Logged
RWDPLZ
Member
Posts: 15010
From: Michigan
Registered: May 2002


Feedback score:    (11)
Leave feedback


Total ratings: 303
Rate this member

Report this Post11-16-2005 05:08 PM Click Here to See the Profile for RWDPLZClick Here to visit RWDPLZ's HomePageSend a Private Message to RWDPLZEdit/Delete MessageReply w/QuoteDirect Link to This Post
The couple times I've measured my gas mileage I've gotten 23mpg. I just filled up today and reset the trip odometer, so I'll let you know how it does in a week or so.

I'll also be installing an MSD 6T Igition Box as soon as it gets here, so I'll be able to compare with it, too.

IP: Logged
Patrick
Member
Posts: 36180
From: Vancouver, British Columbia, Canada
Registered: Apr 99


Feedback score: (1)
Leave feedback


Total ratings: 458
Rate this member

Report this Post03-02-2013 02:56 AM Click Here to See the Profile for PatrickSend a Private Message to PatrickEdit/Delete MessageReply w/QuoteDirect Link to This Post
 
quote
Originally posted by RWDPLZ:

The couple times I've measured my gas mileage I've gotten 23mpg. I just filled up today and reset the trip odometer, so I'll let you know how it does in a week or so.


This is the longest "week or so" I've ever experienced. That tank of gas has lasted more than seven freaking years!

[This message has been edited by Patrick (edited 11-16-2013).]

IP: Logged
RWDPLZ
Member
Posts: 15010
From: Michigan
Registered: May 2002


Feedback score:    (11)
Leave feedback


Total ratings: 303
Rate this member

Report this Post03-03-2013 10:02 AM Click Here to See the Profile for RWDPLZClick Here to visit RWDPLZ's HomePageSend a Private Message to RWDPLZEdit/Delete MessageReply w/QuoteDirect Link to This Post
The thread was archived for years before it got moved to the FAQ section.

-Gas mileage didn't change

-The coil lasted 7 years before it suddenly died without warning.

//www.fiero.nl/forum/Forum2/HTML/122189.html

-The newer 85-86 duke coil bracket fits the MSD coil perfectly

-The MSD Ignition box made the car run worse. Not sure what the problem was, I'll let you know in a week or so
IP: Logged
ag9123
Member
Posts: 264
From: Chicago, IL USA
Registered: Sep 2013


Feedback score: (1)
Leave feedback

Rate this member

Report this Post11-06-2013 12:59 PM Click Here to See the Profile for ag9123Send a Private Message to ag9123Edit/Delete MessageReply w/QuoteDirect Link to This Post
I found the black and gray coil connectors for my MSD Blaster coil swap at NAPA Auto Parts

http://www.napaonline.com/C...R-ECHEC25_0334596197

http://www.napaonline.com/C...R-ECHEC26_0334596198
IP: Logged
snyderman
Member
Posts: 200
From: Lancaster, Ontario, Canada
Registered: Nov 2008


Feedback score: (2)
Leave feedback

Rate this member

Report this Post04-28-2021 09:25 PM Click Here to See the Profile for snydermanSend a Private Message to snydermanEdit/Delete MessageReply w/QuoteDirect Link to This Post
RWDPLZ

After reading your write-up I'd like to go with your coil conversion than to stick with my '84 coil. The problem is that the connectors in Canada - both the grey and black, both have pink and white wires for some reason so can tell me where the 4 original wires fit directly into the new coil connectors rather than trying to match them with the new connectors you discuss in your post? This way I can match the up with the connectors I can buy here. I've done up a diagram and labelled the 4 connections as A,B,C,D. Thanks in advance.


IP: Logged
edfiero
Member
Posts: 949
From: Coatesville, PA
Registered: Nov 2004


Feedback score: N/A
Leave feedback

Rate this member

Report this Post10-26-2023 10:37 AM Click Here to See the Profile for edfieroSend a Private Message to edfieroEdit/Delete MessageReply w/QuoteDirect Link to This Post
 
quote
Originally posted by snyderman:


I see this was never answered. I was thinking about putting in the Blaster Coil as well, and am running into the same problem. The connectors sold today Gray and Black BOTH have Pink and White wires, and not the colors described in the original write up. Did any one figure it out?

My guess..... correct me if I am wrong is that A/B is the GRAY connector with A being white wire and B being the big Pink wire. C/D would be the black connector, with C being white and D being Pink. Then as for the wiring connections: The Original Fiero harness...big pink wire, connects to B and the black (tach filter?) goes to A. Now here is where I am a little sketchy, but it seems that Black wire from the original harness will go D, and the original brown wire will connect with C.
IP: Logged
RWDPLZ
Member
Posts: 15010
From: Michigan
Registered: May 2002


Feedback score:    (11)
Leave feedback


Total ratings: 303
Rate this member

Report this Post12-09-2023 09:53 AM Click Here to See the Profile for RWDPLZClick Here to visit RWDPLZ's HomePageSend a Private Message to RWDPLZEdit/Delete MessageReply w/QuoteDirect Link to This Post
 
quote
Originally posted by edfiero:

My guess..... correct me if I am wrong is that A/B is the GRAY connector with A being white wire and B being the big Pink wire. C/D would be the black connector, with C being white and D being Pink. Then as for the wiring connections: The Original Fiero harness...big pink wire, connects to B and the black (tach filter?) goes to A. Now here is where I am a little sketchy, but it seems that Black wire from the original harness will go D, and the original brown wire will connect with C.


Yes, correct. Here's a picture of the coil in a Fiero V6, you can see the pink and white wires in the above 85+ wiring diagram and the orientation of the wires in the connectors:

This images is larger than 153600 bytes. Click to view.
IP: Logged
PFF
System Bot

next newest topic | next oldest topic

All times are ET (US)

Post New Topic  Post A Reply
Hop to:

Contact Us | Back To Main Page

Advertizing on PFF | Fiero Parts Vendors
PFF Merchandise | Fiero Gallery | Ogre's Cave
Real-Time Chat | Fiero Related Auctions on eBay


Copyright (c) 1999, C. Pennock