Pennock's Fiero Forum
  FAQs & HowTos
  Changing ball joints on an 86

Post New Topic  Post A Reply
Email This Page to Someone! | Printable Version


next newest topic | next oldest topic
Changing ball joints on an 86 by Curlrup
Started on: 01-27-2008 07:45 PM
Replies: 14 (5003 views)
Last post by: Curlrup on 02-04-2008 10:13 PM
Curlrup
Member
Posts: 2590
From: Havre De Grace, MD
Registered: Apr 2007


Feedback score:    (6)
Leave feedback

Rate this member

Report this Post01-27-2008 07:45 PM Click Here to See the Profile for CurlrupSend a Private Message to CurlrupEdit/Delete MessageReply w/QuoteDirect Link to This Post
So I noticed a very nice write up for changing ball joints on an 88 front suspension, but not much for the 84-87 front suspension. So here was my adventure yesterday.

First things first jack up your car correctly and support the side your working on with a jack stand, I usually place the jack stand under the cross member. Get your tire off, and place your jack under your lower control arm. Jack up your lower control arm so you load the suspension some and keep your spring in there. The spring is really hard to get out even with the lower control arm on the floor but you never know that thing could snap out and take your teeth with it. So if you can saftey chain it, do it.

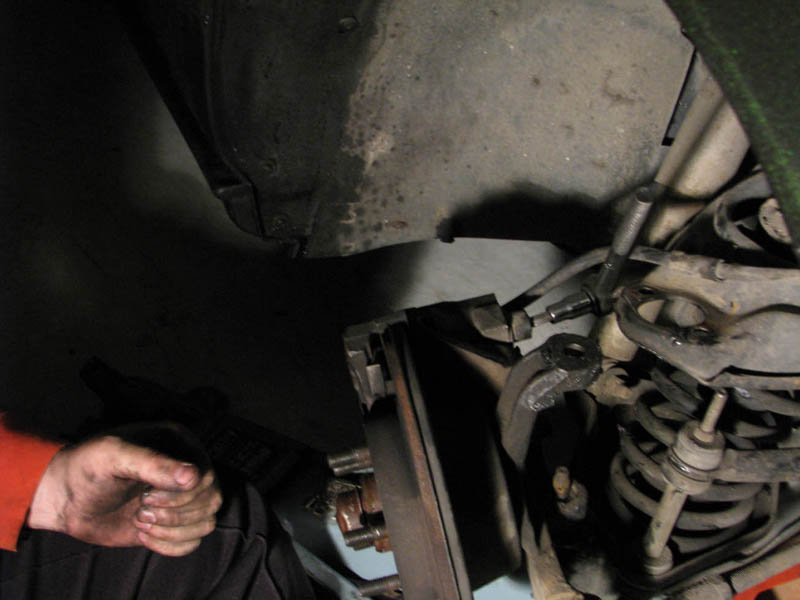
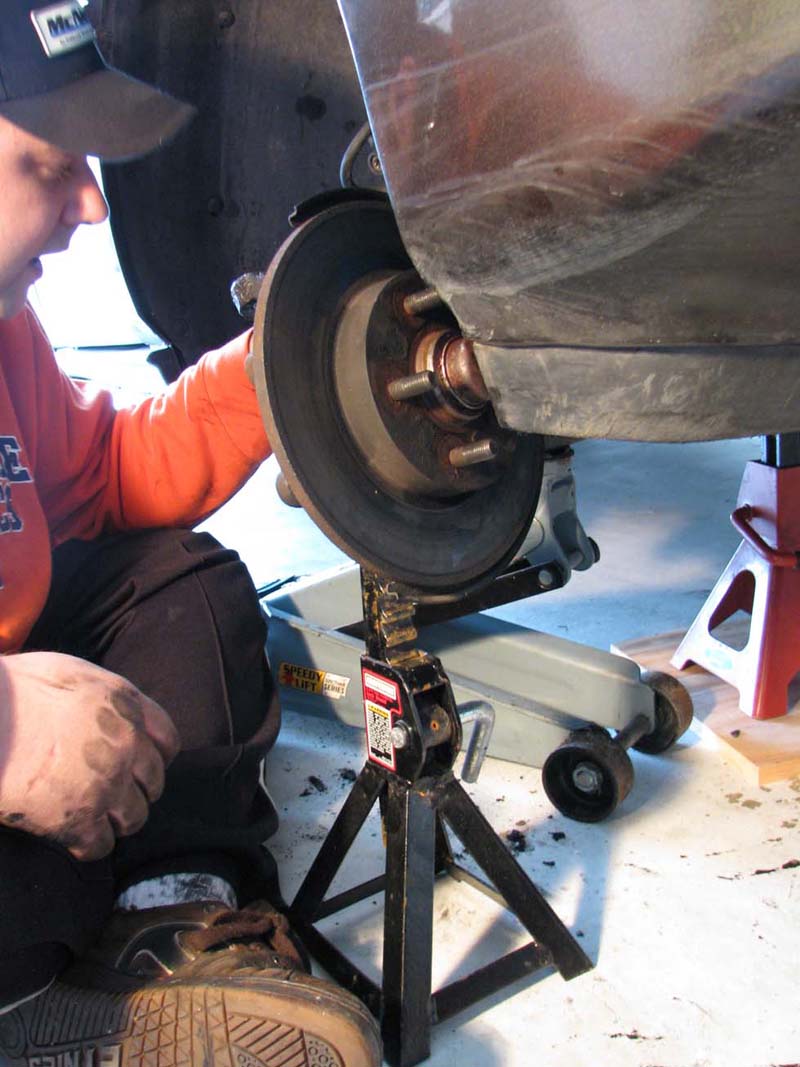
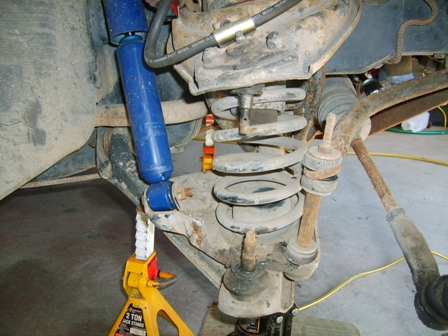
Here is what I learned when I got to the bottom Ball joint. The brake caliper and caliper bracket will get in the way of your seperator (pickle fork).


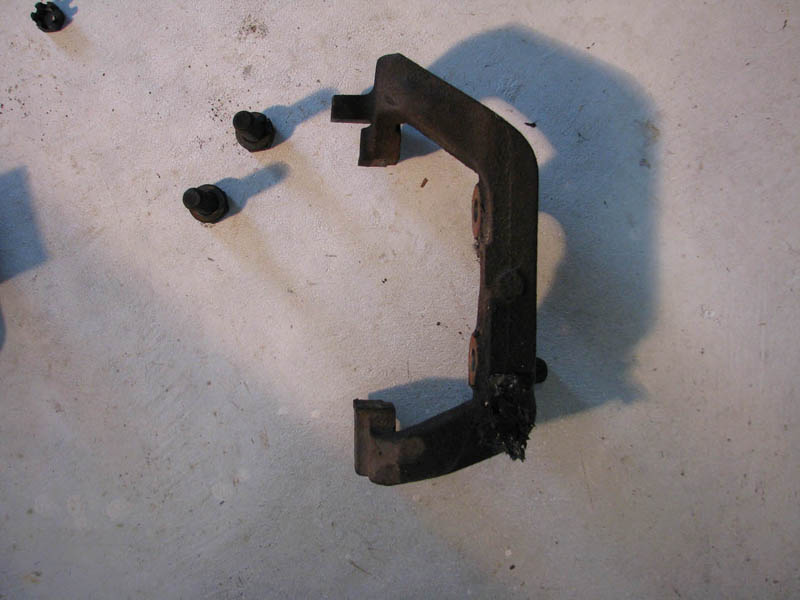
Here is the caliper bracket, two bolts that go into the spindle and it's out. The caliper attaches to this bracket with caliper pins. You need a Torx 50 socket to get the caliper pins out.

When you have the caliper off I like to wire it up to the upper contorl arm so it is out of the way and so it is not hanging from it's flexable hose.


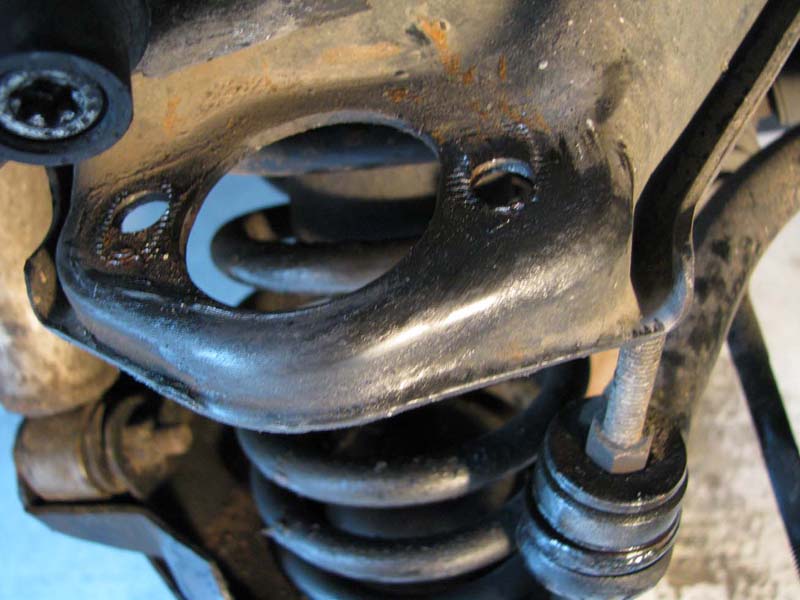
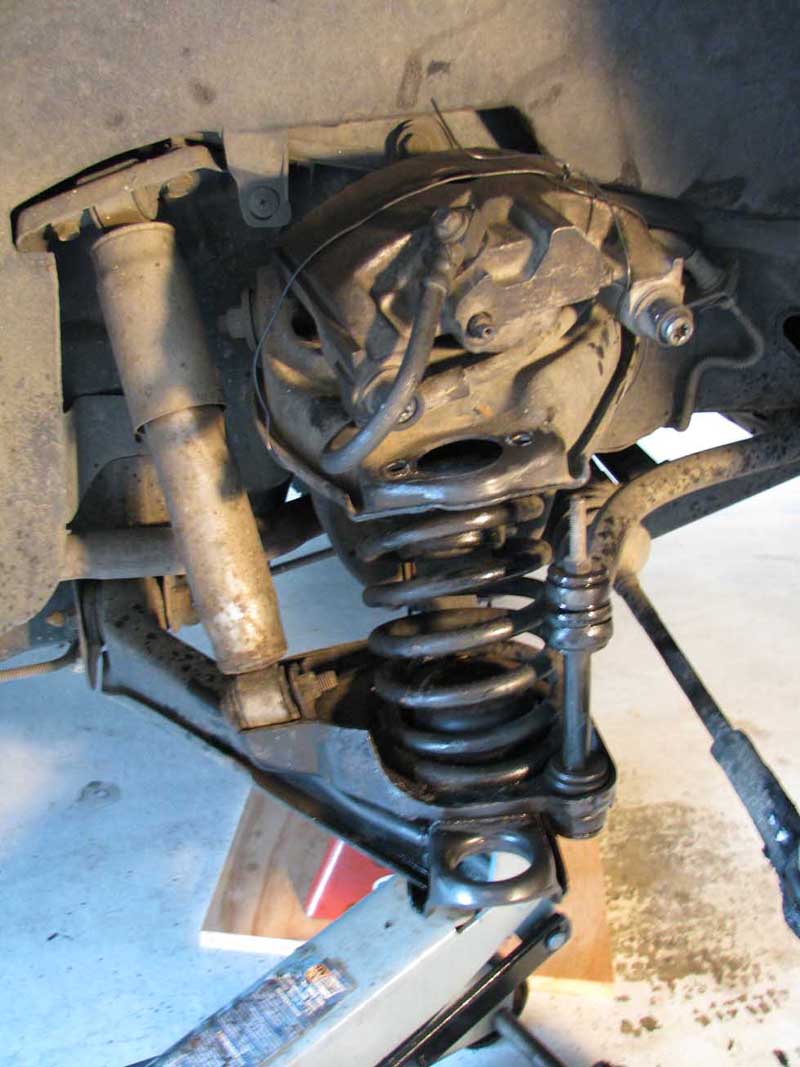
The top ball joint is held into the upper control arm by two bolts and two nuts


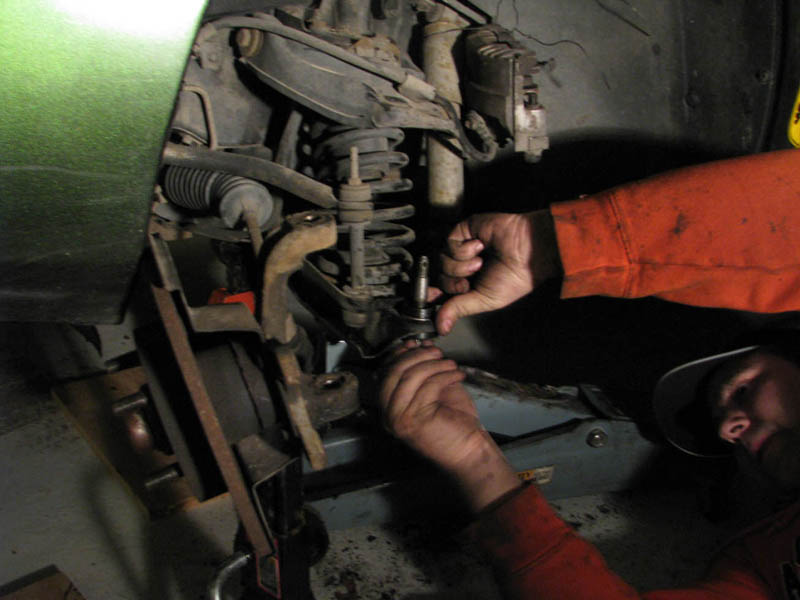
Remove those then remove the cotter pin and castle nut from the joint stud under the spindle arm, then grab your seperator/pickle fork it looks like this.


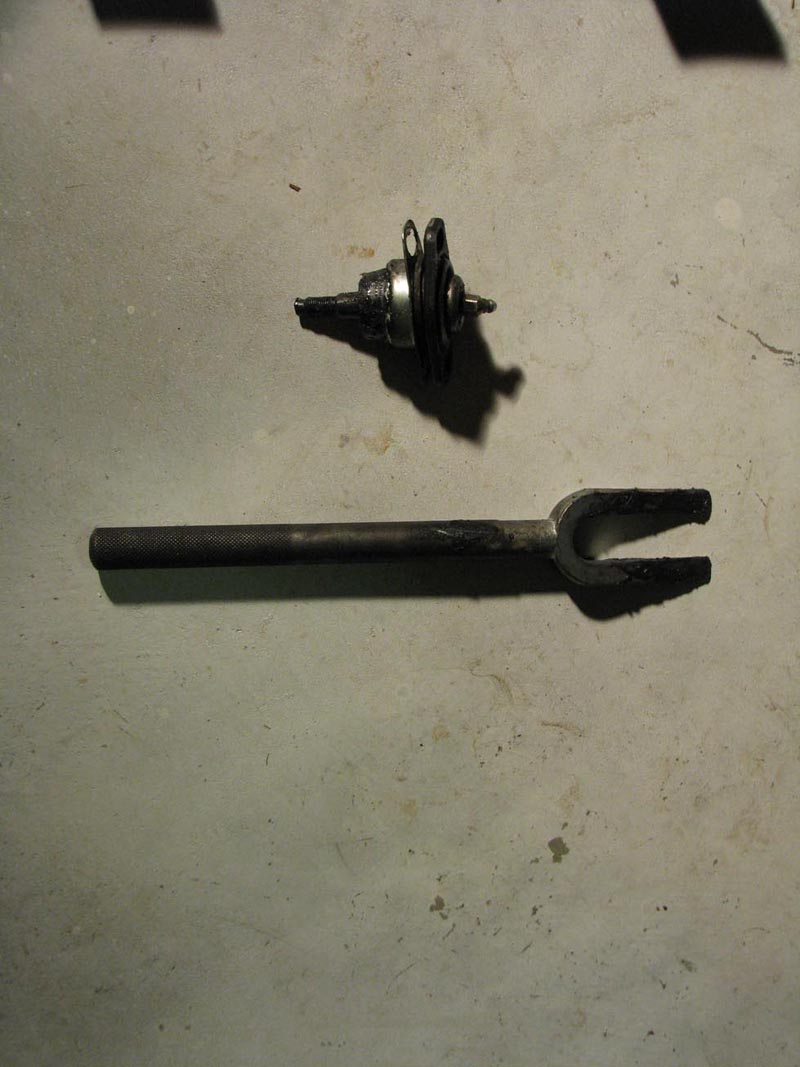
The pickle fork goes between the spindle arm and the ball joint. You hammer it in, as it goes in it wedges the ball joint stud out of the spindle arm. It will need a few good whacks, and make sure that the end of the fork is not hitting something as it slides


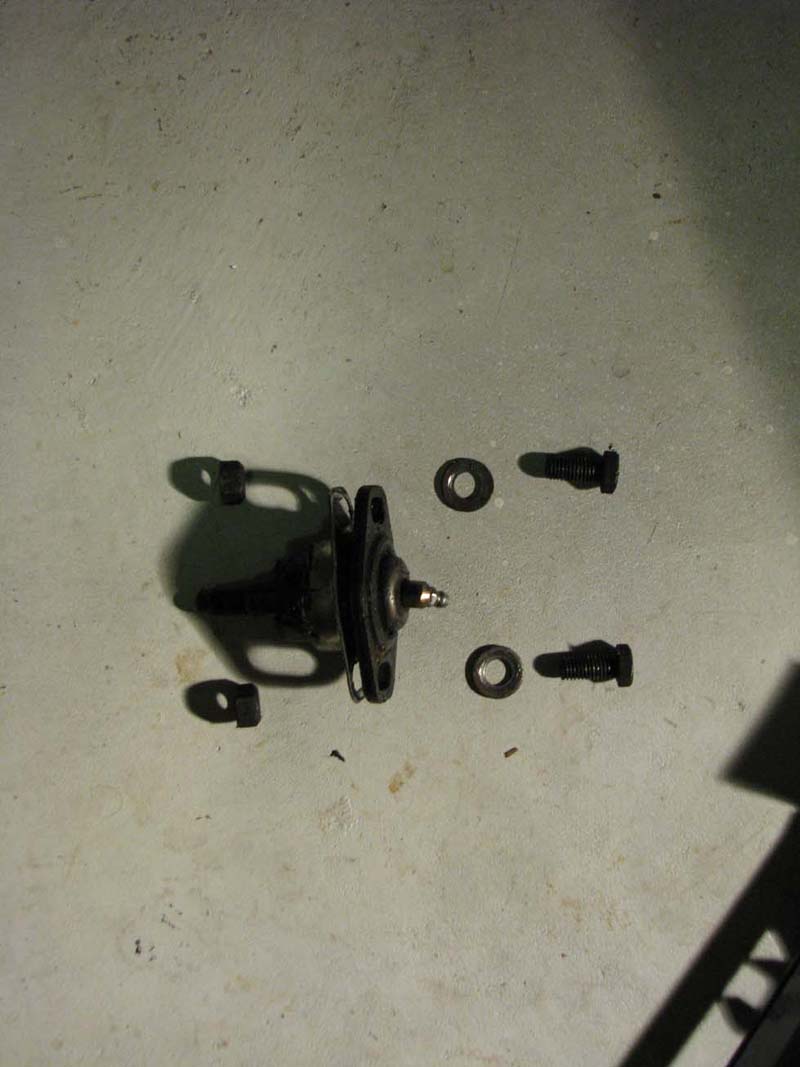
Here is the upper joint removed.


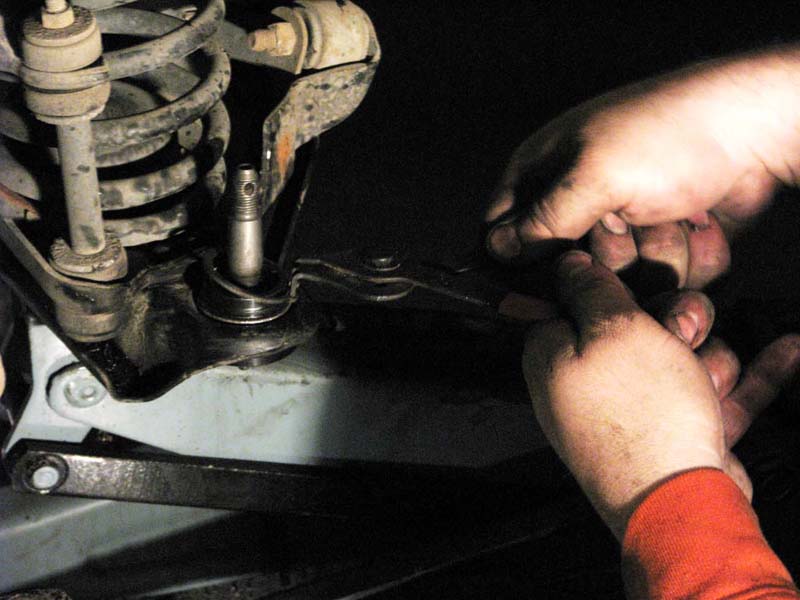
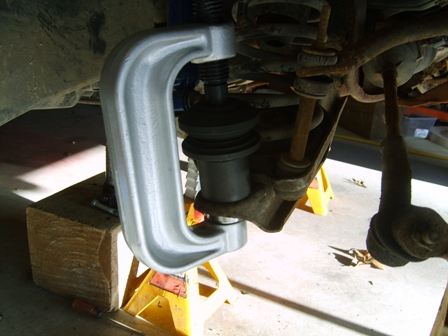
I trace with a paint pen where the old joint was located so I get the camber and caster close to where it was. I believe the OEM joints had just holes in the uppers for the bolts, the replacements have slots so you can twist the joint and adjust it. Now for the lower joint. Same thing remove the castle nut and cotter pin then get your pickle fork in there and whack away until it pops.


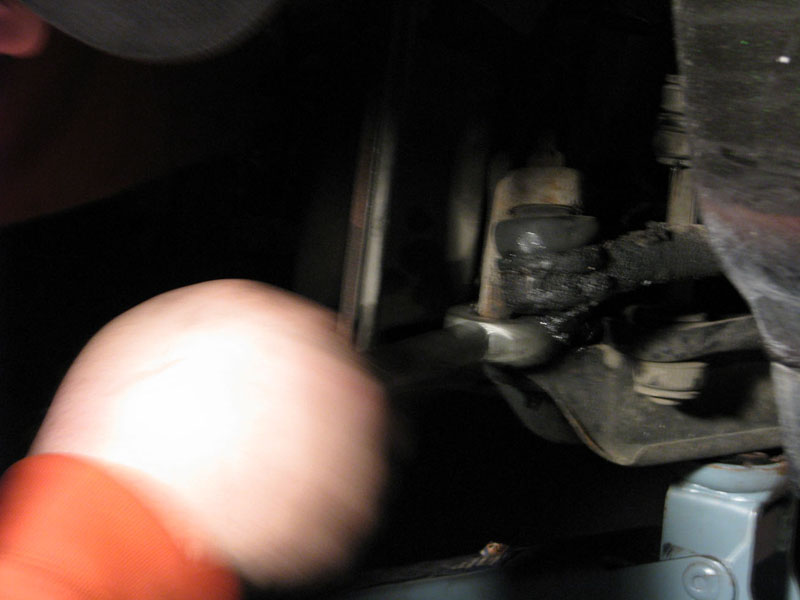
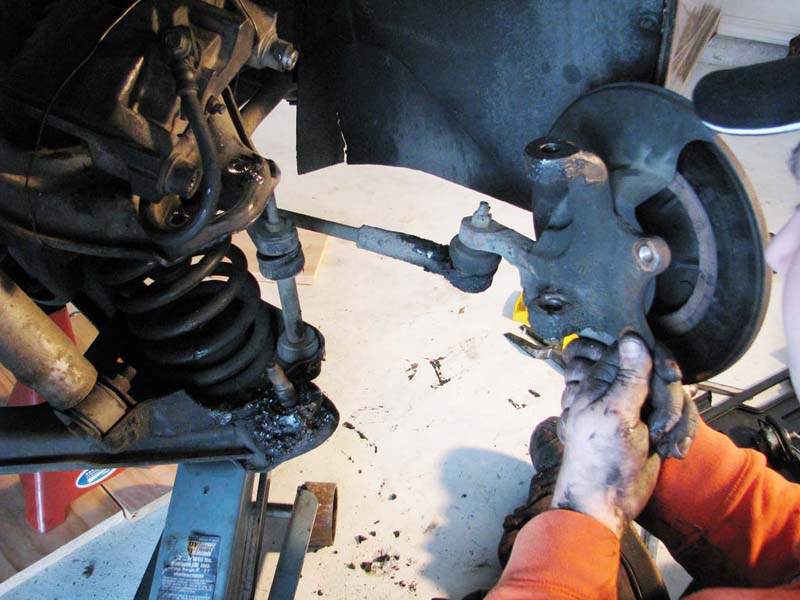
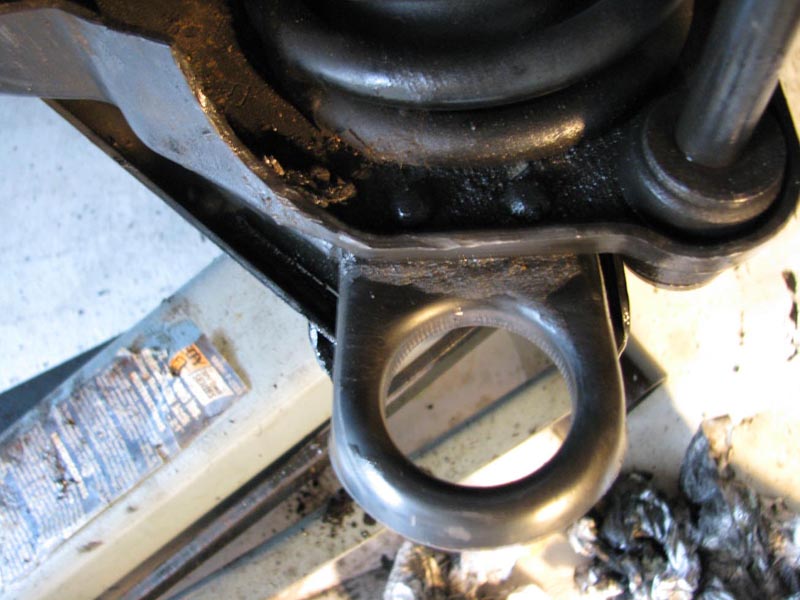
It's hard to see but the pickle fork is coming out from under the tie rod end.

When the spindle pops off the ball joint stud swing it out of the way, my tie rod ends were greasy but still in very good shape so I won't be touching those.


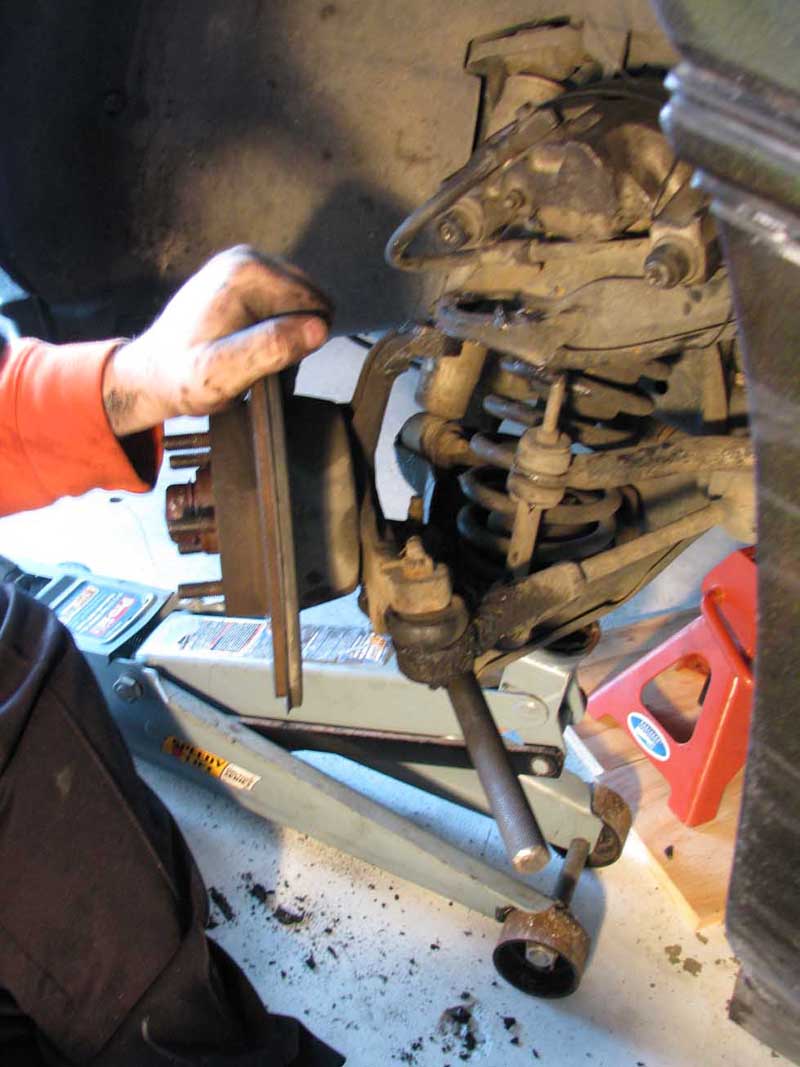
Also support the spindle so it's not hanging from the steering rack. I just used a jack stand (That's my chubby orange self).


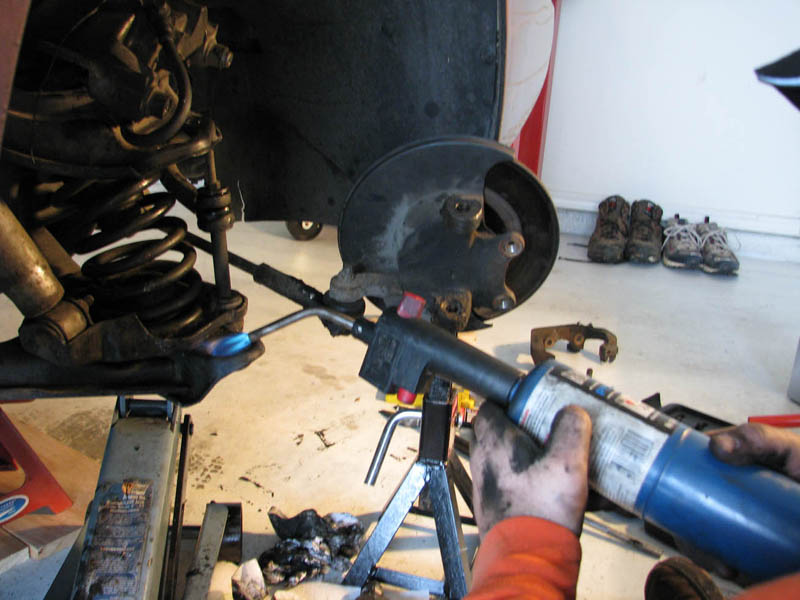
Take a torch, a propane torch and heat up the control arm end around the ball joint. Then whack it on the stud with a hammer. It will take some good whacks...I mean GOOD whacks and it will pop out the bottom. Clean out the hole so your new joint has a nice home.


Old and new ball joint......it was definatly time for new joints. This thing felt like a gear shift.


Now for the new joint. You will need a joint press, and various other things to help you like an over sized socket and a flat crow bar or piece of flat steel because guess what? The $30 press from Harbor Frieght was not made for such a small control arm and you need to improvise a bit.


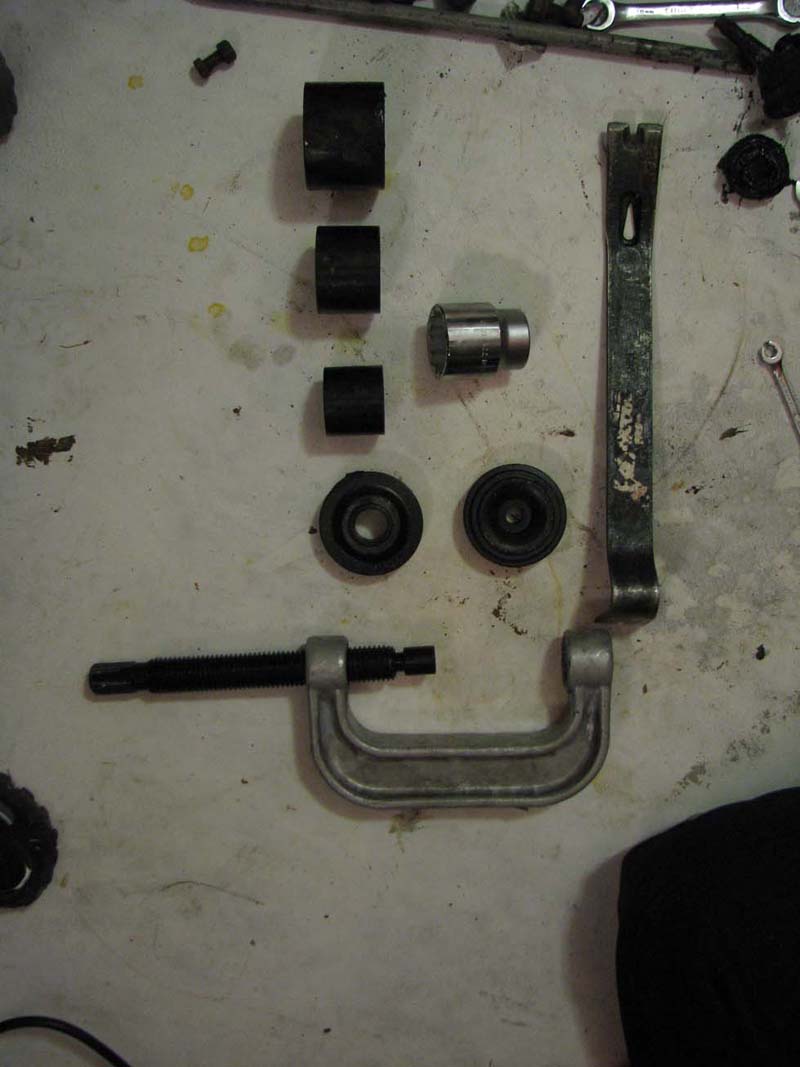
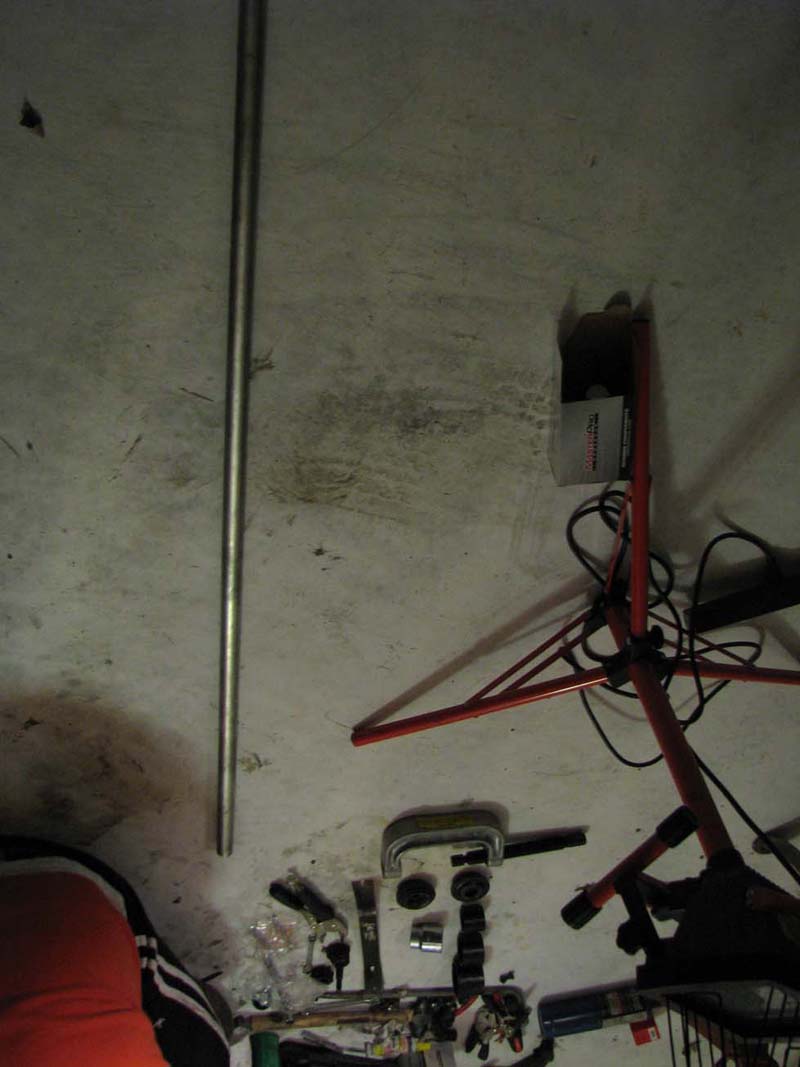
You also need a long pipe for cranking that press around, you would have to be Super Man to crank with out it.


I froze my lowers in the freezer, and then torched the end of the control arm again to expand it. I think it helped some but that ball joint warms up fast when your trying to squeeze it in the hole.


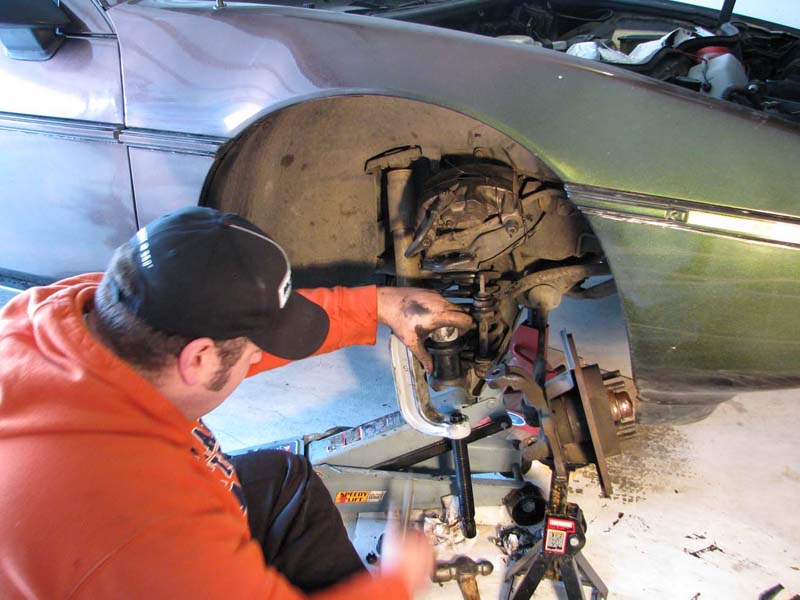
Crank and pop that joint in the control arm. Remember to install the grease fitting.


The replacements came with snap rings to help hold things in. I doubt that joint will come out in a million years on it's own....it is tight, but a little extra insurance is a good thing.


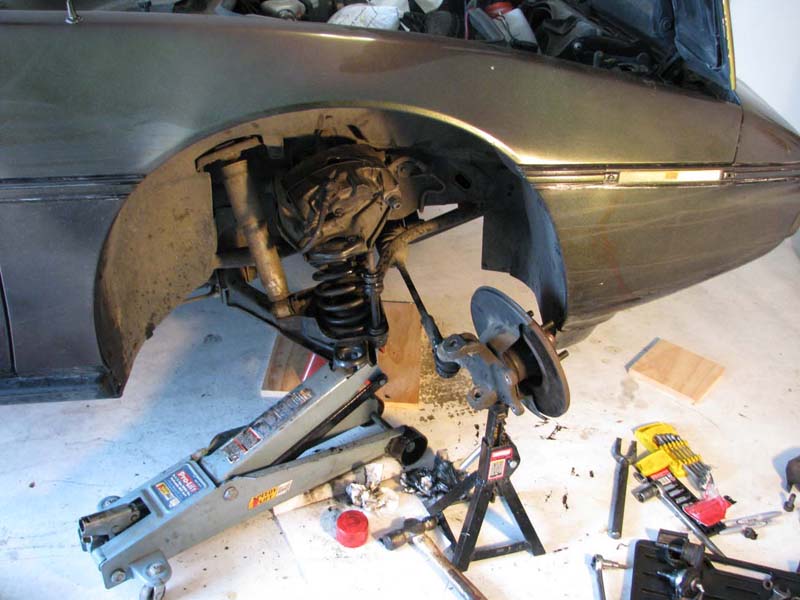
Attach the spindle to the new lower joint stud. I tap it down with a hammer them tighten down the castle nut and make sure all is seated well and install the cotter pin. Bolt in the upper joint lining it up with your paint pen marks from before and insert the joint stud in the spindle arm. Give it a few taps with the hammer and tighten down the castle nut and place the cotter pin. Bolt on your caliper bracket, and your caliper, and your done on that side Time to jack up the other side.


Then drive her away and look for anything odd, pulling, shimmy, shake, noise, clicks, pops. Then take it to an alignment shop to make sure your not going to be eating tires.


There is my write up, I could have used more pics but it is a start. Enjoy.

Curly
IP: Logged
PFF
System Bot
Gordo
Member
Posts: 2981
From: East Guilford, NY, USA
Registered: Mar 2002


Feedback score: N/A
Leave feedback


Total ratings: 114
Rate this member

Report this Post01-27-2008 08:19 PM Click Here to See the Profile for GordoSend a Private Message to GordoEdit/Delete MessageReply w/QuoteDirect Link to This Post
Nice write up!
IP: Logged
Xanth
Member
Posts: 6886
From: Massachusetts
Registered: May 2006


Feedback score:    (18)
Leave feedback


Total ratings: 174
Rate this member

Report this Post01-27-2008 08:24 PM Click Here to See the Profile for XanthSend a Private Message to XanthEdit/Delete MessageReply w/QuoteDirect Link to This Post
Great write-up

------------------
www.FieroDomain.com
"If any car is both the parade and the rain, it is the Fiero"

Upload and Share Fiero Photos! http://Gallery.FieroDomain.com

IP: Logged
Curlrup
Member
Posts: 2590
From: Havre De Grace, MD
Registered: Apr 2007


Feedback score:    (6)
Leave feedback

Rate this member

Report this Post01-27-2008 09:55 PM Click Here to See the Profile for CurlrupSend a Private Message to CurlrupEdit/Delete MessageReply w/QuoteDirect Link to This Post
Thanks, Also if you see anything I left out, or need to add just say so.

Curly
IP: Logged
Hudini
Member
Posts: 9029
From: Tennessee
Registered: Feb 2006


Feedback score: N/A
Leave feedback


Total ratings: 165
Rate this member

Report this Post01-27-2008 10:08 PM Click Here to See the Profile for HudiniSend a Private Message to HudiniEdit/Delete MessageReply w/QuoteDirect Link to This Post
Very nice, a plus to you!
IP: Logged
tjm4fun
Member
Posts: 3781
From: Long Island, NY USA
Registered: Feb 2006


Feedback score: N/A
Leave feedback


Total ratings: 141
Rate this member

Report this Post01-27-2008 11:43 PM Click Here to See the Profile for tjm4funSend a Private Message to tjm4funEdit/Delete MessageReply w/QuoteDirect Link to This Post
Good deal.
2 things to add:
1. The top ball joint may be riveted in if they are still original, only an aftermarket replacement has the bolts. still no big deal, you can either chisel or grind the heads off and drive the remainder out with a punch.

2. you don;t need the picklefork to pop them out of the knuckle. remove the cotterpins on both. break both castle nuts loose, but do not remove them. loosen them so there is about a 1/16th gap between the nut and the knuckle. put a washer or 2 on the top of the bottom nut. get a 3/8" drive deep socket, I think I used a 1/2" one, put the square drive end on the stud with the washer,with the other end over the other stud. you may have to play with the socket size to get it right, and may need a short extension, the idea is to get the socket spacer to snug up against the 2 castle nuts, then continue to loosen each one to tension the joint studs so they are trying to push themselves out. get em tight, then tap the knuckle a few times with a hammer, and the stud will pop out of the taper. re tension it and hit the other side til it pops. Very easy to do with a few sockets and an open end, and will not damage the grease boot on the joint, just in case you are not replacing the joints, but maybe replacing the spring, or other parts.

and one suggestion, if you have rented/own/borrowed the tool to press the new joint in, use that to press the old one out, better than heating the lca and beating on it. if you must beat it out, get a piece of pipe to go around the joint and sleeve and support it like that to knock the old one out, but you must press the new one in, so you;ll need the tool anyway....

the lca is flimsy enough, and if not supported could deform with too much beating....

[This message has been edited by tjm4fun (edited 01-27-2008).]

IP: Logged
Curlrup
Member
Posts: 2590
From: Havre De Grace, MD
Registered: Apr 2007


Feedback score:    (6)
Leave feedback

Rate this member

Report this Post01-28-2008 08:24 AM Click Here to See the Profile for CurlrupSend a Private Message to CurlrupEdit/Delete MessageReply w/QuoteDirect Link to This Post
Yes there are many ways to seperate the ball joint from the spindle. Thanks for the extra tidbit, I figured since I was not trying to save my grease boots and the pickle fork was $12.99 at Oreillys that would be the way to go. All depends on if your doing work and want to save the boots or of your doing a tear down and replacement. It would also be a good idea to support the lower control arm while hammering on it as mentioned. One missed blow and you could be replacing more than ball joints. Thanks for the tips! My car rides great now, no chatter, knocking, or looseness. This car would clunk and knock on the slightest bumbs, now I got nothing, which is good. I like having my wheels secured when driving 70 down the highway everyday.
IP: Logged
josef644
Member
Posts: 6939
From: Dickinson, Texas USA
Registered: Nov 2006


Feedback score:    (71)
Leave feedback


Total ratings: 103
Rate this member

Report this Post01-31-2008 02:46 PM Click Here to See the Profile for josef644Send a Private Message to josef644Edit/Delete MessageReply w/QuoteDirect Link to This Post
Good write up, I'm gonna have to do mine over this weekend. I went for an alignment this morning, and the two lowers were both too loose. He checked everything else, and said it was all in real good shape except for these two lowers. This was just what I needed to see.I'll also give you a good + also.
Joe Crawford
Texas
IP: Logged
tjm4fun
Member
Posts: 3781
From: Long Island, NY USA
Registered: Feb 2006


Feedback score: N/A
Leave feedback


Total ratings: 141
Rate this member

Report this Post01-31-2008 07:07 PM Click Here to See the Profile for tjm4funSend a Private Message to tjm4funEdit/Delete MessageReply w/QuoteDirect Link to This Post
as I said, a great writeup, just like to offer other ways to do things. since you don;t remove the nut, yout really don;t need to support the lower arm, the pring acutally helps to pop the taper.
I never thought when I rebuit my car from front to back to take pics and doc each step, from the frozen bolt removals to brake line replacement. I now wish I had, just ofr others to reference one way to do any particular job. I realize there are many ways to do any particular job on the car, but at the least the pictures are a great reference.
Keep up the good work!
IP: Logged
Dave E Bouy
Member
Posts: 1465
From: Kettle Point Ontario Canada
Registered: Sep 2004


Feedback score:    (6)
Leave feedback

Rate this member

Report this Post01-31-2008 09:09 PM Click Here to See the Profile for Dave E BouySend a Private Message to Dave E BouyEdit/Delete MessageReply w/QuoteDirect Link to This Post
Good job! + to you
IP: Logged
josef644
Member
Posts: 6939
From: Dickinson, Texas USA
Registered: Nov 2006


Feedback score:    (71)
Leave feedback


Total ratings: 103
Rate this member

Report this Post02-01-2008 06:07 PM Click Here to See the Profile for josef644Send a Private Message to josef644Edit/Delete MessageReply w/QuoteDirect Link to This Post
I picked up my lower ball joints this morning, and when I was at Autozone to price the installer tool, they only had a new one unopened in the box. Its $99.00, and they refund it when you return it. I used all of the methods you did except I had put new shocks on a few weeks back and knew that the shock limits the down travel of the lower control arm. I didn't see a need to chain the spring. Between the shock and the sway bar I was happy. But do what works best for you.

I also took a poor quality picture of the installer tool on the ball joint. It took me a while to figure out how to set it up to work correctly. Maybe this picture will save some one else a quarter hour of time.
.
I think I can do the second one in about a half an hour. I went ahead and ordered the uppers to replace, as they are very easy to change out at this stage of un-assembly.
Thanks again for posting this as it was an item I was dreading to start in to doing.
Joe Crawford
Texas

[This message has been edited by josef644 (edited 02-01-2008).]

IP: Logged
PFF
System Bot
Zeb
Member
Posts: 4847
From: New Jersey
Registered: Jan 2008


Feedback score: N/A
Leave feedback


Total ratings: 54
Rate this member

Report this Post02-01-2008 09:02 PM Click Here to See the Profile for ZebSend a Private Message to ZebEdit/Delete MessageReply w/QuoteDirect Link to This Post
Thanks, Curlup, and all the rest of you guys. Now I'll know what to do this spring!
IP: Logged
1MohrFiero
Member
Posts: 4363
From: Paducah, Ky
Registered: Apr 2003


Feedback score:    (37)
Leave feedback


Total ratings: 157
Rate this member

Report this Post02-02-2008 08:00 AM Click Here to See the Profile for 1MohrFieroSend a Private Message to 1MohrFieroEdit/Delete MessageReply w/QuoteDirect Link to This Post
Great right up. Even though you have to adapt the Habor Freight tool it is a help to have.

------------------

IP: Logged
josef644
Member
Posts: 6939
From: Dickinson, Texas USA
Registered: Nov 2006


Feedback score:    (71)
Leave feedback


Total ratings: 103
Rate this member

Report this Post02-04-2008 10:03 PM Click Here to See the Profile for josef644Send a Private Message to josef644Edit/Delete MessageReply w/QuoteDirect Link to This Post
I drove my car today after switching out all 4 front ball joints, and the difference is great. It used to pull to the right at all speeds. I can now see the red square in the tach that used to be covered by the steering wheel off center. Now she is pretty well straight down the road. I have a little shake at about 65-70. I am having the tires balanced again, and the 4 wheel alignment done Wednesday morning. Wasn't the bad jobI feared it would be.
Lets see what can I fix next?
IP: Logged
Curlrup
Member
Posts: 2590
From: Havre De Grace, MD
Registered: Apr 2007


Feedback score:    (6)
Leave feedback

Rate this member

Report this Post02-04-2008 10:13 PM Click Here to See the Profile for CurlrupSend a Private Message to CurlrupEdit/Delete MessageReply w/QuoteDirect Link to This Post
Looks like your press had the one adapter mine didn't. The one that fits in the gap under the lower contorl arm. Looks good, someone told me that by doing the joints myself I saved $200-$300 in labor. I have no idea if that's true but I know I saved some cash. It's like getting an alignment for free.
IP: Logged

next newest topic | next oldest topic

All times are ET (US)

Post New Topic  Post A Reply
Hop to:

Contact Us | Back To Main Page

Advertizing on PFF | Fiero Parts Vendors
PFF Merchandise | Fiero Gallery | Ogre's Cave
Real-Time Chat | Fiero Related Auctions on eBay


Copyright (c) 1999, C. Pennock