Not so long ago my left headlight failed to pop up. The headlight motor had been rebuild a few years before (or that is what the garage claimed they did) and at first I was planning to rebuild it again, but this time do it myself. I contacted Rodney Dickman to ask what was needed for the rebuild and he said he happened to get a complete headlight set from an 88 and that it would be better to swap my "Generation 1" headlight motors out for the "Generation 2" headlight motors. He kindly donated the kit under the condition I would do a write up. So here it is.
I made this into a VBook, so to view the VBook, click here or click the "Print VBook" link at the top of the thread.
Introduction
The Fiero uses two different headlight motor systems. One is used in all 84 to 86 Fieros, the other is used in all 87 and 88 Fieros, hence they are usually referred to as the "Generation 1" and "Generation 2" headlight system. The Generation 1 motors have many, many disadvantages. They are noisy and slow and break down often. A lot of people choose to rebuild them when they fail - which is fine if you want to keep your Fiero stock or if you can't find the parts for the Generation 2 headlight system. Otherwise I would suggest doing this swap since it's an easy one and one you will not regret.
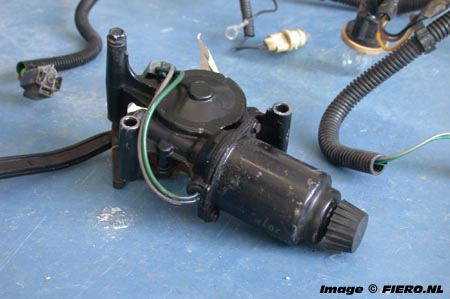
What you need A lot of people wonder what is needed for this swap. Most importantly, you need the headlight actuators (motors) of course. Make sure they are complete with the crank arm and the link assembly:
Generation 2 Headlight Actuators
If you are removing them from the donor car yourself (or if you have someone remove them for you), make sure they are marked "LEFT" and "RIGHT" since there is a difference. Also, you might want to take the three bolts holding the motor in place since they are about half an inch shorter than the bolts from the Gen. 1 motor.
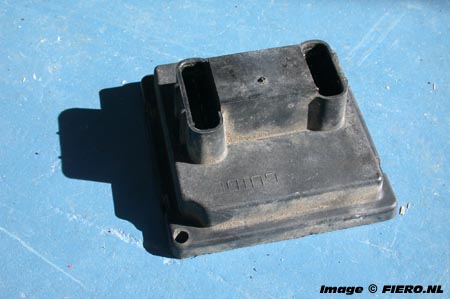
The Generation 2 system uses a motor control module which is not present in the Generation 1 system:
Generation 2 Headlights Motor Control Module
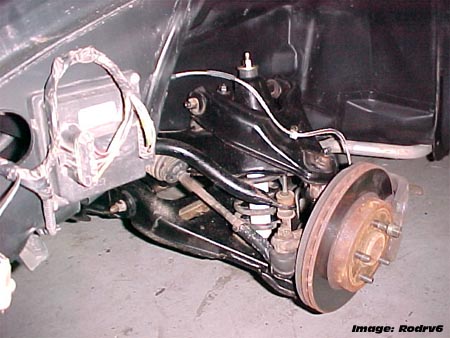
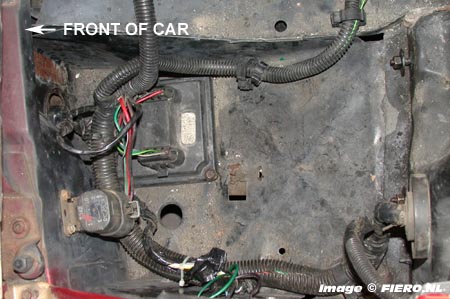
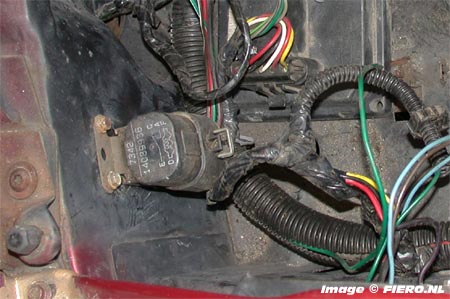
On the 87-88 Fiero, the module is located under the driver's side fender. This really is a strange location for the module since there are far better locations for this module:
Original location of the Motor Control Module
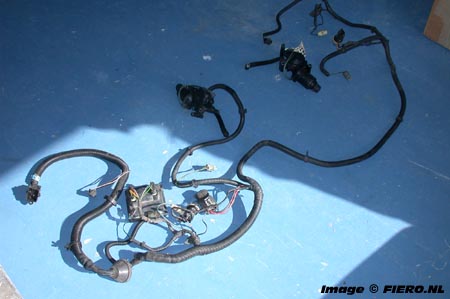
Finally, you will need the entire Forward Lamp Harnass, obviously since it's different from the Generation 1 harnass:
Generation 2 Forward Lamp Harnass
Preperation
Before doing anything else, either disconnect the battery or disconnect the forward lamp harnass (see "The Harnass"). You are working on moving parts and the Fiero's electrical system here and to prevent injuries, you need to make sure the system is not powered!
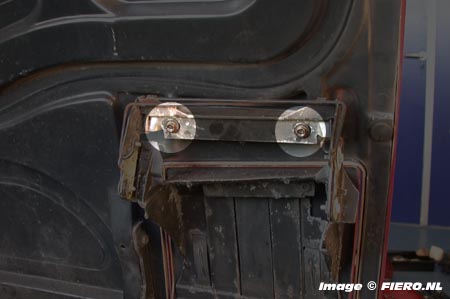
There's absolutely no reason why you don't want to remove the hood. It makes working on the headlights so much easier and re-aligning the hood is a piece of cake. First, open the hood and remove the headlight doors. The headlight doors are attached to the hood with two bolts:
Headlight Cover
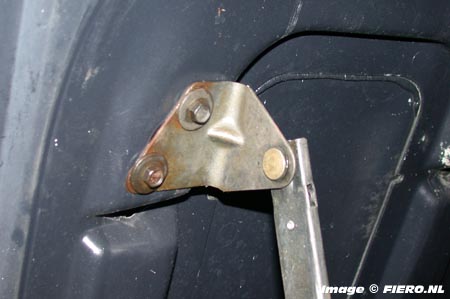
Remove the bolts and remove the headlight door through the top of the hood. When both headlight doors have been removed, it's time to remove the hood support. Unbolt the two upper support bolts:
Upper Hood Support Bolts
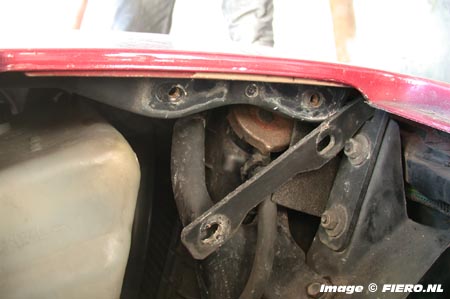
With the upper support bolts removed, lower the hood support and close the hood. If you now look under the hood through the holes, you can see the two hinges that hold the hood in place. Remove the two bolts on both hinges:
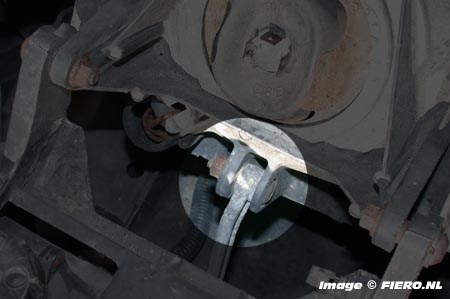
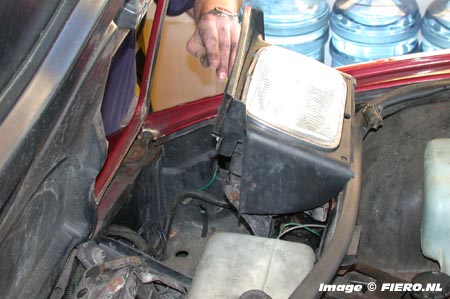
The next step is to remove te headlight assemblies (buckets). The headlight assemblies are attached to the frame with 4 studs, two at the top and two at the bottom. You do not need to completely remove the nuts from the bottom studs. Loosening them a bit is sufficient since you can slide the assembly out. To reach the bottom nuts you first need to detach the link assembly from the headlight assembly:
Detach link assembly
Once that bolt is removed you can lift the headlight, giving you enough room to loosen the bottom two nuts:
Lift the headlight to get to the bottom studs
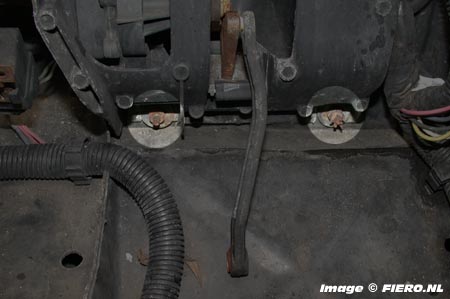
Looking at the assembly from the front, the two nuts to loosen are positioned here:
Bottom two studs of headlight assembly
Like I said, there's absolutely no need to remove these two nuts, just loosen them a bit. You do need to remove the top two nuts. Before you remove the top two nuts, you might want to mark their position since that will save you some time realigning the headlights once you put them back in again. After you have removed the top two and loosened the bottom two nuts, remove the entire headlight assembly by tilting them forward at the top, then pulling them up. Of course, do not forget to disconnect the harnass first. Now that the headlights are out of the car, remove the actuator relais on both of them. They are no longer needed.
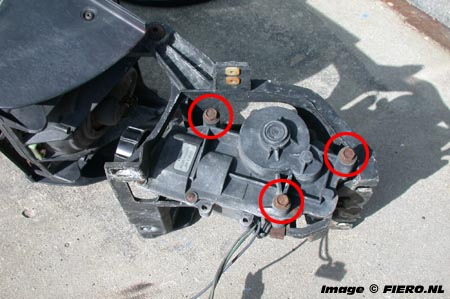
If you look at the headlights from the side, you will see the headlight motor is held in place by three bolts. You will need to remove these three bolts to remove the headlight motor:
Three bolts hold the headlight motor in place
The Gen. 2 headlight motors will drop in without any modifications. But as mentioned earlier, the three bolts use to hold the Gen. 2 motors in place are about half an inch shorter. If you were unable to save the bolts from the Gen. 2 headlight assembly, you will need to shorten the bolts (with a Dremel or something) once you have bolted the Gen. 2 motors in place, otherwise the motor will not be able to make a full turn without the crank arm getting stuck on the bolts (there's in fact only one bolt that's too long. You will be able to see easily which one it is once the motor is bolted in place). Do not attach the link assembly to the headlight assembly just yet (so the headlight can still freely move up and down).
Once the new motor is in place, put the headlight assemblies aside. It's now time to concentrate on the harnass.
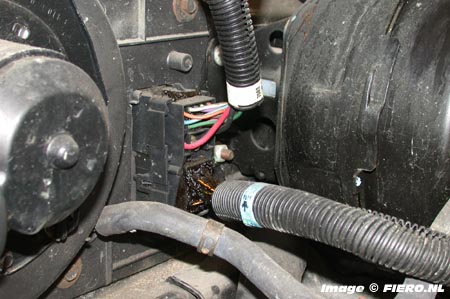
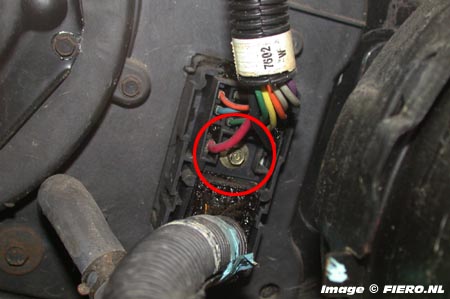
Now it's time to remove the original harnass. First you will need to unplug it from the bulkhead - it's the bottom connector near the brake booster:
Front Harnass Main Connector
You can't simply pull out the connector. The entire connector is bolted to the bulkhead with a single bolt. This bolt also holds the connector in place. So in order to disconnect it, you will need to unbolt it first:
Remove the bolt
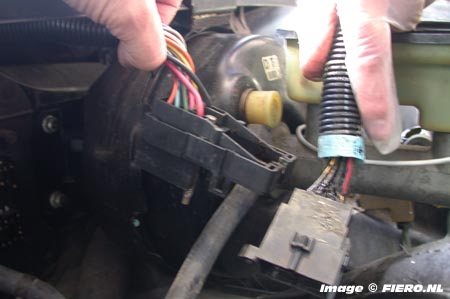
Once the bolt is loose, you can unplug the entire connector from the bulkhead and remove the front harnass' connector by sliding it out:
Slide the connector out to remove it
Now remove the side turn signal lights and remove the bulbs from the housings. The harnass is also connected to the horns which can only be reached from the bottom of the car. Just look under your car just in front of the wheels and you will see the horns. Disconnect them both. Follow the harnass around and disconnect every plug (master cylinder, side turn-signals, horns, headlight motor, headlights, front turn signals, radiator). Also disconnect the plastic retainers holding the harnass to the frame. Now completely remove the old harnass. This is another moment you will be glad you removed the hood. Take note how the old harnass is routed while removing it. You will need to route the new harnass as closely as possible. But before we can route the new harnass, we must find a spot for the motor control module. The original location is under the driver's side fender, but to make things a lot easier I would suggest another location. The best location I have found is under the left headlight assembly, just behind the left turn signal. You have more than enough room there and you don't have to do some creative routing to make the harnass fit. Put the module just behind the turn signal and drill two holes through the screwholes to hold the module in place:
Placing the Headlight Module
Some people are concerned about it getting wet in that location. The module itself is pretty much waterproof so as long as the plugs are in good condition, water shouldn't be a problem. If you want to be absolutely sure water can't get into the plugs, use some dielectric grease on the plugs and reseat them.
Continued in next message... (tomorrow, first I need some sleep)
Just a thought - When I did mine, I tried putting the module where you did, in the driver's headlight bucket. I had a problem with the wires interferring with and getting caught on the headlight when it went up and down, so I ended up putting it under the fender like Pontiac did. If you can find away around that problem, more power to you!
To all... Don't post anything yet. Let Cliff finish first.
Actually, that's the nice thing about the new VBook system - it doesn't matter if people ask questions/offer suggestions since it won't show up in the VBook. So post away.
The Gen. 2 harnass I used only had one connector for the (left) horn. Apparantly the 88 harnass has the wire for the right horn missing while the 87 harnass does not. So I cut the wire for the right horn from the old harnass and spliced that into the left horn wire in the new harnass. So before routing the new harnass, check if you need to add this wire too. Now route the new harnass, and connect all connectors and bulbs. Do not reconnect the main connector just yet! Use the plastic retainers to hold the harnass in place. Screw the actuator relay to the front end panel:
The Actuator Relay
Once the new harnass is routed, test fit the headlight assemblies and move the lights up and down by hand, checking if they can move freely without catching the harnass. If you are satisfied both headlights can move freely, bolt them back in place and attach the link assembly to the headlight assembly. If you want, you can connect the headlight motors and the main connector to test if the headlight motors are actually working.
Now put the hood back on and bolt the hinges through the headlight holes. To align the hood, simply move it around. When the hood is aligned, fasten the bolts. Bolt the hood support and headlight doors back in. Finally, reconnect the harnass' main connector. There, you have just finished the swap!
So did I miss anything? Or does anyone have any suggestions?
Nice write up Cliff . I just did the swap a couple of weeks ago . Not to many people mentioned about the bolts holding the motors were different sizes . I found out after I installed my motors and was running them threw manually and the arm off the motor hit the bolt . I tried to mount my module in the same location as you did but I thought that water would get into the module easier so I mounted it in the stock location . I like how quiet the new motors are also .
One warning... on early models with the two speed radiator fan, you will either loose the two speed setup or have to mess with the wiring more to keep it.
Looks like 88 also used a differnt style fan relay... that's good. The older ones are fairly delicate and not really very weather resistant. (Another what in hell were they thinking item.)
If you mark the hood/hinge with a bit of paint or an obvious scribe line, you won't have to fart with hood adjustment much. Match up the marks will usually get it. (You can do the same with the HL lifts if need be. Usually you can line up the hardware with the marks it leaves on the lift.)
If you take the hinges off the body instead of the hood you won't need to mess with the headlight doors at all.
For reference... the spot you undid to flip the light up is the same spot I recomend people disconnect to make lamp changing allot easier.
Only the 88 harness might be short the one horn connector. Folks want to check the 88 harness as early ones could possibly have the missing horn plug tho it could be burried in the harness. (I think someone else recently used an 88 harness and said they found both plugs. Or at least they were told it was an 88 harness. An 87 harness will definitely have both horn plugs.)
This answered questions I had about how the front wiring works... The lighting harness is separate from the heater/AC wiring like the tail light harrness splits from the engine harness at C500. (C100 is one of the very few plugs I haven't had a reason to mess with yet.)
The plugs on the module are MetriPack weather resistant type. Besides potential clearance problems some folks mentioned... I'd have to worry about water there myself. The MetriPack stuff takes occasion drenching fairly well but the module will have allot of water and in winter snow and ice dumped on it there.
I don't know about if it will have clearance for the wires... but right next to the fan relay might work... It will still get plenty wet but that might cut down on stuff sitting on it and having a chance to soak in.
If it's not already... I'd recomend unplugging and giving everything some dielectric grease. Work out the back seals, assuming this is bog standard MertiPack with soft wire seals, and work a little grease into there and push the seals back in.
Why GM chose the location they did I couldn't say. It does keep allof of crap away and hides the module. Probably felt there was some sort of benifit durring assembly as well. I would have put it somewhere in the spare tire/storage area myself. There were several places in there they could have used for it.
As much as the OE location is a pain in the ass... The modules are pretty reliable and the odds you'd ever have to mess with it again are low.
One warning... on early models with the two speed radiator fan, you will either loose the two speed setup or have to mess with the wiring more to keep it.[quote]
I noticed my radiator fan actually had four wires, and they were spliced together as pairs. So I guess this is one of those two speed fans then?
[quote]Looks like 88 also used a differnt style fan relay... that's good. The older ones are fairly delicate and not really very weather resistant. (Another what in hell were they thinking item.)
Is what I call the "actuator relay" really the fan relay?
quote
If you mark the hood/hinge with a bit of paint or an obvious scribe line, you won't have to fart with hood adjustment much. Match up the marks will usually get it. (You can do the same with the HL lifts if need be. Usually you can line up the hardware with the marks it leaves on the lift.)
If you take the hinges off the body instead of the hood you won't need to mess with the headlight doors at all.
Yes, I took the bolts of the hood because my hood needed a little realigning anyway. Plus it's much easier to remove the hood when it's laying flat than when it's standing upright.
quote
For reference... the spot you undid to flip the light up is the same spot I recomend people disconnect to make lamp changing allot easier.
Only the 88 harness might be short the one horn connector. Folks want to check the 88 harness as early ones could possibly have the missing horn plug tho it could be burried in the harness. (I think someone else recently used an 88 harness and said they found both plugs. Or at least they were told it was an 88 harness. An 87 harness will definitely have both horn plugs.)
Ok, that's good to know.
quote
The plugs on the module are MetriPack weather resistant type. Besides potential clearance problems some folks mentioned... I'd have to worry about water there myself. The MetriPack stuff takes occasion drenching fairly well but the module will have allot of water and in winter snow and ice dumped on it there.
I don't know about if it will have clearance for the wires... but right next to the fan relay might work... It will still get plenty wet but that might cut down on stuff sitting on it and having a chance to soak in.
I looked at the module with the plugs plugged in and it looked pretty waterproof to me. I don't think there will be many problems with water there but I will mention it anyway.
Best Thing I Ever Did To My Fiero ..Other Than Buy And Stroke The Motor lol ...
You Put Your Control Module In The Same Spot I Did Cliff ..Were Like Brothers Now lol jk ..Im Sleepy
------------------ "This car is so good looking its almost indecent. - AutoWeek on the new 1986 GT" Chilliwack Fieros MSN Messanger tylercaddick@hotmail.com
Great guide! Picked up some motors and a harnass for super cheap at a junkyard ($35 all together). I wouldn't have had the courage to take on the swap without this guide, since I am still only learning. Thanks alot!
Lucas
[This message has been edited by Leukay (edited 08-01-2012).]
Isn't it great when you can find a 7 1/2 year old post and shows you exactly what you need to know? I was able to do my complete swap in a couple of hours!
Need step by step to lock 1986 headlights in upright position Till I replace motors. Thanks in advance. You can also send them to garymann@hotmail.com Thank you in advance. Saving up for 87 88 conversions.
I'm doing this exact same swap on my step son's 86GT. The lights are getting blinky and fortunately I have a 1987 GT parts car handy. It is always a good idea to rebuild the new Generation II headlight motors while you have the chance, the parts are cheap and it only takes a few minutes.
Does anyone know if it's possible use the motors from the first generation on the system(harness, cable etc) form the second generation? I ask about this because I have a pontiac fiero 88 but when I bought the car dosn´t have de motors but I had a pair form the first generation. I installed but not works
No. You can't use the Gen 1. Connections are different as well as the length of the mounting bolts. The good news is new Gen 2 motors are still available for a reasonable cost.