Buckling under full throttle acceleration is the only concern with this method. I still need to sit down and do the math to see how much of a concern it would be and what could be done with material diameter and thickness to alleviate. However, any additional tube diameter increases the needed offset. Additionally, I need to decide if I just want to make it work with the current wheel/tire setup or if I want to make it with additional clearance for a future wheel width increase (that would also require other mods).
Interesting. I had not seen that thread before. That's exactly what I was thinking, but it sounds like you don't think its a good idea. Have you looked into other spindles or setups that could use the stock mounting loc? Kind of like how the Camaro/Firebird guys can put a 4 link rear into a space that was designed for a leafspring setup. I know the R&D would be expensive and time consuming, too bad we didn't have a larger customer base. I've wondered if another vehicles spindles would work and offer a brake and bolt pattern upgrade at the same time. Vette, Viper, GTO/Camaro, Cadillac......
I like the simplicity of the simple offset I just need to validate the math if I go that route.
As for adapting something else... anything is possible, with enough time, skill, and $$$. I have several ideas, but it is way, way down the priority list
The cap for the bandsaw table came in earlier this week and I finally got the on/off switch installed for the band saw and belt sander. Now I just need to buy a new 48x6 belt for the sander and I can start putting them both to work.
I'm finally starting to look for an engine and I was wondering if you would recommend a Gen III or Gen IV from an ECM standpoint. My understanding is that mechanically the engines are the same, but that with the Gen IV you have to do more conversions in the programming which can lead to less accuracy. Given the DoD didn't get working with you F40, I'll probably go with a DoD delete from the start and just rebuild the engine while I'm at it. Give all that, I'm thinking Gen III would be the way to go. Any thoughts?
I'm finally starting to look for an engine and I was wondering if you would recommend a Gen III or Gen IV from an ECM standpoint. My understanding is that mechanically the engines are the same, but that with the Gen IV you have to do more conversions in the programming which can lead to less accuracy. Given the DoD didn't get working with you F40, I'll probably go with a DoD delete from the start and just rebuild the engine while I'm at it. Give all that, I'm thinking Gen III would be the way to go. Any thoughts?
The 05 and 06 engines (24x) with the e40 ecm are easier to integrate all the other systems w/o the BCM.
It has been a couple of months since my last update. I have used the bandsaw and belt sander quite a bit and really like them!
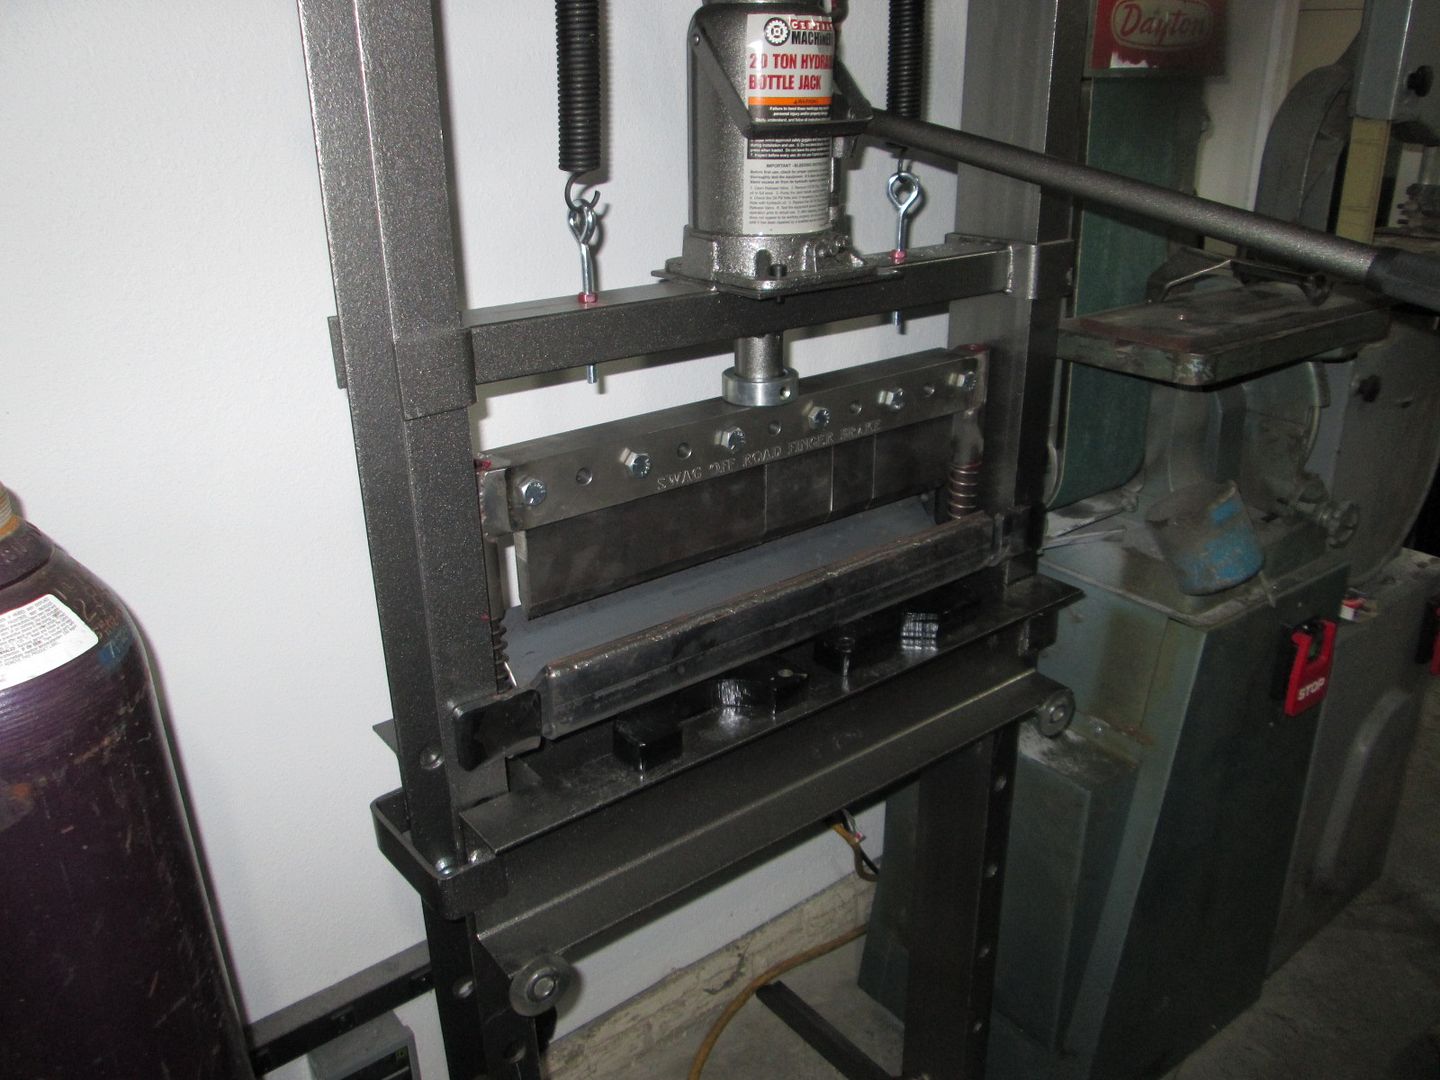
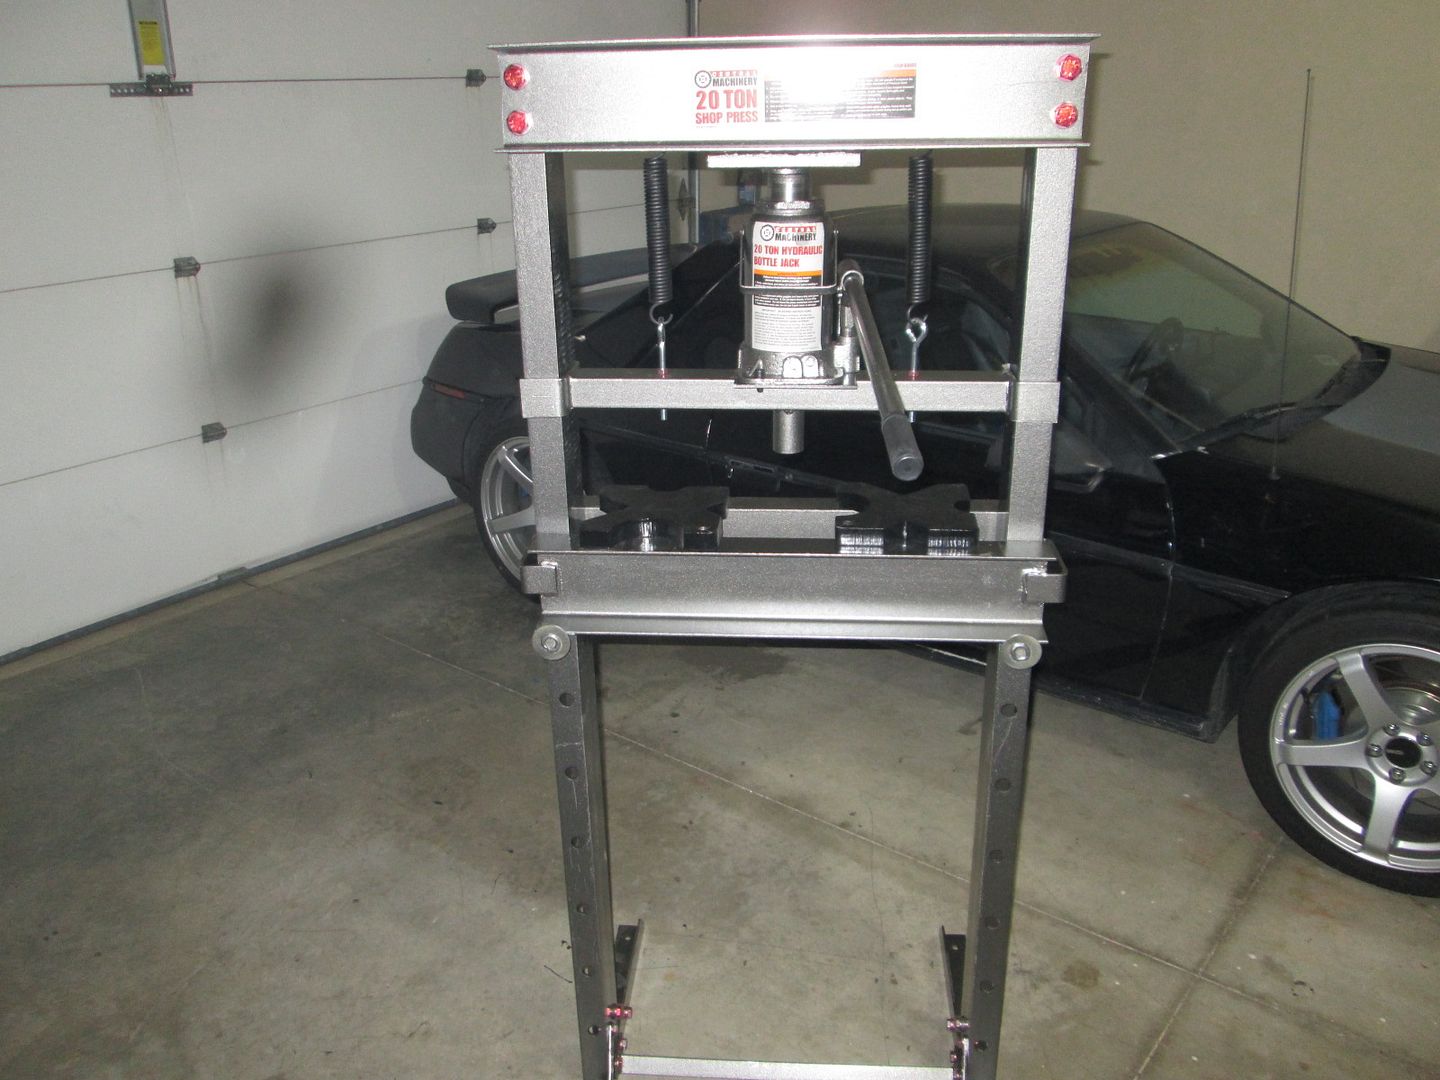
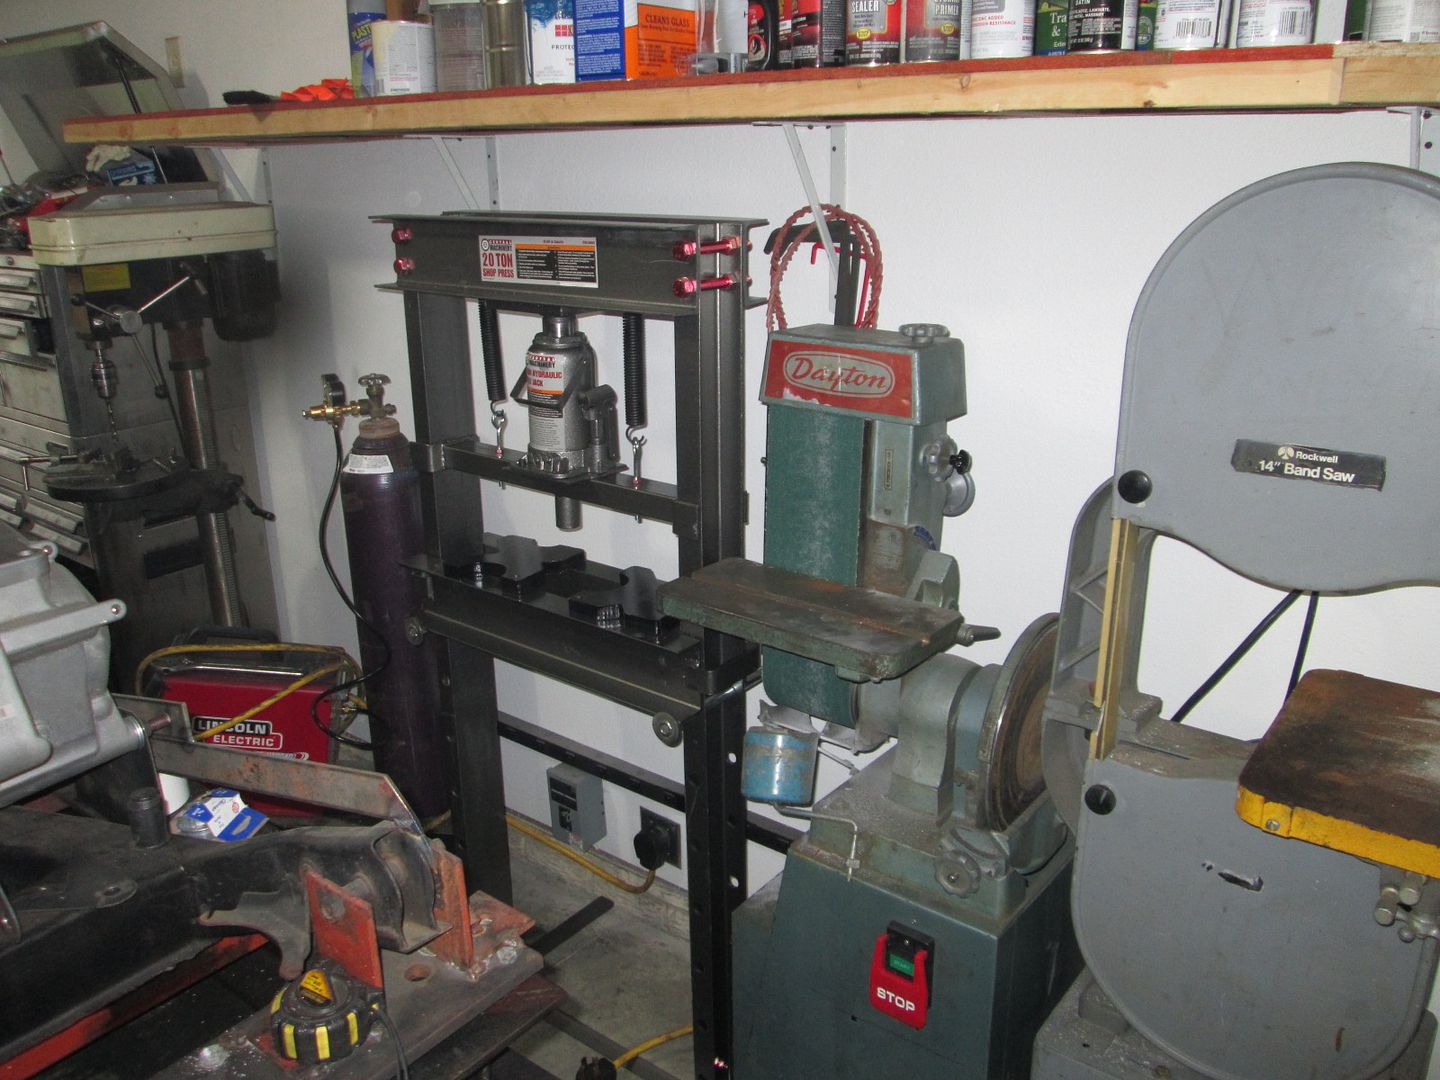
That got me thinking about other handy tools that I should add to my garage. On Black Friday I added a 20 ton harbor freight press to the garage. I am not a fan of harbor freight bolts, so all the hardware was swapped out with higher rated and more reliable parts.
I made some room for the press next to the belt sander (did I mention I need a larger garage):
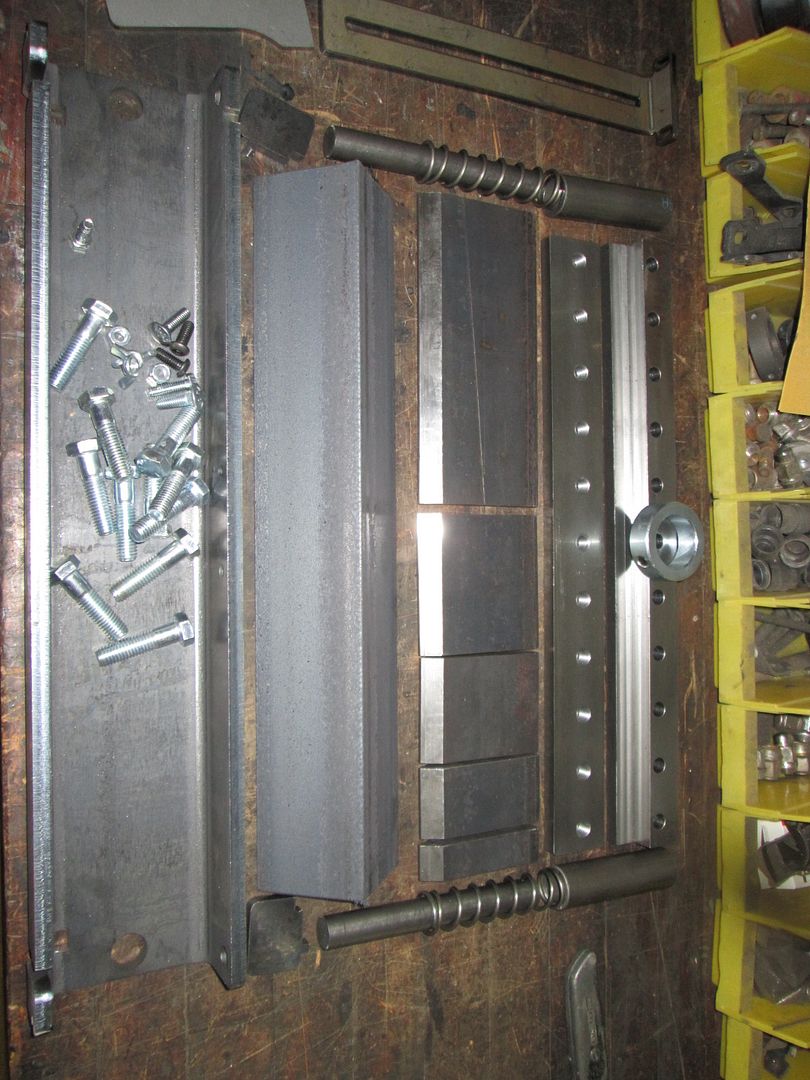
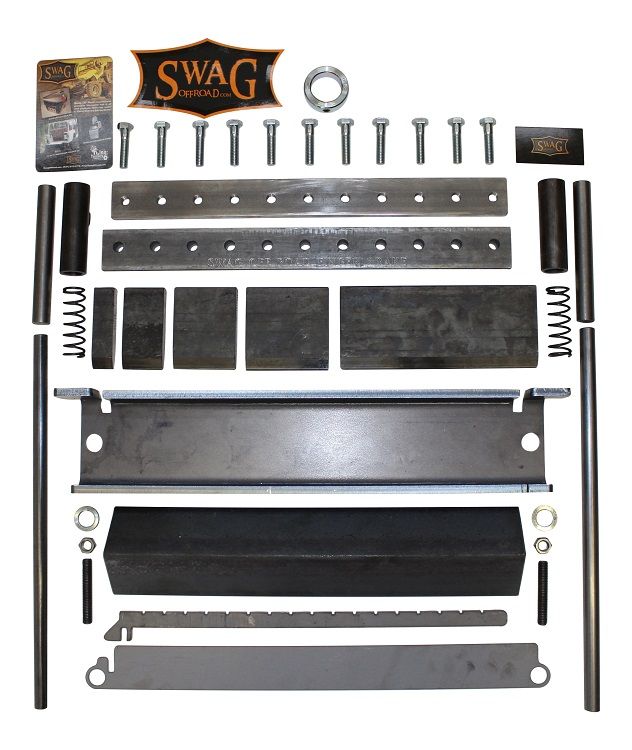
Now the reason I wanted/needed the 20 ton press was to get this:
The finger press hasn't arrived yet, but this is what it will look like once I get it and assemble it. With it I will be able to bend much thicker metal with minimal effort!
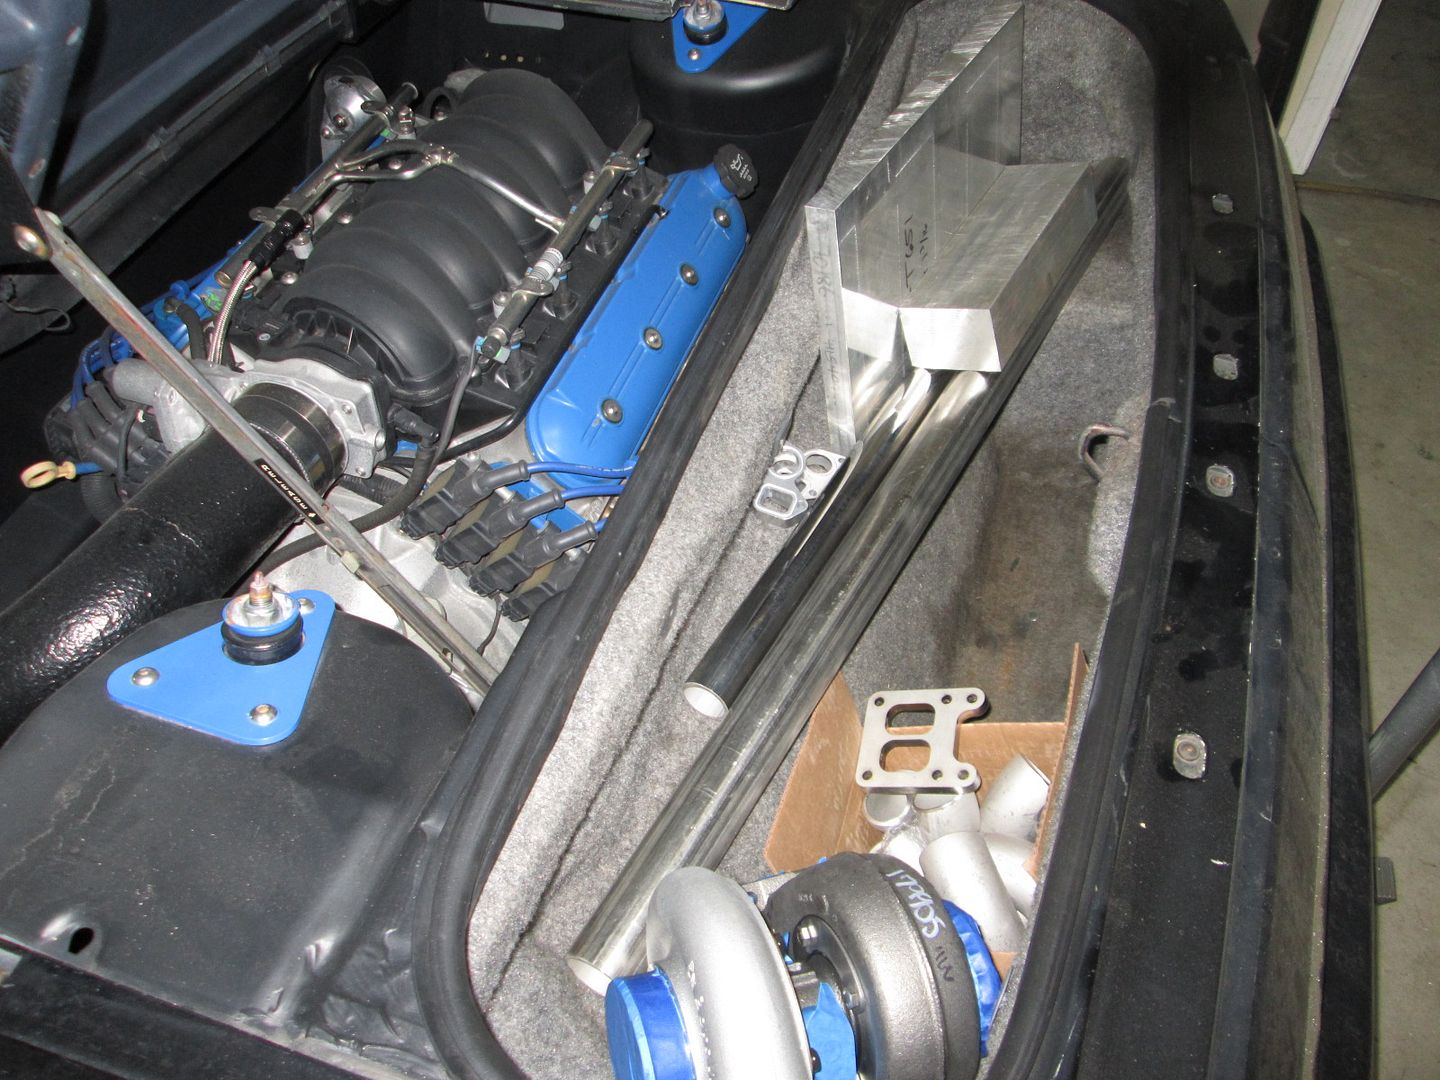
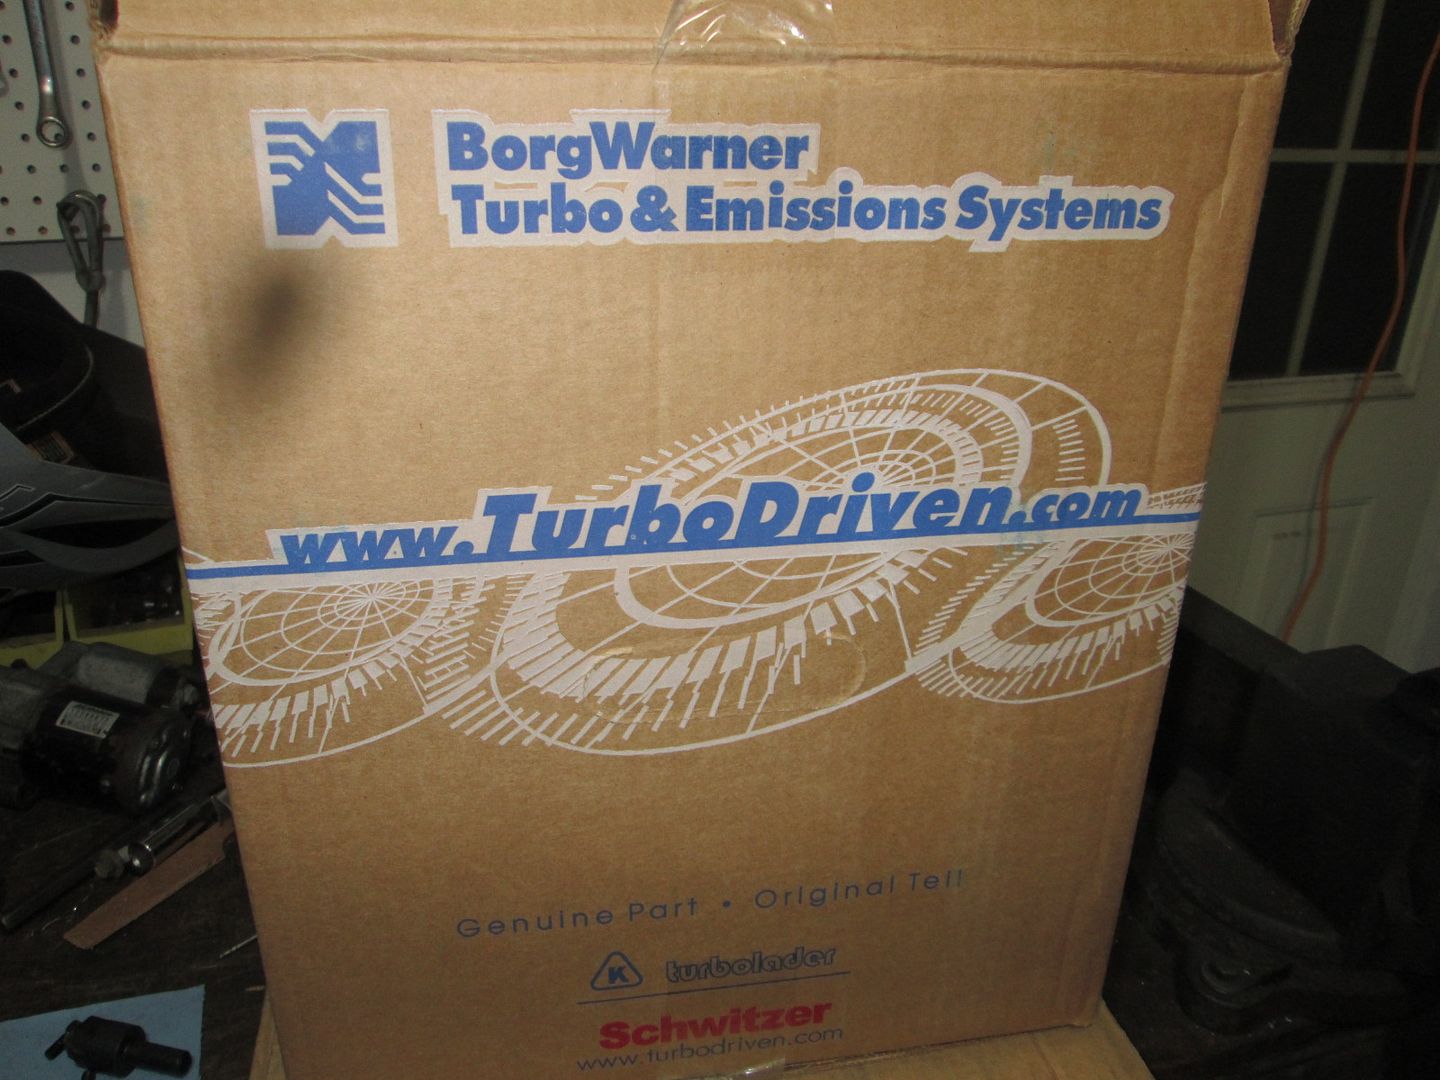
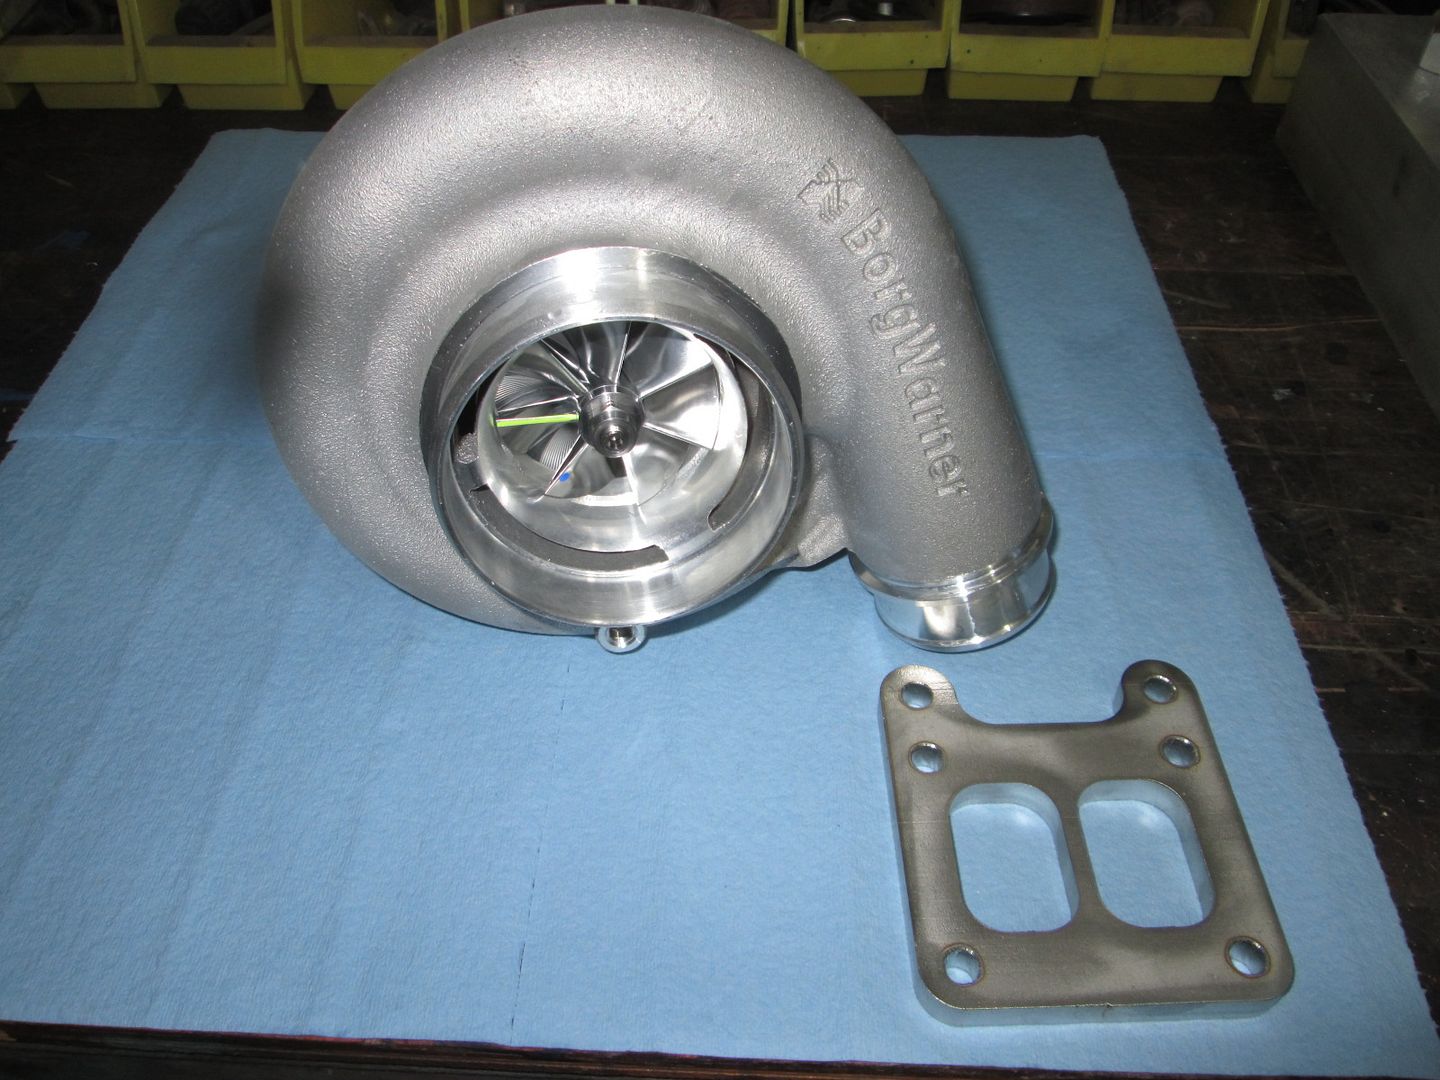
As you can see in the pics above, the LS4/F40 Fiero found a spot in the garage for the winter. The plan is to pull the drivetrain for the next round of upgrades. I took advantage of a black friday sale to get a hairdryer from borg warner for it! I can't wait for it to arrive and try to find room for it in the engine bay.
Originally posted by fieroguru: As you can see in the pics above, the LS4/F40 Fiero found a spot in the garage for the winter. The plan is to pull the drivetrain for the next round of upgrades. I took advantage of a black friday sale to get a hairdryer from borg warner for it! I can't wait for it to arrive and try to find room for it in the engine bay.
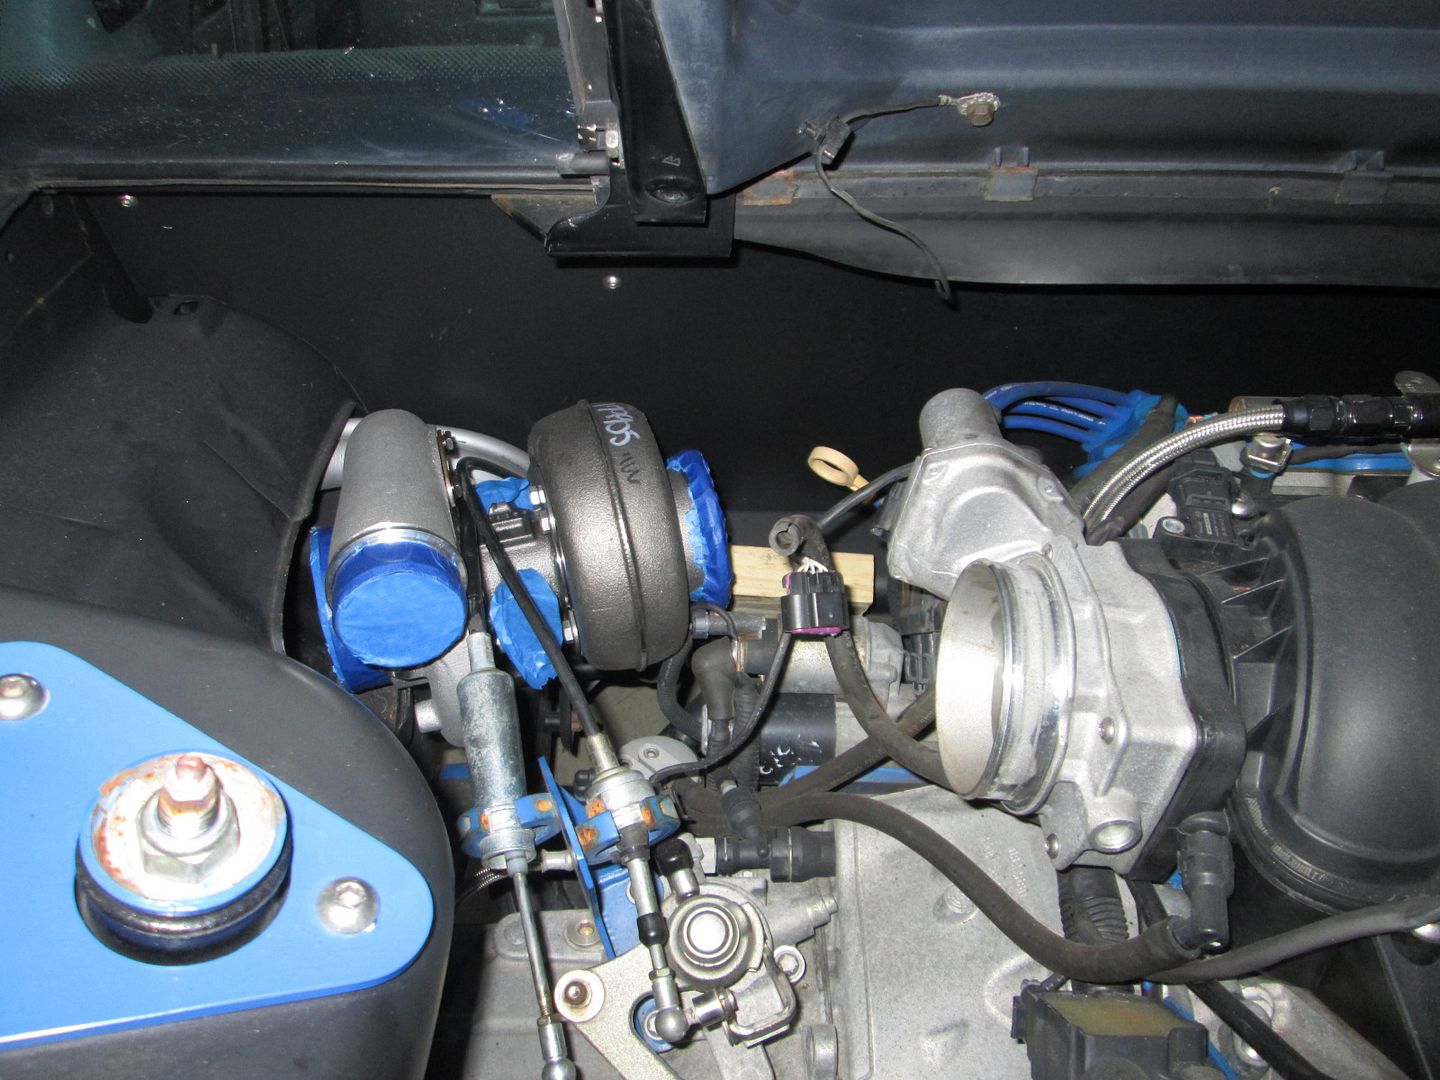
Borg Warner S369sx-e supercore. It is the latest generation turbo from BW and supports 950+ hp without the excessive size of the 400 series turbos, which will make it easier (but probably not "easy" to fit in my engine bay). For phase one, I am "only" looking for 600 whp on E85, but wanted good reliable turbo with room to grow.
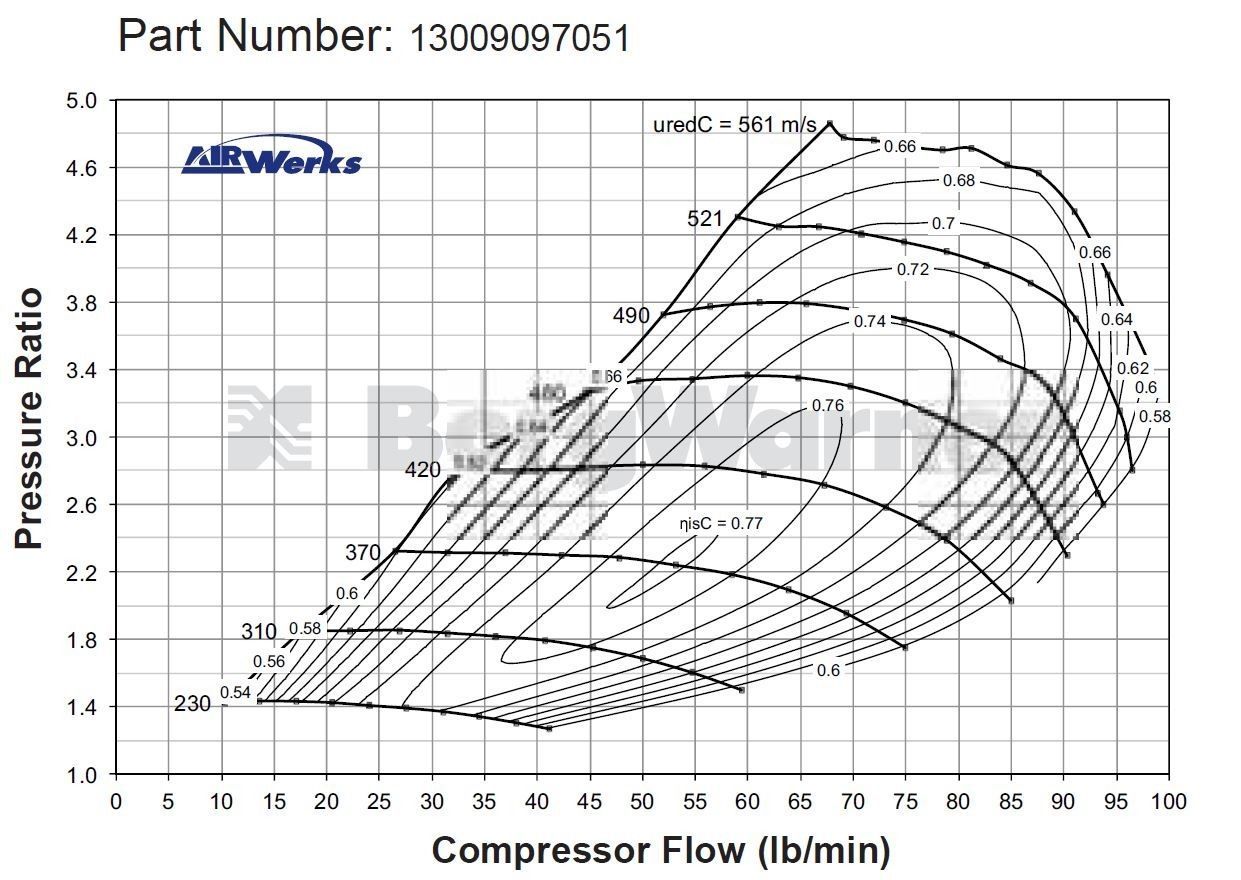
What process did you use to size your turbo and find one with the right map?
Some years ago I had started the planning for a turbo on mine, and worked out gobs math around it to "plot" it, then just spent a few hours looking through turbo maps to find turbos where the dot was in the right place.
The guy I've been talking to do the turbo work said it was waaaay to big of a turbo, and I'd be wasting a lot of it's potential. When I showed him all the math work, he said it made sense, but the turbo was still too huge and it would be blowing off quite a bit. He said he'd install whatever I wanted, but he had other recommendations. He has a history of working for speed shops, and has a brutal Grand National that he built up himself...
So... just wanted to understand your process and get your opinion.
I'm finally starting to look for an engine and I was wondering if you would recommend a Gen III or Gen IV from an ECM standpoint. My understanding is that mechanically the engines are the same, but that with the Gen IV you have to do more conversions in the programming which can lead to less accuracy. Given the DoD didn't get working with you F40, I'll probably go with a DoD delete from the start and just rebuild the engine while I'm at it. Give all that, I'm thinking Gen III would be the way to go. Any thoughts?
There are no Gen III LS4s, but as fieroguru said, the 05-06 engines have the earlier ECM which can be a little easier to deal with. They are still Gen IV engines though.
What process did you use to size your turbo and find one with the right map?
Some years ago I had started the planning for a turbo on mine, and worked out gobs math around it to "plot" it, then just spent a few hours looking through turbo maps to find turbos where the dot was in the right place.
The guy I've been talking to do the turbo work said it was waaaay to big of a turbo, and I'd be wasting a lot of it's potential. When I showed him all the math work, he said it made sense, but the turbo was still too huge and it would be blowing off quite a bit. He said he'd install whatever I wanted, but he had other recommendations. He has a history of working for speed shops, and has a brutal Grand National that he built up himself...
So... just wanted to understand your process and get your opinion.
I spent a lot of time on LS1tech in the Forced Induction section reviewing 5.3L turbo builds and dyno charts on car with a manual transmission. Part of the issue is focusing strictly on compressor maps as that is only 1/2 of the turbo. The turbine side is equally as important, and can become a restriction well before the compressor runs out of cfm, but there are no equivalent maps for those. So I was focused on sizes of the wheels on both sides and comparing the dyno results to find the approximate sizes that produced power curves that were in line with what I was looking for.
Small physical size (better for packaging), quick spool (boost below 3K), oem reliability, and moderate power levels were my goals. Unfortunately, the S369sx-e is too new of a turbo so there are not a lot of installs with dynos... but it is about the ideal size for what I was looking for.
The next step is to get a turbo specific camshaft that matches the specs of the turbo. I will probably call up a couple of vendors and see what they recommend, but I am leaning toward a stage 2 turbo cam in the 218/223 .598/.571 range.
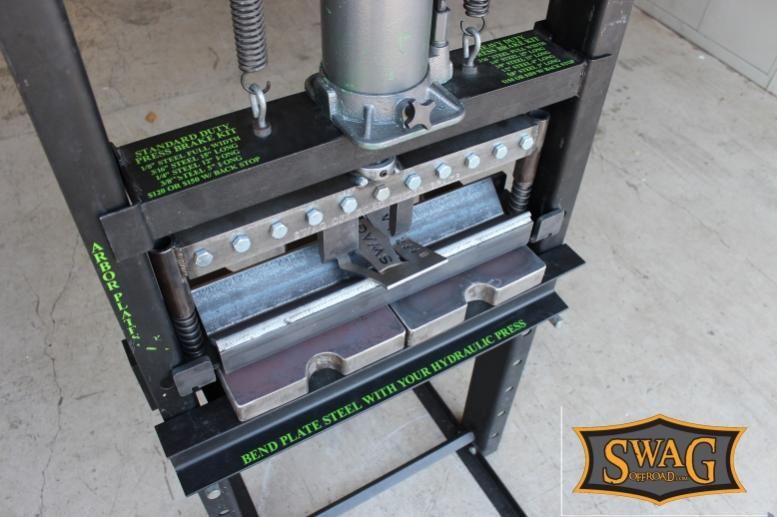
Looks good! I have the non-finger version. You will love it for making brackets and such. Looks like you also picked up a set of the laser-cut press plates?
Looks good! I have the non-finger version. You will love it for making brackets and such. Looks like you also picked up a set of the laser-cut press plates?
Those came with the shop press... not real confident they are any good. But they were plasma cut vs. cast so who knows.
I already have a few modifications I want to make. ** Drill the top portion of the slide shafts so I can pin the brake in the down position to make it easier to install and remove from the press. ** I have several scraps of 5" x 18" 1/2" plate and thinking about welding 1 or 2 of them to the underside of the base as well as welding in some positioning tabs to lock it into the c-channel base. Or drilling holes in the side clamp tabs and through the uprights on the shop press to bolt it in place. ** Also not a fan of the lock collar on the top (too much slop), so I might make something a little tighter and taller. ** Buy or make some inserts for the base to make tighter bends...
It was 60 degrees yesterday, so I put the air filter, intake tube, and wheel well liner back in and drove the car around town for a couple of hours. I really love driving this car, but below 40 the tires are no good and in winter there is a lot of salt on the roads...
I had the filter and air intake tube off to test fit the turbo, but I didn't like any of the areas. With the 6 speed cables and LS4 starter location, here was one of the options, but I really wasn't feeling it. I think I will cut the bottom of the trunk, then the turbo, intercooler, and all associated plumbing will be hidden and not clutter up the engine bay.
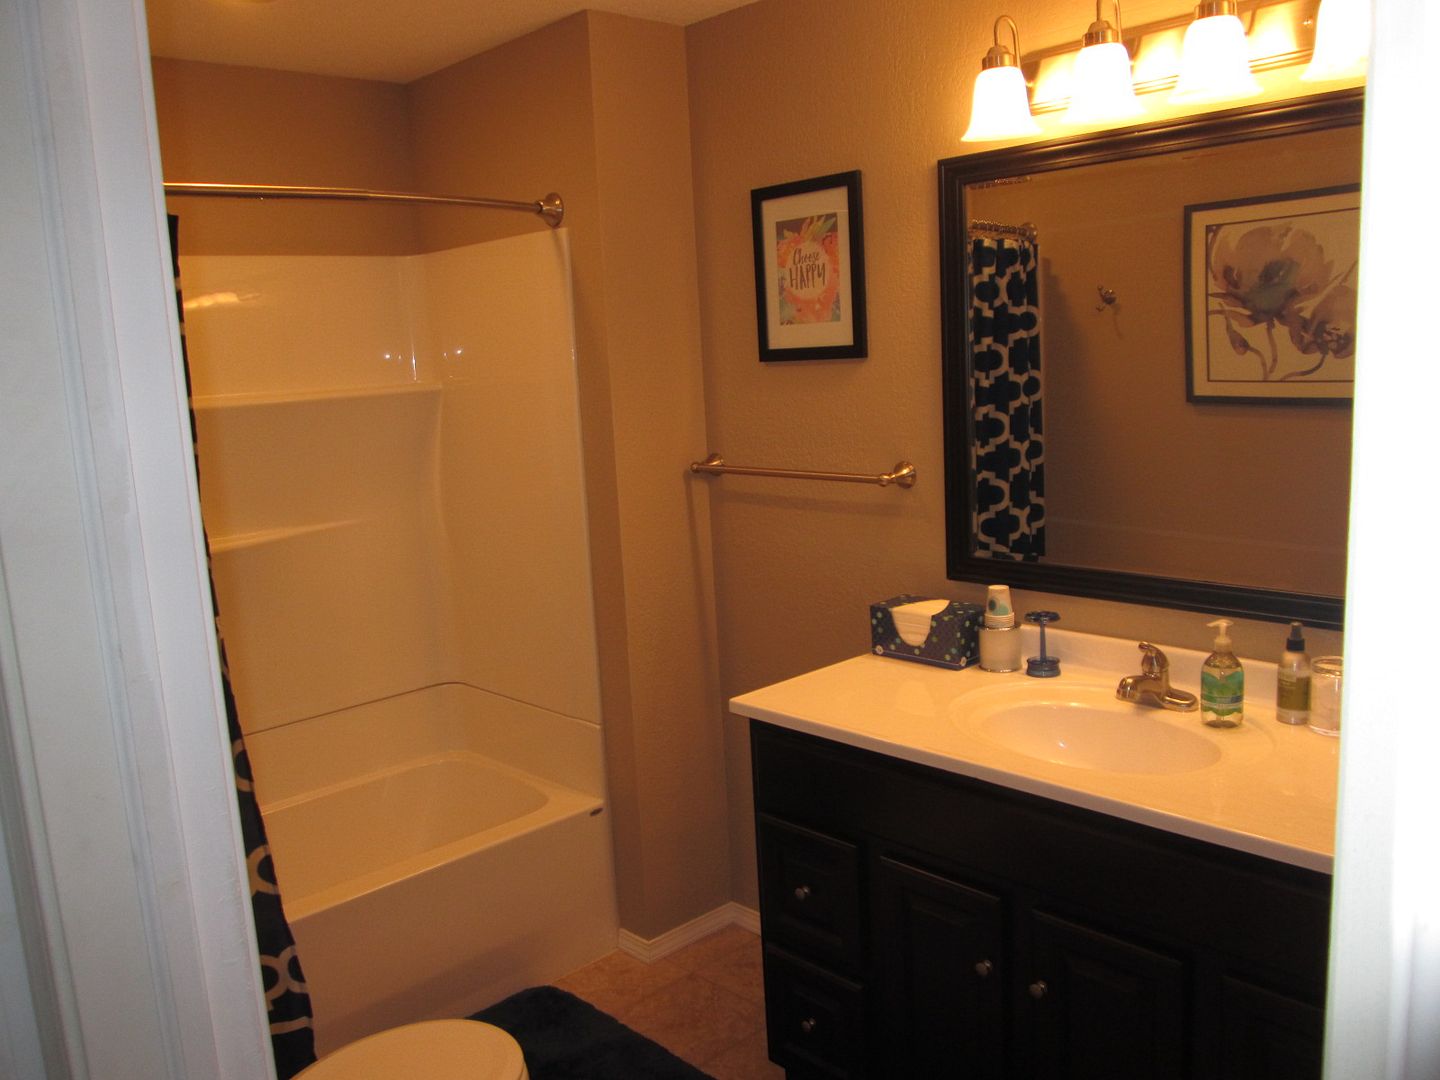
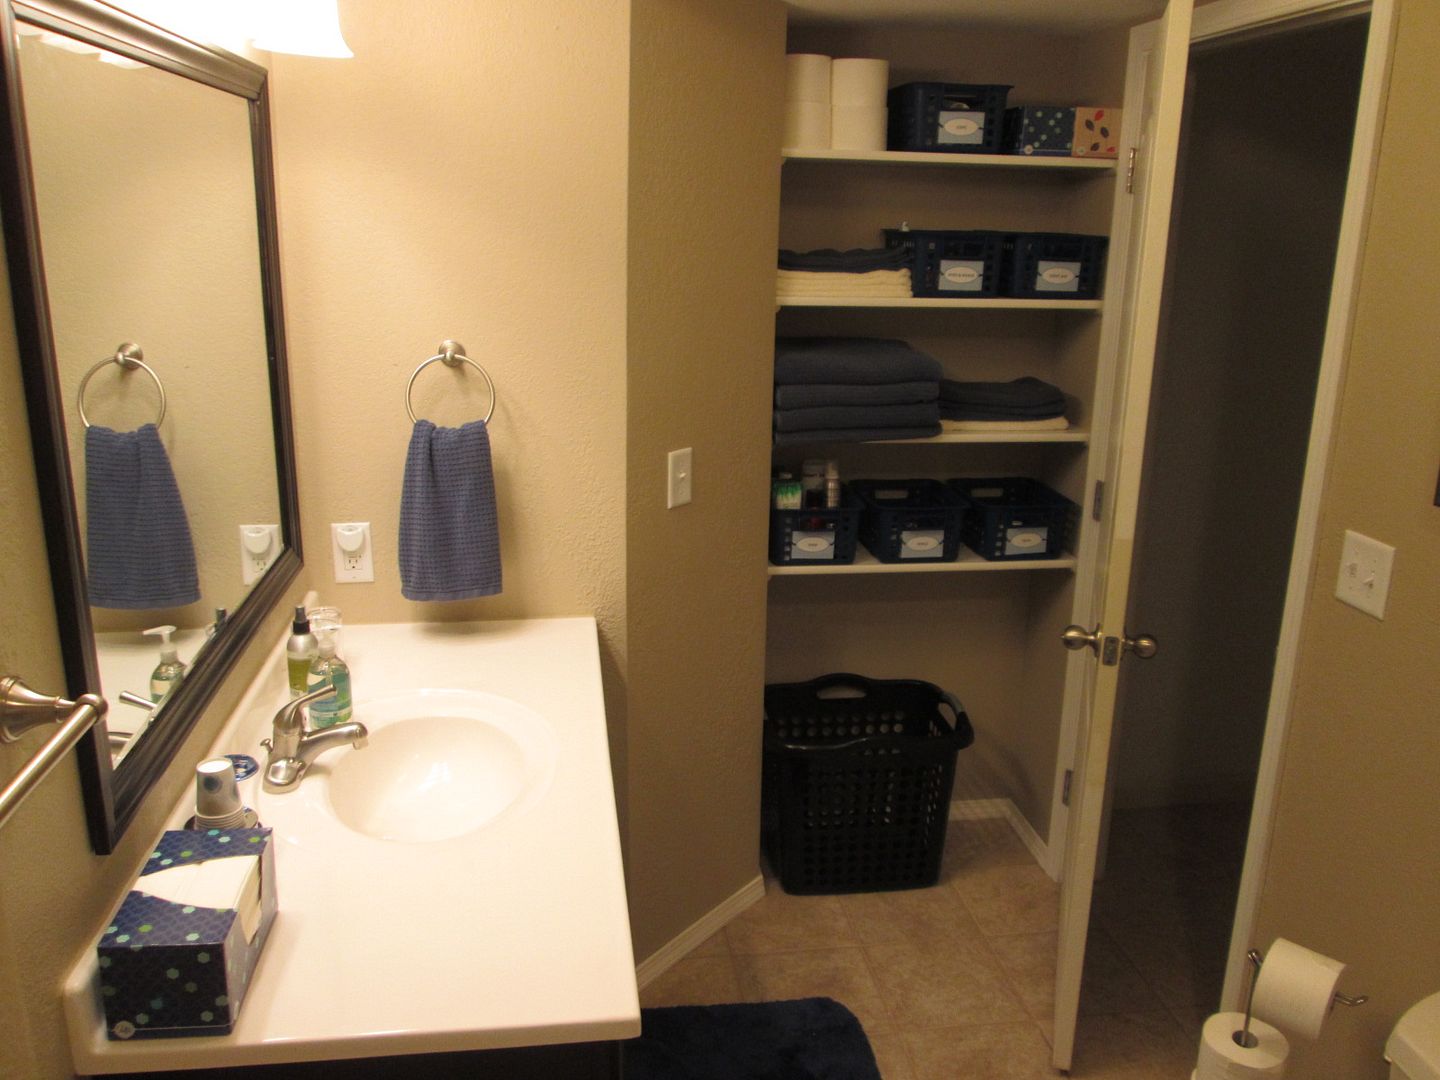
From Thanksgiving until 2 weeks ago, most of my free time was spent finishing our basement bathroom. When we purchased the house, the bathroom was studded in and had all the drains installed below the concrete. We had a contractor run all the copper lines, install the bath tub, wire the electrical boxes for the lights, and install the drywall and tile. I did all the painting, caulking, grouting, hooked up the lights, installed the toilet, vanity, sink, mirror, towel racks, pictures, and built in shelves, and all the trim... My wife put the rest of the towels and supplies in there. So now when guests stay in the spare basement bedroom, they have their own full bath!
This is the last major house project for the wife, so the garage expansion is next, but probably won't start that until 2019.
You could look into a Comp Oil-less turbo 7479 CT43X and mount it near the muffler would be. You only use water and no oil lines/scavenge pump. But you already bought the turbo so... Z06 cam, LS9 cam, or Lil Jon Stage 2 cam can work. Not sure if you upgraded springs but it is highly recommended. Great build and thanks for helping me. Great customer service.
You could look into a Comp Oil-less turbo 7479 CT43X and mount it near the muffler would be. You only use water and no oil lines/scavenge pump. But you already bought the turbo so... Z06 cam, LS9 cam, or Lil Jon Stage 2 cam can work. Not sure if you upgraded springs but it is highly recommended. Great build and thanks for helping me. Great customer service.
I am likely going to mount the turbo in that general location... going to have to remove the trunk below the shelf. Lil Jon Motorsports spec'd a camshaft for my engine and turbo combo: 221/225 .597/.600 112+4 and will run the BTR platinum springs he recommended.
It was 60+ degrees today, so I washed the LS4/F40 Fiero and spent a couple of hrs of driving around town. I will probably drive it the next couple of days.
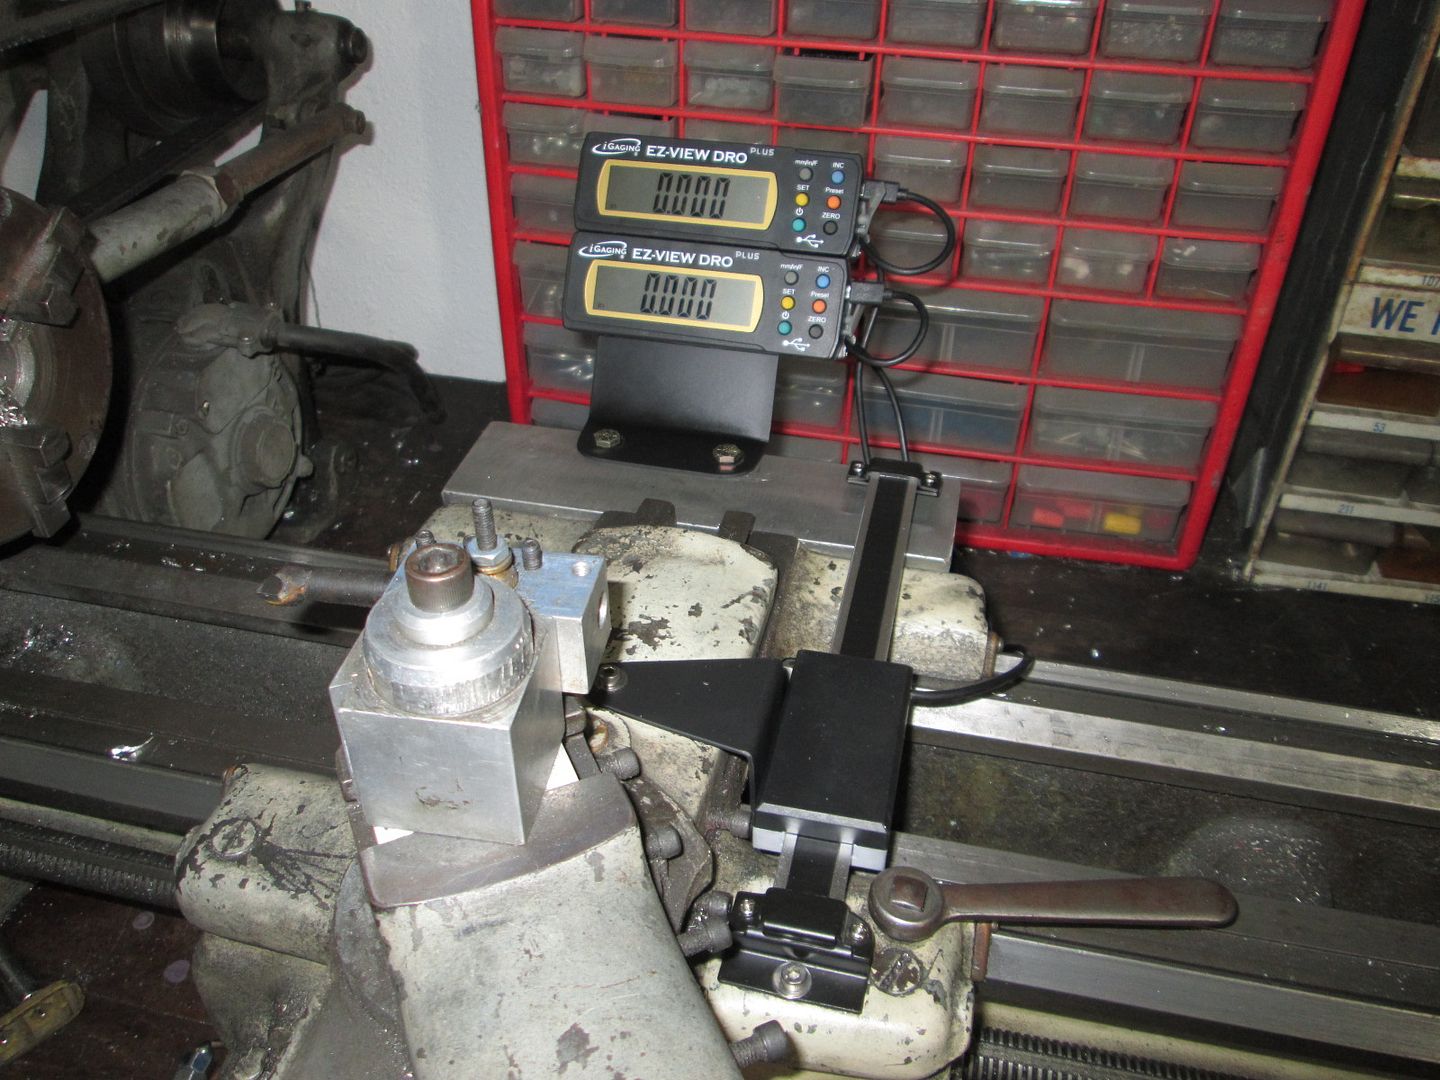
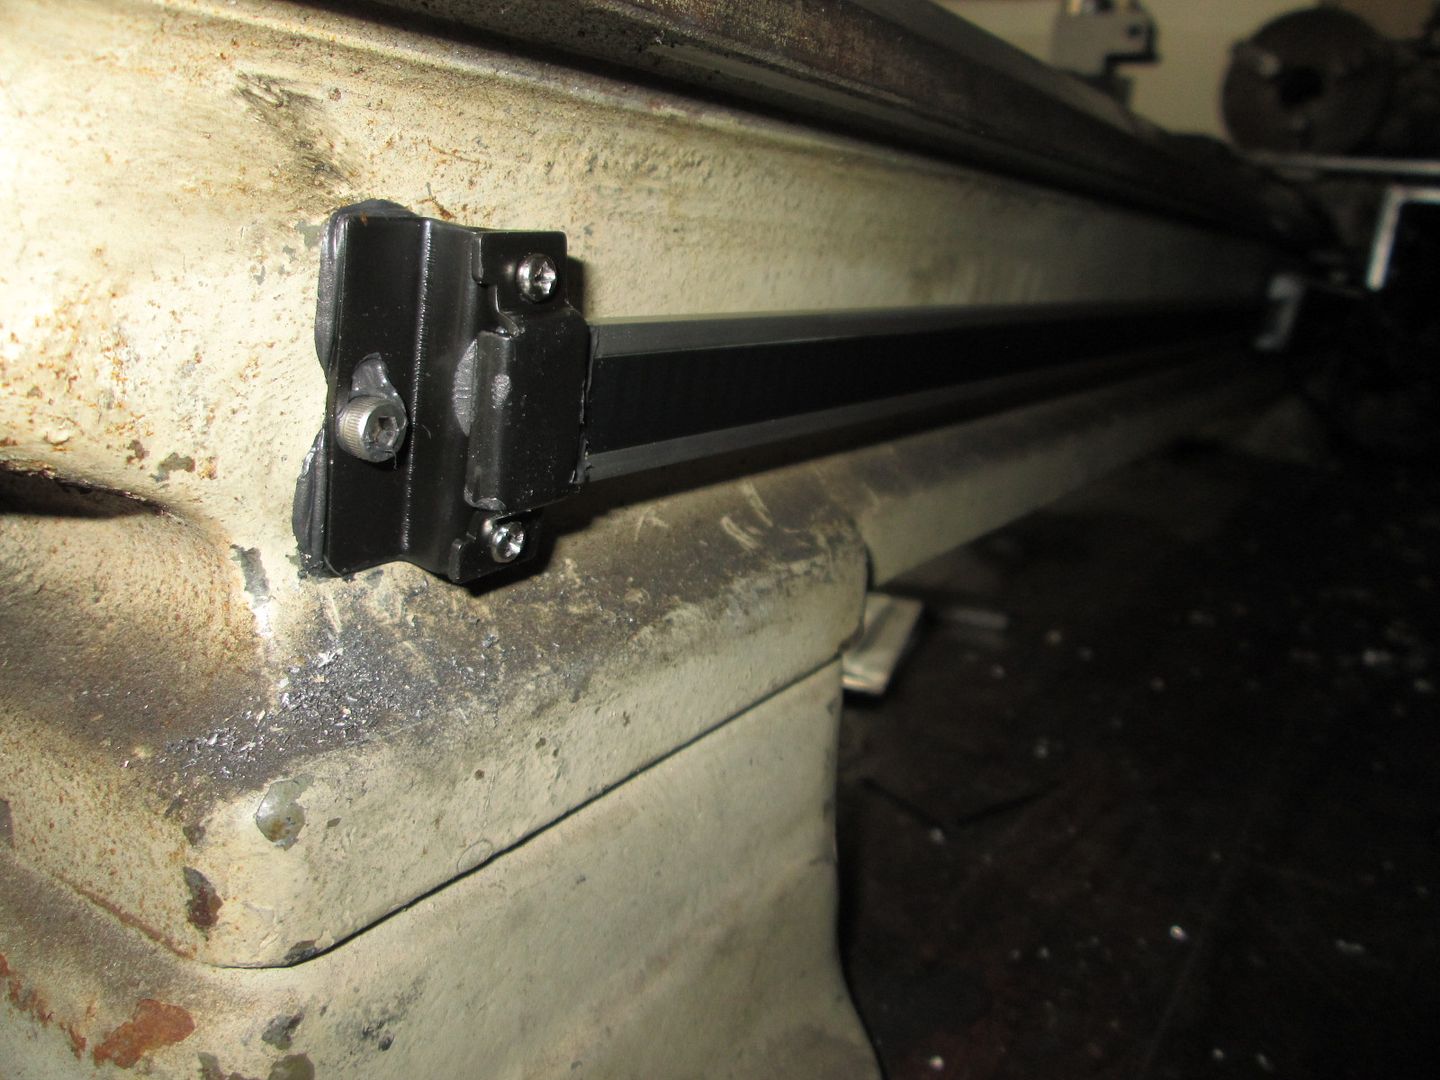
I picked up a DRO setup for the lathe and had a few hours today to get it installed. It was a universal setup, so I ended up making some of the brackets so they better fit this application.
I'm doing another 3800sc swap and wanting to use the F-40 as my transmission selection. I can not find any straight forward advice. If I do the trans swap I'm just putting some $$$$ out and getting the WCF kit. Still not sure about what axles to use and how far I need to move the drivetrain over. I seen on a thread "about an inch" not sure if that is enough information to just go hacking on my cradle. With a 3800 swap, all I should have to do is notch the cradle and drill new holes for the 2.8 engine mount. From the looks of the trans mounts from WCF it's straight forward on where to put them once I have the engine moved. This still leaves me with the question how far do I shift the drivetrain over to keep the axles at even lengths, what axles to use, and how to mod them? The WCF kit comes with the jack shaft. I've modified axles for past swaps, but information for f-40 swaps are very limited.
------------------ Fast Unicorn
[This message has been edited by Derrick (edited 05-14-2017).]
I'm doing another 3800sc swap and wanting to use the F-40 as my transmission selection. I can not find any straight forward advice. If I do the trans swap I'm just putting some $$$$ out and getting the WCF kit. Still not sure about what axles to use and how far I need to move the drivetrain over. I seen on a thread "about an inch" not sure if that is enough information to just go hacking on my cradle. With a 3800 swap, all I should have to do is notch the cradle and drill new holes for the 2.8 engine mount. From the looks of the trans mounts from WCF it's straight forward on where to put them once I have the engine moved. This still leaves me with the question how far do I shift the drivetrain over to keep the axles at even lengths, what axles to use, and how to mod them? The WCF kit comes with the jack shaft. I've modified axles for past swaps, but information for f-40 swaps are very limited.
WCF sells everything you need to install the F40 with the 3800. Mounts, flywheel, axles, cables/brackets, etc... just call them up and place the order.
Ok, so not much guess work if I got the F-40 kit from WCF. I know the F-40 swap is for the higher experienced fiero guys, so I was afraid to tackle the project. My brother in law has a service shop and certified welders, I'll probably have them do the cradle, trans/engine mount install, and so on. Also with PFF I should be fine.
I'll see if WCF will let me piece their kit. I like your 5-speed shifter/cable kit and world rather use a spec clutch. Thank you.
The shaft bearing mount is a issue. I have a 3800 w F40 as well. Archie Machines a Aluminum mount for the bearing .....BUT it bolts to where the engine mount would normally bolt to. I used a Aluminum oil pan and fabbed up a mount from the factory point on the pan.
Not much to report on, just been driving the LS4/F40 Fiero. My goal was to long haul the 2017 Hot Rod Power Tour, but due to a work conflict, I had to miss the last 2 stops (Indy and Bowling Green).
While on the 2017 Hot Rod Power Tour the swap passed 40K miles since completed a little more than 4 years ago. The best tank of gas was 28.8 mpg, the worst was 19.3 mpg, and the average over 1625 miles was 22.7. Not bad considering I ran A/C quite a bit and there was a lot more stop/go traffic this year vs. last year. I also did 2 autocross runs at Iowa Speedway and one 1/4 mile run at Gateway before a significant rain delay.
I wish I would have data logged the run as the power during the 1/4 mile seemed down (mph was off about 6 mph). It likely was a combo of sprinkling rain, engine temps being over 200 (195 thermostat and fans kick on around 198), running 92 octane vs. 93, and my tach acting up and reading high which likely caused me to short shift the first 2 gears. Shifting at 7200 rpm with a 6K tach is enough of a challenge when it reads right, down right impossible when it reads high.
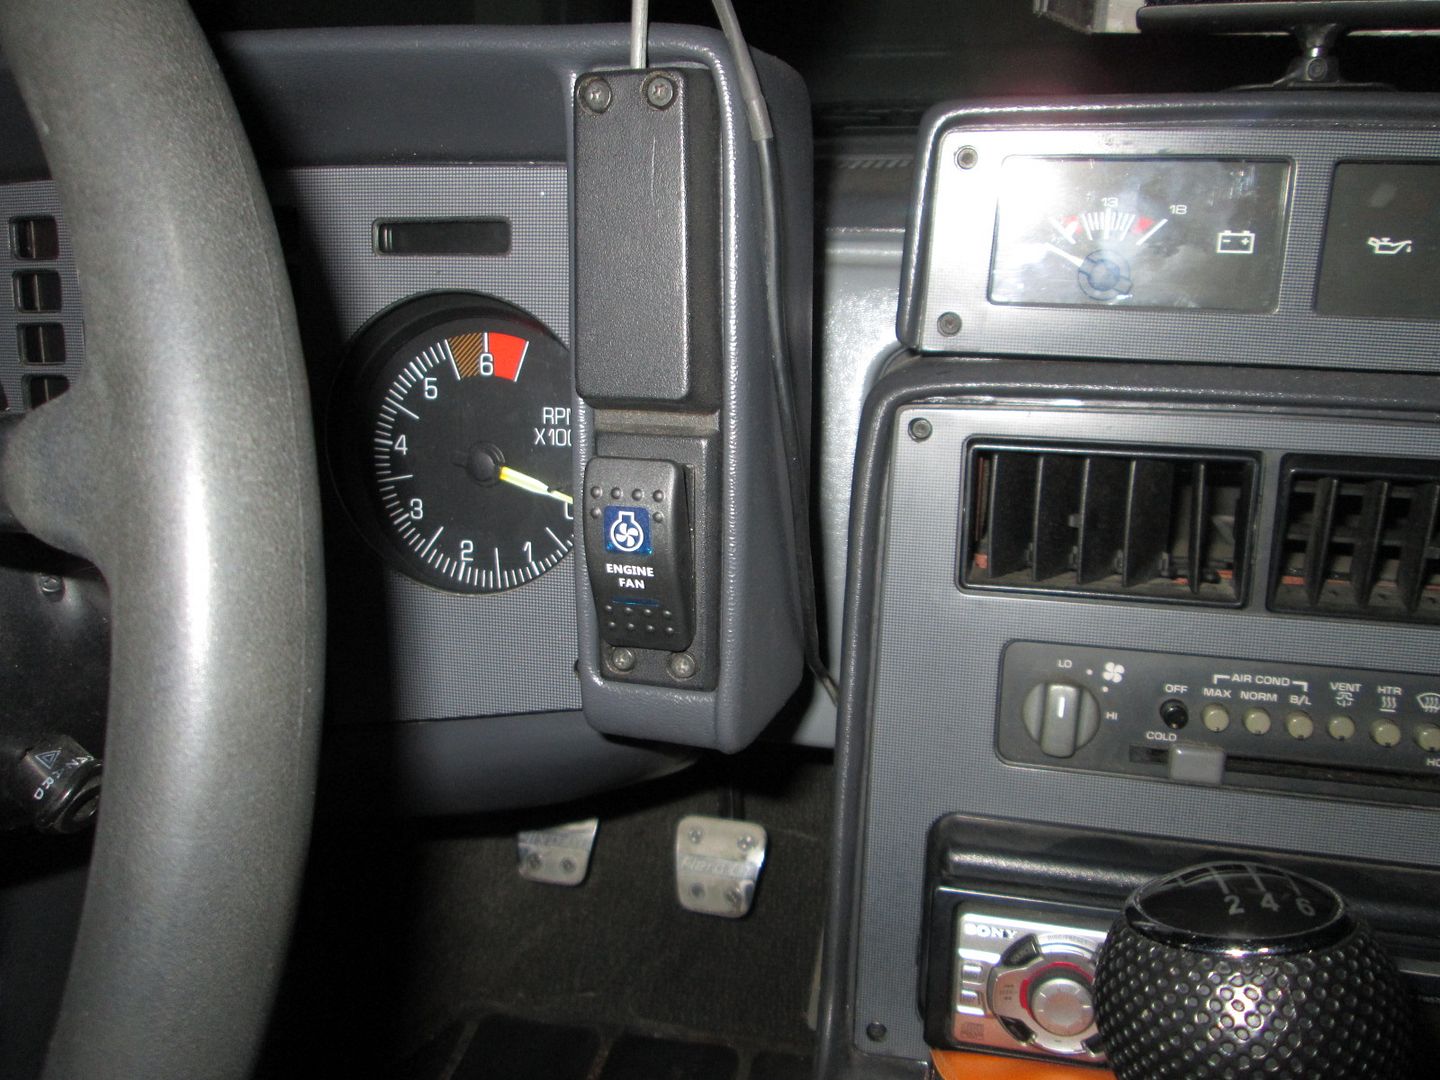
Last night I swapped out the V6 tach with another one from the shelf and corrected some wasted effort from the initial install. I have been a V8 guy for years and converting the tach from V6 to V8 is just part of doing a swap... I didn't learn until after I converted the tach, that in stock form, the LS4 V8 outputs a V6 tach signal. I ended up having to change the tune for a V8 output to match my modified V6 tach... I like I said, wasted effort... So when it was time to replace the tach, I simply installed a stock V6 tach and changed the settings in the tune back to stock (V6)... works!
I am also going to swap out the thermostat for a 180 one and install a fan override switch. The cooling system is rock solid and quickly cools the engine when the car is moving or when the fan is on. I want to disable ecm control of the fan, but I would like to manually turn the fan on in the staging lanes to keep the car as cool as possible before the run.
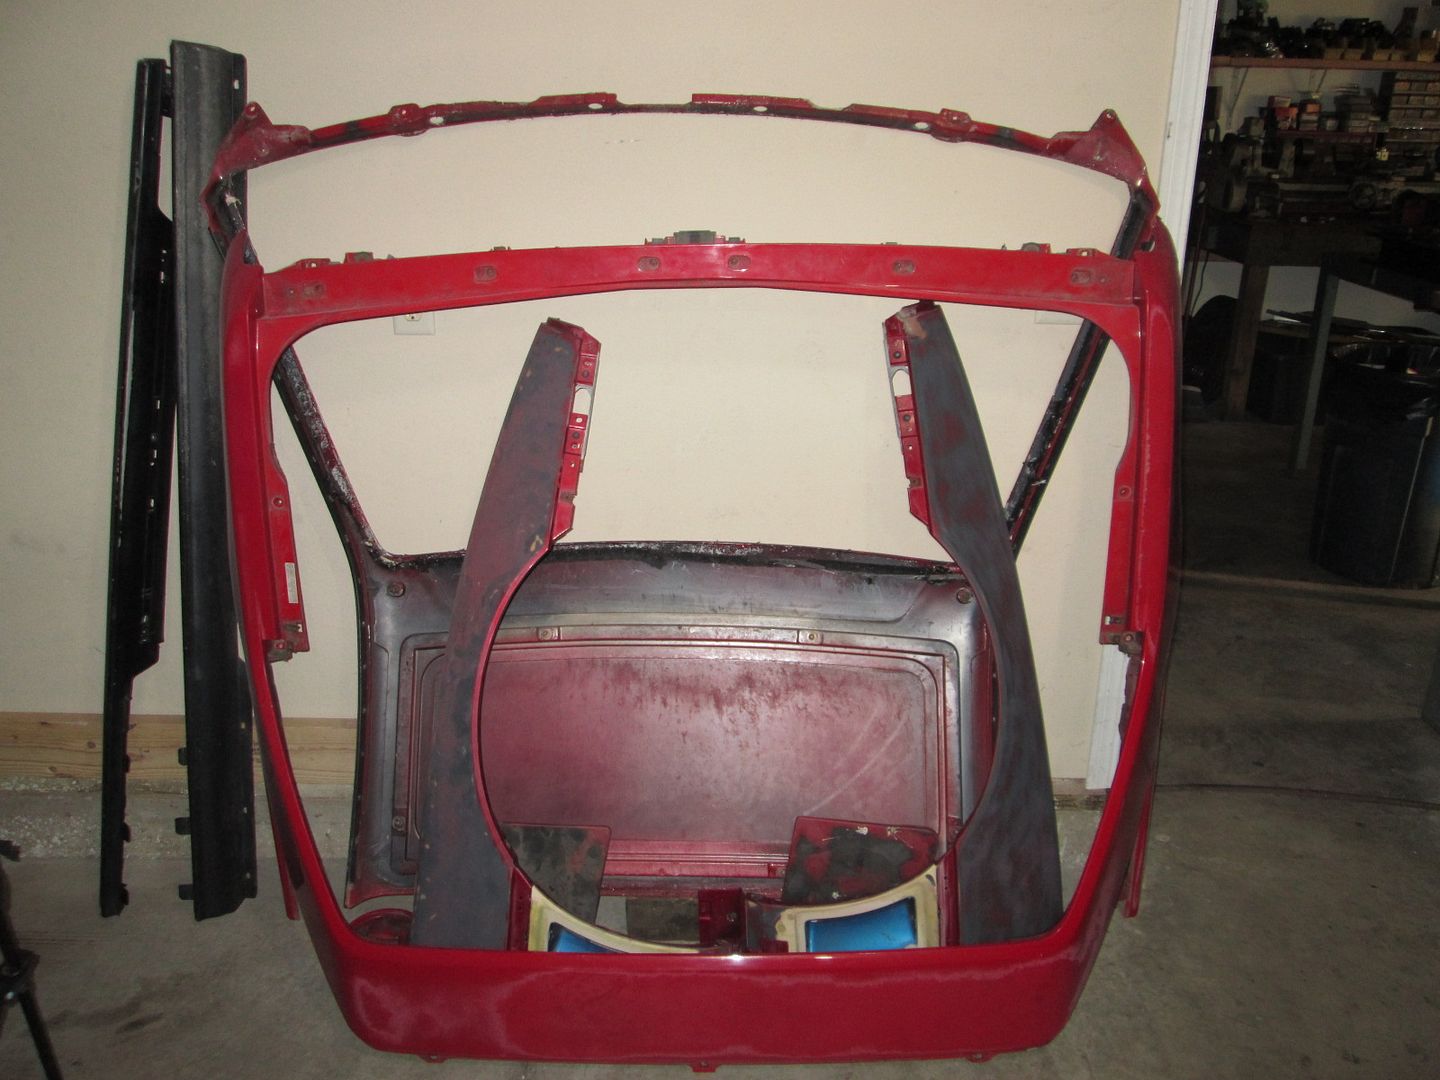
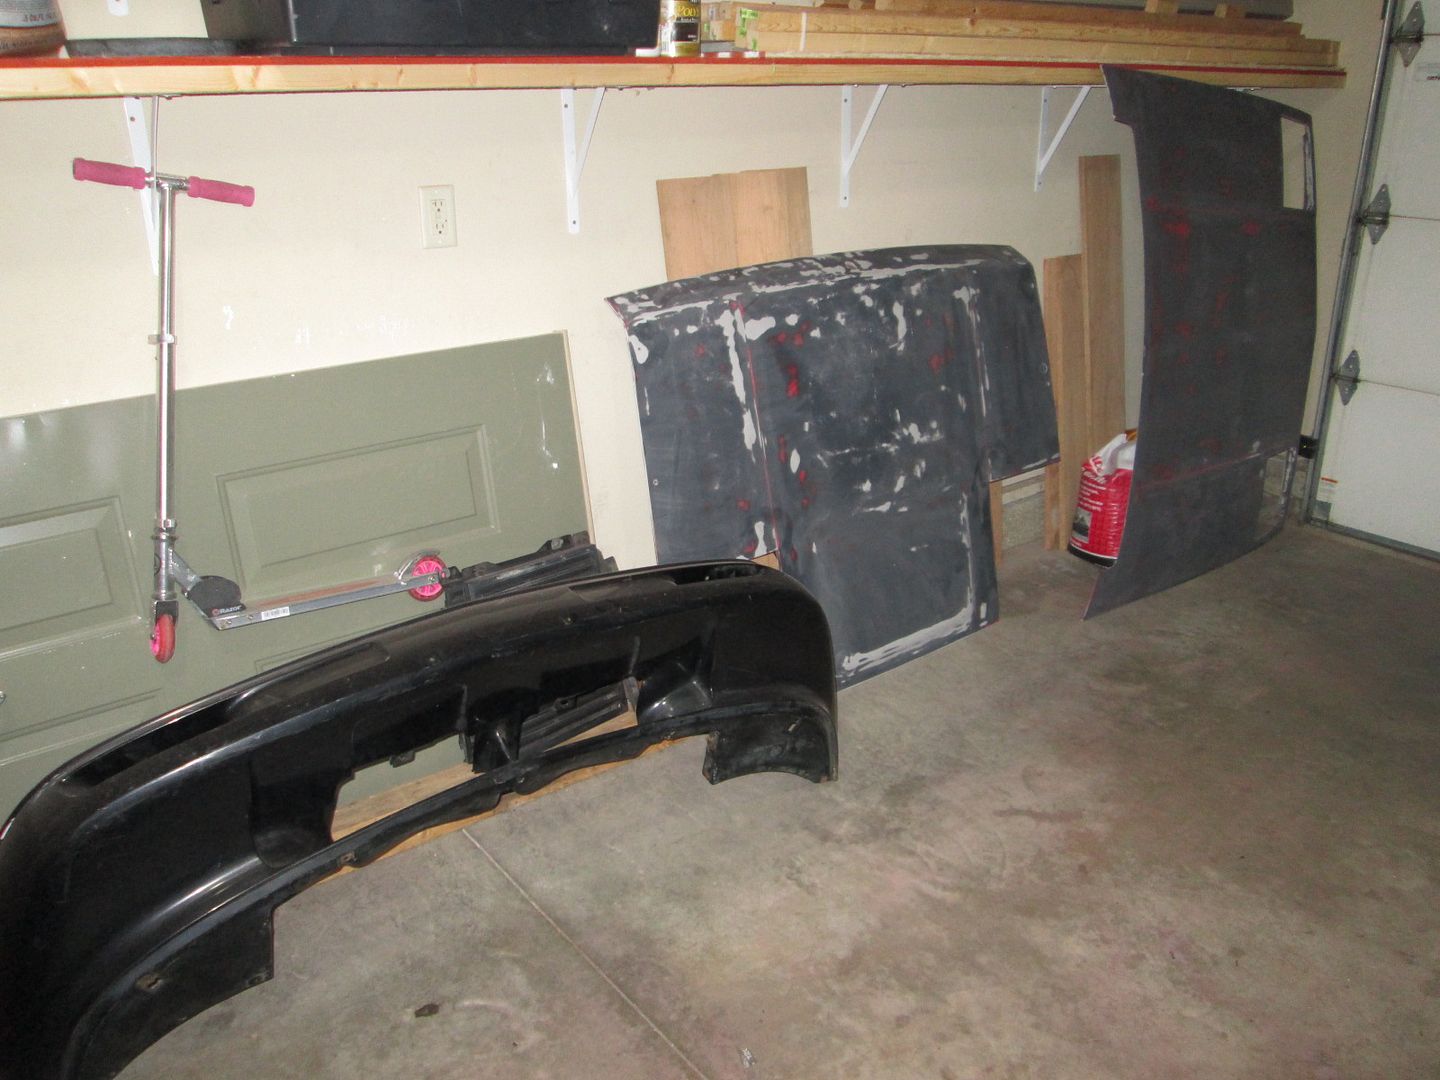
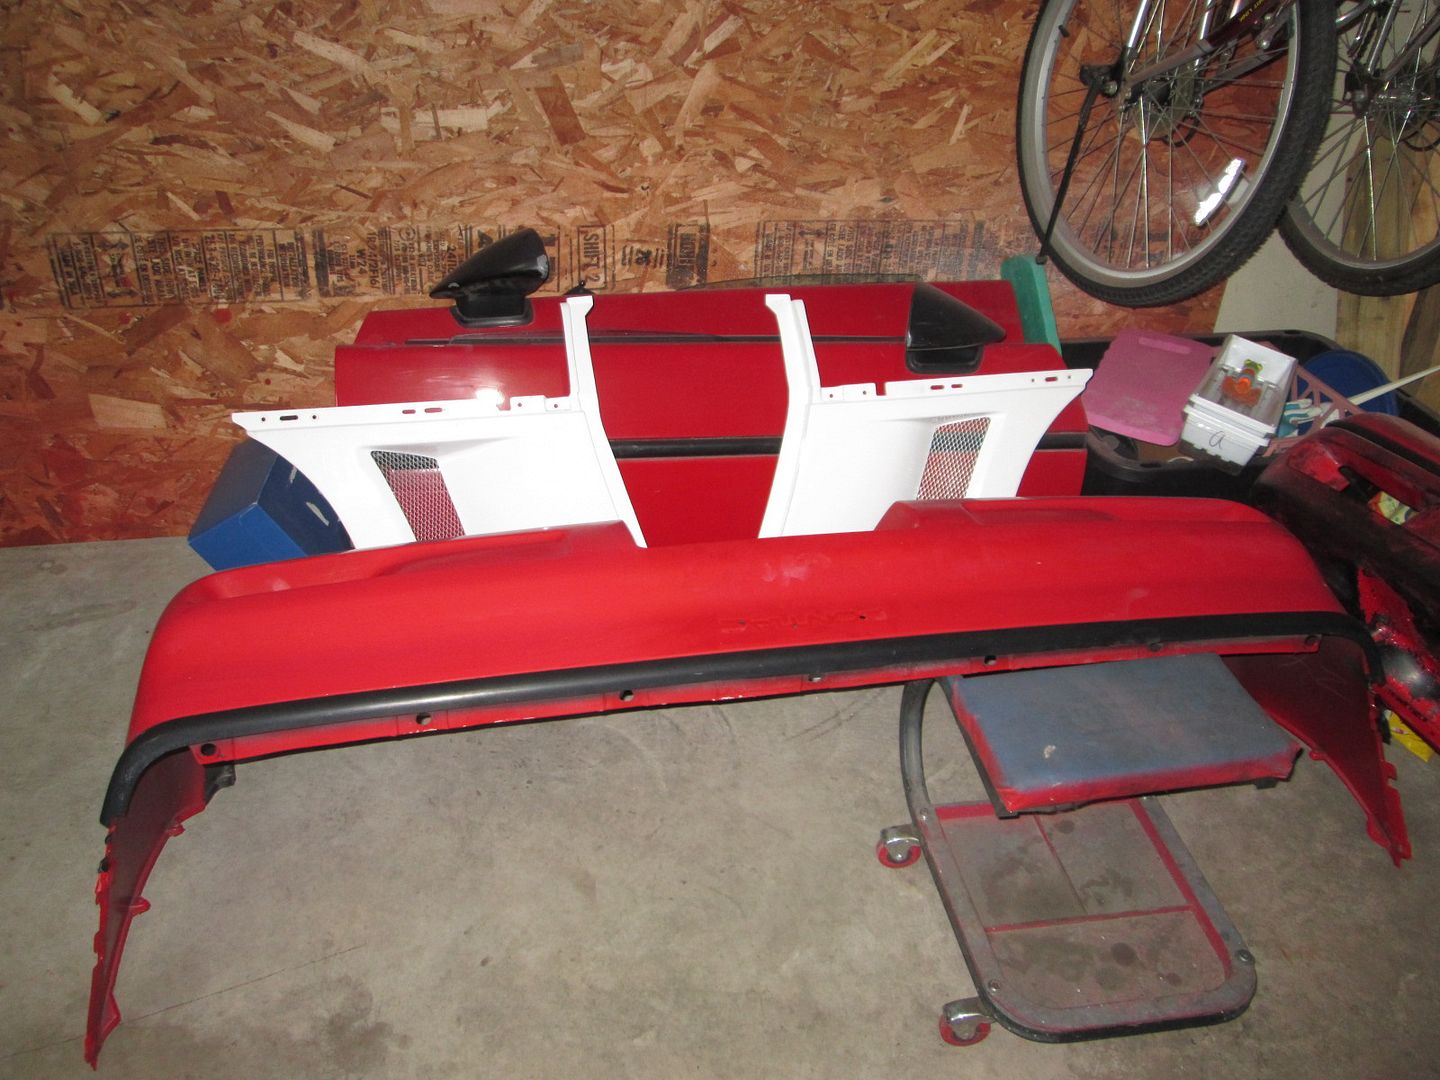
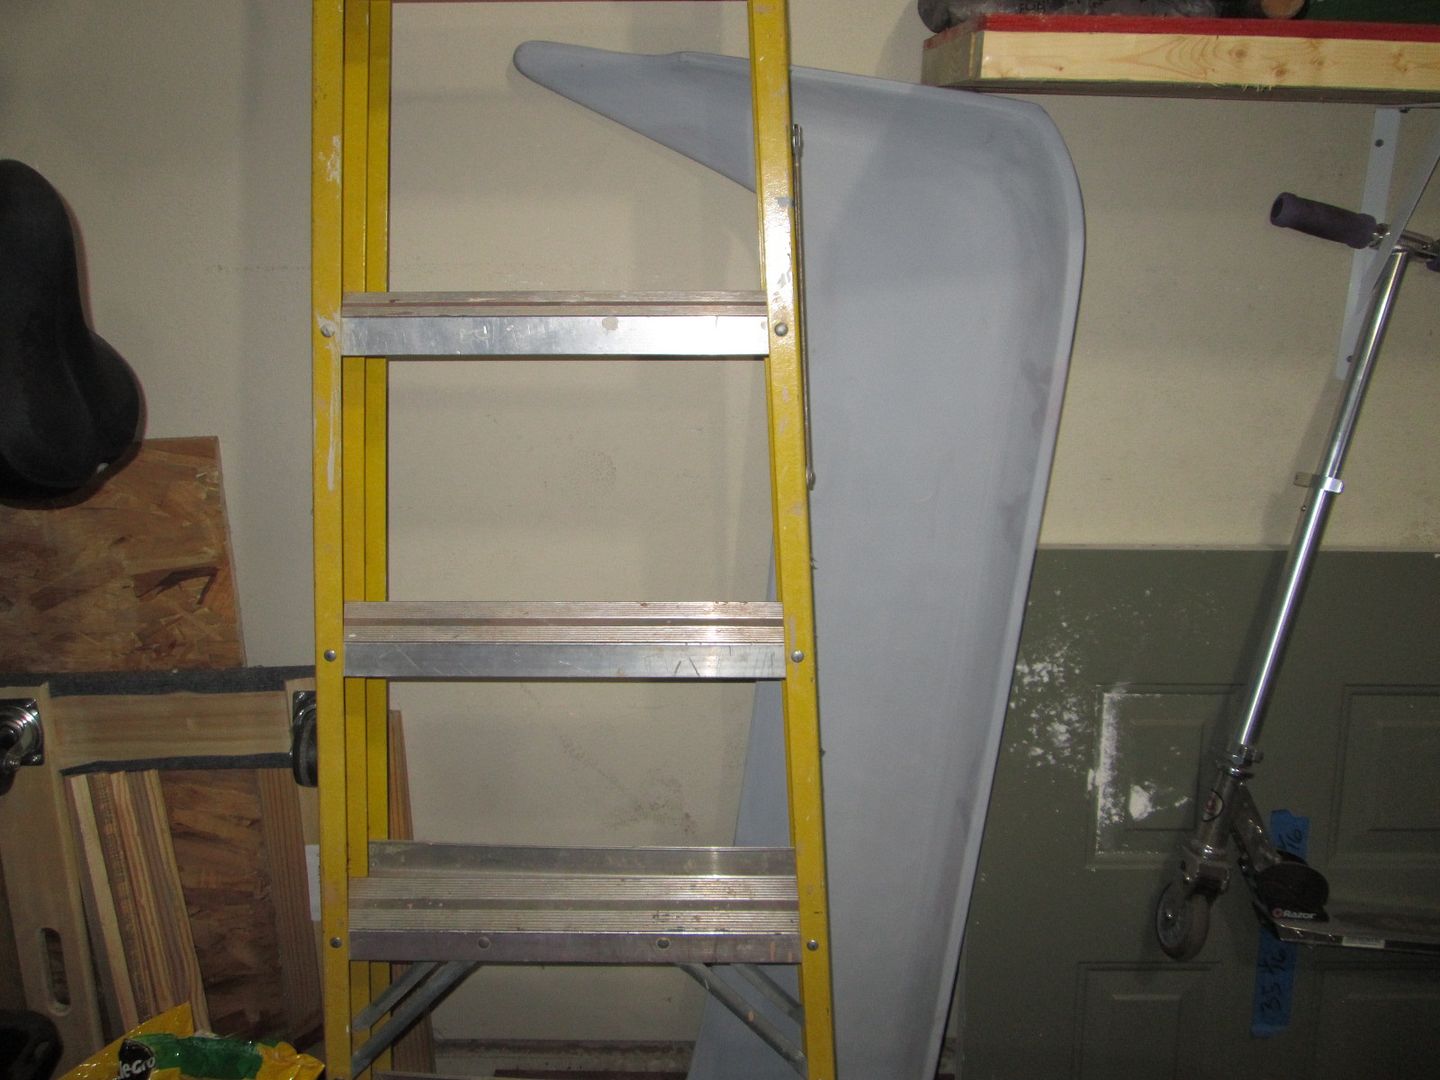
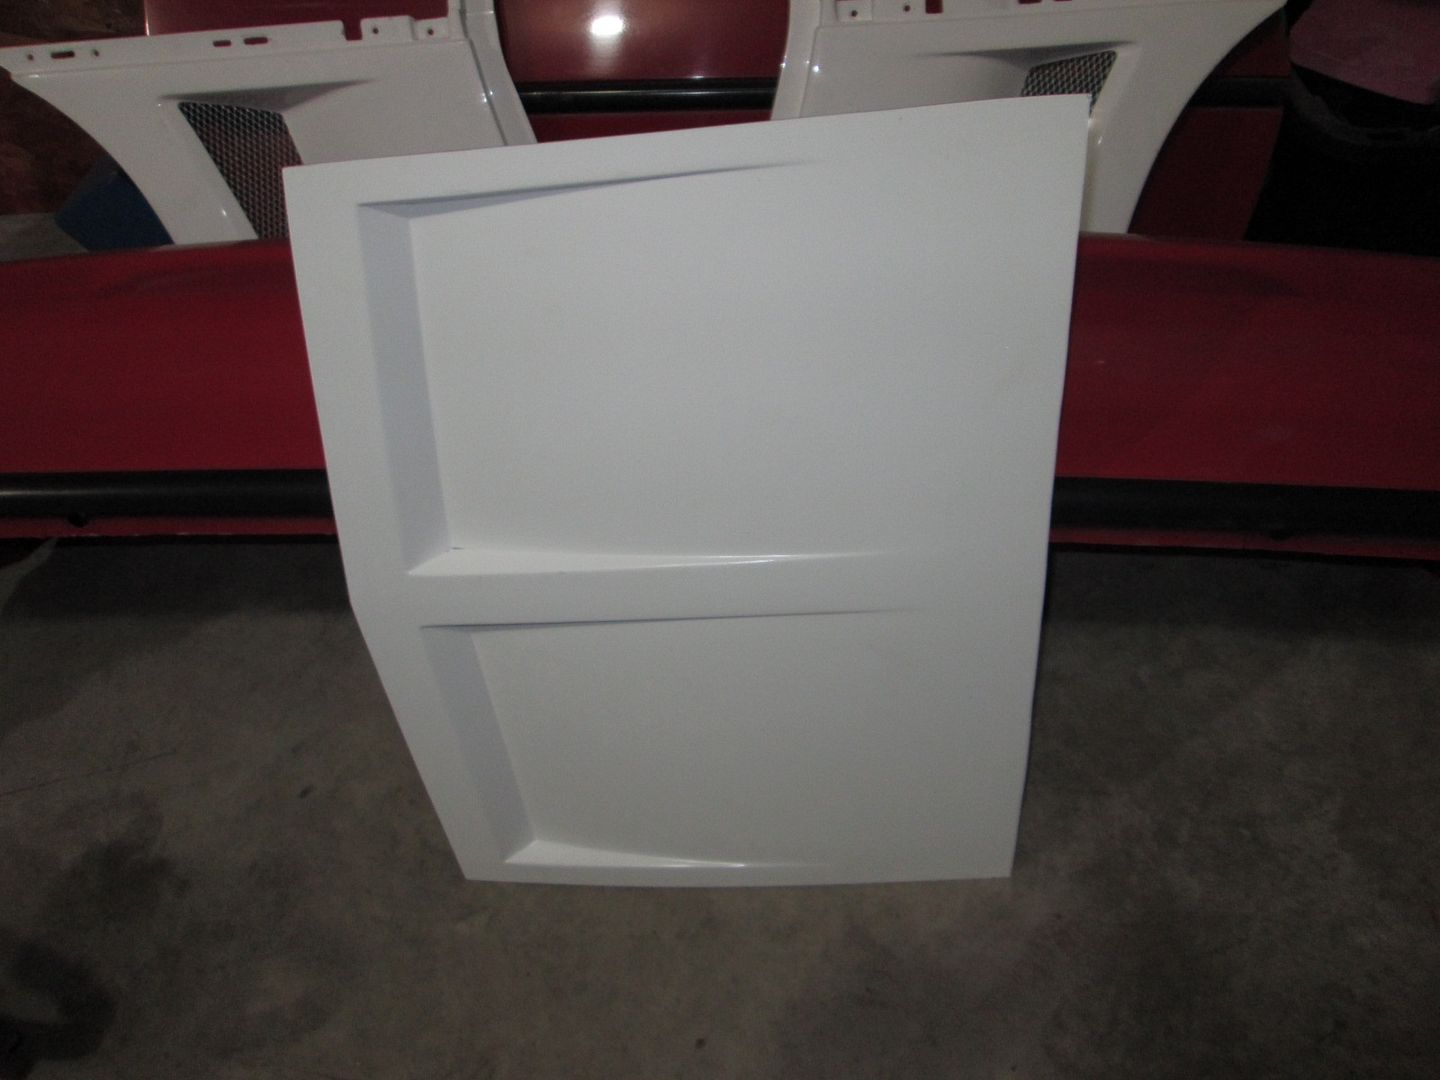
My big project for the summer is to address the paint on the car. It is pretty much a disaster from certain angles, so I want to paint it. I really don't want to take the car down for months while I slowly make progress on the paint, or pay someone to paint it. So I have a complete set of spare panels that I am slowly working on. With this work, I am also adding trans am vents to the fenders, IMSA 1/4 panels, mustang convertible whale tail spoiler, and I am currently exploring options for a hood vent. I also plan to eliminate the antenna hole, all badge holes in the front and rear fascias, as well as Pontiac in the DS front headlight...
Over the past few weekends, I installed the 180 thermostat, the fan manual override switch, configured the scanner upgrade on HP Tuners to datalog with the wideband for MAF as well as Virtural VE tables, and did a lot of WOT as well as normal part throttle data logging. Overall the tune was pretty close, but I did make a few small changes.
I haven't had any time to get back to sanding panels, but I did picke up a STM hood vent from The Driver
The other side project I have been researching is getting another F40 transmission... but not just any F40. FieroWannaBe1 shared some info about a Europe F40 version with a 3.09 final drive behind some Opel Insignia diesels (there is also a 3.35 version as well). http://vxoc.org.uk/download...20Specifications.pdf I was able to track down a 2009 version on eBay.co.uk, and purchased it. It is crated and should be picked up by the shipper early next week and I should have it here about 7 days after it is picked up. This is a little bit of a gamble as the final drive parts might not be interchangeable with the G6 version, but it was worth the risk.
But if it works, 1st will be much longer with more opportunity to put the power to the ground vs. spinning. 1st will still be shorter than the T56 transmission with 4.10 gears, but 2-6 will be longer. With the lighter Fiero and future turbo plans, I think the 3.09 final drive will be very nice.
I'll definitely be watching to see if that trans works. I've already been sticking to looking for the MT2 rather than the MU9, but this would be even better.
I'll definitely be watching to see if that trans works. I've already been sticking to looking for the MT2 rather than the MU9, but this would be even better.
To clarify, this 3.09 transmission does not have the metric bellhousing, so all I will be using from it is the rear diff and the 2 final drive shafts. I plan to swap everything into the MT2 case with the MT2 1-6 gear ratios. So you will need an MT2 transmission ($400 to $1000), the 3.09 transmission ($500), and the international freight to bring it to the US ($300).
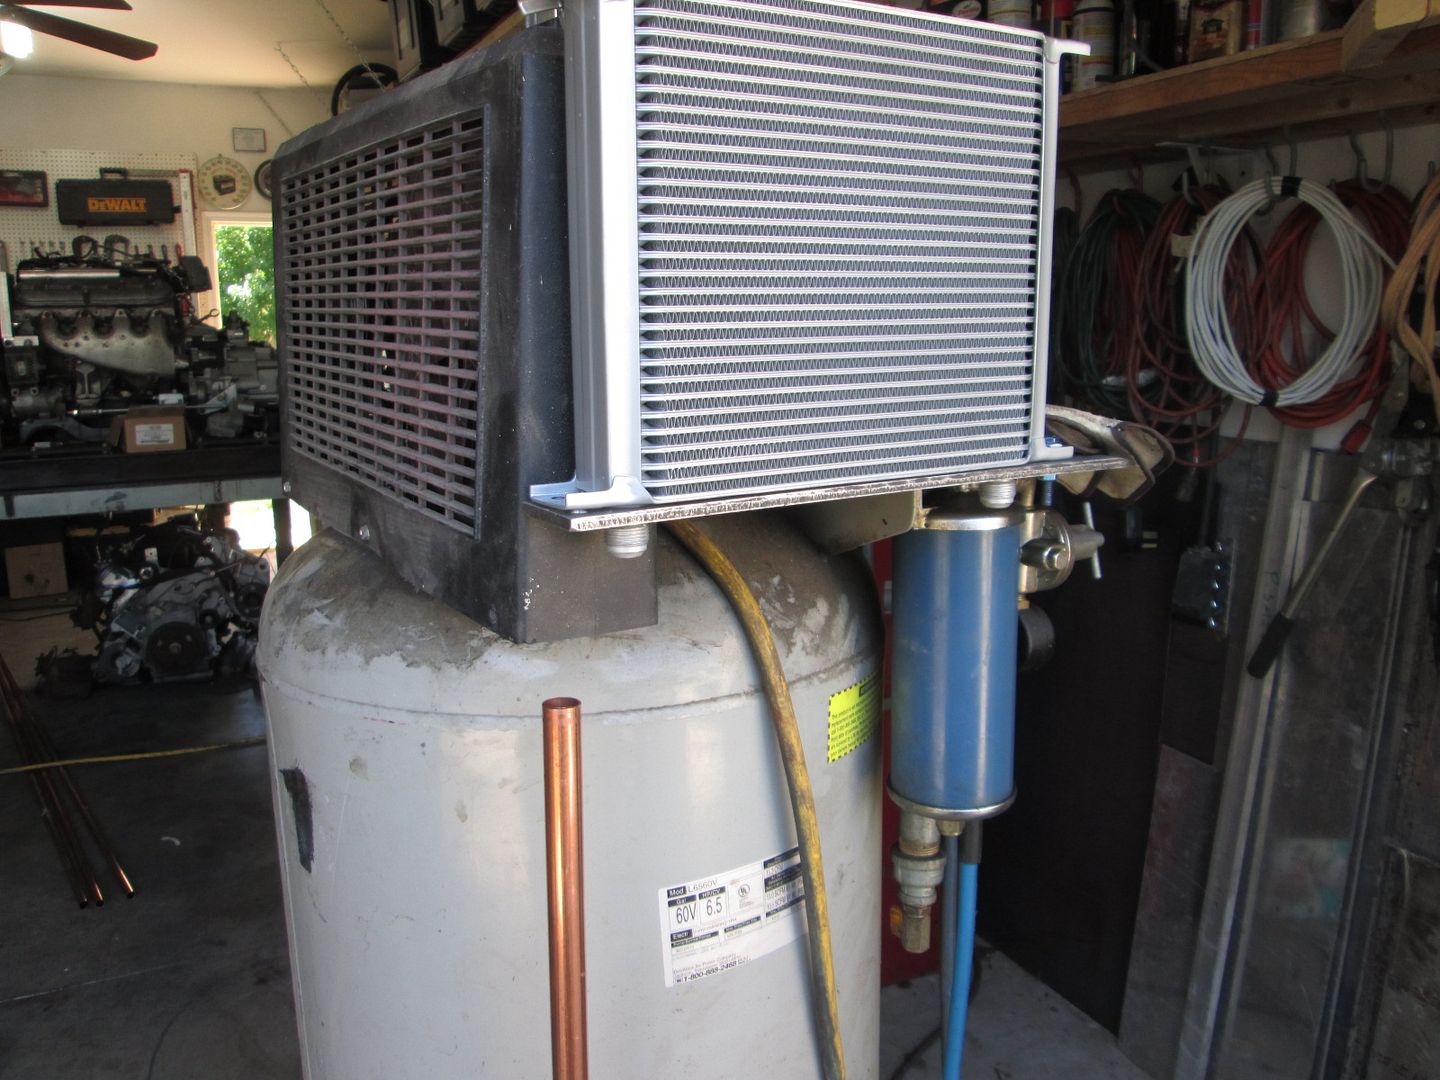
This weekend I started doing some modifications to my air compressor to make it better for the future painting projects. The primary concern with it is keeping the air dry for painting.
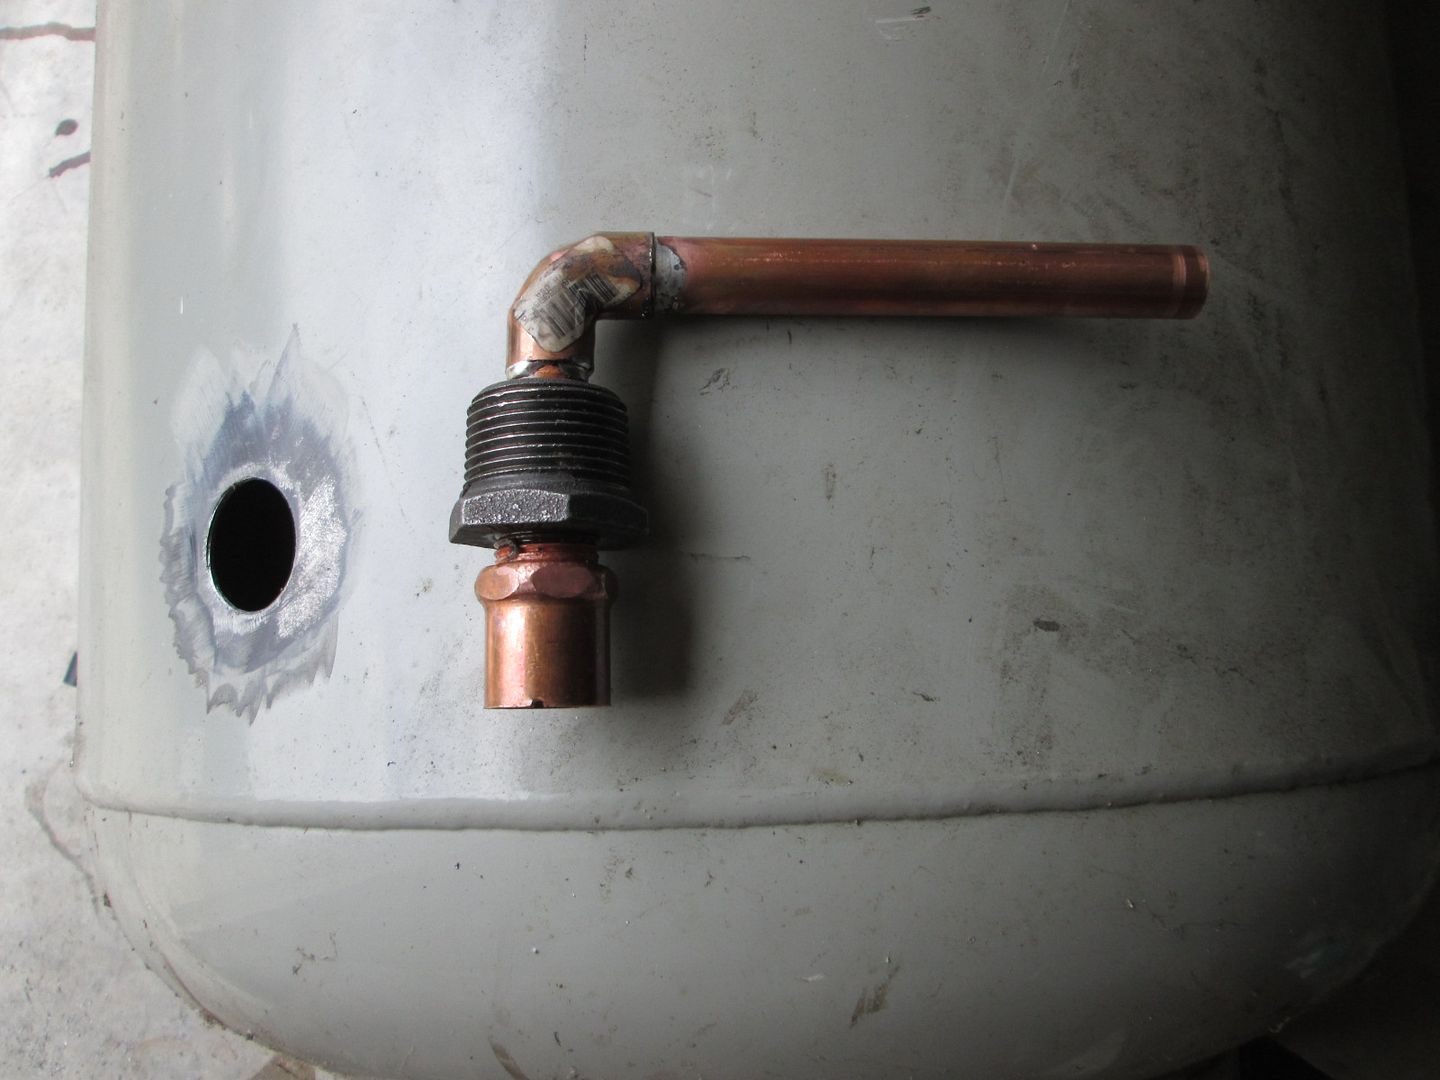
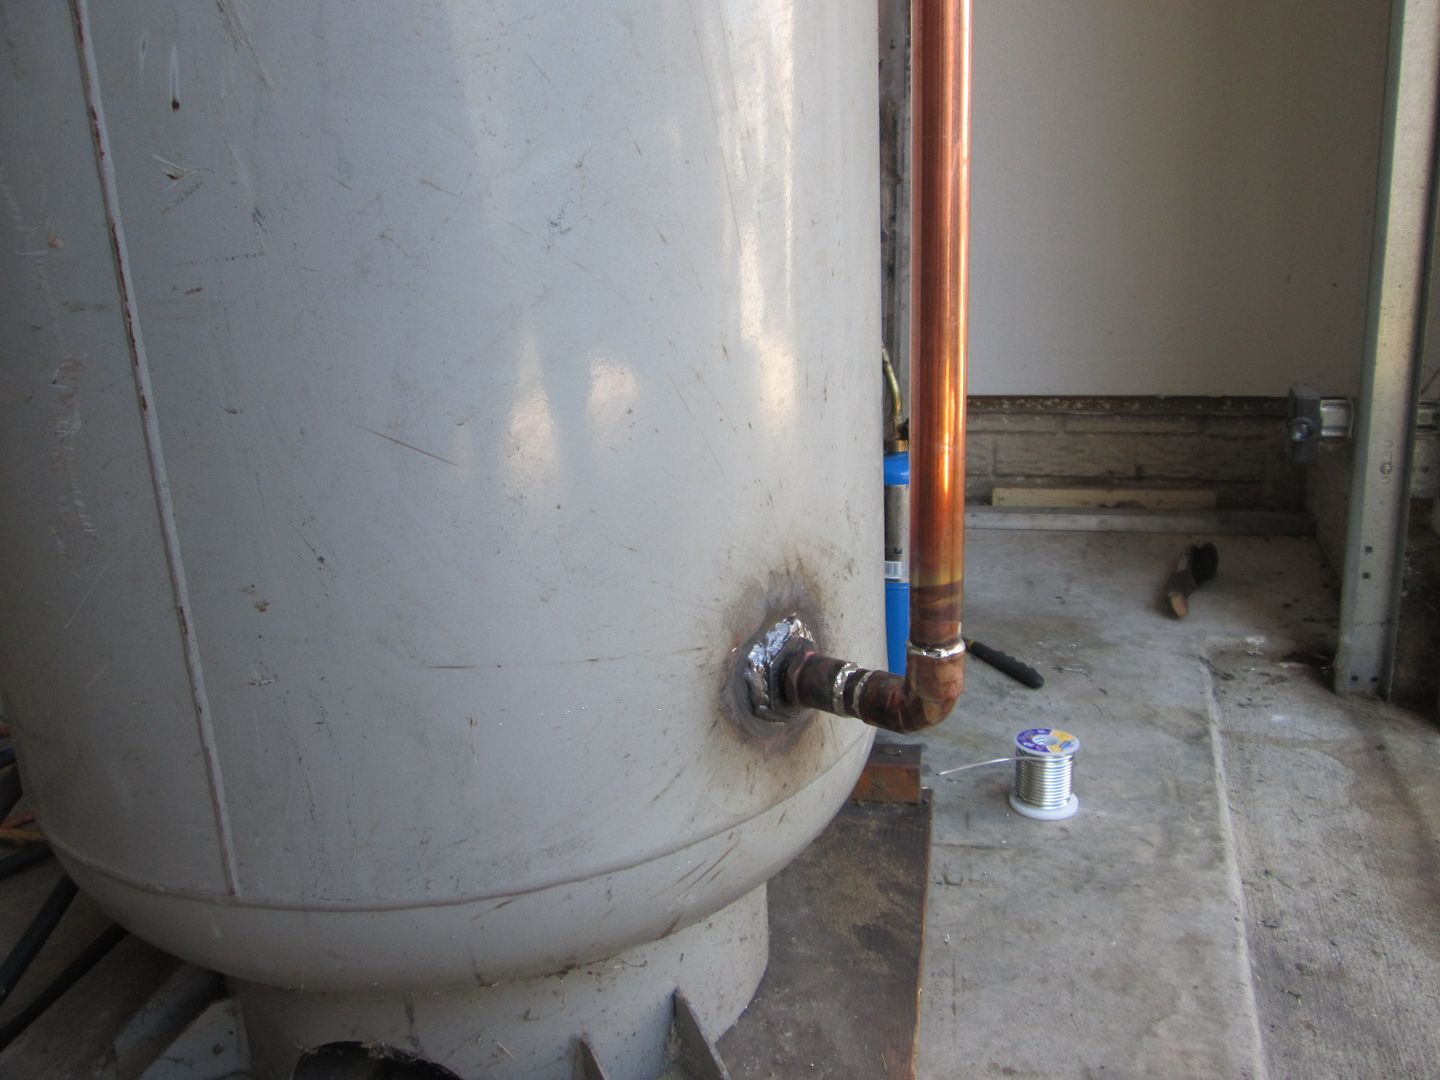
There are 3 parts to this modification. 1. Modify the tank for the inlet to be low on the tank and induce a spiral flow of air around the tank, with the outlet of the tank being in the top center. 2. Heat exchanger with 9" fan between compressor and tank to remove heat from the air and condense as much water as possible. 3. Route the outlet of the tank through a significant length of copper pipe with water traps to further cool the air and remove any water.
Part 1: Here you can see a combination of cooper parts as well as steel. The steel sleeve is so I can weld it to the tank. The copper portion is made so that I can unthread it once the steel portion is welded so I can seal the threads. There is a notch on the end that is used to ensure the tube inside is pointed to the side. With this installed, as the compressor runs, the air entering the tank will now cause a slight rotation of the air around the outside of the tank tank to help with moisture condensation. It also creates about 3 feet of vertical separation between the air inlet and outlet. Before they both were at the top of the tank about 9" apart, so hot humid air went into the tank and quickly right back out w/o spending much time flowing around inside the tank.
Part 2: Here is a picture of the heat exchanger (9x10x2) mounted to the side of the compressor. I am still waiting on the -10AN fittings to finish the plumbing between the compressor and the heat exchanger as well as the 9" fan (puller type, so it will pull air off the compressor and through the heat exchange) and the power supply for it.
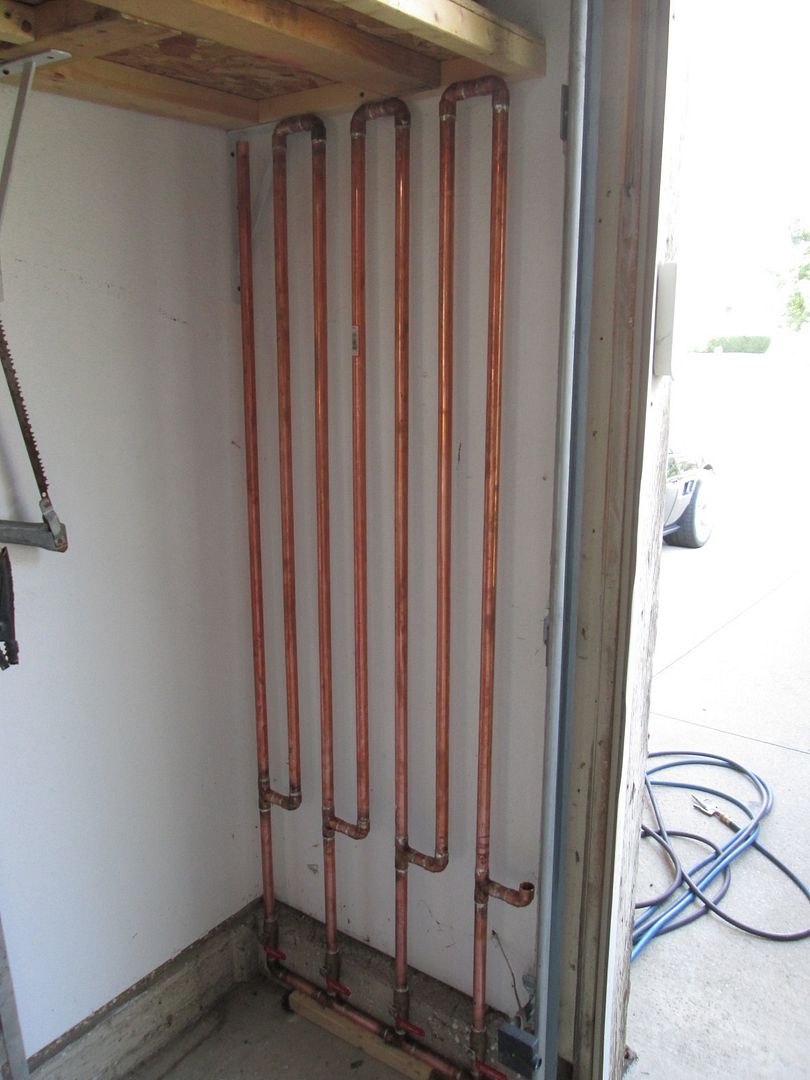
Part 3: Here is my prison door... The outfeed from the tank will enter the top left corner of this assembly. With all the vertical drops, climbs, and water traps at directional changes, as the air flows through this assembly, it will cool and moisture will condense along the walls of the tube and drain into the traps. There are valves at the bottom of each trap to a common drain channel. I still need to mount it to some 2x4s along the wall, and finish all the connections, but you can get the general idea. All the tubing is 3/4", the main vertical portions are 48", the spacer sections between all the elbows and "T" fittings are 2 1/2" and the water traps tubes are 11 3/4". Overall height is about 67 1/2" tall and about 25" wide.
Where/what did you source the heat exchanger from? Many are using automotive condensors with good results so it will be interesting to see how much of a temp drop you get with it.
I don't paint but I lost my last compressor to moisture in the tank so I'm taking some extra precautions with the new one.
Is your override switch running through a relay? I'm pretty sure the Bocatech style can handle a similar load as the Carling switches. But I have no first hand experience with them.
Originally posted by davylong86: Very nice work. You have one heck of a shop going there.
Thanks! It continues to be a work in progress.
quote
Originally posted by G-Man: Guru,
Where/what did you source the heat exchanger from? Many are using automotive condensors with good results so it will be interesting to see how much of a temp drop you get with it.
I don't paint but I lost my last compressor to moisture in the tank so I'm taking some extra precautions with the new one.
Originally posted by wgpierce: Have you looked at these sort of switches? Not sure how it compares in size:
quote
Originally posted by KissMySSFiero: Check out bocatech switches. It's the latest in marine applications.
Is your override switch running through a relay?
Thanks for the suggestions but I was looking for a more period correct type of switch. Those push button ones are a little to fancy for my basic interior setup.
The switch grounds the ECM fan output to the stock Fiero fan relay.
Thanks for the suggestions but I was looking for a more period correct type of switch. Those push button ones are a little to fancy for my basic interior setup.
The switch grounds the ECM fan output to the stock Fiero fan relay.
maybe you can adapt a fog light switch or another GM on/off switch from an 80's or 90's era vehicle. You may get lucky enough to find something that fits the stock deck release or rear defrost opening. Obviously, It won't be labeled. If that matters.
You could also use the stock overhead light console. There's space to mount a 3rd switch in the middle. You could use an extra light switch from the console, but in the middle where the performance sound slider would be. Unless you have a perf. sound slider. But you could use the switch anywhere in the car and it would fit the era. I think the early cars had a 3rd switch in the middle from the factory.


 Can't wait to see it installed!