I finally put time into uploading most of my pictures of the restoration of the Seyfert/Buist(then the Jack Ondrack) Fiero racecar that ran in IMSA from 1985 to 1987.I hope it will be of interest to some to show how the car went from this:
To this.....
To how i found it like this.....
and turned it into this.......
So,here i go..................
P.S. If at any time someone would like to see another view of something done to the car,let me know as I have many more pictures than what I will be posting.
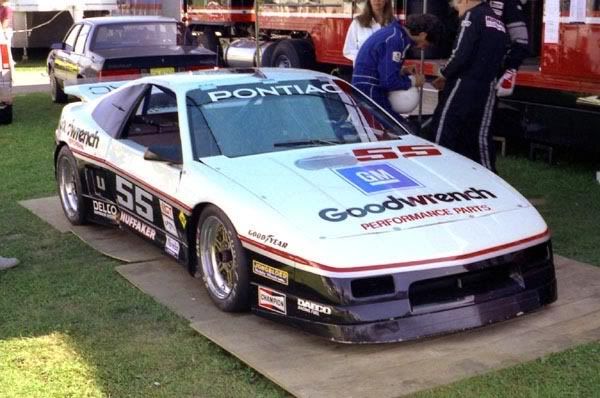
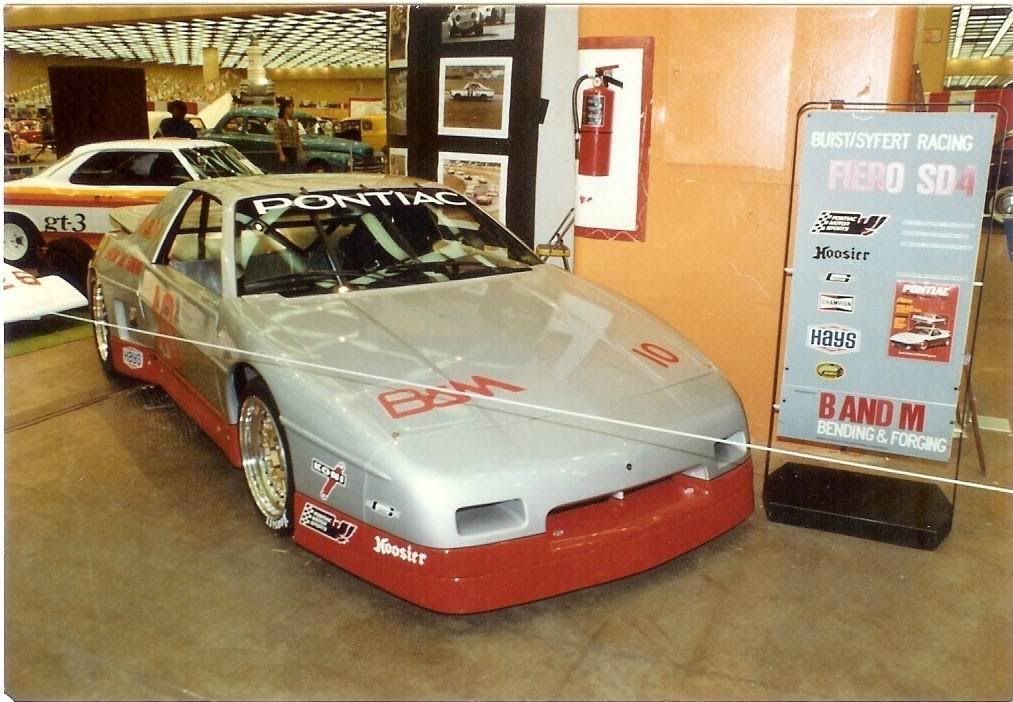
The car started off as a sparetime project betweeb Pontiac suspension engineer Terry Satchell and his longtime friend Greg Seyfert.It was built over the winter of '84.Number 10 or "Geraldine" as she was named by Seyferts wife,was raced in mostly SCCA GT2 events and was entered in IMSA GTU races that were within reasonable distance to the Detroit area.Satchell later sold his share in the car and Seyfert then partnered with David Buist to continue to campain the car up to the cars sale in 1992 to Jack Ondrak of Canada.
]
Jack raced the car in GT2 up to 1999 when he replaced the car with his newly purchased toy-a real Huffaker Fiero.The new car is the V6 GT1 car seen in many pics on this forum.The old car was sold to his buddy in Arizona to be used as a chassis for a Porsche bodied project.As most projects go,the car languished away in a horse barn,untouched, until I bought the car in late 2004.I really was only looking for wider rear quarter panels for my '88 racecar when I called Joe Huffaker to find out who had the old moulds for the race bodies.He put me in touch with Jack(who owns them now)and told me about this old chassis sitting in a barn and how I should make an offer to help his buddy make some room and get his wife off his back about the unfinished cars stored in there and ............that's how I got involved. She came to me as a roller with crates of parts and old body panels.
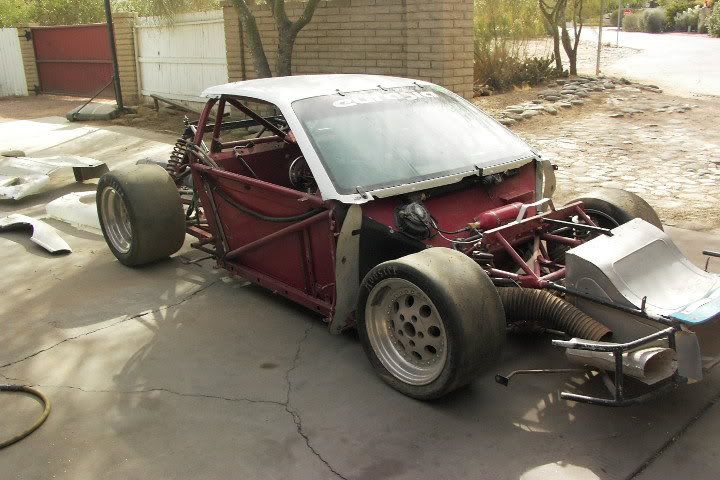
So next........what was usable and what had to be trashed...........
The only original Fiero parts on the car are the taillights and the windshield.All the IMSA GT cars(GTU and GTO) are/were dedicated tube chassis race cars.The early IMSA rules stated that at least the roof,front hood and rear decklid must be production pieces,but later these rules were relaxed and the complete car could be total race parts.Much along the same vein as NASCAR "stock cars" are actually Malibus,Taurus' ,etc.. IMSA GT, There were not many panels left with the car(including the front spoiler).In fact the only body panel reused was the roof,and that was a major project as there were at least 14 coats of paint I had to remove to get down to the original gel coat(although it was neat seeing the individual colors of the past come off as if a book's pages were being flipped from the end).The rest of the panels were new from the original Huffaker/GM moulds-and let me tell you,it was difficult finding who had each of the moulds to what pieces and in what part of North America they had to be shipped from!! The chassis was pretty beat up from many years of racing-there were patches over old patches,suspension mounting points were not symetrical side to side and off by as much as 3/4 to 7/8 in!!The chassis was so bad from behind the main hoop that I descided to cut it off and rebuild it with a longitudinal V8 instead of the Super Duty 4. A few reasons why: I am a staff member of a racing organization here in the northeast and can get up to 4 hours of track time at such venues as Watkins Glen,Lime Rock,NJ Motorssports Park,Pocono and a few more,so I wanted a powerplant that 1.had low maintenance 2.ran on pump gas (race fuel is expensive if you log alot of track time) 3. put at least 320 to 350hp to the ground(with 2100lb,it's a good power to weight ratio) The Super duty motor is expensive to put together now as the parts are getting rare.The Muncie/Getrag/Webster-geared trans is equally as rare and expensive. So I went with a Corvette Z06 LS6 engine(warmed up for now at 410hp to the wheels) and a Porsche 930 trans(will be converting it to dog ring style syncros this winter) since a Hewland DGB is out of the buget for now at near $12k just for the trans.Paul Hosler very gratiiously gave me his chassis dimentions(x,y,z coordinates) for the updated(for 1986) suspension pick up points as done by E.J. Trivette.I must say my life hasn't been the same since I opened a certain Car Domain Blog of a Yellow IMSA V8 powered Fiero! Thanks Paul,I am sure my wife feels the same!!!!!!! The engine enen has a race history itself!It is a used take-out from GM engineer John Heinracy's SCCA T1 car! The race shop that prepares his car is located near me in Philadelphia and sells off the used engines as they hit 20 hour of use.It should be fine for what I use the car for.
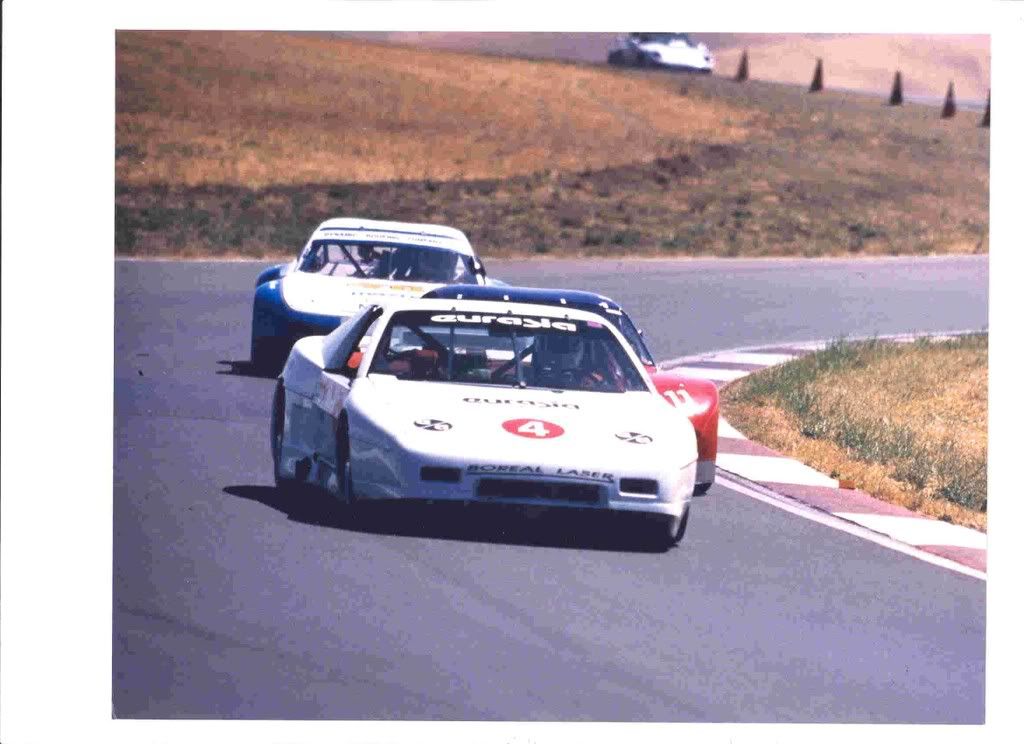
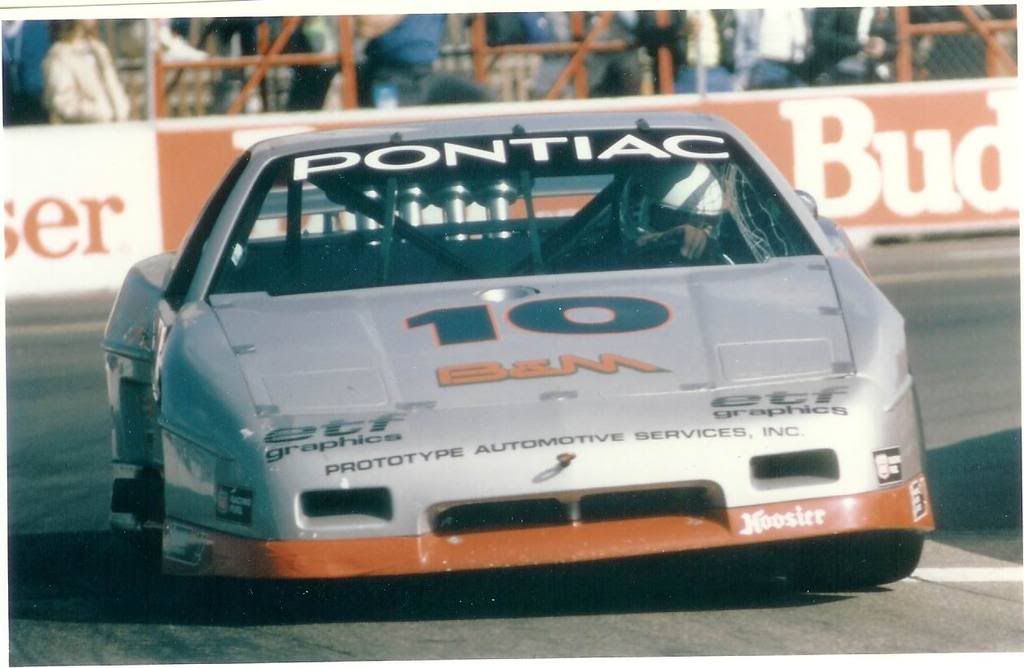
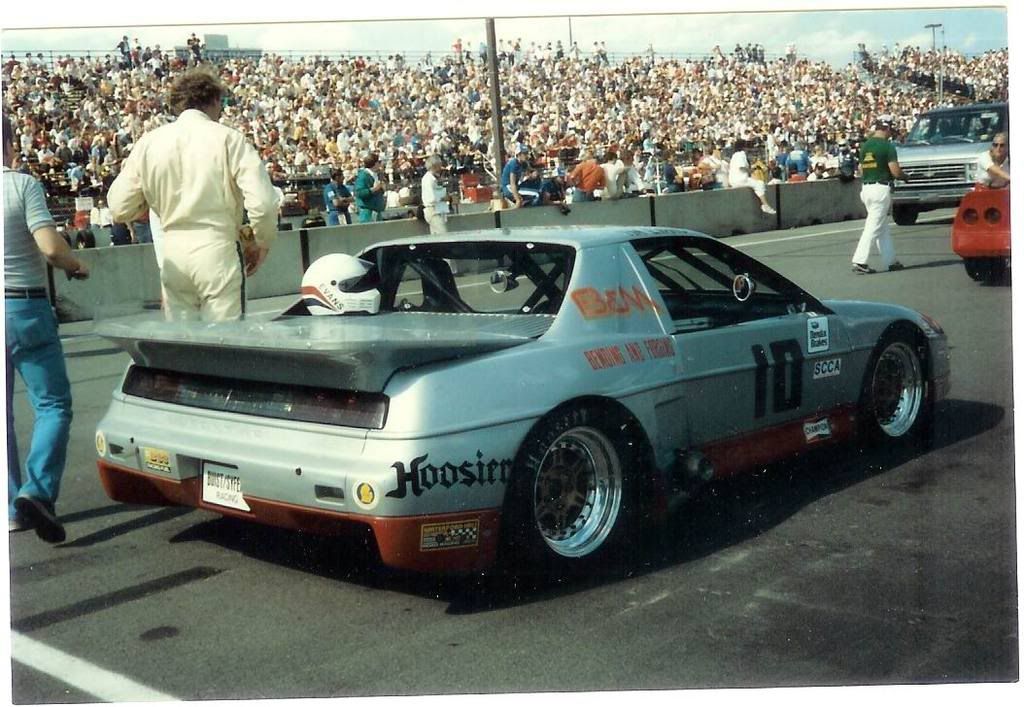
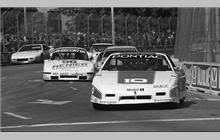
Here's some pics as the car was raced back in 1985 by Seyfert/Buist:
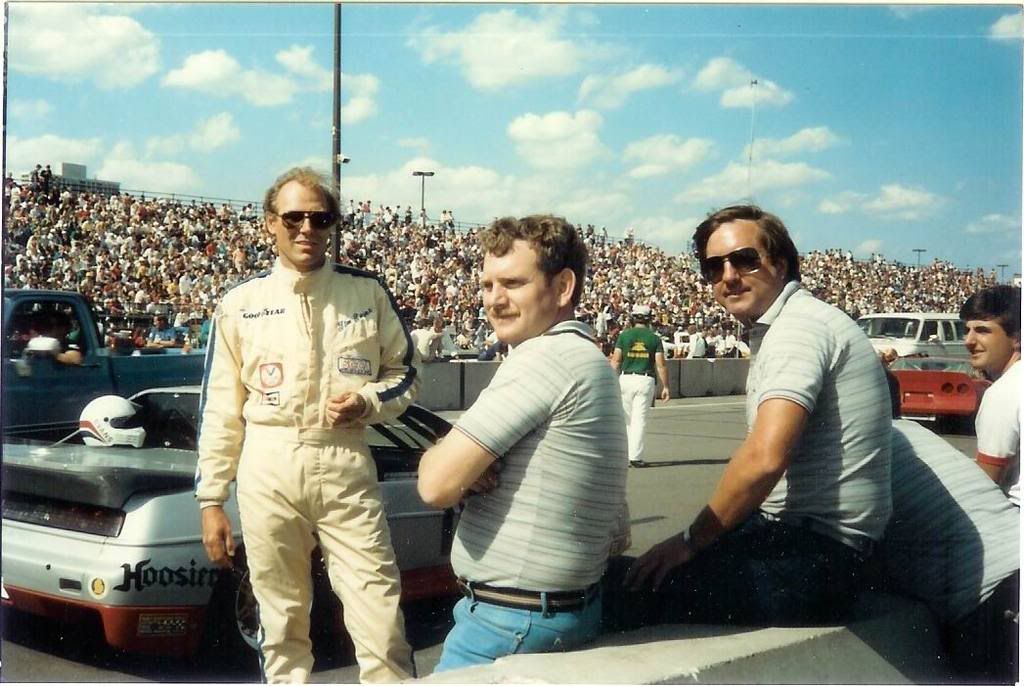
Terry Satchell in center of the pic with his arms crossed
on the grid
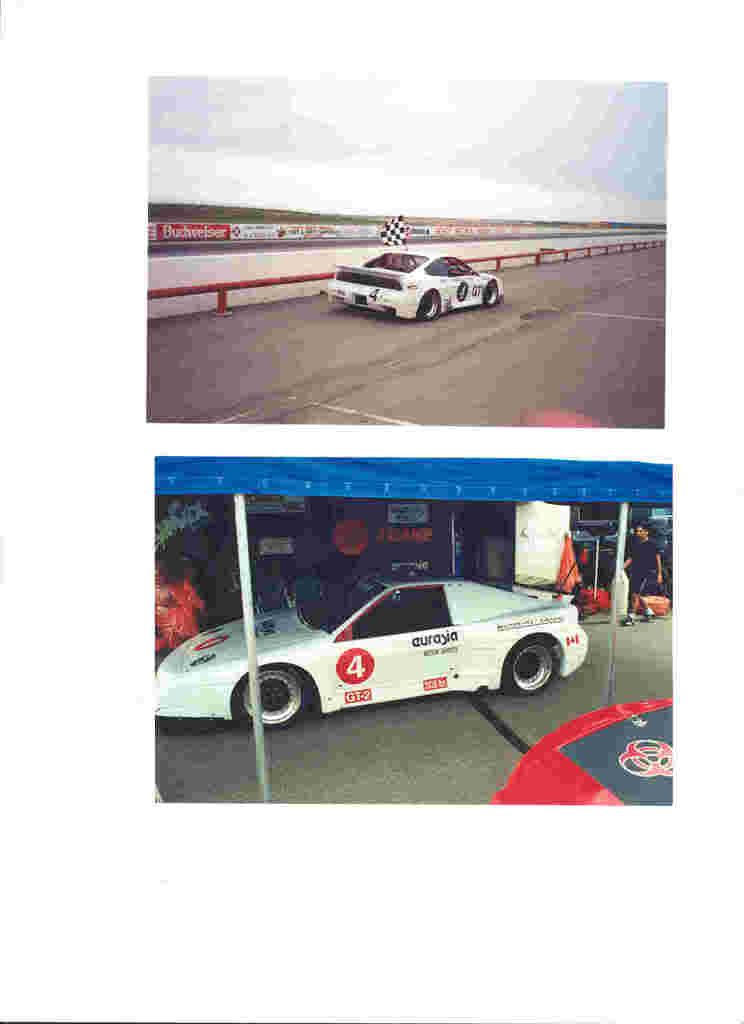
1987 Cleveland IMSA GT I'm not sure where in Canada Jack took this one,Hey Mickey Moose!Help me out with that info! Here's some pics of the chassis as I started:
Excellent thread and happy to see it resurected. I was wondering,, Diversified Glass Products would haev been the oringal provider for the body so when did the moulds go out to the other race teams? They owned the rights thru Pontiac Motor Sports in the beginning. Thanks for all the pictures and I know allot of folks who would love the orignal Center Lines. Rick B
Dave.... It's great to see you post. You deserve a lot of credit for building this car. Also, you are quite welcome for the help. As you know, you helped me TREMENDOUSLY witht the rear quarters and other components.
As for the CarDomain thread.... well... I hope it has not caused too much trouble.
The car turned out great! I hope we can get them together some time for some fun. Cool story and lots of good history.
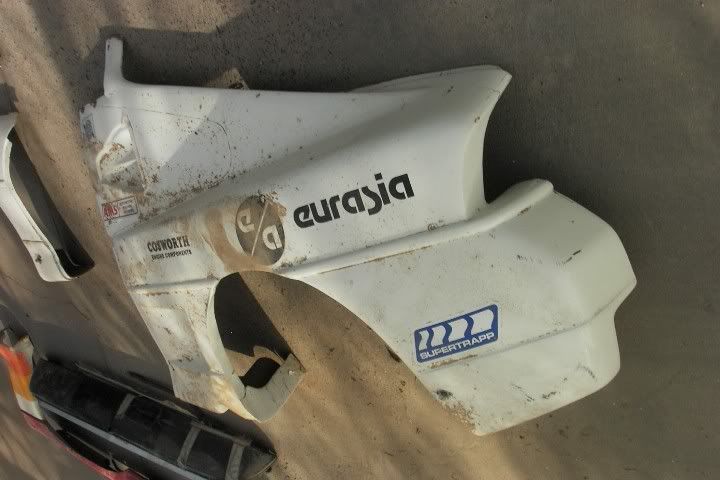
DGP may have been involved in the initial development of the race bodies and supplied the street versions of the IMSA Fiero,but as far as I know,Huffaker had the moulds and was the firm one would go to to purchase body panels.Then later on, later 1987 to 1988,they widened the front and rear flares as IMSA allowed wider track widths and made their own moulds for them.These are the moulds that my fenders and rear quarter panels(Paul Hosler's as well) came from and they still have the DGP numbers cast into the lower edge.Huffaker later sold the moulds to Jack Ondrak and another gentleman in California. As far as the Centerline wheels,they only would fit the race car suspension as the race uprights used wheel hub/bearing units from the larger full size cars.The bolt pattern is larger than stock Fiero.
As far as the history of the DGP bodies is concerned, when I talked to Huffaker back in 2001, he said that he knew nothing about the body panels I had because He (Huffaker) had nothing to do with them. Around here somewhere I have a phone number for the guy who ran DGP back in the day.
I can think of two guys that could help answer this question: SuperchargedV6 and Red GT. They have lots of DGP information.
In any case, Dave is right. Several of the mold locations are now known. I also think the Fiero Warehouse has some old molds (information as of 2003) that were in pretty bad shape for the '84 version of the car. These are NOT the same as the street molds.
Those shots from 1985 appear to be from the pit lane of the Detroit Formula One Grand Prix street course. I'll have to find my old pictures and see if I have any other shots.
Bob Birchmeir owned DGP and I talk with him quite frequently. He closed the main shop around 1989 and this was when he sold the mold or in 1988 possibly. I figure they bought the molds around that time frame but up until then DGP had sole rights to them thru Pontiac Motor Sports and was making them for all the racing teams from all I was told. I will have to bring this up with Bob maybe later today. I hate calling him just for questions on the car.
Little known fact. Bob was called in by Ford to make the hood on the GT40. The problem was the body was made of aluminum on the original spec'd frame work and they wanted a fiberglass hood. The hood had to be thicker then the aluminum and Ford gave up. With Glass spec it was setting way above the rest of the car and they didn't think of this until after it was almost complete and to much money was spent. Bob said it was the worst F*&^ing project he ever had but he got it done. DGP built many Indy car bodies also and I have the pictures of these. Rick B
Being that I wanted to shift the Porsche trans with a rod/linkage instead of cable(rod linkage is more accurate and someday hope to be able to upgrade to a Hewland DGB which has to shift with that style),I wanted to give first priority to its routing/mounting.Then the exhaust and the rest would be built around that.
Building the headers is something I really enjoy(to some it's torture),it took about 2 weeks of spare time(this whole project really took off just as I had bought a house,moved and got over a serious injury to my right arm,and was planning a wedding!) Theheaders are 1 3/4 diam. with 26in long primaries into 3in collectors. The rest of the collectors and exhaust system would have to wait as I still didn't have all of the body parts collected! I couldn't build the exhaust to go through an opening that wasn't there! Here is the logistical nightmare I went through: The roof I was saving,the front nose,fenders(decided to go with the 1988 Huffaker style as opposed to Jack Ondrack's wider style--really for looks), center rear bumper and "whaletail"rear decklid came from the Huffaker moulds in Calif. The wide 1988 rear quarters came from Jack in Canada. The front chin spoiler came from Doug Kinney at Fiero Warehouse. While the front hood and doors are real,unused original Pontiac Motorsports panels found stored in Texas(a ton of thanks to a great find by Paul Hosler!) . So,I have panels from over 25 years apart, from 4 locations,2 countries and they all fit as intended like they came from one source!! I was amazed in how well the panels fit together!(for a racecar that is) But,I am getting ahead of myself!! Here is a mockup of the original "narrow" front track with Jack's "wide" custom front fenders:
You can see just how narrow the track was here
Compare the narrow control arms to the wider 1988 arms(there's a difference of 1.5in per side)
stringing up the track and wheelbase:
Next time...........Getting the suspension mocked up............And STILL waiting for a body!!!
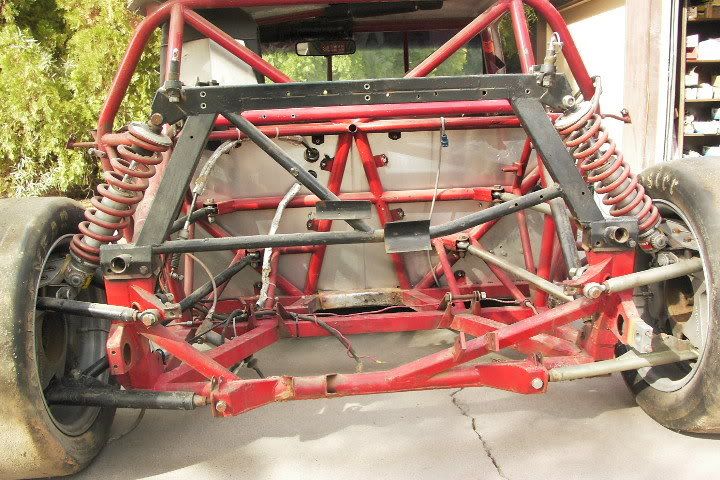
Here I am mocking up the suspension. I have made "dummy" sway bars out of wood so as to check the fit and packaging of full dimention pieces before I ordered them .Only this came from hours on the computer using a spreadsheet(thanks Paul H) to help choose not only the diameter and thickness of the swaybars,but the length of the lever arm also. Once these were speced out,I checked the fit of the wooden mock ups. I also would suggest anyone taking on a project like this to do as much mock up test fits as possible .Even if this means making parts out of wood,paper or cardboard(this my version of CAD---Cardboard Aided Design!),so the fit and integration of everything can be checked before some parts get fabricated,bought or painted.
After confirmation of proper fit,the "real"parts are ordered:
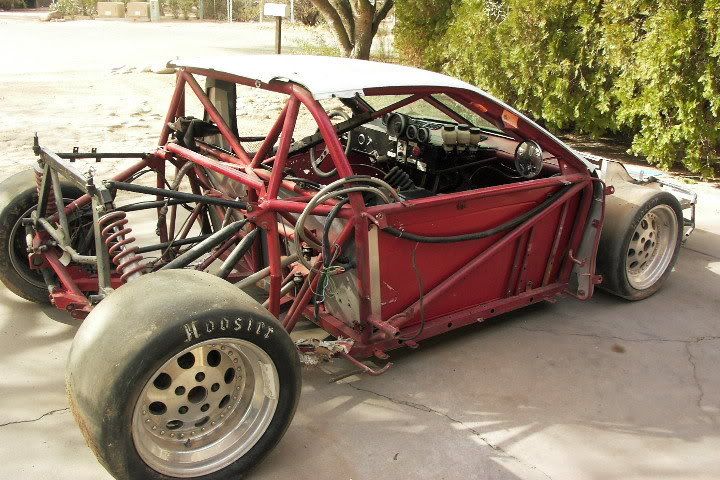
In the background you can see the interior tinwork taking shape. I reused the center "tunnel" that housed the fuel cell. All of the other panels were copied exactly using the originals as patterns. I did not reuse many parts due to them either being damaged (multiple holes drilled) or worn down. I may miss some details of what was going on in some of the pics as some of these were taken 1 to1 1/2 years ago,so if there's a question,please let me know.
Here are some shots of the little details on the chassis coming together like oil cooler,engine cooling pipes,rear window,etc..:
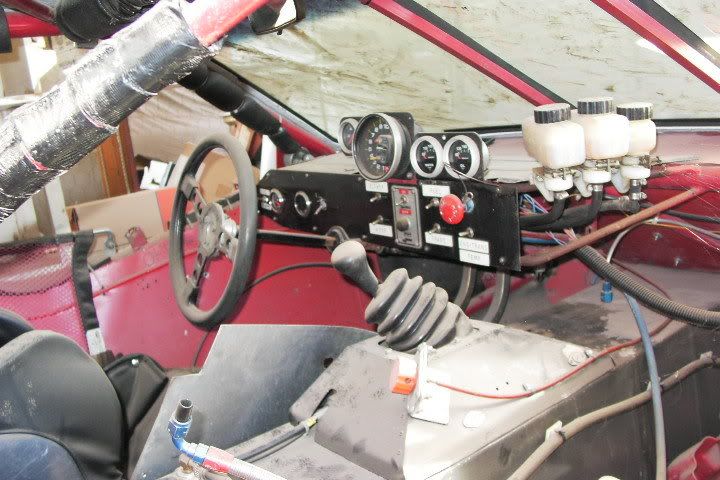
Next will be the interior,dash panel,and mounting the body(after 7 months of waiting,numerous phone calls,and even threats of legal action!!)
Here's the interior in it's final mock up.Yes I do like to make everything out of cardboard,even the gauges. I spent a long time in the seat making sure things like gauge placement,shifter location,switches,pedals,etc.. were thought out as much as possible(yes,there were a few late nights making engine noises and shifting gears trying to imagine what this beast would be like on the track!)
Now came things such as radiator support,radiator and brake cooling ducting,and start on hanging body panels:
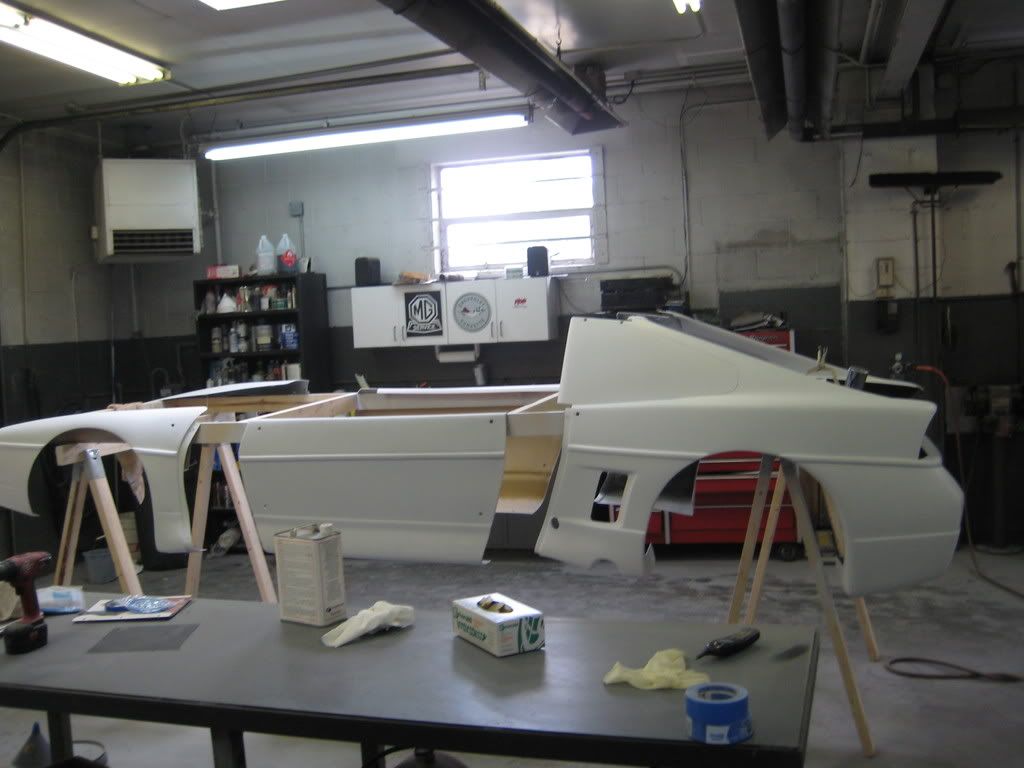
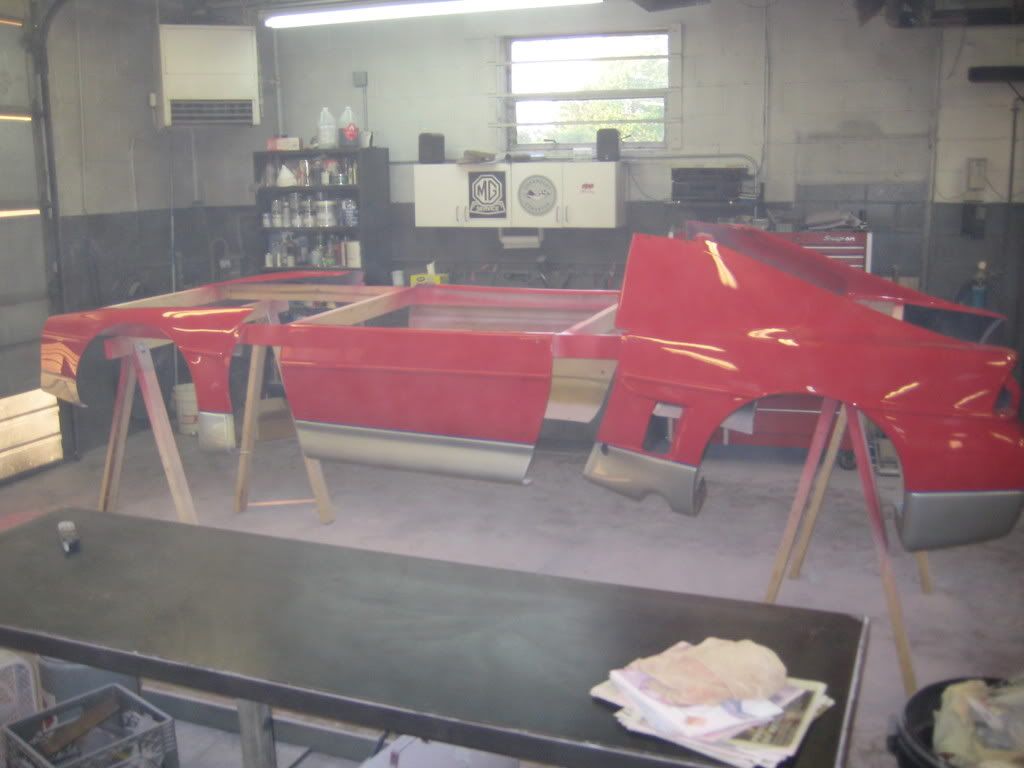
On to hanging the body,which took some effort to get a reasonable fit. Being a racecar body,some of the panels are not equal side to side! For example,the rear quarter flares are 3/4in wider on the right side than the left and the right front fender is longer than the left!! So just squaring up the body to the centerline of the chassis would not work as the wheels would rub on one side and have too much clearance on the other .It is more important to have the chassis and suspension square and even side to side so a compromise is needed. Then comes the task of getting the panel gaps acceptable,I know it's a racecar,but I just could not let some things go. Many hours of shaving or adding fiberglass to panel edges left me very itchy,but happy with the results. I'll post those pics tomorrow as I probably put up enough for everyone today!!
DGP may have been involved in the initial development of the race bodies and supplied the street versions of the IMSA Fiero,but as far as I know,Huffaker had the moulds and was the firm one would go to to purchase body panels.Then later on, later 1987 to 1988,they widened the front and rear flares as IMSA allowed wider track widths and made their own moulds for them.These are the moulds that my fenders and rear quarter panels(Paul Hosler's as well) came from and they still have the DGP numbers cast into the lower edge.Huffaker later sold the moulds to Jack Ondrak and another gentleman in California. As far as the Centerline wheels,they only would fit the race car suspension as the race uprights used wheel hub/bearing units from the larger full size cars.The bolt pattern is larger than stock Fiero.
Quick note Dave,, this is the Huffaker car with the Whale tail at DGP's garage right after they finsihed painting it and stickering it. I have plenty of photo's from DGP's records like this. Rick B
Maybe DGP made the bodies,but I think Huffaker was the one that distributed them to much of the racers.The guy here in NJ that built his car from the plans bought his plans and body panels from Huffaker directly. Then later Hufaker may have made his own set of moulds as his rear quarter panels and front fenders were 1 1/2in wider in 1988-on. Also,a "Huffaker" door panel for the driver's side did not have the "return" on the upper flange as "his" cars(the STP/Goodwrench racecars) used a NASCR style doorbar for increased driver protection as opposed to the minimal door bars as on the original drawings(and on my car). All the later genuine Huffaker cars(1988-1990) also used the NASCAR doorbar,as seen on cars such as Jack Ondrack's. I'll try to get a Pic posted up
P.S. My "discaimer": I never claimed to be an "expert" on these IMSA cars. I got my info from Terry Satchell,John Callies(through Paul H),Joe Huffaker JR,Jack O. and others,plus hundreds of photos and my own car Some facts may have been blurred by the passing of many years,so I can't claim all to be totally accurate. So if something sound incorrect,I'm all ears!
I appreciate all feedback and hope you all enjoy these pics as much as I do posting them.
This is great work you' ve done here, the build looks excellent. How does the structure compare to Paul Hossler's car? Is it similar geometry or have you guys come up with your own plans?
Ok,finally I got all the body panels from all corners of North America and I could start on building the mounting brackets. But before this I had to decide what body I was going to use.There were 3 body types used on the Fiero roadrace cars throughout the years:1.The original knotchback as on the cover to the Performance Plus guide(complete with opening driver's door).This was only used for a very short span 2.Knotckback "pacecar" nose(the nose most commonly seen and used on all of the rest) as used with the Huffaker "STP Son of A Gun" cars through 1986. 3.Fastback narrow body as used with the Huffaker "Goodwrench" cars through 1987. 4.Fastback widebody-from 1988 and up,Huffaker did not have the GM sponsership and the cars were raced by guys like George Robinson who brought their own money to the table. As a result,Huffaker continued development of the cars and changed both the chassis and the body with the cars sporting longitudinal V6s,heavily revised front and rear susepnsion,and front fender and rear quarter flares stretched 1 1/2in per side.Since I knew where the moulds were for the later(and IMHO the more aggressive looking) wide body fastback body,this is the style I went with.
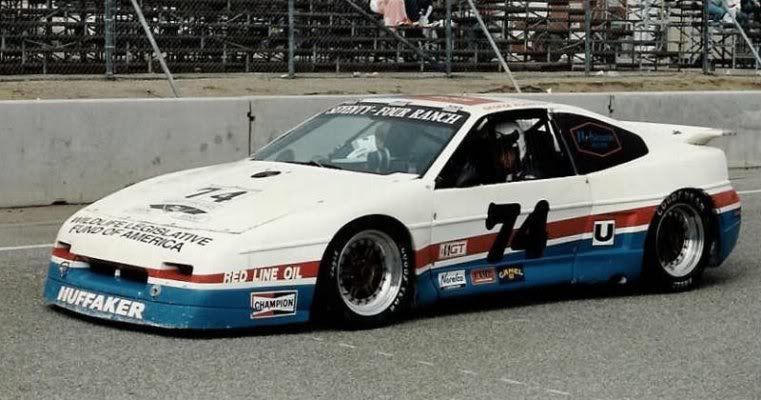
1987 narrow body fastback:
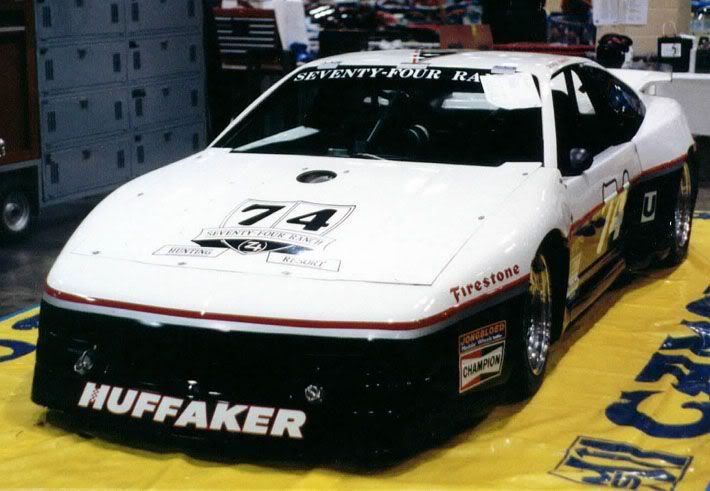
1988 wide body fastback with George Robinson's "74 Ranch" sponsership:
1989 widebody still with Robinson
then Jack Ondrack took some wide body front fenders and made them even wider still for another set of moulds!
So as I started to hang the panels,the car really came to life! It was almost 2 years from when I started and I was beginning to forget how it looked!
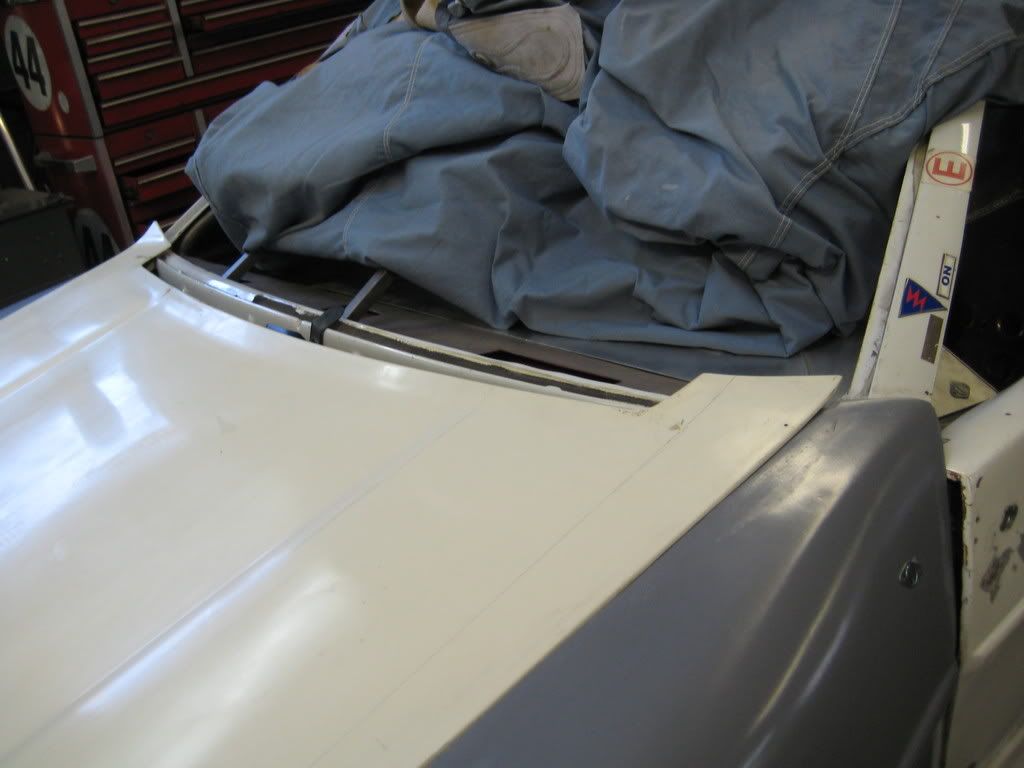
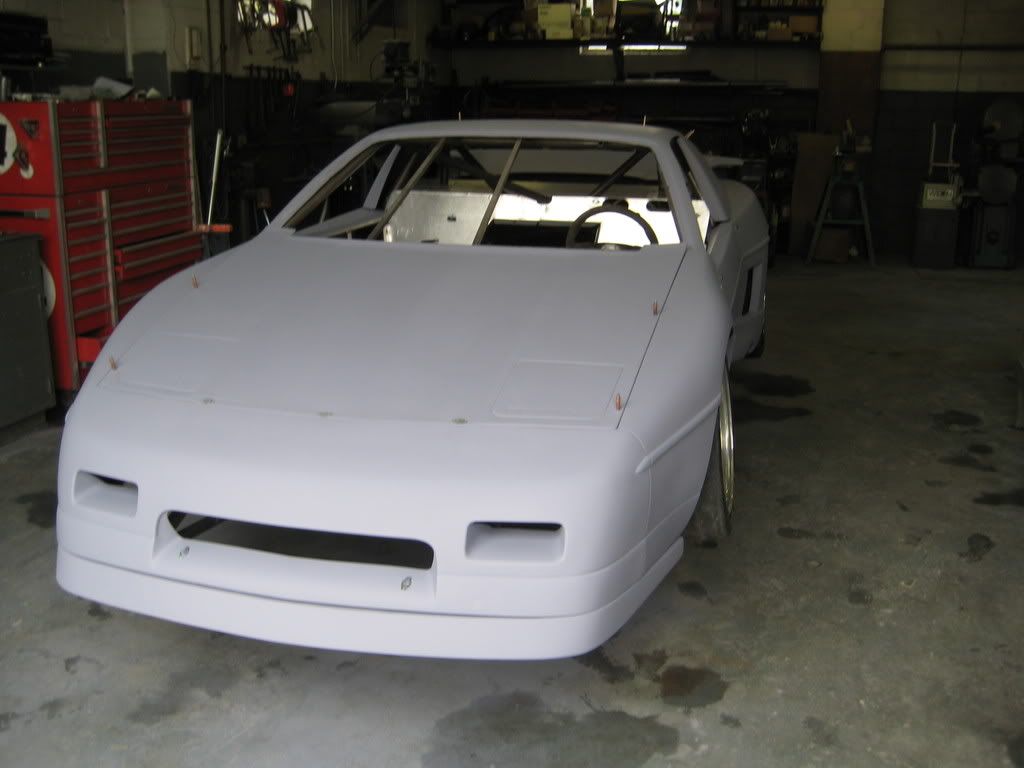
But I think the best day up until then was the day I put it on 4 wheels for the first time and rolled it outside!! Little details such as taillight mounts and rear diffuser: If you notice,the hood in those first pics have a black hood,after that I came across brand new,never mounted Pontiac Motorsports hood and doors which are white gell coat.The hood fit perfectly and had the correct "pontiac" logo in the headlight door and the original style doors just completed the body. BTW the original Motorsports fiberglass is VERY thin cloth,while the rest of the body is thicker chopped mat(which I like better as it will hold up much better to track use) .
Here is the "new" hood and stripping 14 coats of paint from the roof!! You can just make out some red as when Jack bougth the car in 1992 and I did find the original coats of silver just before I got down to the gel coat.
I even tried my hand a pulling some moulds off the fenders.
After much tweaking of body gaps with fiberglass resin,mat and filler and sanding,sanding,and more sanding!! Here she is finally all in one color in primer!!
Next.............onto final paint(after lots of wet sanding!),wiring,plumbing and assembly! That's when the money really disappeared!
Paul,I thought I sent pics of that experiment.They weren't pretty but I think I could pull some parts from them.I never made moulds before so I thought I'd try my hand at it.Wow,I totally underestimated the attention to detail needed to make a mould! I guess practice makes perfect,so maybe this summer I will have some time to try again. I have one spare fender and quarter to use as plugs. I think in the end I will just try to pull the trigger and by those moulds in CA.
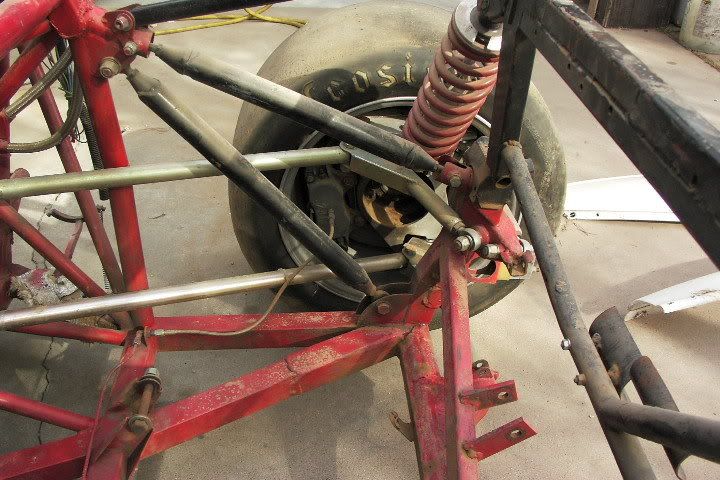
The front and rear suspension uprights were made by Bell Axle Co. as designed by Pontiac. Terry Satchell wanted to keep costs in check. Where a "real " upright for a mid-engined sports racer (Lola,Spice,etc...) were very expensive per corner, he designed these uprights to use the less expensive hub/bearing units from the fill size front wheel drive sedans and S-10 truck(front of 4x4) with the larger bolt circle. These uprights even carry a GM part number! The bearings could be used off the shelf,but Huffaker would disassemble them and "blueprint" them to get the freeplay where he deemed acceptable.The best hubs to use are off the very early "E" body(V8 powered front wheel drive Toronado/Eldorado) as these units did not use ball bearings,but tapered rollers. The tradeoff in more drag was a bearing that handled the increased loads encountered on the track.
P.S. Ok,so I can build a car,but I never claimed to be a great typist or speller!!! I just realized that I misspelled the title to this thread!! It should be "restoration" not resoration"!!!!
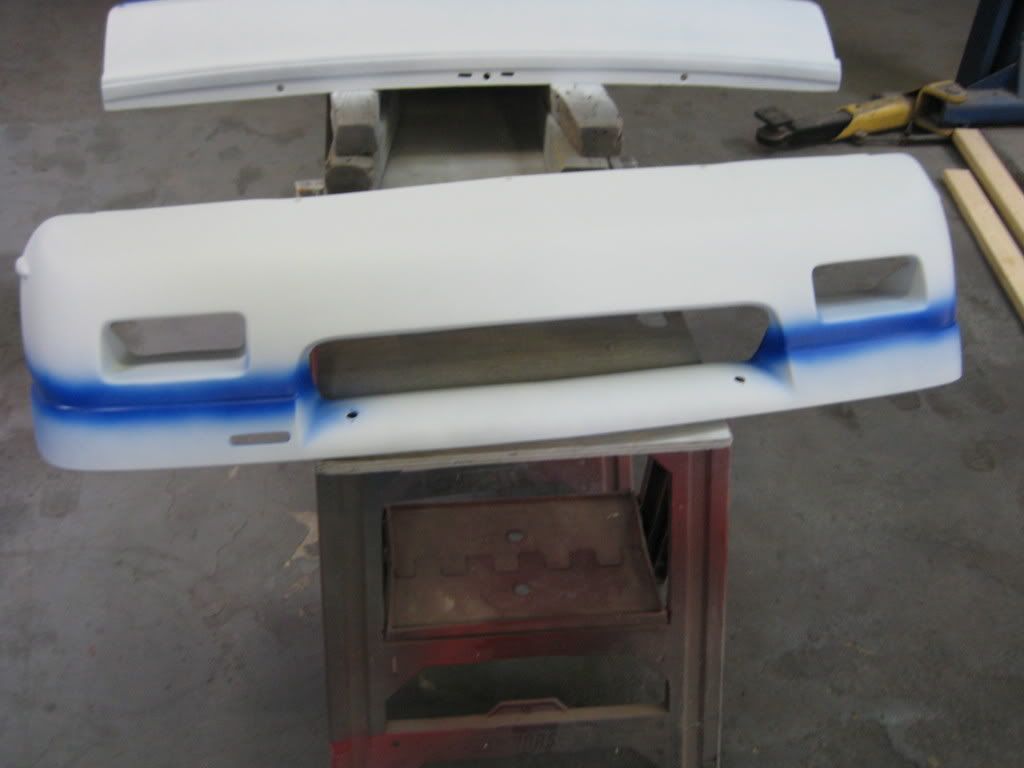
After all the sanding,prepping,and more sanding on went the white sanding sealer. Then I laid on small base of blue for the stripe,waited for it to flash off then masked it with 3/8 vinyl striping masking tape.
I then masked of the top and sprayed on the silver,let it flash off so the bottom can then be masked off for the red. The silver is just GM code 13 silver and the red is GM code 9075 Torch red.Let me tell you,this red is bright in the sun! It makes Viper red look pink next to it.After all of these steps,the masking comes off and the clear goes on.Yes the haze in the pictures is from painting,and yes I do have a full respirator.Since I paint in the shop with out a booh,I just wet the floor down and put a few extra coats of clear on so I can wet sand and buf any dust on the clear.I have seen cars come out of high dollar spraybooths with dust and bugs still getting in the clear!
Also around this time I painted a set of wheels gold from the black they came with.The outer rim shell were then polished. I could not make up my mind which I liked better, gold or black centers. The gold look great,but the black is easier to maintain with the large amounts of brake dust from the racing brake pads. In the end I left one set in black and one set in gold.The wheel are Jongbloeds(pronounced Youngblood) and were used on many GT and GTP cars in the 80's.They are magnesium,so they must be crack checked every couple seasons or especially if involved in a shunt on track.They measure 16x10 in front and 16x12 in back with the tires being 23/11-16 and the rear 25.5/12/5-16(height/width & rim dia).
Then there is the cu$tom fuel cell.........Wow I had no idea the price increase for them. Ever since the war started,all ballistic fibers went up over 300%,so a cell that cost $1500 2 years ago now cost over $3000!! After the extra fees for custom design on CAD from ATL,all the options(fuel level sender,in tank pump with integral surge tank,etc..) I think the final cost was near $3200.But at least they put my name on it!! Next time I will get to the plumbing and assembly
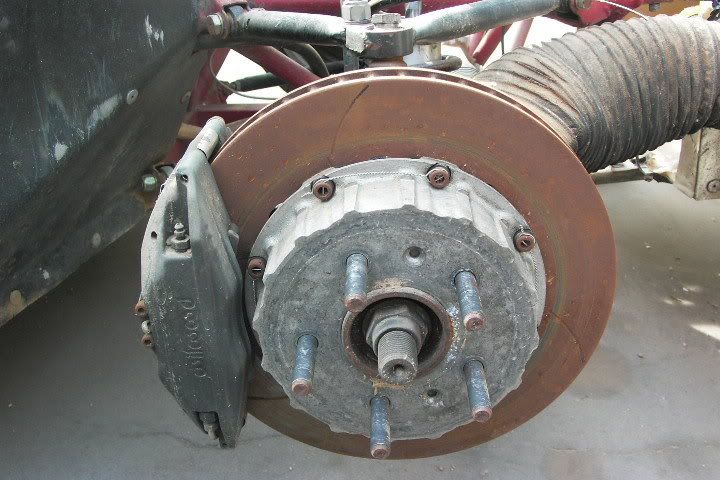
Onto the build up.It was getting more enjoyable at this point as I started to bolt things together for the final time with the parts nice and clean and freshly painted.The engine as I said before is a balenced and blueprinted Z06-LS6 take-out engine from Phoenix racing with 20 hours since the freshening. It makes 405 to the wheels which moves the car pretty well with the weight at 2250lbs with me in it.I have a head and cam set that should push output to 475-485 to the wheels,but I want to just spend a full season just concentrating on chassis set up and getting comfortable in the car.I chose MSDs stand alone ECM kit as it comes complete with wire harness and is user programmable.I had to extensively modify the harness as it is really set up for a front engine car with the ECM to be mounted under the dash. I have a mid engined car with the intake manifold turned around. All told,I love the system! It's easy to work with and is so small,it was easy to find space for. Actually, this unit from MSD really started life as a GM Performance Parts stand alone ECM for crate engines!GM sold the production rights to MSD when the crate engines chaned over to the new style relucter wheel with the different ignition reference pulses. The headers have been coated,the shift linkage that slides alongside the engine was hard-chromed for less friction and wear and the suspension has been hung. I converted the clutch actuation from cable to a push-type release cylinder.The suspension took a week on it's own to install and set up as everything is adjustable. After a rough static alignment, the bump steer must be graphed and adjusted on all 4 corners,getting both front and rear wheel pairs at equal settings(it takes alot of patience!!) The brakes are installed and bled. if you notice, I am not using the smaller brakes that came with the car.Instead I am using Alcon B-type calipers with 13x1.1 floating rotors all around with a 3/4 bore master cylinder in front and 13/16 in rear.This setup hauls the car down from 160 very well.
The mufflers are from Coast Fabrication and are the same ones as used on Daytona Prototypes.They work so well in fact that i was almost dissappointed when I started it for the first time as they are too quiet!.The radiator is a Ron Davis double pass unit and I have since come to the conclusion that I may have oversized it a little,but that's not a bad thing! Also mounted up is the engine oil cooler plumbed that takes in cool air from the side duct in the quarter panel.The air filter gets it's air from the duct on the opposite side.
In the driver's compartment I finished the wiring,gauges,fuel lines, installed the Accusump,the ECM and the brake and clutch reservoirs, Completing the gearshift linkage is a shifter I fabbed up that is modeled after sports racers and GTP cars,only had to be designed for the Porsche's shift travel,not like a shorter throw Hewland race trans. This will change this winter as I convert the 930 box to dog-engagement.
Next...........The unveiling roll-out and first couple track days!!! Enjoy, Dave D.


 ]
]


 This is excellent