I'm going to leave this in general because I'm not going to get into specifics for the most part on how we did things. I'll more focus on WHY we did some of the things we did and what was behind what we did. But before we can do that, we have to go back.
Long ago, in a galaxy far, far away, an idea was born on PFF and with Archie to make a Roadster version of the Finale. I liked the looks of it even though I know it's a completely and totally impractical car. From that thread, this was the inspiration.........
That's the image that piqued my interest and I was looking for something new to build. I called Archie and we talked about it and he started getting the molds ready for the first customer car. In the meantime, I was looking for a donor. I had a couple of chassis around, but didn't want a V6 powered car. Then I remembered that a few months before that, a kid had called wanting to sell me his V8 SBC powered project that he couldn't finish. I posted a thread about that car at the time in then mall but nobody was interested at his (admittedly too high for the condition) asking price. I couldn't find his number to call him back, but while I was thinking about it he called ME back and asked if I knew of anyone as he needed the money and was willing to negotiate. $1,000 and a few weeks later and I had the beginnings of the project.
Not a real looker at this point. An '86 SE that had a 4 cylinder in it orginally, no power accesories, just a regular old 5 spd 4 cylinder car.
The engine was a fresh overhauled 355 (I was told) with a single 4bbl Holley and an Archie Economy kit.
Not what most here would call a "clean install" and it was worse the harder you looked. The valve cover off was a tipoff that they were having problems getting it running, for good reason, as we found out later.
Not only was the interior a truly lovely sight to behold but it had that wonderful "lived in" by many rodents aroma.
When we got it home, we put it on the hoist and dropped the cradle. I'm not going to go into what all was done wrong because, well, it was pretty much everything. We just started over and pretended they hadn't done anything at all. The reason they were having trouble starting the engine was because they had used a Cloyes true roller timing set. These are set up with three marks on the crank and cam gear, each gear having a square, triangle, and circle on them. One is to line up with 0� advance/retard, one is advanced, the other retarded. You have to line up the circle with the circle, the square with the square, etc. They had lined up the circle on the crank gear and the triangle on the cam. I was TOLD it had run a bit, but most likely all it ever did was backfire through the carb, if that.
I decided early on to use a TPI. Yes, I know they don't flow as well as a good single plane intake and carb stock. Yes, I know they don't make great gobs of power. But the DO run nice and, more important, the SHOW very, very well when polished up and shining.
We pulled the motor down completely and degreed the cam to find out what was in it. It was a "no name" (Jegs or Summit) that matched perfectly to a Crane profile. We were also surprised to find it had 400 crank in it making it not a 355, but 383 stroker motor. This I was happy with because many tests have shown them to make close to 400 hp with a super ram intake. I'm using a stock TPI, for the most part, and don't expect anything like that, more along the lines with 300 hp at the crank but, more important, that are great torque motors so lots of fun to drive.
After disassembling, we started cleanup and painting and polishing, with a few custom touches. That will follow in the next post.
With the cradle and engine out, we found a number of things that were done wrong or simply left un-done. As I said earlier, we decided to act like nothing at all had been done to the car and swap.
The cradle was completely disassembled and new Monroe struts purchased, which we immediately hacked up to turn into coil overs. There is ample documentation on HOW it's done, but we ordered all of our pieces from Speedway Motors at Lincoln, NE. I've used them for years and while their prices aren't always the lowest, they're often close TO the lowest and using regular UPS Ground I get overnight service from them. We painted the cradle with black epoxy after sandblasting it. We blasted all of the suspension components and used Reflective Chrome powder coating on them.
I should mention now that I had decided to have only three colors on the car. Red (or variations thereof), Black, and polished and/or Chrome.
The engine was completely disassembled and checked for clearances with new Total Seal Rings and Sealed Power Bearings installed. A few dress up items were installed and the conversion components were cleaned, blasted, and either polished or powder coated reflective chrome.
Reading a magazine I get geared to performance engine machine shops, there was an article about a shop called "Innovations West" in Hutchinson, KS. I decided one day to stop in and meet the owner. Art Carlson is a very nice and skilled older gentleman that specializes in custom engraving of valve covers. He took the time to give me a tour of the shop and what he did. I gave him an example of some artwork and he gave me a reasonable quote for some custom valve covers. I finished the arwork at home, emailed him the designs, and 3 weeks later had the covers, filler, and breathers installed on the engine.
The work nicely on the completed engine.
We'll move on to cleaning up the engine bay and making modifications there next.
When you use the TPI in the Fiero you have to either relocate the TPS and use some sort of linkage or notch the strut tower. Since I decided to go with coil overs there was plenty of room for the strut tower notch, so that's the way we went. I also think it gives a cleaner look than to have the R/C links and such, but that's just personal preference.
Here you see the area roughly marked that we needed to cut out of the strut tower. A little zipping with the plasma cutter and some work with the wire welder and grinder, a few pieces of scrap iron, and you have the necessary notch.
You can also see the opening in the fender panel for the electric water pump we decided to use. In retrospect, I'd use and inline pump in the hose, as it would be easier for future maintenance and repair if required.
We also cleaned up all of the brackets, studs, and other now unnecessary items to smooth the engine compartment area on the firewall, trunk wall, and as shown in the above picture, the driver's side fender panel.
Left side of the firewall
Right side of the firewall. You might also notice the hinge boxes are completely gone. At that time Archie hadn't really come up with a suitable hinge assembly for the decklid and I had ideas of my own for that, so we knew the boxes would no longer be used and just get in the way of the engine installation.
At the same time I was also working on mating the above harness with the below pictured engine harness.
That's all for tonight. I'll try to make 2 or three posts a day until I get to a semi finished state, but have patience as I have several hundred pictures to go through and get organized.
Finish with a bit more on the engine compartment cleanup and back end area........
Pressure and return lines are both -6AN steel braid. The larger line shown is the power brake line covered with steel braid. The smaller line with the fuel filter on top is the tank vent, the evap cannister has been removed. This is a specialty vehicle and I did not try to make it emissions legal in any way, shape or form. In KS, we have no emissions testing or inspections.
Another view of the fuel lines as well as the passenger side engine bay area
The trunk wall was cleaned up, painted, the stock brake lines taken off and the old clamps replaced with rubber cushion clamps (adel clamps). The brake line was also painted a bright silver.
A shot of the engine/trans on the cradle after the transmission has been cleaned up, checked for operation and loose bearing, axle support bearings installed.
The PO kinda/sorta forgot to install the torque rod on his install, so we welded on the bracket on the cradle and reinforced that area[/img]
I chose to use the cast iron, rams horn style manifolds. I wasn't building this for max performance and they last longer without warping, leaking, cracking, and causing problems. They are coated with Columbia Coatings' ceramic DIY coating. You have to spray or brush this on (I sprayed it) and then cure it at pretty high temps in an oven. They will final cure when the engine is fired.
We made our own fiberglass battery box to front mount the battery. Fairly simple, take a block of foam a bit bigger than the battery, cover it with plastic (I used release film) after cutting it at the appropriate angle to fit in the trunk well, lay it up with about 3 layers of matte leaving a 1" lip on the outside, let it cure, trim, and paint.
We also made a small aluminum panel to house a fuel pressure gauge, the fuel pump relay, and a manual overide switch for the electric water pump. We can manually turn the water pump on with this switch or, when it's off, the oil pressure switch pictured will turn it on. The other sender is the oil pressure sender for the Nordskog digital instrument panel we were planning on using.
The panel was wired from a single multi conductor wire so all the instrument wires possible are automatically loomed together. All connectors were Weatherpack connectors for reliability.
Heater hoses were Summit Racing's steel braided regular hose. Really it's just a decorative steel braid over a normal heater hose, but it continues the steel braided theme with the fuel lines.
This isn't the order things were done but I'm going to move to the top cutting and reinforcing of the space frame.
We did ours pretty much the same way Archie did in his roadster build up. Before the top was cut, the reinforcing was added. Of course by this time the body panels were all off.
The gussets were cut for the console and B pillar reinforcement from 3/16" steel plate. Easy to do with plasma. We first made cardboard templates and traced the patterns to the steel for cutting.
We used the plasma cutter to cut out the lower rockers on each side and open them up.
Square tubing was laid in the bottom and angle iron welded in to the rear area then welded all together.
A healthy dose of rubberized undercoating was sprayed on, and in, the square tubing.
The rear area was also undercoated.
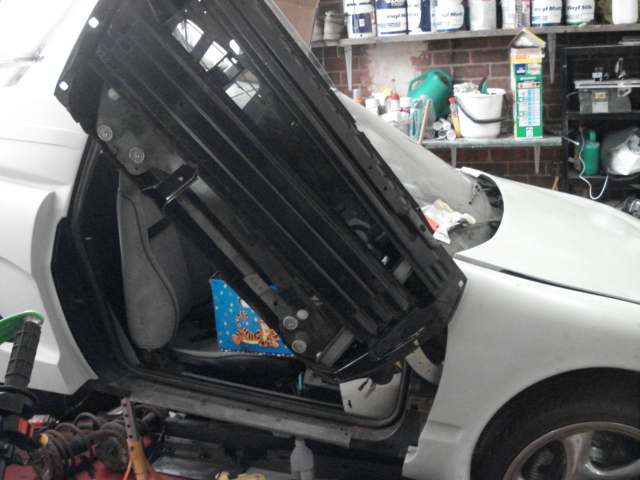
With the inside gussets welded into the car and the rocker reinforcement finished, we're ready to cut the top off the car.
The top cutting was a piece of cake. I taped the rear window on both sides with masking tape and then using my Fein sander with a cutoff blade, went around the window to cut as much of the adhesive as I could. I did this just to get the window out without making a mess in the engine compartment.
I'm going to put another plug in here for the Fein MultiMaster sanding tool. To call it a sander is a gross injustice. I've used it for cutting cured glass, removing windshields, sawing wood precisely, and, yes, even some sanding. The thing is unbelievable in what it can do and if you do any glass work at all you really can't afford NOT to have one. It is nearly identical to the same thing the doctor uses to cut off casts and works with high speed vibrations that will cut nearly any solid object or material but not harm pliable materials, like skin. It will get hot if you hold it aganst your hand, but it won't cut you if you accidentally get your hand in the way. Good machine and very, very well built.
With the top off, these parts are no longer required.
We filled both the windshield header and the B pillars with foam so we'd have something to glass over.
As I said earlier, we made our own front mount glass battery box. We also built a simple but very secure mount and powder coated it chrome. Cables were fine strand welding cables that ran both positive and negative back to the engine from the red top Optima. I'd like to mention here that I have NOT had good luck with Optima batteries at all and won't use them any longer. I know a lot of people rave about them, but after spending way too much money on them for batteries that don't last any longer, if even as long, as cheapo Exides, I'm not throwing my money away on them any longer.
I also removed the shifter, completely rebushed and cleaned it up, and installed Rodney's short shifter.
Here's a shot of a couple of things. First, a new clutch slave cylinder and boot. You can also see how we did the coolant crossover. That's an aluminum pipe and the picture was taken before it was polished. Last, we ran into the common problem with an Archie V8 kit of not having the proper slave cylinder clutch throw and finally decided we actually DID have enough throw on the cylinder itself, but the pushrod was too short. We were going to make a new one on the lathe, but I had a junk 2.8 V6 in the shop and picked up a pushrod from it. After measuring, it was within .050" of being the right length so we stuck it in and it workd perfectly.
The back end is pretty well taken care of so we moved to the front end. Other than new bushings, shocks and ball joints, we weren't really going to do anything there except we cut one coil from the front springs. We later leveled the car using the rear coil overs to get the stance we were looking for. Along with the earlier pictures of the suspension components, here's a shot of one side of the knuckle with the 12" 'vette brakes mounted and everything painted and powder coated.
We also added a rear sway bar. I machined some aluminum plates to lower the rear mounting points just a touch and give a more solid mounting point for the sway bar bushings.
On the front end we start with this
Move to this
A little paint and powder coating
And finish up with something looking like this
The underneath of the car was undercoated, brake and clutch lines cleaned and painted, and the coolant tubes painted with Hi Temp silver paint. Many of the details like the cross members and small items were powder coated chrome as well
[This message has been edited by jstricker (edited 03-25-2007).]
Very interested in how the supports hold up after some miles are put on it. I think this is the way to go and leaves the underside of the car clean and neat.
this looks great...you do very nice work. be sure to stop by the previous owner's when it's all done to see what his car now looks like. He'll wish he had never sold it.
Which supports? The control arms and things like that? If so, I can tell you how they're going to do.......a little better than paint as long as they're kept clean. The surface, being powder, is actually tougher, but the reflective chrome tends to stain if not kept clean.
I should mention that when I built the car I built it with "SHOW" in mind, and little real, regular "GO". Reason being that since it has no top at all it's pretty much going to have to be treated like a motorcycle and a toy, so inclement weather on the undercarriage shouldn't be a big deal.
John Stricker
quote
Originally posted by Jake_Dragon:
Very interested in how the supports hold up after some miles are put on it. I think this is the way to go and leaves the underside of the car clean and neat.
I'm confused as to which previous owner you're talking about?? The kid that owned the orginal car was having to sell it to pay his DUI fines, that's why I got it for less than 1/2 what he originally wanted. Last I knew, he had been busted again and didn't have a license and won't have a license for another year or two......
There you are kids, a lesson for you, drink and drive and you have to sell all your Fieros and can't drive them anymore. Here ends the Public Service Announcement.
John Stricker
quote
Originally posted by BH2OFiero:
this looks great...you do very nice work. be sure to stop by the previous owner's when it's all done to see what his car now looks like. He'll wish he had never sold it.
Ditto motoracer. Mine is an AD355 and I'm not satisfied with the minimal frame reinforcement that was done to mine. Do you have any idea how much weight the frame reinforcement added?
To be honest, I really don't expect those supports to be any problem at all. You can see the pictures of the supports along the tunnel. This picture is actually of the belt retractor mounted but you can see how high up the B pillar we came with the support. It wraps around on the bottom right up to the edge of the seat belt mounting bolt.
In this picture you can see how high we came up with the plating on the back of the console. It worked out so that the ECM mounts just between the plates and we just put some slots in it so it slides in.
The rear plating going up the firewall is solidly welded to the plating on each side of the tunnel so that's all one piece and the rocker reinforcements are nearly directly tied into the B pillar supports. I really can't imagine them breaking out barring a major collision or some other trauma.
reapermedic,
The picture does look like that. It's my entirely new suspension design for a drag race only car. Drag racers don't turn corners anyway. (it's just an optical illusion from the camera angle)
Joe & Dratts,
Weight wise, I'm sure that we did NOT lose any weight in the subframe after the reinforcements. We may have even gained a few pounds. There will probably be slightly less overall total weight because we don't have the roof and rear quarter body panels and, of course, no rear window.
The torsional rigidity amazes me. First off, as far as simple bowing, we reinforced everything before we cut the roof, of course. When we did cut it, we cut the windshield header first and to my amazement, when we got to the end of the cut the car did not bow enough to bind the sawzall blade. We then put three tractor front end weights (90 pounds each) on each floorboard, driver and passenger side, and my hired man got in on the driver's side (the two of us probably weigh 425# or so) and I got into the passenger side and we jumped up and down. We could not measure any bowing flex whatsoever.
I was happy with that part, but was a bit concerned like you about the torsional rigidity. We noticed that when we put it on the lift that often one of the 4 arms would always be lose. Just enough that a 1/16" piece of paneling would take up the slack, but not tight. When we had it painted, the painter set the car up about 24" on jackstands to paint under the nose, rockers, and rear valance and one of his stands was always lose to the point they had to go get door shims and shim it to keep it from rocking when he was using a tack rag and such. I was pleasantly surprised by how rigid it turned out.
If there are any more questions, yell out. I'm mostly just trying to post the "broad stroke pictures" but if you have anything specific you see that you're curious about I'll be happy to try to respond.
John Stricker
quote
Originally posted by Jake_Dragon:
I was talking about the supports welded in to the rockers and the fuel tank tunnel.
Well, I'm going to try this again since I just completed a post and my ISP decided to take a dump and lost it all.
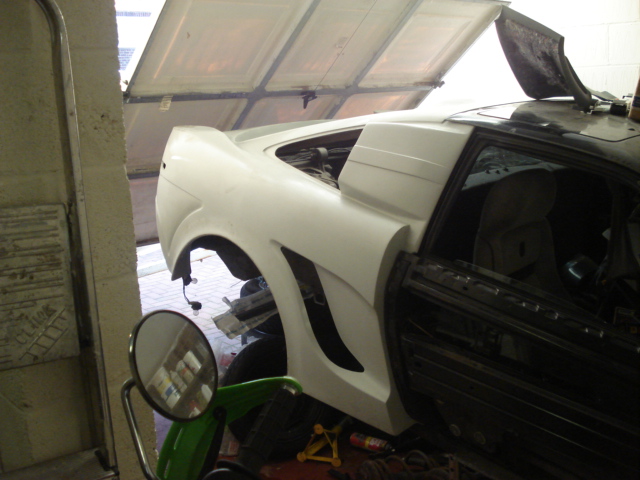
I'm going to get into some Finale/Fino specific chassis modifications. The biggest things are with the front and rear of the chassis. At the rear, all of the bumper honeycomb and structure with the exception of the main beam needs to be removed. The main beam needs to stay because that is what the rear body mounts actually attach to.
In the front, there needs to be some trimming of the sheet metal in the area under the headlight buckets. The metal needs to be trimmed on the side, and front, after all of the front bumper honeycomb and other miscellaneous brackets are removed.
This picture will show a good view of what needs to be trimmed.
You can see that the front needs to be trimmed back, even beyond in areas where the crossmember in front of the radiator support mounts. The side needs to be trimmed straight off.
This shows how the front needs to be trimmed back. If the front frame rails aren't trimmed as pictured, they will hit the headlight openings of the Finale front clip.
One more shot to give an idea of the trimming required.
About this time, Archie called and said the first Roadster body was out of the molds. We discussed shipping the kit and since I had a Crash/Fire/Rescue class to attend in Des Moines in a couple of weeks, and that's almost 1/2 way to Chicago for me, I decided to just pick up the kit myself.
There's always something interesting to look at in Archie's shop. This was back before he had moved into his new shop and, in fact, he was in the process of negotiations to buy his new building that he's in now at that time.
There are always a few Fino's and Finale's sitting around.
The area above used to be completely full of Fino and Finale parts
This was before Archie sold the GT4T
And a Lambo kit in the shop for some work. I always thought I'd like to do one of these, but I don't think so. Look at how the cowl of the kit overhangs the master cylinder, A/C, and all that stuff. Wouldn't THAT be a treat to work on?
Hi John, your build is looking fantastic a great eye for detail. Do you have any more pictures of how and where you mount the various body parts. I have stripped off all of the body pannels, I used the photos you posted to cut the front and have test fitted the front clip I could just do with a few more photos and bits of advice on what was easy and what was hard. Thanks again Carl
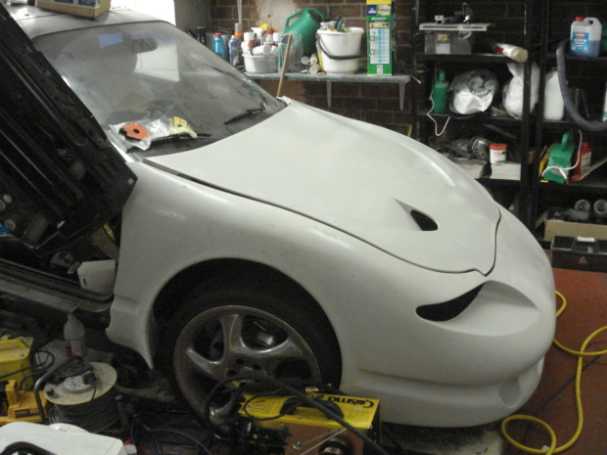
You can either leave the front hood vents closed or cut them open. If you open them up, follow the guide marks molded into both the top and bottom skins. The marks look nothing alike and just to look at it you'd think it was screwed up on alignment, but they do line up when they're cut out.
You can also see the pour foam between the skins. I like to pour the foam in then cover it with tape so that it expands firmly between the two skins and adheres well. You then have a solid surface to glass over instead of an open hole.
I had also decided early on that I'd have shaved door handles on this car as well so the Door Handle recess on the door skin had to be filled.
Again, this was done with pour foam, then glassed, the filled and sanded. One thing to remember when using pour foam under glass is that the foam will out-gas for quite some time (actually weeks) so you should leave a way for the gas to escape. We try to do that by leaving holes on the back side, covered with tape while the foam is poured and setting up, then the tape removed to give the gas a route to escape from. I've seen examples of serious delaminations if there is not path for the gas to escape.
You also have to cut out the opening and glass in the license plate recess in the back of the car.
Always remember the more care you take NOW, when you're glassing, the less sanding you'll have to do later on, and you'll have plenty to do under the best of circumstances.
Everybody makes mistakes, this was one of mine.
I decided to close those little "decorative" holes in the door skin and the front fender because they served no purpose. Archie told me he didn't think that would work, but I knew better. When the car was together, and panels adjusted, the door wouldn't open fully without that area hitting the fender so, out came the sander, the foam and glass came back out, and it was back to the way it came out of the molds.
On the first Finale we decided to leave the "UK Style" license recess alone but on this car I wanted the lower valance smooth so we filled, sanded, and glassed that area as well.
I also decided that on this car I wanted to use late model Camaro tail lights. They're relatively inexpensive, you can get some bizzare things from the aftermarket if you want, and they looked to be simpler to install than the Bonneville lights we used in the first car.
Well, they were no easier to install, but they look different. We made a paper template of the opening on a car in the junkyard then transferred that to the Finale body and the Fein sander made short work of the opening.
Of course this was just the beginning because we had to fill the openings above the lights, reshape the inset at the rear of the car so that it flowed well into the light area, and build the recess in the light area, but it showed that the lights would fit and not hit anything in the inside of the car.
Make sure you don't mount the front clip too low. If you do, the hood will not close properly against the gasket. We made that mistake on the first Finale. Mount your doors up fairly early and use them for a guide, but don't actually align things to them precisely because the doors can be moved around quite a bit, front and rear, and even in and out with spacers. The rear clips are usually pretty simple to mount up, it's the rockers, doors, and front end that is more problematic to really get precise.
When you bond ANYTHING together with fiberglass tape or matte, make sure there is no air under your bond or it WILL crack right through the paint. You can't just cover screw holes and other imperfections with filler or micro without some glass over it because it will crack there as well. Other than that, the pictures will all be in this thread, eventually.
John Stricker
quote
Originally posted by northeastfiero:
Hi John, your build is looking fantastic a great eye for detail. Do you have any more pictures of how and where you mount the various body parts. I have stripped off all of the body pannels, I used the photos you posted to cut the front and have test fitted the front clip I could just do with a few more photos and bits of advice on what was easy and what was hard. Thanks again Carl
Yep, I was away working races for the weekend and in that thought I have a question...............
Why is it when you leave for two days and come back you find you're at LEAST 3 days behind in everything? If someone could answer and solve that little problem I'd really be grateful.
The conversion has been well documented in other threads but we did use the 12" Corvette brake swap pretty much as outlined by Bubbajoe, for the most part. Other than locating the caliper brackets and we, too, had rotors with a bevel in them so the concentric rings weren't wide enough as drawn in his plans, there were no surprises. We also used the 'Vette Master Cylinder.
The knuckles and other pieces were powder coated and the calipers themselves were painted with red caliper paint.
OK, back to the bodywork.
In order to seal off the trunk compartment from the engine compartment we needed to extend the reinforcements over as far as possible to the edge of the decklid. We did that with simple foam blocks cut to size, floxed in place, and then glassed over. This will lay directly on the existing, stock trunk seal.
I also wanted the panel recesses in the rear quarter to flow properly into the tail lights. After cutting the opening for the lights, I started filling the existing recess with micro.
The openings had to be cut into the decklid to install the vents. We used our handy-dandy Fein tool for this. The vents came with precise templates including markings for the screw holes. These were transferred to masking tape covered area to be cut.
The vents cost something like $200 but they really set the decklid off.
John Stricker
Although this doesn't look like a big deal, it makes a world of difference in the flow of the body.
The Camaro tail lights are not flat on the edges, particularly the top. They go in and out and round a-bout. IOW, they needed a recess to fit into like the Camaros have. To do that I added 1" foam to the back side of the cutout and floxed, clamped, and held it in place to match the curve.
You can also see that the upper body slots have also been filled with pour foam and are waiting to be glassed.
Clamps are taken off, foam is trimmed, and we're ready to glass over the edge leaving us a 3/4" to 1" lip around the inside of the tail light cutout.
quote
Originally posted by DanFiero:
Bump for some very good and in interesting information!!
The black belts and the actuator we got along with the seats from a wrecked Pontiac Solstice. I don't believe they would work with the stock Fiero mounting points and the actuator is completely different.
After we foamed in the windshield header I carved foam out for about 3/4" back and intentionally made that very rough. I mixed up some flox and filled that area and after dry, glassed it over with two layers of heavyweight glass tape. Then the customary sanding and shaping and sanding and priming and sanding and smoothing........................
My theme throughout this car was smooth. I don't want a lot of things sticking out. I was only moderately succesful in this but it came out pretty well in the header area, I think.
One of the things about the Finale kit that I've never quite understood is the fuel filler location on the body is too far back to use the stock pipes without cutting and extending the filler and vent pipe. I decided on this car to move the filler forward. To do this I cut a square out that surrounded the filler, then cut another piece the amount I wanted to move it. I then reversed the pieces, moving the filler forward and the and the extra piece to the rear. They were glassed with 3 layers of matte on the back of the body and then work started to smooth the outside.
What you see is the opener moved and covered with a thick layer of microballoon/resin mixture (called micro) then covered with PeelPly fabric to help level and keep it from running as it cures.There was also 2 layers of light glass cloth immediately over the cut pieces to keep the micro from cracking.
After the micro is cured you peel off the fabric (it won't adhere to the resin) and you're ready to start sanding (again).
I like to use 3M's Pirannah Putty for glass work as it doesn't seem as prone to cracking.
This is far from ready to prime, but close enough to see the basic shape.
At the same time the back end of the car is coming along nicely
Notice how the panel inset now flows into the new tail light openings.
I have another modification in mind for the rectangular section between the tail lights
Tail lights mounted and in to get a sense of the rear view, although still without a wing........
More in a bit........
John Stricker
Edited to add this was my 8000th POST
[This message has been edited by jstricker (edited 04-04-2007).]
Since I forgot to show them in the last post here's a quick shot of the tail light brackets. Very simple and basically scrap metal.
I glassed in the side vent screens BEFORE I mounted the rear clip and did that simply by mixing up some flox and after forming the mesh to fit the opening, floxing it in place. Trust me, it will NOT come out.
It's time to work on the wing. The car looks naked to me without it.
When I picked up the body kit from Archie there were several wings there and I happened to get a not so good one. For some reason it was very rough and warped. I thought about calling him and having him send me another one (I later mentioned it to him and he was a little cranky at me for NOT calling him) but decided to use this one. First thing we did was cut out the area for the third brake light to blend it into the wing. I thought about doing it several ways but this is how we did it on the copper Finale and it worked well so why screw with success?
You can see the cutout for the light as well as the starting of smoothing and filling the seams which were very rough. Like I said, I grabbed a not so good one.
Other side, and you can see the LED Strip
Third brake light LED Strip. I think this thing cost me $20. You don't want to know what the one in the copper Finale cost in '02.
I don't have a picture of my "forming" of the wing itself, but this picture illustrates how it was done. I put the wing on the car and bolted it down on the driver's side. There was about a 1/4" gap at the rear of the wing mount area on the passenger side when this was done. I sat one of these tractor front end weights on the wing along with 3 more 25# bags of lead shot as close to the edge as I could. This twisted it into shape. I then put 4 heat lamps around the wing and let it get war. REALLY warm. I don't know what the Tg (transition temperature) of the glass used was, but I got past that as you could see the wing relax. The heat was then removed and let cool overnight with the weight still in place.
Once that was done, I used just the one weight to make sure it was solidly placed and began glassing in the wing.
Each side got two wraps of heavy tape, then micro'd in.
IMHO, the most tedious part of the basic kit is blending the wing (it's a PITA to sand on the inside of the sing/body) and the front vent openings.
You might notice a bolt sticking through the wing. Well, as I said, this wing was NOT one of the best and one of the studs pulled out that are glassed into the wing. I simply drilled a hole clear through it to hold it into place until it had been completely bonded, then I filled the hole later.
From here on out for this part, it's sanding, filling, sanding, filling, rinse, repeat. It takes a lot of time and dust and you won't have any fingerprints left when you're halfway through.
I don't think I have any others that show it any differently. The reason ours look different is it had to be modified to clear the recessed tail lights. We had to do pretty much the same thing with the Bonneville tail lights on the copper Finale. Modified as in the pictures, they are very strong and give good clearance for the lights and brackets.
John Stricker
quote
Originally posted by northeastfiero:
Hi john do you have any more pictures fo the rear body mounting bracket. I notice yours is triangular where the bracket I have is not Thanks Carl
Hi John here`s a couple of photos of where I am at the moment None of the pannels have been final fixed or aligned yet. Is it possible to show on some of your pictures where each body part is fixed and pictures of the fastners you have used Thanks all help is welcome Carl
The rear clip is, of course, mounted to the wing mounting pads as per the video you should have gotten from Archie. It is mounted at the front at the two bolts per side as the stock body panels are mounted. In addition, on the roof of the full Finale kit (as opposed to the roadster) the roof I bonded with panel bonder to the space frame and then glassed and filled smooth with the stock roof section you have left. I mount my rockers with simple "L" brackets to the space frame made from 1" aluminum strip and then that is glassed and smoothed with the front and rear clips as well as bolted to them before glassing where the panels mate.
At the front, I have a couple of pictures.
This is a bracket my painter made and I wasn't too happy about because he thought the front end flexed too much. We have NOTHING like this on the copper car and after 40K miles it doesn't show stress cracks. If I were doing a mount like that, I'd have done it differently and cleaner, but by the time I saw it he already had it in.
We also mount the front clip, of course, with all of the stock front fender mounting bolts as well as making "L" brackets to hold it at the proper distance for a smooth transition to the door.
You can barely see it looking up from the bottom with the inner fender liners on if you can see the silver area at the top of the picture.
The rocker panels are countersunk and pop riveted to the lower door jambs. That's pretty much it with regard to mounting the panels. It takes a lot of time to get things to mate evenly and get your door gaps even.
I like the Lambo hinges you have installed although it looks like you have limited space for your legs to get in and out of the car. If you aren't swinging the doors out, you can fill and smooth the "holes" at the front lower door and front fender area. I tried to do that with the Roadster and with them filled you don't have enough clearance in that area to open the doors more than 1/2 way, but with the Lambo hinges you should be fine if you want to smooth the body up some.
Thanks that info helps a lot I have no video as this body is from when candy apple owned the company The lambo doors do open out quite a bit, I haven`t welded the bracket to stop the door closing on itself. J Scott the firebird interior gets deliveredon tuesday it arrived in to the coountry today will post pics when that is done. Thanks Carl
Call or email Archie and I'm sure he can work something out with you on the video.
John Stricker
quote
Originally posted by northeastfiero:
Thanks that info helps a lot I have no video as this body is from when candy apple owned the company The lambo doors do open out quite a bit, I haven`t welded the bracket to stop the door closing on itself. J Scott the firebird interior gets deliveredon tuesday it arrived in to the coountry today will post pics when that is done. Thanks Carl


 for more
  Nice
Nice