I have a complete 2.8 sitting in my garage getting bathed in pb blaster for a complete disassembly. let me know what photos you want of what angles and I'll take them and email them to you. I have a really really high end digital camera so I can get you some detailed shots if you need them. nothing has been taken off.. Max the Chainsaw simply removed the car from the engine so I'ts 100% as if it was in the car right now EXCEPT for the throttle cables.. I took those off last night.
[This message has been edited by timgray (edited 09-12-2006).]
someone give Back On Holiday a plus.. i can only give one... it makes me happy to know there are still good people out there (like all of you who have helped!)
someone give Back On Holiday a plus.. i can only give one... it makes me happy to know there are still good people out there (like all of you who have helped!)
THANKS!!
Cool, glad you got them. that was the first thing I did when I got home was to check to see if you got it
Originally posted by BobadooFunk: someone give Back On Holiday a plus.. i can only give one... it makes me happy to know there are still good people out there (like all of you who have helped!) THANKS!!
for the cylinders closest to the trunk (rear) from the pass side to the drivers side is 1-3-5 for the cylinders closest to the firewall (front) from the pass side to the drivers side is 2-4-6
using the picture you posted above, you can see the intake valves with the intake manifold off.
so for the forward cylinders, pass side to drivers side E-I-I-E-I-E just flip that around for the rear cylinders, pass side to drivers side E-I-E-I-I-E
(E = exhaust valve and I = intake valve)
all of the above is looking from the rear of the car forward...
if you haven;t done it yet, and the intake is still off, here is a way to set it properly. install the rocker arm and rod on the cylinder you are going to adjust. grab the pushrod down near the lifter. slowly tighten the lifter til the ball is just in the cup of the lifter, and start moving it side to side. as it moves further into the cup, you will be able to move it less, until it won;t move at all. if you are watching the cup it should not have moved down at all. wiggle the rocker a little, then check the wiggle at the lifter end. if none, start the preload from there and tighten the nut another 1.5 turns. the spinning method does not always work too well, the reall trick is making sure you are not compressing the cup on the lifter before you set the valves. with the intqke off, it is actually easiest to just watch the cup, it has a retaining ring with 2 wires going across the top of the cup. when the cup just moves off that wire is when you start counting turns. you will see what I mean as you do it. just be sure you don't over compress the lifters, you should try to get it as close as possible. with no oil in the motor, and it cold, the lifters will compress fairly easily, so you need to watch the cups on the lifters.
if the intake is on, you can do it in a similar fashion. let the pushrod rest in the lifter.hold it with 2 fingers so it can;t compress down,(the guideplate is a good rest) and slowly take up on the rocker. wiggle the rocker side to side , you should feel it hit the pushrod in the little cup it sits in. when there is no play left, then start counting the turns in.
the 1.5 turn in adjustment makes starting too loose on the rocker starting point more desirable than starting too tight.
keep that motor covered!!!!! you don;t want waqter getting in anywhere while the top end is open...... and due to murphy's law, it will find a way in if you don;t cover it. a big garbage bag should fit over the top nicely.
keep that motor covered!!!!! you don;t want waqter getting in anywhere while the top end is open...... and due to murphy's law, it will find a way in if you don;t cover it. a big garbage bag should fit over the top nicely.
taken care of
no progress..ive been working alot cause some slackers got fired and a friend was sick (had a nice 12 hour day yesterday..) then 7 hours today.. then i gotta wake up at 8 am tomorrow for some more.. but i only work till round 4 tomorrow.. so tommorrow i plan on getting ALOT done.
but i did get a nice gift from blacktree, an ignition coil!
oh no.... you need to remove that middle intake and the fuel rail. next step is valve covers, make sure you have everything set correctly on those valves then put sealant on these two spots on each side, put gasket down and torque down valve covers.
quote
does this hose go here?
yes, thats a heater hose for 85-86 v6's. the 87+ changed the design so if you replace the waterpump you might not get that nipple so dont turn the core in with the nipple.
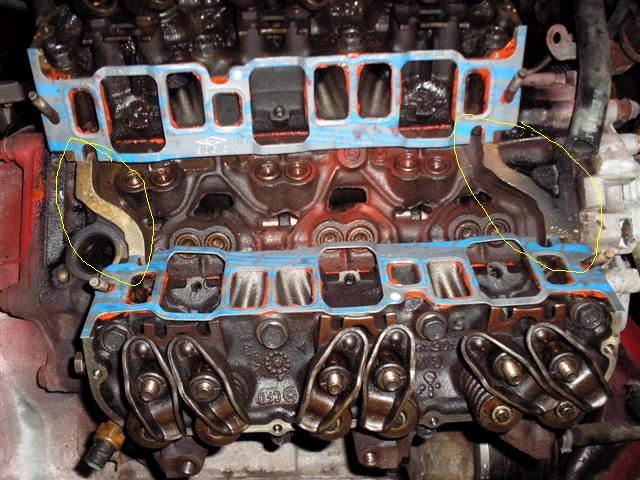
Please tell me you put RTV sealant on the circled area's in this picture that seals up the lower part of the intake, without RTV there, your going to be blowing oil out like crazy.
matthew
funny, i actually didnt the first time i put lower on... then i was looking closely at stuff to double check and noticed a big gap, took it all apart and re-did all of it, and put a nice thick bead there. ths is why i got so little done...
ok so so far all i have heard is valve covers....
should i start with some brackets? alternator? or do those last? i know im not putting the upper intake on untill last.. i still need a new exhaust manifold, egr, and every exhaust piece from y pipe down.
All brackets and engine mounted accessories can go on last. After you get the valve covers on, do the middle intake and fuel rail. You can then start looking at the vacuum lines that go under the plenum since they have to be done before the plenum goes on.
Also, when you put the lower intake on, please tell me you didn't cut the intake gaskets. Since the pushrods go through part of the gasket, you have to remove the pushrods to put the gaskets on. Some people just cut the gasket instead, but that will probably leak later. Since you had to install the pushrods anyway, I doubt it, but I wanted to give you a heads up.
Looks like it's coming along nicely.
Do you have a Chilton's or Haynes book? If so, follow it step by step on the assembly process. That should help a lot. You'll have to read up on the disassembly, since it will probably jump from chapter to chapter for each subsystem, and then tell you assembly is reverse of disassembly.
[This message has been edited by Formula88 (edited 09-17-2006).]
All brackets and engine mounted accessories can go on last. After you get the valve covers on, do the middle intake and fuel rail. You can then start looking at the vacuum lines that go under the plenum since they have to be done before the plenum goes on.
Also, when you put the lower intake on, please tell me you didn't cut the intake gaskets. Since the pushrods go through part of the gasket, you have to remove the pushrods to put the gaskets on. Some people just cut the gasket instead, but that will probably leak later. Since you had to install the pushrods anyway, I doubt it, but I wanted to give you a heads up.
Looks like it's coming along nicely.
Do you have a Chilton's or Haynes book? If so, follow it step by step on the assembly process. That should help a lot. You'll have to read up on the disassembly, since it will probably jump from chapter to chapter for each subsystem, and then tell you assembly is reverse of disassembly.
i have both and yes pushrods are through the gasket
went to put back one on and !!! only one bolt for it!?!? im not sure if i misplaced them.. (i dont think i did..) or if i only had 7.. but i put it there for now ant just started the bolt, then i attatched oil dipstick and bracket
so i searched for the other bolts.. no luck so far.. im thinking i didnt have enuff! anyone have like 6 extra valve cover bolts??
im almost certain i sent all 12 as there arent any holding the valve covers on the donor engine I have sitting, i checked the cleaning solution i threw them in to clean some of the residue off and it was empty also, you might want to double check the blue tape if you havent thrown it out
Yup, middle intake and fuel rail. And the valve cover bolts should be pretty standard, so take one to the hardware store and you should be able to get 'em for a few cents each.
Yup, middle intake and fuel rail. And the valve cover bolts should be pretty standard, so take one to the hardware store and you should be able to get 'em for a few cents each.
this is an oil filter adaptor. It gets two bolts that attach it to the engine block and then you screw the oil filter onto the pipe threads. It should be pretty easy to see where it bolts on if the engine does not already have one on it.
this is an oil filter adaptor. It gets two bolts that attach it to the engine block and then you screw the oil filter onto the pipe threads. It should be pretty easy to see where it bolts on if the engine does not already have one on it.
i think this is egr sensor of some sort? whatever it is its attatched...
cant find the bolt to fit ths anywhere...
also attatched this bracket
and did injector harness
here is my list of needs to get more done: bolt to hold cold start injector new vaccum hoses little cap for fuel rail thing.. near lines ono left side everything from exhaust system except egr tube, buying that off fellow forum member all the sensors from the right side of the lower intake! i have none...
so if you have any parts you are willing to spare PLEASE let me know... i need to get this thing running ASAP!!
[This message has been edited by BobadooFunk (edited 09-19-2006).]
ok, for your fuel line question, the larger one (closer to the front of motor) goes to the filter, it is the supply. the smaller one is the returnline, goes back to the tank eventually. this should help with the 2 sensors on top. the ecm coolant temp sensor goes in the manifold hole just above the waterpump, pointing to the side. clickk for full size.
thecold start bolt is a std bolt,about 3/4" thread length. sorry, I don;t know the size, but it is not anything special.
oh, and I found that taking the decklid off makes working on the engine compartment much easier. just remember to cover the engine so the rainwater doesnt get in there
[This message has been edited by Back On Holiday (edited 09-20-2006).]
yea i dont have a gasket.. i dunno if i lost it or what.. but im gonna pick one up at pep boys asap.. cheap..
and the decklid thing.. doesnt make to much of a difference with me.. i am tall and skinny.. and very flexible
I also want to say thank you to EVERYONE that has donated time, money, parts, and knowledge so far to help me get a running Fiero. Im close... real close.. now i just need to work out all the little stuff and she should be up and running! and i assure you all monetery donations went strictly to the ressurection of this Fiero!
[This message has been edited by BobadooFunk (edited 09-21-2006).]
i still need an egr valve! anyone feeling generous cause due to those 2 im broke
Let me check my garage tomorrow, I removed mine and I believe I still have it around here somewhere. It still works, I don't have tail pipe sniffers over here where I live.