A few updates ... I acquired a '97 throttle body via eBay, cleaned it thoroughly, and replaced the TPS and IAC valve. I haven't decided yet if I'll gut the MAF or fabricate my own connection for the air inlet tube. I still need to research my options on what to use for an inlet tube, but I'm holding off until after the engine is in the car. Convoluted dryer vent hose is NOT an option.
I've also installed the shroud over water pump belt and pulleys, and a few other minor items. And yes, the EGR valve and tubes are installed. In VA, when one swaps engines, it must be an equal year or newer year engine, and all of the emissions controls with the new engine must be transferred with the engine. Don't ask me how it will operate, and I'll tell you no lies.
------------------ "For those who understand, no explanation is necessary. For those who do not, no explanation is possible."
I was thinking about gutting the MAF on mine too but decided to weld some 3 inch exhaust pipe to a flange and put a filter cone on the end inside the side scoop area.
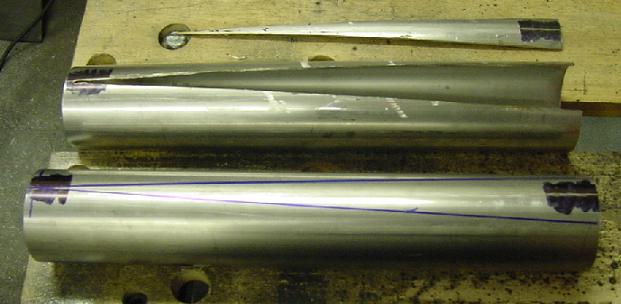
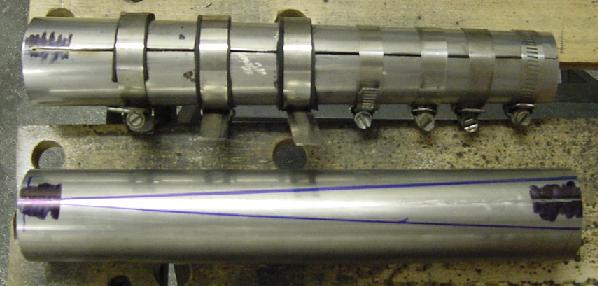
I started making my stainless steel exhaust manifolds this week. I'm going to follow the basic routing of the 2.8L V6 exhaust system ... crossover to the front ... transverse mounted 2-in/2-out catalytic converter ... then two rectangular pipes beneath the drivetrain to a 2-in/2-out muffler. The first steps were to determine perimeters for both large and small ends of the manifold tube, and make some cuts along the lengths of the two tubes.
The next step was to form the tubes into long cones using a few hose clamps.
Tackwelds along the seam between the hose clamps, and remove the clamps.
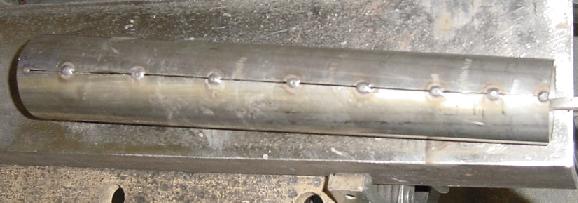
After welding the seam, I had to beat the tubes some with a large rubber mallet so I could get them round again ... they went a little egg shaped on me due to the "draw" of the welded seam. Once happy with their shape, I used a bench grinder to square each end with the centerline of the conical tubes. I tackwelded the first elbow to the small ends, and a scrap piece of angle-bar at the other end. The angle-bar will allow me to repeatedly position the manifold at the same height, and not be bothered with some loose spacers.
Laying out the curved cuts in the next three elbows was not much fun. I'll cut them this weekend using a friend's plasma-arc cutter ... and I'll cut the first three a little long. After I see how much fitting I must do, I may cut the three on the other manifold a tad shorter. I won't know for certain until I'm in it elbow deep (pun intended).
[This message has been edited by WAWUZAT (edited 08-24-2007).]
A single 2" cat seems pretty restrictive to me or were you planning on running 2? Even with 2, 2" seems pretty small. I went dual 2.5" into a single 3" muffler.
Yes, I'm using two 2" lines, and the cat has two 2" inlets and two 2" outlets. The area of two 2" diameter circles is roughly 6.28 square inches, and the area of one 3" diameter circle is about 7.03 square inches. Based on circle diameters alone, the two 2" lines will flow about 90% of one 3" line. Not equal, but the 2" lines are a lot easier to fit into tight quarters.
[This message has been edited by WAWUZAT (edited 08-24-2007).]
Yeah when i did my exhaust i was trying to get away from tapering down into a 3" but couldn't avoid it. It's only 3" for about 4-5 inches though, the rest is dual 2.5". 2" pipes are definatly easier to route though and with that beefy automatic i don't imagine there is to much room.
[This message has been edited by Zac88GT (edited 08-24-2007).]
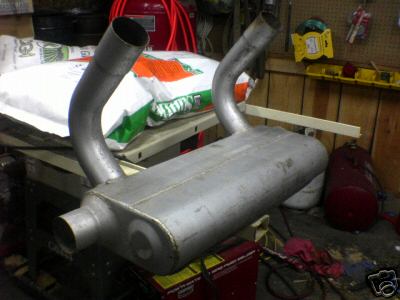
FWIW, here's an advance photo (from the eBay auction) of the Flowmaster muffler I'll be using. The inlets come in through the side, and the outlets are located on the ends ... all 2-1/2" diameter. This muffler was made to fit a '68 Camaro or Firebird. This will sit where the original muffler was located, and that's another area where I'm tight on room because my GT40 body tucks in at the rear. Part of the body installation required whacking off the bottom four inches of the trunk, and now I'll remove more of the trunk bottom.
That crossover pipe on the original Caddy may have measured 2.25" at the round ends, but it was flattened severely where it snakes down and up between the engine and transaxle. That flattend area might have been closer to the equivalent of a 1.5" diameter tube.
Spent a couple days cutting and fitting the elbow sections to the main manifold tube. Then cut openings in the tube itself once the elbow sections were saddled on the tube and their outline could be traced. The plasma-arc machine was very handy for this work. Without it, I would've had to do all the cutting with abrasive cutting wheels since I cannot use my oxy-acetylene torch to cut stainless steel. Here's a shot taken before I tackwelded it this evening.
------------------ "For those who understand, no explanation is necessary. For those who do not, no explanation is possible."
That crossover pipe on the original Caddy may have measured 2.25" at the round ends, but it was flattened severely where it snakes down and up between the engine and transaxle. That flattend area might have been closer to the equivalent of a 1.5" diameter tube.
I cut one apart, and they did a good job at keeping the area constant and equivalent to 2.25" round tubing. That's not to say it didn't flow like a 2" diameter tube.....
Originally posted by ryan.hess: I cut one apart, and they did a good job at keeping the area constant and equivalent to 2.25" round tubing. That's not to say it didn't flow like a 2" diameter tube.....
You cut one up? Interesting! The one aspect of that cross-over tube that boggled my mind was where it was routed on the Caddy. There must have been a lot of heat transferred to the oil pan, bellhousing, and other parts of the transaxle.
[This message has been edited by WAWUZAT (edited 08-29-2007).]
On the rear side, it's 2.25" out of the manifold but on the front side it's less than 2". I'm planning on using the stock rear manifold on both sides, the going to, well, YOU know what.....
John Stricker
quote
Originally posted by ryan.hess:
The stock exhaust is 2.25" (going by the stock crossover diameter). I think 2", even with our shorter exhaust, might be a bit on the restrictive side.
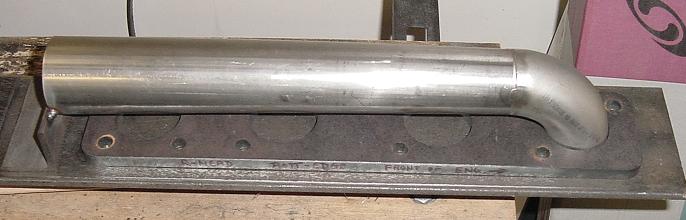
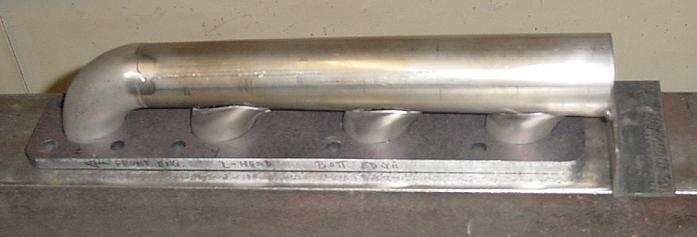
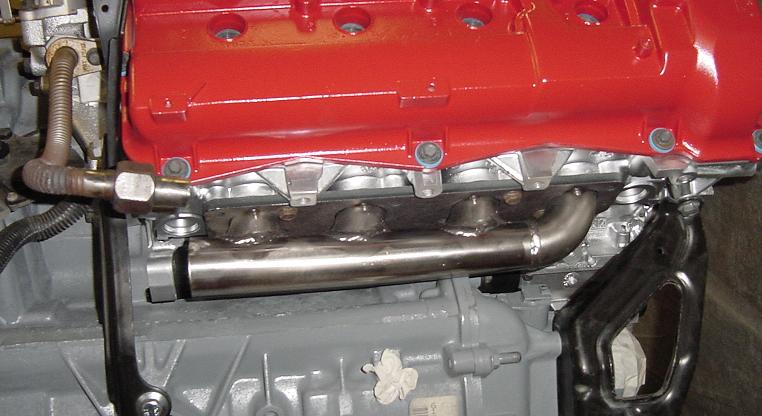
Spent a few evenings this past week & Saturday to layout & cut the main conical tubes where the elbows "saddle" onto them. Finished welding the elbows to those tubes today, and tacked them to the manifold flange. Here's a couple photos taken when test-fitting the manifolds on the engine.
Left head / forward side ...
Right head / aft side ...
------------------ "For those who understand, no explanation is necessary. For those who do not, no explanation is possible."
I've learned that I do not like MIG welding stainless steel too much. That stuff draws up / shrinks a lot. After I finished welding the stainless manifolds to the carbon steel flanges, they both warped a bit. The warpage wasn't there when I made my first pass on the outside, but they curved slightly when I welded the inside diameters. Before anyone asks, I used Type 308 wire for stainless-to-stainless joints, and Type 309 wire for stainless-to-steel. The steel flanges are 3/8" thick.
I clamped the two manifolds together to where they were flat again, then tackwelded them so I could remove the clamps. Then I heated them with a torch to relieve weld-induced stress. I couldn't get the entire flange red hot at one time, only a portion at a time. Still, it didn't work. They sprung apart when I cut the welds loose. So, my machinist buddy is going to get a little job from me to mill the gasket surfaces flat again.
Weather permitting, I'll start cutting my rear strut towers this weekend to make some extra room for the Northstar. I'll post more pix then.
I got sidelined again. I'm getting to the point where I now only hope to get the engine into the car with all the mounts fabricated by the end of the year. Maybe get some more exhaust system work done, too. Then it will have to sit again while I build more suspension parts for Ford Excursions. Folks are sending me all sorts of requests for items for which I've run out of stock, and they're even offering extra $$$ if I'll make those parts before 2008. Last Sunday was lost to getting my Harley ready for pick-up by the winning eBay bidder. Then I spent a few days this week to find and buy a replacement bike. Bought a used '06 Honda ST1300 in Norfolk yesterday. This coming weekend is lost to a wedding I must attend at Ft. Belvoir near DC.
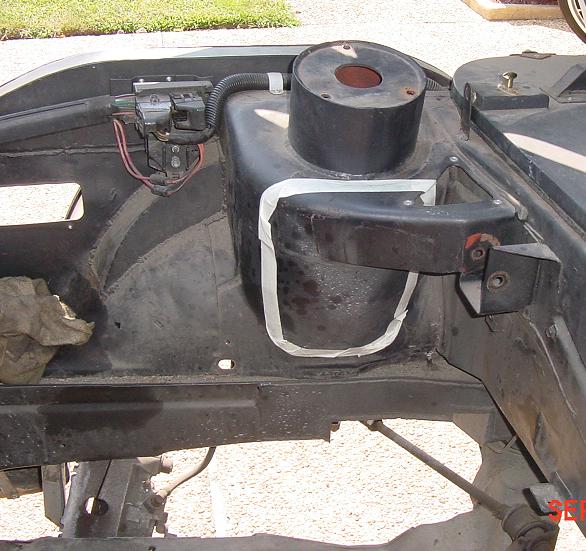
But I did get a little bit done last Saturday. I layed-out cutting lines parallel to the section of chassis immediately below the rear strut towers. Then I cut the towers and removed the old torque-strut bracket. This was done so I can fit some flat 16ga. sheet steel and gain some room in the engine compartment around the Northstar. After these panels are welded in, I'll cut out the front trunk bulkhead, and fab/fit a replacement panel after the engine is in place. Here's a shot of the lay-out work ... after marking the chassis with a scribe, I applied some masking tape so it would be easy to see while using the abrasive cutting wheel ...
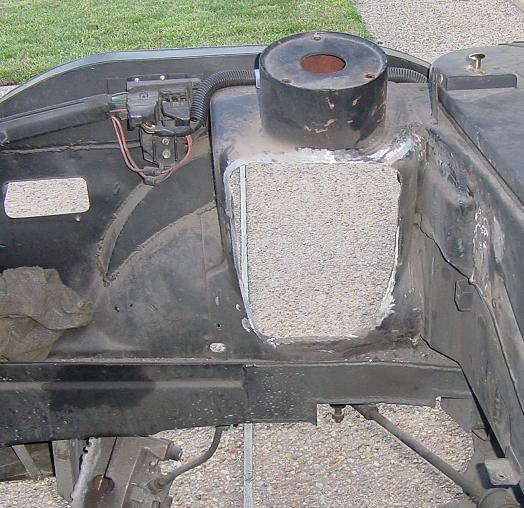
And here's a shot taken after cutting the strut tower and removing the bracket ...
The driver side was also cut in the same manner. I now need to make cardboard templates for laying out the sheet steel for cutting and fitting.
Originally posted by fieroguru: That is taking the lowering of the fiero chassis to the extreme! Good job on the build!
Thanks! I did that about 10 years ago. The GT40 body has enough room for those 3-1/2" tall top-hats. I modified the engine cradle back then by cutting it where it sweeps upward at the forward end, and welding it back together in a straight line (no more upsweep). I also modified the rear cradle mounts to allow for the 2-1/2" higher position of the entire drivetrain. If you look closer, you can see where I notched & boxed the chassis to clear the axle & tie-rod.
OK, I'm making progress again. I fabricated & welded panels onto the strut towers, and will post pix soon. I also have started fabricating brackets that are bolted to the engine/transaxle that will be used when I complete making the motor mounts. As soon as these brackets are ready, I'll pull the cradle and start introducing it to the new drivetrain. I anticipate installing a total of five mounts using polyurethane bushings.
I looked at the Spintech website, but could not find any oval or rectangular tubing. I't just as well since I'll have to fabricate my own anyway because I'll need to have the rectangular tube make a turn/bend.
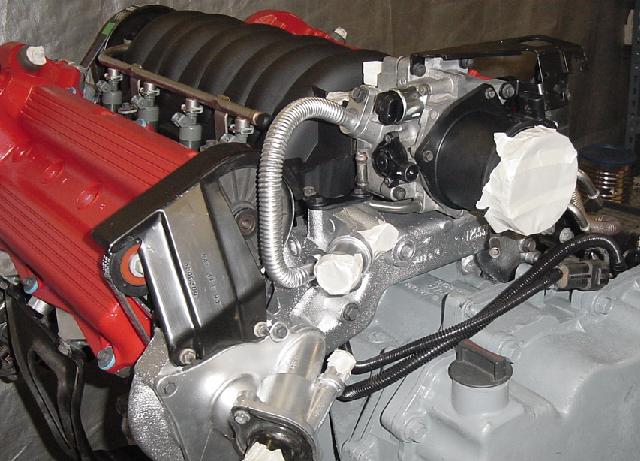
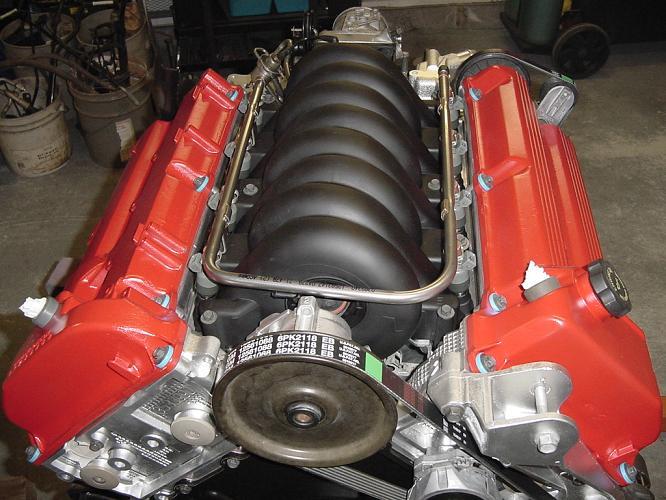
All I've gotten done this week is to get the intake manifold, fuel rail, and throttle body installed. I did not like the Fel-Pro intake gaskets too much, and used "clip-on" GM gaskets. I also used a GM "seal kit" to rebuild the fuel rail ... included all the O-rings, the little metal retainer clips, parts to rebuild the pressure regulator, and the short vacuum tube with rubber ends. If those of you that are familiar with the Northstar will look close at my intake manifold, you may be able to figure out why this took me an entire week.
I am borrowing your picture. I am working on my very own smooth intake
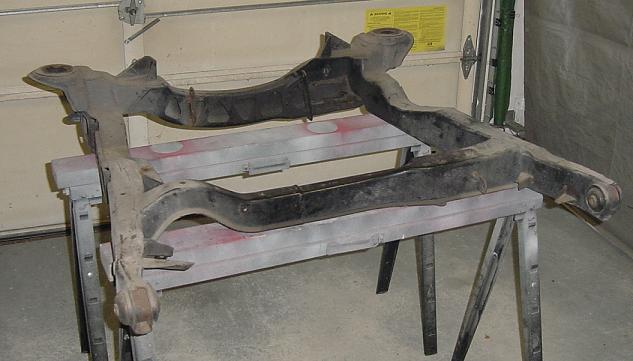
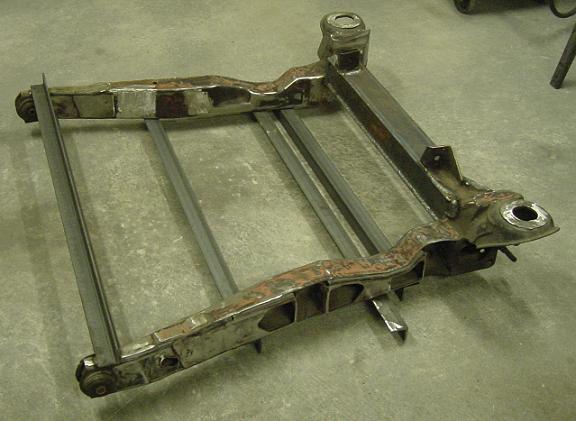
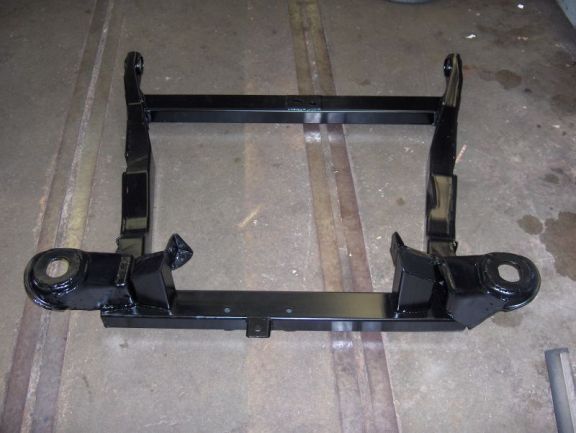
Dropped the cradle from under the car today and pulled it into the garage.
Since taking this photo, I cut off brackets that won't be needed with the N*. I'll tackweld some temporary braces across the cradle and fabricate new crossmembers. The rear crossmember will be a simple box-beam made from 1/8" x 3" flat bar. The front crossmember is a length of pipe I've had machined for Delrin bushing inserts at each end, and will eventually contain my anti-swaybar. I'll fab the rear member first since I can't final position the front member until after I hang the drivetrain in place over the cradle and take some measurements.
EDIT TO ADD: The rear anti-swaybar is one I obtained through Paul Hosler in this forum. Real nice stuff. The swaybar can be ordered from a large variety of torsion cross-bars, and the end-arms are separate pieces. It was the ONLY swaybar I could find that could be installed "through" the chassis.
[This message has been edited by WAWUZAT (edited 12-01-2007).]
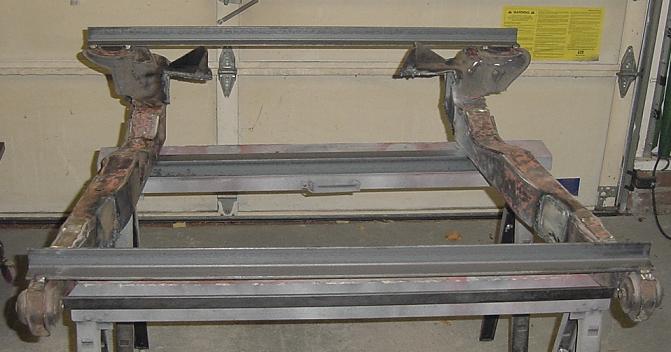
Today I got around to tack-welding some temporary braces in place, then fired up the "smoke wrench" to remove the original crossmembers.
Since taking this photo, I've cleaned up the torch cuts, and started fabricating the new rear crossmember. I'll leave all of the temporary braces on until after the welding is complete, then I can remove the rear temporary braces.
Originally posted by Will:Jon Lagler fit the 4T80E to a Fiero cradle without cutting the rear X-member. It was real tight, but it fit.
Will -- Thanks. Yes, I have seen that website. The reason I decided to re-fab mine was not due to the size of the 4T80E, but for gaining additional space beneath the crossmember for a second exhaust pipe. The OEM cradle had one "hump" on the passenger side to clear a pipe, and I wanted room to pass two pipes underneath. I also wanted to "box in" that crossmember in lieu of it being open on its forward side. Think of inaccessible voids on ships. Since they're air-tight, once the oxygen has been consumed via surface oxidation, no more corrosion can occur.
Thanks, Joe! I finished making and installing the new rear crossmember. I removed only one of the temporary braces ... removed the one that spanned the top faces of the rear mounting points. I tack-welded two more angle-bars beneath the cradle to make a platform I'll using for holding the engine "up" versus leaving it hang from the engine hoist. The aft face of the one angle-bar which protrudes outboard of the cradle's side-rails is in alignment with the axle centers. I'll use that face for positioning the drivetrain longitudinally. And since the axles will be of equal length, I merely need to center the drivetrain using the axle tripots as measurement guides. Vertical positioning requires that the axle centers at the transaxle be 6-inches above the bottom of the cradle.
If all goes well, I will position the drivetrain atop the cradle tomorrow evening, and then I can start fabricating the motor mounts.
AJ - I thought you "hung" your engine from the chassis. So, you still had to have at least one mount on the cradle, huh? BTW, nice looking work!
I had to work late yesterday, but I did get to lift the N* tonight, and position the cradle beneath it atop a pair of steel sawhorses. I've only "roughed" it into postion so I could spend some time and study several aspects before I final position it.
One thing that bothers me a bit is the location of the Cadillac alternator. Mine is in the original location as it came out of the Seville, but from just looking at it ... and looking at the cradle's front mounting points ... I'm wondering if it will foul with the rear bulkhead of the passenger compartment. It was raining tonight, so I didn't bother to go outside to look at the engine compartment again. I searched several threads here, and I couldn't find anything about having to relocate the alternator. So, if any of you other N*-swappers are reading this, can you tell me if the Cadillac alternator must be relocated, or am I concerned over nothing. Thanks!
[This message has been edited by WAWUZAT (edited 12-13-2007).]
The stock N* alternator will fit in there. I'm doing the swap as well and have fit it twice and it clears everything. I've got my motor sitting about an inch lower than the stock fiero 5 speed tranny mounts but I don't think that will affect the alternator clearance issues much.
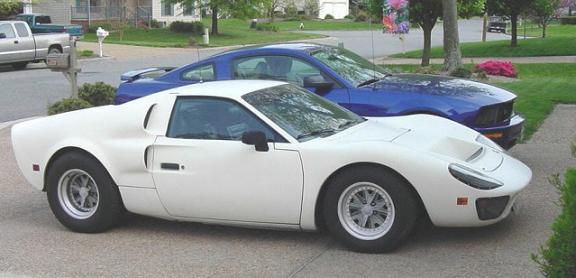
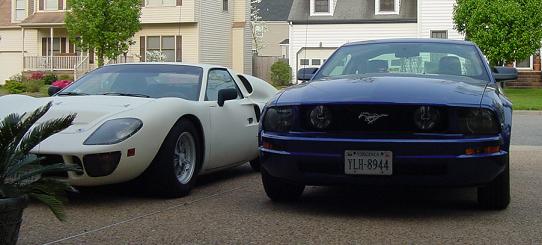
Thanks guys! I appreciate the replies. My drivetrain (at the axle-centers) sits 2-1/2" higher than a stock Fiero, but it's also 5/8" further aft. That drivetrain relocation was done 10 years ago when I lowered the car by raising the drivetrain. If push comes to shove, I can notch the bulkhead, fabricate a clearance hump, and weld it in ... but it would be nice to avoid that extra work. Here are a couple photos of it sitting next to my wife's '05 Mustang ... gives an idea of how low the car sits. Thanks again.
[This message has been edited by WAWUZAT (edited 12-14-2007).]


 No
No