Pennock's Fiero Forum
  The Construction Zone
  V6 Engine Rebuild -mild performance- maniac way (Page 2)

Post New Topic  Post A Reply
Email This Page to Someone! | Printable Version

This topic is 5 pages long:  1   2   3   4   5 
Previous Page | Next Page
next newest topic | next oldest topic
V6 Engine Rebuild -mild performance- maniac way by Fieromaniac
Started on: 08-28-2008 02:21 PM
Replies: 170 (22122 views)
Last post by: Rivethead on 01-21-2011 12:48 PM
Fieromaniac
Member
Posts: 980
From: Hamburg, Germany
Registered: Nov 2006


Feedback score: N/A
Leave feedback

Rate this member

Report this Post11-02-2008 02:52 PM Click Here to See the Profile for FieromaniacClick Here to visit Fieromaniac's HomePageSend a Private Message to FieromaniacEdit/Delete MessageReply w/QuoteDirect Link to This Post
2nd head cleaned


polished the "old" valves just to see how it comes out and here is the result :

before after pic


maybe i keep the valves if i get a good surface
IP: Logged
Fieromaniac
Member
Posts: 980
From: Hamburg, Germany
Registered: Nov 2006


Feedback score: N/A
Leave feedback

Rate this member

Report this Post11-04-2008 04:22 PM Click Here to See the Profile for FieromaniacClick Here to visit Fieromaniac's HomePageSend a Private Message to FieromaniacEdit/Delete MessageReply w/QuoteDirect Link to This Post
had not much time today so i overhauled my distributor


IP: Logged
Fieromaniac
Member
Posts: 980
From: Hamburg, Germany
Registered: Nov 2006


Feedback score: N/A
Leave feedback

Rate this member

Report this Post11-05-2008 05:47 AM Click Here to See the Profile for FieromaniacClick Here to visit Fieromaniac's HomePageSend a Private Message to FieromaniacEdit/Delete MessageReply w/QuoteDirect Link to This Post
block came back from the engineshop bored + honed 0.040 over ,
new camshaft bearings


camshaft has been polished and alligned ( was 6/10mm wrong )
IP: Logged
AusFiero
Member
Posts: 11513
From: Dapto NSW Australia
Registered: Feb 2001


Feedback score: (2)
Leave feedback


Total ratings: 326
Rate this member

Report this Post11-05-2008 08:01 AM Click Here to See the Profile for AusFieroClick Here to visit AusFiero's HomePageSend a Private Message to AusFieroEdit/Delete MessageReply w/QuoteDirect Link to This Post
I just love the look of a freshly honed block. Looks like you did a good job on the distributor too.
IP: Logged
aconesa
Member
Posts: 374
From: Trenton, New Jersey, USA
Registered: Jun 2005


Feedback score: N/A
Leave feedback

Rate this member

Report this Post11-05-2008 12:30 PM Click Here to See the Profile for aconesaSend a Private Message to aconesaEdit/Delete MessageReply w/QuoteDirect Link to This Post
great progress!

keep up the good work.

IP: Logged
Fieromaniac
Member
Posts: 980
From: Hamburg, Germany
Registered: Nov 2006


Feedback score: N/A
Leave feedback

Rate this member

Report this Post11-05-2008 03:28 PM Click Here to See the Profile for FieromaniacClick Here to visit Fieromaniac's HomePageSend a Private Message to FieromaniacEdit/Delete MessageReply w/QuoteDirect Link to This Post
showed the crank its new home


dremel + wirebrush and some hours of fun later .....


IP: Logged
Fieromaniac
Member
Posts: 980
From: Hamburg, Germany
Registered: Nov 2006


Feedback score: N/A
Leave feedback

Rate this member

Report this Post11-06-2008 02:58 PM Click Here to See the Profile for FieromaniacClick Here to visit Fieromaniac's HomePageSend a Private Message to FieromaniacEdit/Delete MessageReply w/QuoteDirect Link to This Post
UPS man came hard breathing to my door in the 5th Floor and delivered me a package with a Engineholder


------------------
1984 Fiero Sport
1987 Fiero
1984 Fiero SE
1999 Chrysler Grand Voyager 3.3 LX LPG

*** nuclear winter cures global warming ***

[This message has been edited by Fieromaniac (edited 11-06-2008).]

IP: Logged
Fieromaniac
Member
Posts: 980
From: Hamburg, Germany
Registered: Nov 2006


Feedback score: N/A
Leave feedback

Rate this member

Report this Post11-07-2008 02:20 PM Click Here to See the Profile for FieromaniacClick Here to visit Fieromaniac's HomePageSend a Private Message to FieromaniacEdit/Delete MessageReply w/QuoteDirect Link to This Post
opened the oilchannels to clean them


crankbearingholders cleaned


IP: Logged
red84sematt
Member
Posts: 1413
From: black river falls wisconsin usa
Registered: Mar 2006


Feedback score: (2)
Leave feedback

Rate this member

Report this Post11-07-2008 08:30 PM Click Here to See the Profile for red84semattSend a Private Message to red84semattEdit/Delete MessageReply w/QuoteDirect Link to This Post
is it just me or do you have a jagged hole in your block in a couple of pics? what is that, maybe i just don't recgonize it.
IP: Logged
timgray
Member
Posts: 2461
From: Muskegon,MI,USA
Registered: Jul 2006


Feedback score: (4)
Leave feedback


Total ratings: 59
Rate this member

Report this Post11-08-2008 08:49 AM Click Here to See the Profile for timgrayClick Here to visit timgray's HomePageSend a Private Message to timgrayEdit/Delete MessageReply w/QuoteDirect Link to This Post
Fantastic job!
IP: Logged
m0sh_man
Member
Posts: 8460
From: south charleston WV 25309
Registered: Feb 2002


Feedback score:    (23)
Leave feedback


Total ratings: 163
Rate this member

Report this Post11-08-2008 12:49 PM Click Here to See the Profile for m0sh_manSend a Private Message to m0sh_manEdit/Delete MessageReply w/QuoteDirect Link to This Post
You WILL have to use a neutrally balanced flexplate for a 2.8L-3.1L, only the 88 fiero v6 had this as far as fiero's go, you cant use a 4cyl flexplate on a v6 either.

you CAN use the 1988 and up cavalier, beretta, corsica, and any other 3.1L v6 flexplate, should be dirt cheap really, its a common part.

matthew
IP: Logged
PFF
System Bot
Fieromaniac
Member
Posts: 980
From: Hamburg, Germany
Registered: Nov 2006


Feedback score: N/A
Leave feedback

Rate this member

Report this Post11-09-2008 11:53 AM Click Here to See the Profile for FieromaniacClick Here to visit Fieromaniac's HomePageSend a Private Message to FieromaniacEdit/Delete MessageReply w/QuoteDirect Link to This Post
 
quote
Originally posted by m0sh_man:

You WILL have to use a neutrally balanced flexplate for a 2.8L-3.1L, only the 88 fiero v6 had this as far as fiero's go, you cant use a 4cyl flexplate on a v6 either.

you CAN use the 1988 and up cavalier, beretta, corsica, and any other 3.1L v6 flexplate, should be dirt cheap really, its a common part.

matthew


nah not that common over here i guess i need to order a new plate

ok , yesterdays work :

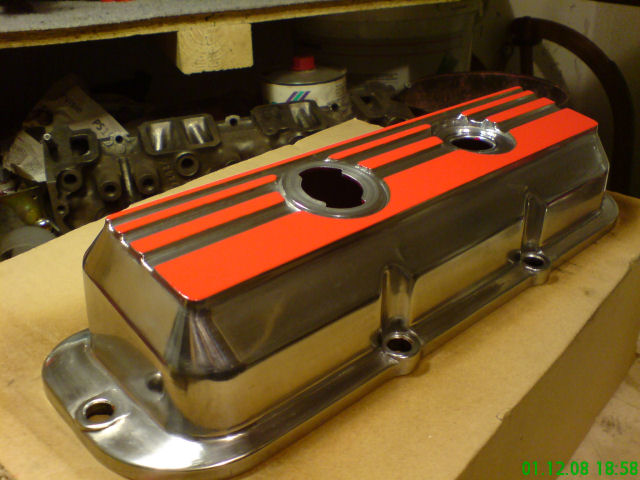
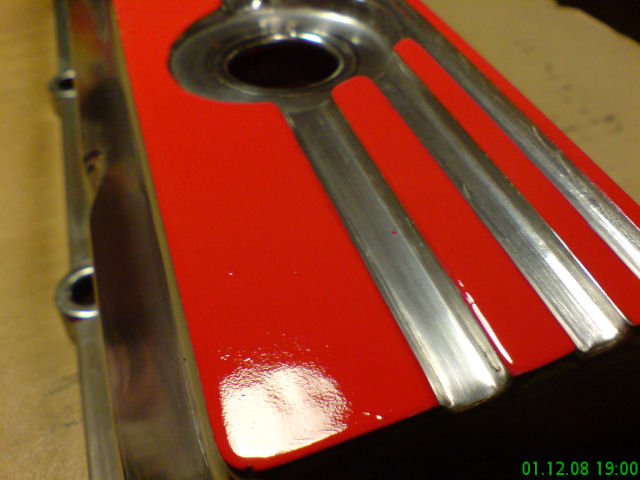
felt the urgent need to polish something ( i think you know what i mean )

before


paintstripper


after wetsanding with 280grid

IP: Logged
Fieromaniac
Member
Posts: 980
From: Hamburg, Germany
Registered: Nov 2006


Feedback score: N/A
Leave feedback

Rate this member

Report this Post11-09-2008 11:57 AM Click Here to See the Profile for FieromaniacClick Here to visit Fieromaniac's HomePageSend a Private Message to FieromaniacEdit/Delete MessageReply w/QuoteDirect Link to This Post

Fieromaniac

980 posts
Member since Nov 2006
started with the valves today

cleaned the valveguides


after some rounds


both valves of cylinder 2 done incl. finish


if the oil is still there tomorrow morning , the valves are ok
IP: Logged
Fieromaniac
Member
Posts: 980
From: Hamburg, Germany
Registered: Nov 2006


Feedback score: N/A
Leave feedback

Rate this member

Report this Post11-10-2008 02:11 PM Click Here to See the Profile for FieromaniacClick Here to visit Fieromaniac's HomePageSend a Private Message to FieromaniacEdit/Delete MessageReply w/QuoteDirect Link to This Post
ok checked my "Valve Test " some Minutes ago and after 1 and a half day little amount of oil reached the intake and exhaustchannels but didnt ran out of
the head.( intake was better than exhaust )

so i will give both valves some more round with the finishing creme then ill retest the Valves .
If they hold the complete amount of Oil / or Petroleum i know how to treat the other Valves ,
i mean ill get to know what "Valve-face" is needed
IP: Logged
Fieromaniac
Member
Posts: 980
From: Hamburg, Germany
Registered: Nov 2006


Feedback score: N/A
Leave feedback

Rate this member

Report this Post11-13-2008 07:47 AM Click Here to See the Profile for FieromaniacClick Here to visit Fieromaniac's HomePageSend a Private Message to FieromaniacEdit/Delete MessageReply w/QuoteDirect Link to This Post
got some stuff today :

perf. Valvesprings : 15$ ebay
oilpump repairkit : 16$ ebay

Winaldl cable : PFF member odgerunner thx dodgie


IP: Logged
Fieromaniac
Member
Posts: 980
From: Hamburg, Germany
Registered: Nov 2006


Feedback score: N/A
Leave feedback

Rate this member

Report this Post11-16-2008 09:07 AM Click Here to See the Profile for FieromaniacClick Here to visit Fieromaniac's HomePageSend a Private Message to FieromaniacEdit/Delete MessageReply w/QuoteDirect Link to This Post
oilpump overhauled


cleaned the housing and smoothed the scratches from the old gears with 1000grid wetsandpaper


pin removed that holds the spring


cleaned in gasoline bath


surface smoothed


further cleaned


new spring installed


new gears


and done


IP: Logged
katatak
Member
Posts: 7136
From: Omaha, NE USA
Registered: Apr 2008


Feedback score:    (8)
Leave feedback


Total ratings: 82
Rate this member

Report this Post11-16-2008 10:32 PM Click Here to See the Profile for katatakSend a Private Message to katatakEdit/Delete MessageReply w/QuoteDirect Link to This Post
Fieromaniac,

Great thread. I have read this entire thread 3 times since it was started. I really admire your "old school" approach to your rebuild. Years ago (like 30 plus) I needed to rebuild a straight six in an old Chevy truck. My Grandfather owned a service station for years but was retired at the time I started the rebuild. Being a teenager, I did not have the money to just pull the motor and drop it off at the machine shop. He and my Dad and I did it the "old school" way. Honed and then ball honed the cylinders, hand lapped the valves, hand polished the Rod journals with emory cloth, etc. Did all the work with the block still bolted to the trans. Installed new rod bearings, valve seals, piston rings, oil pump and seals. I drove that truck for 5 years and never had one problem with the motor - never used a drop of oil. Keep up the great work.....

Pat
IP: Logged
Fieromaniac
Member
Posts: 980
From: Hamburg, Germany
Registered: Nov 2006


Feedback score: N/A
Leave feedback

Rate this member

Report this Post11-23-2008 03:24 PM Click Here to See the Profile for FieromaniacClick Here to visit Fieromaniac's HomePageSend a Private Message to FieromaniacEdit/Delete MessageReply w/QuoteDirect Link to This Post
pressed the wrist pins out


all rods cleaned a lil


starting to polish the rods


IP: Logged
timgray
Member
Posts: 2461
From: Muskegon,MI,USA
Registered: Jul 2006


Feedback score: (4)
Leave feedback


Total ratings: 59
Rate this member

Report this Post11-23-2008 10:43 PM Click Here to See the Profile for timgrayClick Here to visit timgray's HomePageSend a Private Message to timgrayEdit/Delete MessageReply w/QuoteDirect Link to This Post
I love this thread, it shows the youngins' how we used to do an engine rebuild with little to no money. I remember doing my first engine rebuild in my dad's shed to a VW pancake 4 cyl.
IP: Logged
Francis T
Member
Posts: 6620
From: spotsylvania va. usa
Registered: Oct 2003


Feedback score: (1)
Leave feedback


Total ratings: 119
Rate this member

Report this Post11-24-2008 07:42 AM Click Here to See the Profile for Francis TClick Here to visit Francis T's HomePageSend a Private Message to Francis TEdit/Delete MessageReply w/QuoteDirect Link to This Post
Now I did not read the whole thing so this may be moot: I hope you tanked that block and those heads and also pulled your freez-out plugs and oil passage allens out and cleaned the oil bores. The yuk on the outside is not as big a problem as the crud build up in your water jackets/passages and oil passages etc. Replay that water pump and oil pump too while your at it, cheep and easy to do now.

------------------
[IMG]


Trueleo.com/fiero.htm
RSpiderII@aol.com

IP: Logged
Fieromaniac
Member
Posts: 980
From: Hamburg, Germany
Registered: Nov 2006


Feedback score: N/A
Leave feedback

Rate this member

Report this Post11-24-2008 08:44 AM Click Here to See the Profile for FieromaniacClick Here to visit Fieromaniac's HomePageSend a Private Message to FieromaniacEdit/Delete MessageReply w/QuoteDirect Link to This Post
 
quote
Originally posted by Francis T:

Now I did not read the whole thing so this may be moot: I hope you tanked that block and those heads and also pulled your freez-out plugs and oil passage allens out and cleaned the oil bores. The yuk on the outside is not as big a problem as the crud build up in your water jackets/passages and oil passages etc. Replay that water pump and oil pump too while your at it, cheep and easy to do now.


the machineshop that bored my block had it around 10 times in a special bath to get the old oil and other stuff out.
oilpump is already overhauled , waterpump will be a new one or maybe refreshed.
The shop also installed new cam bearings and they alligned my new cam and polished it.
IP: Logged
PFF
System Bot
Fieromaniac
Member
Posts: 980
From: Hamburg, Germany
Registered: Nov 2006


Feedback score: N/A
Leave feedback

Rate this member

Report this Post11-24-2008 12:37 PM Click Here to See the Profile for FieromaniacClick Here to visit Fieromaniac's HomePageSend a Private Message to FieromaniacEdit/Delete MessageReply w/QuoteDirect Link to This Post
1st rod done


b4 after pic

IP: Logged
Fieromaniac
Member
Posts: 980
From: Hamburg, Germany
Registered: Nov 2006


Feedback score: N/A
Leave feedback

Rate this member

Report this Post11-29-2008 03:33 PM Click Here to See the Profile for FieromaniacClick Here to visit Fieromaniac's HomePageSend a Private Message to FieromaniacEdit/Delete MessageReply w/QuoteDirect Link to This Post
made someprogress with the valve covers

after wetsanding :


after polishing :


to do : painting + clearcoat
( where the red color was will be polished and where it was polished ill paint it red )
IP: Logged
Francis T
Member
Posts: 6620
From: spotsylvania va. usa
Registered: Oct 2003


Feedback score: (1)
Leave feedback


Total ratings: 119
Rate this member

Report this Post11-29-2008 10:16 PM Click Here to See the Profile for Francis TClick Here to visit Francis T's HomePageSend a Private Message to Francis TEdit/Delete MessageReply w/QuoteDirect Link to This Post
When I did my rebuild, I got a lil paraniod with my oil pump -new high vol- pickup tube and welded a small bracket to fit under one of the mounting bolts for the pump just to be sure it never works it's way out. Probably never happens, but I'm just not comfy with a force-fit for something so important.

------------------
[IMG]


Trueleo.com/fiero.htm
RSpiderII@aol.com

IP: Logged
Francis T
Member
Posts: 6620
From: spotsylvania va. usa
Registered: Oct 2003


Feedback score: (1)
Leave feedback


Total ratings: 119
Rate this member

Report this Post11-29-2008 10:17 PM Click Here to See the Profile for Francis TClick Here to visit Francis T's HomePageSend a Private Message to Francis TEdit/Delete MessageReply w/QuoteDirect Link to This Post

Francis T

6620 posts
Member since Oct 2003
BTW: nice job on the valve covers, Are you going to have them powder coated clear?
IP: Logged
Fieromaniac
Member
Posts: 980
From: Hamburg, Germany
Registered: Nov 2006


Feedback score: N/A
Leave feedback

Rate this member

Report this Post11-30-2008 07:19 AM Click Here to See the Profile for FieromaniacClick Here to visit Fieromaniac's HomePageSend a Private Message to FieromaniacEdit/Delete MessageReply w/QuoteDirect Link to This Post
 
quote
Originally posted by Francis T:

BTW: nice job on the valve covers, Are you going to have them powder coated clear?


ill use an spray clearcoat for brakes and rims ( 350°C and scratchresistant )
IP: Logged
Fieromaniac
Member
Posts: 980
From: Hamburg, Germany
Registered: Nov 2006


Feedback score: N/A
Leave feedback

Rate this member

Report this Post11-30-2008 07:20 AM Click Here to See the Profile for FieromaniacClick Here to visit Fieromaniac's HomePageSend a Private Message to FieromaniacEdit/Delete MessageReply w/QuoteDirect Link to This Post

Fieromaniac

980 posts
Member since Nov 2006
after 10 rounds of polishing they are now "blink" enuff


IP: Logged
Fieromaniac
Member
Posts: 980
From: Hamburg, Germany
Registered: Nov 2006


Feedback score: N/A
Leave feedback

Rate this member

Report this Post11-30-2008 12:22 PM Click Here to See the Profile for FieromaniacClick Here to visit Fieromaniac's HomePageSend a Private Message to FieromaniacEdit/Delete MessageReply w/QuoteDirect Link to This Post

Fieromaniac

980 posts
Member since Nov 2006
cleaned with siliconremover and painted


2nd cover to compare the result

IP: Logged
randye
Member
Posts: 13817
From: Florida
Registered: Mar 2006


Feedback score: (1)
Leave feedback


Total ratings: 216
Rate this member

Report this Post11-30-2008 02:18 PM Click Here to See the Profile for randyeClick Here to visit randye's HomePageSend a Private Message to randyeEdit/Delete MessageReply w/QuoteDirect Link to This Post
Die richtige Wort ist BLING, nicht blink.
Gerne helfen, wenn ich kann.
Cover der Aluminum mit Glanz transparente Farbe.
Später wird es schlecht aussehen, wenn Sie nicht

Wärme-und Sauerstoff wird der Angriff nackt Aluminum so muss sie mit klaren Farben

[This message has been edited by randye (edited 11-30-2008).]

IP: Logged
burntwood
Member
Posts: 120
From: Holly Springs, NC
Registered: Nov 2008


Feedback score: N/A
Leave feedback

Rate this member

Report this Post11-30-2008 03:29 PM Click Here to See the Profile for burntwoodSend a Private Message to burntwoodEdit/Delete MessageReply w/QuoteDirect Link to This Post
Phenomenal job on this thread Fieromaniac! Make it look too easy.

Keep up the great work!
IP: Logged
timgray
Member
Posts: 2461
From: Muskegon,MI,USA
Registered: Jul 2006


Feedback score: (4)
Leave feedback


Total ratings: 59
Rate this member

Report this Post12-01-2008 07:00 AM Click Here to See the Profile for timgrayClick Here to visit timgray's HomePageSend a Private Message to timgrayEdit/Delete MessageReply w/QuoteDirect Link to This Post
I always weld the pickup tube to the oil pump. that way it can never come off. Lots of hootrodders and racers do that as well. just a couple of seconds with the tig or small mig and it's done.

What brand of paint did you use on the covers? Is it high temp? Every time I see polished aluminum painted in clear, it really dulls the look and yours did not.

[This message has been edited by timgray (edited 12-01-2008).]

IP: Logged
PFF
System Bot
m0sh_man
Member
Posts: 8460
From: south charleston WV 25309
Registered: Feb 2002


Feedback score:    (23)
Leave feedback


Total ratings: 163
Rate this member

Report this Post12-01-2008 08:53 AM Click Here to See the Profile for m0sh_manSend a Private Message to m0sh_manEdit/Delete MessageReply w/QuoteDirect Link to This Post
 
quote
Originally posted by timgray:

I always weld the pickup tube to the oil pump. that way it can never come off. Lots of hootrodders and racers do that as well. just a couple of seconds with the tig or small mig and it's done.

What brand of paint did you use on the covers? Is it high temp? Every time I see polished aluminum painted in clear, it really dulls the look and yours did not.


i do the same, after you've had one fall off on a 2.8L you never leave them alone again.

with the tube off, when you make hard turns, it will NOT suck oil up and oil pressure will drop scarry when your oil pressure gauge bottoms out in turns but works fine in normal driving.

matthew

IP: Logged
Fieromaniac
Member
Posts: 980
From: Hamburg, Germany
Registered: Nov 2006


Feedback score: N/A
Leave feedback

Rate this member

Report this Post12-01-2008 09:12 AM Click Here to See the Profile for FieromaniacClick Here to visit Fieromaniac's HomePageSend a Private Message to FieromaniacEdit/Delete MessageReply w/QuoteDirect Link to This Post
 
quote
Originally posted by timgray:

I always weld the pickup tube to the oil pump. that way it can never come off. Lots of hootrodders and racers do that as well. just a couple of seconds with the tig or small mig and it's done.

What brand of paint did you use on the covers? Is it high temp? Every time I see polished aluminum painted in clear, it really dulls the look and yours did not.


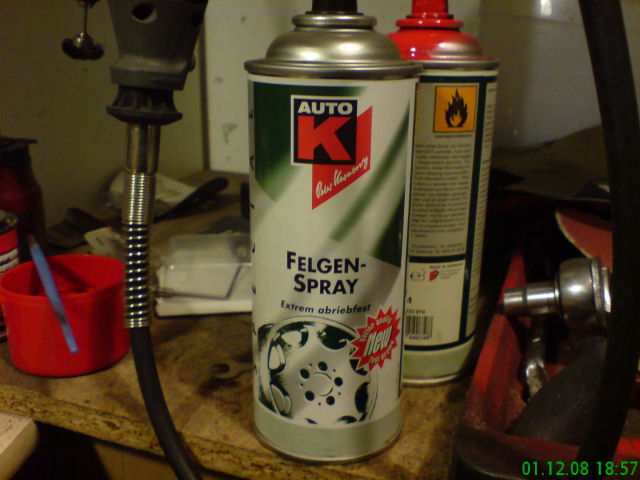
these rims are done with same clearcoat 350° Temperature and ultra scratchresistant


did also engineroom things( dogbone and others ) with it and brake calipers .
The rims and the other Things still look good
brand is from A.T.U but iam afraid you wont get it over there .
IP: Logged
Fieromaniac
Member
Posts: 980
From: Hamburg, Germany
Registered: Nov 2006


Feedback score: N/A
Leave feedback

Rate this member

Report this Post12-01-2008 02:31 PM Click Here to See the Profile for FieromaniacClick Here to visit Fieromaniac's HomePageSend a Private Message to FieromaniacEdit/Delete MessageReply w/QuoteDirect Link to This Post

Fieromaniac

980 posts
Member since Nov 2006
here the clearcoat brand i used


some shots with the dry clearcoat and some closeups


IP: Logged
Fieromaniac
Member
Posts: 980
From: Hamburg, Germany
Registered: Nov 2006


Feedback score: N/A
Leave feedback

Rate this member

Report this Post12-29-2008 09:40 AM Click Here to See the Profile for FieromaniacClick Here to visit Fieromaniac's HomePageSend a Private Message to FieromaniacEdit/Delete MessageReply w/QuoteDirect Link to This Post
all rods are the same weight now


- wrist pins where 2 hrs in the freezer -18°C
- rods heated to around 400°C

then you have 2 seconds to push the wrist pin with your hand through the rod
if you fail you maybe damage the Piston if you press out the pins again.


now checking the weight and all rod+pistons are at 1092 gramm

IP: Logged
82-T/A [At Work]
Member
Posts: 22739
From: Florida USA
Registered: Aug 2002


Feedback score: (1)
Leave feedback


Total ratings: 198
Rate this member

Report this Post12-29-2008 11:15 AM Click Here to See the Profile for 82-T/A [At Work]Send a Private Message to 82-T/A [At Work]Edit/Delete MessageReply w/QuoteDirect Link to This Post
Hey Fieromaniac,

I've done the 3.1 conversion, and hopefully can give you some insight on the rebuild. Interstingly enough, I performed most of these upgrades and changes in phases, so I can tell you what works and what doesn't. On the port-matching, I did the 1.52:1 Crane Roller Rockers, and the port-matching of all the intake pieces all at the same time, it made a huge difference... huge as in, it was clearly noticeable on the V6 engine (it was still a 2.8 at the time). I do not have dynoed results, but the performance difference was like that of going to a set of headers on an ecotec motor.

Honestly, when you look at the way the intakes are matched up, there is at LEAST a 1/8th restriction on one side of each intake. When you add the total blockage (if you will) in the intakes, you've got as much as 2 to 3/8ths of an inch of restriction in some of the intake ports between the intake manifold and the runners (the middle section). I honestly believe that ANYONE that has a V6 Fiero, this should be their first improvement.

I don't know if you're planning on going with headers or performance manifolds, but going with hogged out stock exhaust manifolds will also greatly improve the performance.

As far as cam selections, the ARI Racing Phase-2 cam was pretty decent, that's what I went with. Directly from off-idle, it would smoke the rear tires at least 20 feet with my Th-125 and 235/60/15 Firestone Firehawk tires (that's what I have in the rear). It's strange that I could get so much wheel spin from a chinsy 3.1? I wasn't that happy with the Phase-2 cam though because all the power was focused in the lower RPM range. The engine would basically die after 4,000 rpms. Even with the restrictive intake neck, the Fiero's engine should still perform well at least to 5,000 rpms. My advice is to go with either the 2030 Crane Cam, or the H272 Cam. I chose the H272 personally along with the 1.52:1 Crane Rollers that I already had.

I went with .040 overbore Hyperutectic pistons for a total compression of 9.1:1 (also from ARI Racing).

Although somewhat unnecessary, I figure if you're going to do it, you might as well make it as reliable as you can and build it as best as you can. Ask the machine shop to knife-edge the counterweights on your new 3.1 crank, and balance the rotating assembly (crank, rods, pistons, rings, etc). It's been proven to GREATLY improve the overall reliability, fuel economy, and efficiency of an engine when the entire rotating assembly has been professionally balanced.

Also make sure you have your spring thickness and height properly adjusted for the cam you select.


You'll also want to go with 17lb injectors. You'll want to keep the "pintle" style injectors (like what's factory). Accel sells a set of nearly identical injectors that are 17 pounds. They sell them in sets of 4, 6 or 8 from Summit Racing.


As you may have realized already, going with the 3.1 crank will make your car neutrally balanced, so you'll want to make sure you get the 88 flywheel.

Also, are you keeping the Th-125 or switching to a 4-Speed automatic? Either way, you'll want to get a torque converter that's got a slightly higher stall speed. I ended up going with an FZ (I believe?) torque converter from an 87 4-Cyl Th-125 which apparently has a 150 higher stall speed (as recommended by Ed Parks). It definitely made the car feel more snappy. The old torque converter was such a slug.


Also, make sure that your temperature sensors, intake air temperature, etc... are new when you put it all back together.


Also, Rodney Dickman sells an air intake kit which allows you to keep the stock canister, but gives you a much improved passage through the water seperator area. Basically connecting directly from the scoop to the air filter canister without any sharp bends. I think it was like $21 bucks or something.


Good luck, FEEL FREE to e-mail me if you have any questions about my setup:

jasperst@dolphins.nfl.com


EDIT: There is a much newer (and better) distributor that is an OEM replacement for the one that came with our cars originally. It's identical in every way but has a more advanced "rotator"??? assembly. Fewer chances for a misfire, etc. I would look into getting that instead.
------------------
Todd,
2006 Pontiac Solstice
2004 Volkswagen Beetle Convt. (Wife's)
2002 Ford Crown Victoria LX
1987 Pontiac Fiero SE / V6
1981 EZ-GO Xi875-A "Miami Dolphins" Medical Cart
1973 Volkswagen Type-2 Transporter
1973 Oldsmobile Cutlass Supreme 350

[This message has been edited by 82-T/A [At Work] (edited 12-29-2008).]

IP: Logged
Fieromaniac
Member
Posts: 980
From: Hamburg, Germany
Registered: Nov 2006


Feedback score: N/A
Leave feedback

Rate this member

Report this Post12-29-2008 02:58 PM Click Here to See the Profile for FieromaniacClick Here to visit Fieromaniac's HomePageSend a Private Message to FieromaniacEdit/Delete MessageReply w/QuoteDirect Link to This Post
 
quote
Originally posted by 82-T/A [At Work]:

Hey Fieromaniac,

I've done the 3.1 conversion, and hopefully can give you some insight on the rebuild. Interstingly enough, I performed most of these upgrades and changes in phases, so I can tell you what works and what doesn't. On the port-matching, I did the 1.52:1 Crane Roller Rockers, and the port-matching of all the intake pieces all at the same time, it made a huge difference... huge as in, it was clearly noticeable on the V6 engine (it was still a 2.8 at the time). I do not have dynoed results, but the performance difference was like that of going to a set of headers on an ecotec motor.

Honestly, when you look at the way the intakes are matched up, there is at LEAST a 1/8th restriction on one side of each intake. When you add the total blockage (if you will) in the intakes, you've got as much as 2 to 3/8ths of an inch of restriction in some of the intake ports between the intake manifold and the runners (the middle section). I honestly believe that ANYONE that has a V6 Fiero, this should be their first improvement.

I don't know if you're planning on going with headers or performance manifolds, but going with hogged out stock exhaust manifolds will also greatly improve the performance.

As far as cam selections, the ARI Racing Phase-2 cam was pretty decent, that's what I went with. Directly from off-idle, it would smoke the rear tires at least 20 feet with my Th-125 and 235/60/15 Firestone Firehawk tires (that's what I have in the rear). It's strange that I could get so much wheel spin from a chinsy 3.1? I wasn't that happy with the Phase-2 cam though because all the power was focused in the lower RPM range. The engine would basically die after 4,000 rpms. Even with the restrictive intake neck, the Fiero's engine should still perform well at least to 5,000 rpms. My advice is to go with either the 2030 Crane Cam, or the H272 Cam. I chose the H272 personally along with the 1.52:1 Crane Rollers that I already had.

I went with .040 overbore Hyperutectic pistons for a total compression of 9.1:1 (also from ARI Racing).

Although somewhat unnecessary, I figure if you're going to do it, you might as well make it as reliable as you can and build it as best as you can. Ask the machine shop to knife-edge the counterweights on your new 3.1 crank, and balance the rotating assembly (crank, rods, pistons, rings, etc). It's been proven to GREATLY improve the overall reliability, fuel economy, and efficiency of an engine when the entire rotating assembly has been professionally balanced.

Also make sure you have your spring thickness and height properly adjusted for the cam you select.


You'll also want to go with 17lb injectors. You'll want to keep the "pintle" style injectors (like what's factory). Accel sells a set of nearly identical injectors that are 17 pounds. They sell them in sets of 4, 6 or 8 from Summit Racing.


As you may have realized already, going with the 3.1 crank will make your car neutrally balanced, so you'll want to make sure you get the 88 flywheel.

Also, are you keeping the Th-125 or switching to a 4-Speed automatic? Either way, you'll want to get a torque converter that's got a slightly higher stall speed. I ended up going with an FZ (I believe?) torque converter from an 87 4-Cyl Th-125 which apparently has a 150 higher stall speed (as recommended by Ed Parks). It definitely made the car feel more snappy. The old torque converter was such a slug.


Also, make sure that your temperature sensors, intake air temperature, etc... are new when you put it all back together.


Also, Rodney Dickman sells an air intake kit which allows you to keep the stock canister, but gives you a much improved passage through the water seperator area. Basically connecting directly from the scoop to the air filter canister without any sharp bends. I think it was like $21 bucks or something.


Good luck, FEEL FREE to e-mail me if you have any questions about my setup:

jasperst@dolphins.nfl.com


EDIT: There is a much newer (and better) distributor that is an OEM replacement for the one that came with our cars originally. It's identical in every way but has a more advanced "rotator"??? assembly. Fewer chances for a misfire, etc. I would look into getting that instead.


Hi,
- i would have ordered at ARI but they dont answer Mails !! i simply asked if they ship to germany but nothing ( some other people tried too )
- i start with ported stock exhaust system but ill build me an own true 2 tube system
- camshaft is crane 2030
- rockers will be 1:1.52

- i dont need other fuelinjectors than the stock V6 because the car will run on propane/buthane and this system has its own injectors
- have already an cold air intake fitted
- have performance valve springs and iam waiting for the Fierostore Stainless Valve set
- i like to stay with the TH125 because its a 87 duke TH125 with the longest final drive of all th125 ( 1:2.81 )

IP: Logged
Stubby79
Member
Posts: 7064
From: GFY county, FY.
Registered: Aug 2008


Feedback score: N/A
Leave feedback


Total ratings: 58
Rate this member

Report this Post01-15-2009 11:14 PM Click Here to See the Profile for Stubby79Send a Private Message to Stubby79Edit/Delete MessageReply w/QuoteDirect Link to This Post
Any updates?
IP: Logged
Fieromaniac
Member
Posts: 980
From: Hamburg, Germany
Registered: Nov 2006


Feedback score: N/A
Leave feedback

Rate this member

Report this Post01-16-2009 05:51 AM Click Here to See the Profile for FieromaniacClick Here to visit Fieromaniac's HomePageSend a Private Message to FieromaniacEdit/Delete MessageReply w/QuoteDirect Link to This Post
polishing 2nd valvecover atm .

and waiting for FS Parts
IP: Logged
Fieromaniac
Member
Posts: 980
From: Hamburg, Germany
Registered: Nov 2006


Feedback score: N/A
Leave feedback

Rate this member

Report this Post02-21-2009 09:17 AM Click Here to See the Profile for FieromaniacClick Here to visit Fieromaniac's HomePageSend a Private Message to FieromaniacEdit/Delete MessageReply w/QuoteDirect Link to This Post
new freezeplugs


installed the new rings


mounting bearings and crank


[This message has been edited by Fieromaniac (edited 02-21-2009).]

IP: Logged
Previous Page | Next Page

This topic is 5 pages long:  1   2   3   4   5 
next newest topic | next oldest topic

All times are ET (US)

Post New Topic  Post A Reply
Hop to:

Contact Us | Back To Main Page

Advertizing on PFF | Fiero Parts Vendors
PFF Merchandise | Fiero Gallery | Ogre's Cave
Real-Time Chat | Fiero Related Auctions on eBay


Copyright (c) 1999, C. Pennock