Pennock's Fiero Forum
  Technical Discussion & Questions
  Headlight lift and bucket assembly installation

Post New Topic  Post A Reply
Email This Page to Someone! | Printable Version


next newest topic | next oldest topic
Headlight lift and bucket assembly installation by ninedriver
Started on: 01-03-2021 02:04 PM
Replies: 4 (153 views)
Last post by: theogre on 01-04-2021 01:16 PM
ninedriver
Member
Posts: 64
From: North Mississippi
Registered: Dec 2020


Feedback score: N/A
Leave feedback

Rate this member

Report this Post01-03-2021 02:04 PM Click Here to See the Profile for ninedriverSend a Private Message to ninedriverEdit/Delete MessageReply w/QuoteDirect Link to This Post
So, I removed my headlight lift and bucket assembly to address issues with the motor. Fixed the motor and went to reinstall. Unfortunately, I didn’t mark the original location of the nuts on the assembly and there is quite a bit of play / adjustment, up and down / left and right. What am I looking for as far as adjustments and lineup is concerned?
IP: Logged
PFF
System Bot
fierofool
Member
Posts: 12811
From: Auburn, Georgia USA
Registered: Jan 2002


Feedback score:    (13)
Leave feedback


Total ratings: 154
Rate this member

Report this Post01-03-2021 04:23 PM Click Here to See the Profile for fierofoolClick Here to visit fierofool's HomePageSend a Private Message to fierofoolEdit/Delete MessageReply w/QuoteDirect Link to This Post
You might be able to see some scuff marks on the top mounting points where the washers scuffed the mechanism. To align it, notice the two Teflon rub strips on the headlight door. They should have scuff marks. The assembly rubs and pushes against these as the assembly moves up and down. These can be used as indicators. I like to center the assembly rub points as closely as possible on these strips.

Power to the motor should be disconnected once the headlights are raised. Leave the lower nuts slightly loose. Lower the hood to its halfway latch point. I think the headlight door will be in contact with the headlight assembly. Now, loosen the top nuts and center the rub points on these strips. Be sure both rub points are balanced each coming into contact with the door at the same time. You may have to raise and lower the hood to make this adjustment. Tighten the top nuts. Unplug the single motor wire on Gen 1 systems or the headlight motor harness on Gen 2 systems. Then underneath and tighten the lower nuts.
IP: Logged
cvxjet
Member
Posts: 3649
From: ca, usa
Registered: May 2010


Feedback score: (1)
Leave feedback

Rate this member

Report this Post01-03-2021 04:52 PM Click Here to See the Profile for cvxjetSend a Private Message to cvxjetEdit/Delete MessageReply w/QuoteDirect Link to This Post
I don't know if this will help- I took pics of the linkage before disassembly so I could put it back together....


(This is with the headlights in the down position)

[This message has been edited by cvxjet (edited 01-03-2021).]

IP: Logged
ninedriver
Member
Posts: 64
From: North Mississippi
Registered: Dec 2020


Feedback score: N/A
Leave feedback

Rate this member

Report this Post01-03-2021 05:45 PM Click Here to See the Profile for ninedriverSend a Private Message to ninedriverEdit/Delete MessageReply w/QuoteDirect Link to This Post
Hey guys

Thanks for the pic, and awesome explanation using the scuff marks for alignment fierofool! That oughta get me heading in the right direction.
IP: Logged
theogre
Member
Posts: 32246
From: USA
Registered: Mar 99


Feedback score: N/A
Leave feedback


Total ratings: 568
Rate this member

Report this Post01-04-2021 01:16 PM Click Here to See the Profile for theogreClick Here to visit theogre's HomePageSend a Private Message to theogreEdit/Delete MessageReply w/QuoteDirect Link to This Post
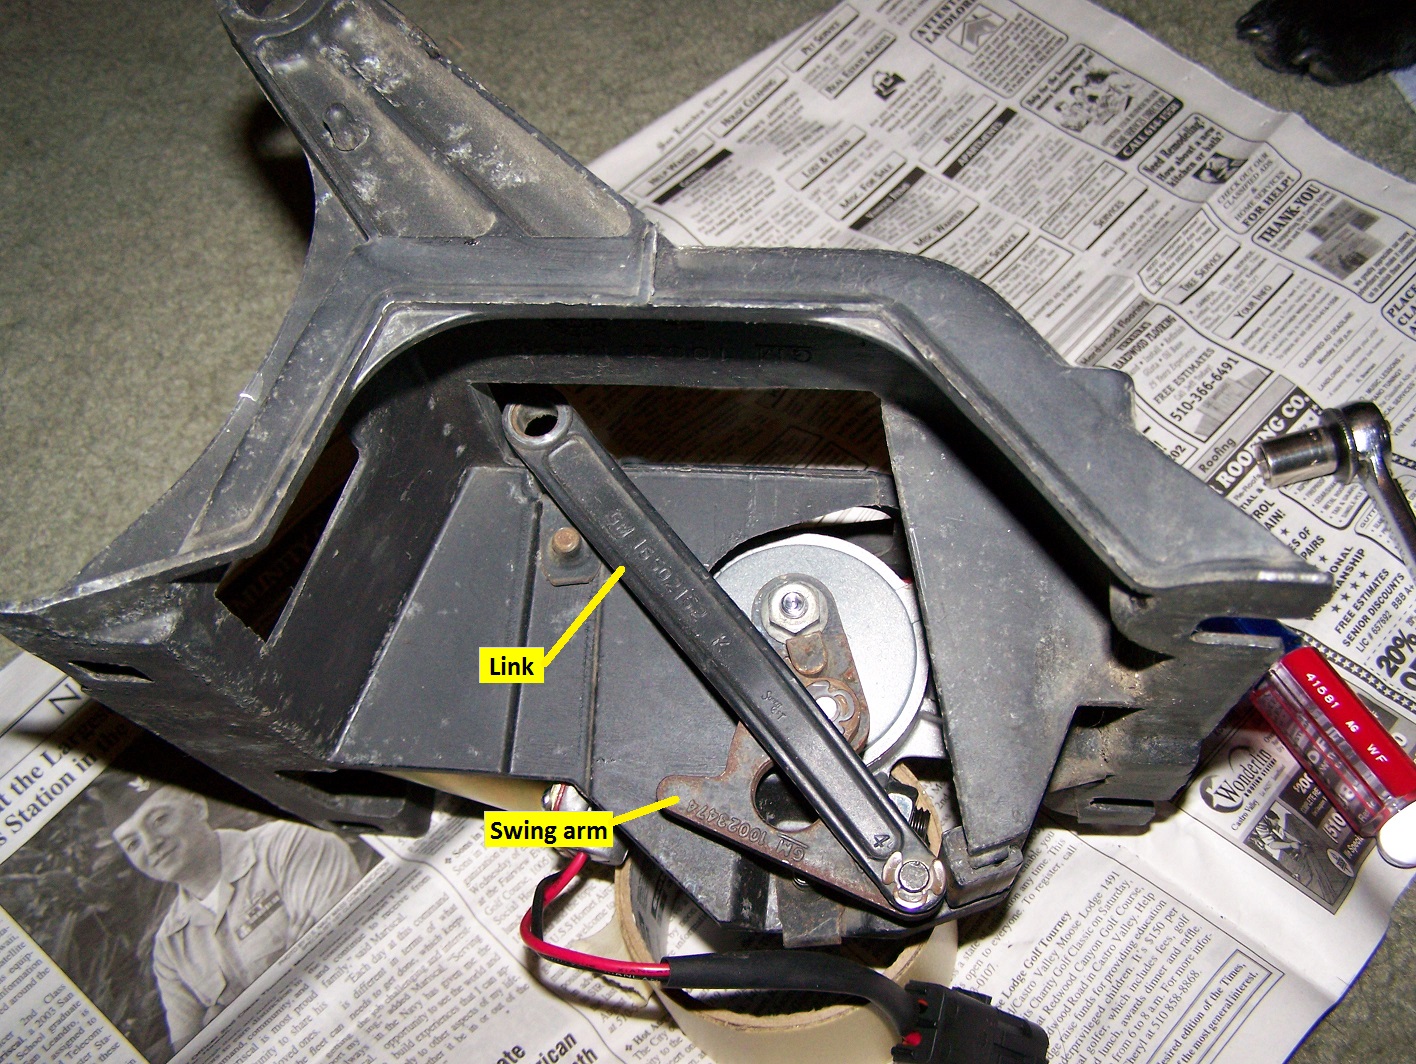
Lift mec have some play open/close the bucket. Only is tight at full open/close.

4 nuts holding lift on/in the car needs careful attention more then most think.
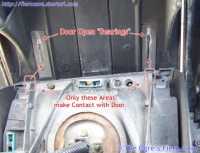
If you got lucky, you might see 1 set of "wear spots" where nuts were tighten at factory but many have been pulled 1 to many times and those wear spots mean nothing.

Buckets only hit the Door on 2 bearing strips...
CLICK FOR FULL SIZE

2 other spots in front is a backup and barely touches door.
Bucket Trim must not touch/rub the door anywhere else or extra load can bind or jam the system.

Many also let lift frame rest on top studs and HL bulb doesn't fully clear the hood at bottom of bulb.

See my Cave, Headlights etc.

------------------
Dr. Ian Malcolm: Yeah, but your scientists were so preoccupied with whether or not they could, they didn't stop to think if they should.
(Jurassic Park)


The Ogre's Fiero Cave

IP: Logged

next newest topic | next oldest topic

All times are ET (US)

Post New Topic  Post A Reply
Hop to:

Contact Us | Back To Main Page

Advertizing on PFF | Fiero Parts Vendors
PFF Merchandise | Fiero Gallery | Ogre's Cave
Real-Time Chat | Fiero Related Auctions on eBay


Copyright (c) 1999, C. Pennock