Pennock's Fiero Forum
  Technical Discussion & Questions
  Upper Ball Joint Majorly Stuck

Post New Topic  Post A Reply
Email This Page to Someone! | Printable Version


next newest topic | next oldest topic
Upper Ball Joint Majorly Stuck by Brent7088
Started on: 06-25-2020 11:34 PM
Replies: 18 (436 views)
Last post by: theogre on 06-27-2020 03:49 AM
Brent7088
Member
Posts: 321
From: Ohio
Registered: Apr 2008


Feedback score: N/A
Leave feedback

Rate this member

Report this Post06-25-2020 11:34 PM Click Here to See the Profile for Brent7088Send a Private Message to Brent7088Edit/Delete MessageReply w/QuoteDirect Link to This Post
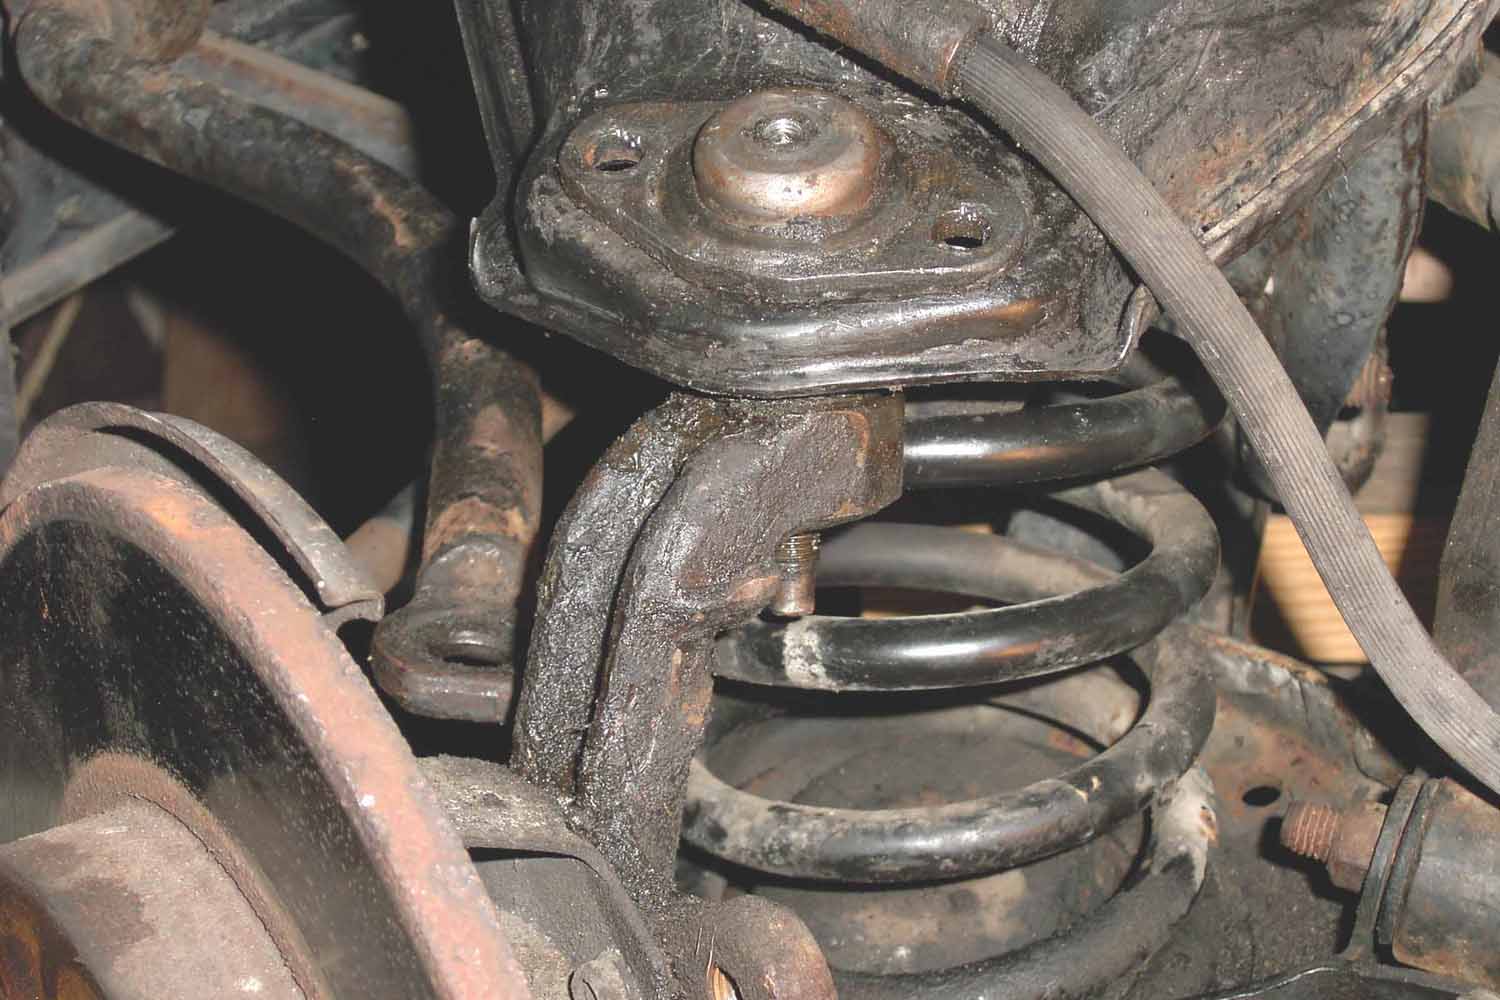
I'm trying to replace the front upper ball joints on my 86 GT. I removed the mounting bolts, castle nut and the grease fitting. I tapped the threaded stud from the bottom with pretty good wacks, and even tried prying up on the top between the mount and the control arm and the stubborn thing still won't pop out.

Is there anything I'm forgetting to do? Thanks in advance.


[This message has been edited by Brent7088 (edited 06-26-2020).]

IP: Logged
PFF
System Bot
Notorio
Member
Posts: 2964
From: Temecula, CA
Registered: Oct 2003


Feedback score: (3)
Leave feedback

Rate this member

Report this Post06-25-2020 11:40 PM Click Here to See the Profile for NotorioSend a Private Message to NotorioEdit/Delete MessageReply w/QuoteDirect Link to This Post
Could you add a picture or two showing the situation? Some of us haven't done this job yet and we can learn with you
IP: Logged
cvxjet
Member
Posts: 3649
From: ca, usa
Registered: May 2010


Feedback score: (1)
Leave feedback

Rate this member

Report this Post06-26-2020 12:28 AM Click Here to See the Profile for cvxjetSend a Private Message to cvxjetEdit/Delete MessageReply w/QuoteDirect Link to This Post
It takes a lot to break the tapered end of the BJ loose....I bought Rodney Dickman's BJ removal tool which goes between the two BJ ends and then expands- Be prepared- when one breaks loose it makes quite a loud sound. Also, leave the nut on but loose by 1/8" to contain it when it pops loose.

[This message has been edited by cvxjet (edited 06-26-2020).]

IP: Logged
Brent7088
Member
Posts: 321
From: Ohio
Registered: Apr 2008


Feedback score: N/A
Leave feedback

Rate this member

Report this Post06-26-2020 02:07 AM Click Here to See the Profile for Brent7088Send a Private Message to Brent7088Edit/Delete MessageReply w/QuoteDirect Link to This Post
Thank you - I'm assuming this tool is for the upper joints. I may just decide to use a fork (even though it may be tougher to get under the collar). I'm not worried about damaging the BJ since it's being replaced.
IP: Logged
rubyredfiero
Member
Posts: 720
From: Belle River, Ontario, Canada
Registered: Jul 2003


Feedback score: (1)
Leave feedback


Total ratings: 58
Rate this member

Report this Post06-26-2020 07:27 AM Click Here to See the Profile for rubyredfieroSend a Private Message to rubyredfieroEdit/Delete MessageReply w/QuoteDirect Link to This Post
I had that problem before. Here's what I did. Check to make sure someone didn't tack weld the the BJ from the underside. Put the BJ back in the spindle with the nut on as far as you can, but don't tighten it. Lift the car and put something solid under the lower control arm, but NOT on the grease fitting. Now make sure there's space between the upper control arm and the spindle and pound the top control arm close to the BJ flange with a flat nose of a hammer or dull chisel. Repeat around the flange. I was surprised how stubborn it was but I got it out. Then you should be able to remove the old BJ while the lower control arm is still propped up. Wear safety equipment and exercise caution at all times. Good luck.
IP: Logged
AsaBergman
Member
Posts: 137
From: Harrisburg area, PA
Registered: Apr 2018


Feedback score: N/A
Leave feedback

Rate this member

Report this Post06-26-2020 09:43 AM Click Here to See the Profile for AsaBergmanSend a Private Message to AsaBergmanEdit/Delete MessageReply w/QuoteDirect Link to This Post
Most of the time I hit the part of the knuckle the ball joint stud is inserted into perpendicular to the stud rather than the ball joint stud itself while pulling down on the knuckle. Other note is leave the castle nut on the end of the threads flush with the end of the stud, gives you a larger surface to hit with a hammer but it'll probably damage the threads(doesn't matter here).

I know for sure I removed my passenger side upper ball joint with the pickle fork however I had the lower ball joint disconnected when I did this, might not be able to fit it with the lower still connected.
IP: Logged
Notorio
Member
Posts: 2964
From: Temecula, CA
Registered: Oct 2003


Feedback score: (3)
Leave feedback

Rate this member

Report this Post06-26-2020 12:26 PM Click Here to See the Profile for NotorioSend a Private Message to NotorioEdit/Delete MessageReply w/QuoteDirect Link to This Post
 
quote
Originally posted by Notorio:

Could you add a picture or two showing the situation? Some of us haven't done this job yet and we can learn with you


Thank you for adding the picture. Now I see what you are dealing with. Lots of great suggestions are being posted. (But I still don't look forward to that job in the future.)
IP: Logged
rubyredfiero
Member
Posts: 720
From: Belle River, Ontario, Canada
Registered: Jul 2003


Feedback score: (1)
Leave feedback


Total ratings: 58
Rate this member

Report this Post06-26-2020 12:42 PM Click Here to See the Profile for rubyredfieroSend a Private Message to rubyredfieroEdit/Delete MessageReply w/QuoteDirect Link to This Post
I don't know if I misunderstand your issue. Is your problem, 1- getting the tapered stud out of the spindle or 2- can't get the bj out of the control arm? I thought #2 is your problem. In that case my post will not help you a bit. Sorry.
IP: Logged
theogre
Member
Posts: 32246
From: USA
Registered: Mar 99


Feedback score: N/A
Leave feedback


Total ratings: 568
Rate this member

Report this Post06-26-2020 12:48 PM Click Here to See the Profile for theogreClick Here to visit theogre's HomePageSend a Private Message to theogreEdit/Delete MessageReply w/QuoteDirect Link to This Post
Put the nut back on the stud so spring etc hits the nut not you. leave nut 1 or 2 turns loose ref to full tight.

Buy/make a tool above and use it to push out the stud.
To help that, bump the side of knuckle hole area w/ a hammer to shake/vibrate the joint area. Do Not "beat" the knuckle, use repeated light hits
Between the two, should pop out w/o tighten the tool "to death."

Do Not use a "Pickle Fork" for BJ or Tie rod ends.
Rod end used a "press" tool to push out the stud. Can bump the knuckle same as above to pop the taper easier.

------------------
Dr. Ian Malcolm: Yeah, but your scientists were so preoccupied with whether or not they could, they didn't stop to think if they should.
(Jurassic Park)


The Ogre's Fiero Cave

IP: Logged
Raydar
Member
Posts: 40727
From: Carrollton GA. Out in the... country.
Registered: Oct 1999


Feedback score:    (13)
Leave feedback


Total ratings: 460
Rate this member

Report this Post06-26-2020 02:04 PM Click Here to See the Profile for RaydarSend a Private Message to RaydarEdit/Delete MessageReply w/QuoteDirect Link to This Post
Another vote for Rodney's balljoint tool. It locks between the upper and lower balljoint studs. As you unscrew it, it expands and forces against both balljoints. As others have said, leave the nut screwed on, but only loosened a couple of turns.
When if finally lets go it'll make a nice "bang".
You'll probably never be able to pry it off, and a pickle fork will just tear things up.
IP: Logged
Spadesluck
Member
Posts: 2069
From: Georgia
Registered: Jul 2016


Feedback score:    (8)
Leave feedback

Rate this member

Report this Post06-26-2020 02:59 PM Click Here to See the Profile for SpadesluckSend a Private Message to SpadesluckEdit/Delete MessageReply w/QuoteDirect Link to This Post
Pickle forks have always worked for me. Unless I am not following what is trying to be done here.
IP: Logged
PFF
System Bot
Patrick
Member
Posts: 36402
From: Vancouver, British Columbia, Canada
Registered: Apr 99


Feedback score: (1)
Leave feedback


Total ratings: 458
Rate this member

Report this Post06-26-2020 03:09 PM Click Here to See the Profile for PatrickSend a Private Message to PatrickEdit/Delete MessageReply w/QuoteDirect Link to This Post
 
quote
Originally posted by Brent7088:

I'm assuming this tool is for the upper joints.


Just to be clear, it's for both upper and lower ball joints. Works like a charm. I'll never go back to using a pickle-destroy-the-BJ-fork again.

IP: Logged
IMSA GT
Member
Posts: 10268
From: California
Registered: Aug 2007


Feedback score:    (8)
Leave feedback


Total ratings: 251
Rate this member

Report this Post06-26-2020 05:08 PM Click Here to See the Profile for IMSA GTSend a Private Message to IMSA GTEdit/Delete MessageReply w/QuoteDirect Link to This Post
Go to the auto parts store and get one of these. You just need to get the proper size for the arms to fit around the top of the spindle.


I use the same one for my Dodge truck and Hummer ball joints. It is a breeze once you have this tool.

[This message has been edited by IMSA GT (edited 06-26-2020).]

IP: Logged
Patrick
Member
Posts: 36402
From: Vancouver, British Columbia, Canada
Registered: Apr 99


Feedback score: (1)
Leave feedback


Total ratings: 458
Rate this member

Report this Post06-26-2020 07:23 PM Click Here to See the Profile for PatrickSend a Private Message to PatrickEdit/Delete MessageReply w/QuoteDirect Link to This Post
 
quote
Originally posted by IMSA GT:

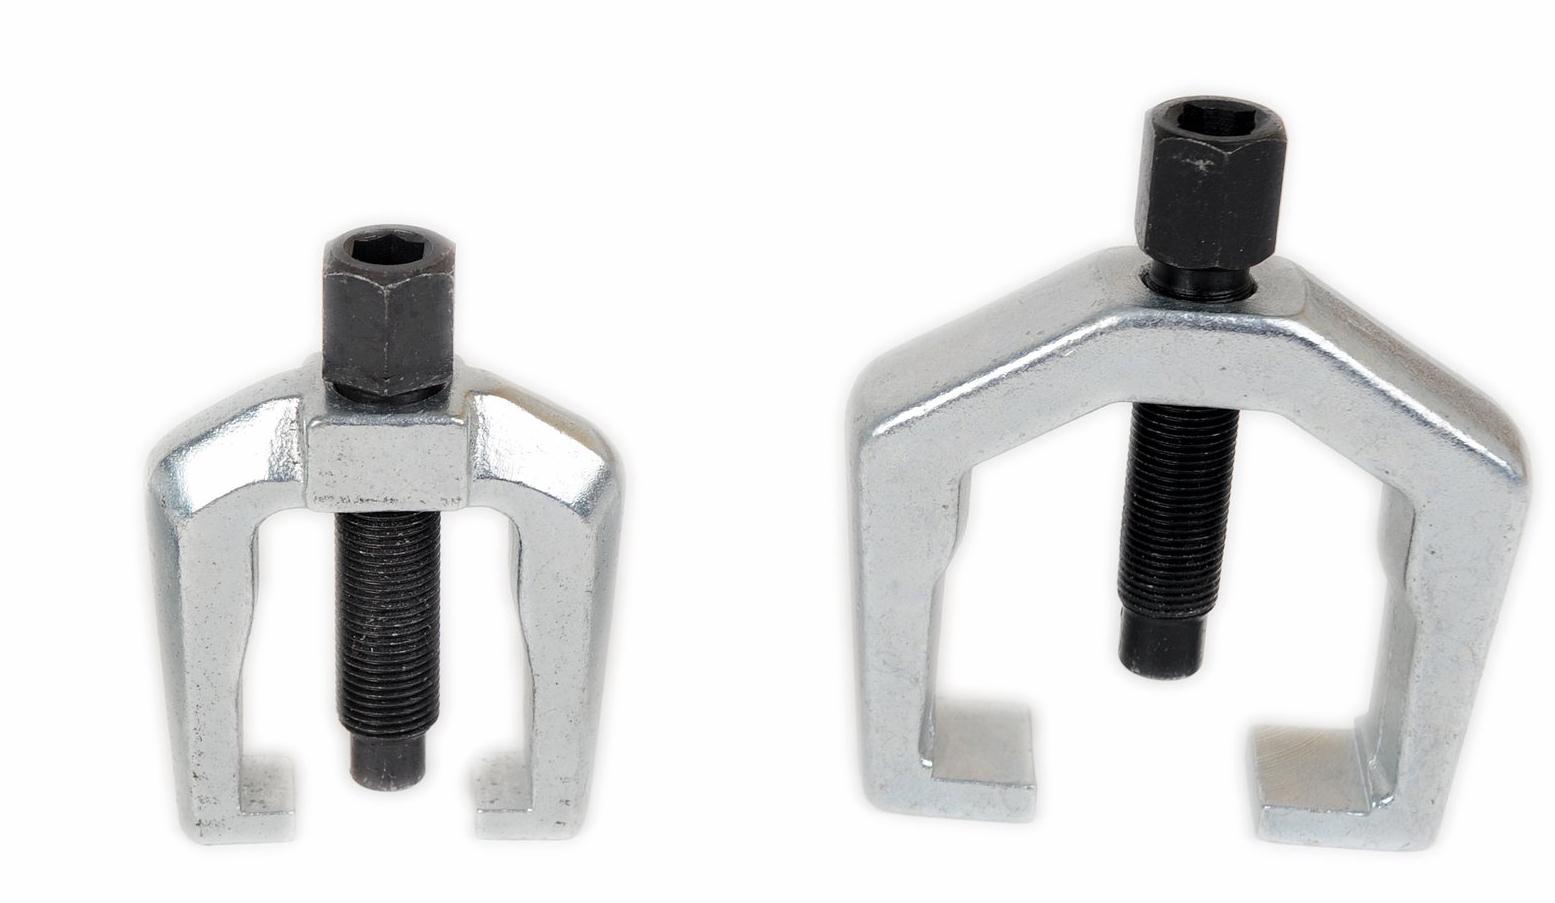
Go to the auto parts store and get one of these... It is a breeze once you have this tool.


It's nice to have options... but I fail to see how that tool could be anywhere near as much of a "breeze" to use than Rodney Dickman's BJ removal tool. With Dickman's tool (that doesn't sound right ), both upper and lower ball joints can be loosened... without even repositioning it.
IP: Logged
sspeedstreet
Member
Posts: 2306
From: Santa Maria, CA
Registered: Dec 2002


Feedback score:    (18)
Leave feedback


Total ratings: 53
Rate this member

Report this Post06-26-2020 07:42 PM Click Here to See the Profile for sspeedstreetSend a Private Message to sspeedstreetEdit/Delete MessageReply w/QuoteDirect Link to This Post
Another huge plus for Rodney's tool.
IP: Logged
IMSA GT
Member
Posts: 10268
From: California
Registered: Aug 2007


Feedback score:    (8)
Leave feedback


Total ratings: 251
Rate this member

Report this Post06-26-2020 09:04 PM Click Here to See the Profile for IMSA GTSend a Private Message to IMSA GTEdit/Delete MessageReply w/QuoteDirect Link to This Post
 
quote
Originally posted by Patrick:

It's nice to have options... but I fail to see how that tool could be anywhere near as much of a "breeze" to use than Rodney Dickman's BJ removal tool. With Dickman's tool (that doesn't sound right ), both upper and lower ball joints can be loosened... without even repositioning it.


Oh I'm just giving another option. I'm sure Rodney's tool works awesome.
IP: Logged
Brent7088
Member
Posts: 321
From: Ohio
Registered: Apr 2008


Feedback score: N/A
Leave feedback

Rate this member

Report this Post06-27-2020 01:09 AM Click Here to See the Profile for Brent7088Send a Private Message to Brent7088Edit/Delete MessageReply w/QuoteDirect Link to This Post
Well - I was able to get my hands on a ball joint separator, and I finally got it to pop off (surprisingly it wasn't as loud of a pop as I thought it would be). I'm sure getting the new one in is going to be just as much of a treat as getting it off.

Ordering the RD tool would have been my plan B - I just didn't care to wait an additional 2 weeks for it to arrive (shipping has been Xtra slow lately due to the virus situation). Anyhow I'll be working on the passenger side Saturday as I wait for the new joints to arrive.

I want to thank everyone kindly for chiming in. It's always a pleasure reading helpful advice from experienced folks.

Notorio (and for anyone else): When I get to the passenger side, I can try to get more pics and a few instruction as to how it worked for me.

[This message has been edited by Brent7088 (edited 06-27-2020).]

IP: Logged
Patrick
Member
Posts: 36402
From: Vancouver, British Columbia, Canada
Registered: Apr 99


Feedback score: (1)
Leave feedback


Total ratings: 458
Rate this member

Report this Post06-27-2020 02:18 AM Click Here to See the Profile for PatrickSend a Private Message to PatrickEdit/Delete MessageReply w/QuoteDirect Link to This Post
 
quote
Originally posted by Brent7088:

Ordering the RD tool would have been my plan B - I just didn't care to wait an additional 2 weeks for it to arrive (shipping has been Xtra slow lately due to the virus situation).


Just as a note of interest to anyone reading this thread... as much as I have exalted the use of the RD tool, it's actually super simple to make one. Necessity is the mother of invention, because ordered goods take even longer to reach Canada than they do to Ohio.
IP: Logged
theogre
Member
Posts: 32246
From: USA
Registered: Mar 99


Feedback score: N/A
Leave feedback


Total ratings: 568
Rate this member

Report this Post06-27-2020 03:49 AM Click Here to See the Profile for theogreClick Here to visit theogre's HomePageSend a Private Message to theogreEdit/Delete MessageReply w/QuoteDirect Link to This Post
⚠️ Warning: Clean knuckle hole and new stud before installing new BJ.
Tapers need clean to work right. Tapers do all the real work. Nut mainly holds the taper tight.

 
quote
Originally posted by Patrick:
Just as a note of interest to anyone reading this thread... as much as I have exalted the use of the RD tool, it's actually super simple to make one. Necessity is the mother of invention, because ordered goods take even longer to reach Canada than they do to Ohio.
Yes, easy to make in several ways...
And RD tool is a just "copy" of Kent-Moore/GM J-26407 listed in Fiero FSM https://www.google.com/sear...ent-moore/GM+J-26407

I make one out of parts from Power Steeling Pulley puller/install kit and 2 iron pipe plumbing fittings.
The kit is common and cheap at HF etc. and had one to install L4 WP.
Used the screw, nut, and maybe bearing plus an ½ coupler and ½ to ¾
Use ½ coupler to remove LBJ, other to remove UBJ.

Note: any tool listed in any GM FSM is a Kent-Moore tool and often use same PN. (KM is now owned by SPX.)

[This message has been edited by theogre (edited 06-27-2020).]

IP: Logged

next newest topic | next oldest topic

All times are ET (US)

Post New Topic  Post A Reply
Hop to:

Contact Us | Back To Main Page

Advertizing on PFF | Fiero Parts Vendors
PFF Merchandise | Fiero Gallery | Ogre's Cave
Real-Time Chat | Fiero Related Auctions on eBay


Copyright (c) 1999, C. Pennock