Pennock's Fiero Forum
  Technical Discussion & Questions
  How to set up the shift cable getrag 5 speed

Post New Topic  Post A Reply
Email This Page to Someone! | Printable Version


next newest topic | next oldest topic
How to set up the shift cable getrag 5 speed by zobari
Started on: 04-10-2019 07:08 AM
Replies: 6 (252 views)
Last post by: zobari on 04-11-2019 03:48 AM
zobari
Member
Posts: 99
From: belgium (EUROPE)
Registered: Jul 2018


Feedback score: N/A
Leave feedback

Rate this member

Report this Post04-10-2019 07:08 AM Click Here to See the Profile for zobariSend a Private Message to zobariEdit/Delete MessageReply w/QuoteDirect Link to This Post
Hi,

I have searched for but i don't understand how set up the shift cable on the getrag 5 speed tranny.
Could you show me with a picture what's the nut that i must have lossed ?

Thank you very much
IP: Logged
PFF
System Bot
fierofool
Member
Posts: 12810
From: Auburn, Georgia USA
Registered: Jan 2002


Feedback score:    (13)
Leave feedback


Total ratings: 154
Rate this member

Report this Post04-10-2019 08:28 AM Click Here to See the Profile for fierofoolClick Here to visit fierofool's HomePageSend a Private Message to fierofoolEdit/Delete MessageReply w/QuoteDirect Link to This Post
Only one cable has a nut that must be loosened. The cable that comes upward to the transmission is fixed and non-adjustable.

First, remove the shift knob and shift surround on the front console. Place the shifter into 3rd gear. Now, look on the side of the shift lever, just below the pivot point. You will see a small hole. That hole should line up with a hole in the main body of the shift mechanism. You need to insert a pin or drill bit or allen wrench of appropriate size into this hole to hold the shift lever stationary.

Once this is done, go to the rear and loosen the nut on the end of the cable that comes downward. Just loosen it enough that the screw post will move. Now, with your hand, move the transmission lever back and forth just a little until you feel it settle into what might feel like a "notch".

Tighten the nut. The screw post has a square shoulder that fits into the slot on the transmission lever. Be sure it's seated properly.

Now, remove the pin used to lock the shifter and go for a test drive before replacing the shift surround.
IP: Logged
zobari
Member
Posts: 99
From: belgium (EUROPE)
Registered: Jul 2018


Feedback score: N/A
Leave feedback

Rate this member

Report this Post04-10-2019 10:06 AM Click Here to See the Profile for zobariSend a Private Message to zobariEdit/Delete MessageReply w/QuoteDirect Link to This Post
Thanks for the advice i will follow it
But for the last part i have uplaoded an image, could you tell me if that's the first or second red arrow at the below image for the nut ?

This images is larger than 153600 bytes. Click to view.

Thank you
IP: Logged
fierosound
Member
Posts: 15144
From: Calgary, Canada
Registered: Nov 1999


Feedback score: N/A
Leave feedback


Total ratings: 286
Rate this member

Report this Post04-10-2019 10:43 AM Click Here to See the Profile for fierosoundClick Here to visit fierosound's HomePageSend a Private Message to fierosoundEdit/Delete MessageReply w/QuoteDirect Link to This Post
Put shifter in 3rd gear. Insert 1/8" drill bits in alignment holes to lock shifter in place.


Only shifter cable attaches to slotted hole in arm. (no adjustment for select cable from below)
Loosen nut, ensure arm feels like it's in 3rd gear "notch" in transmission. Tighten nut.


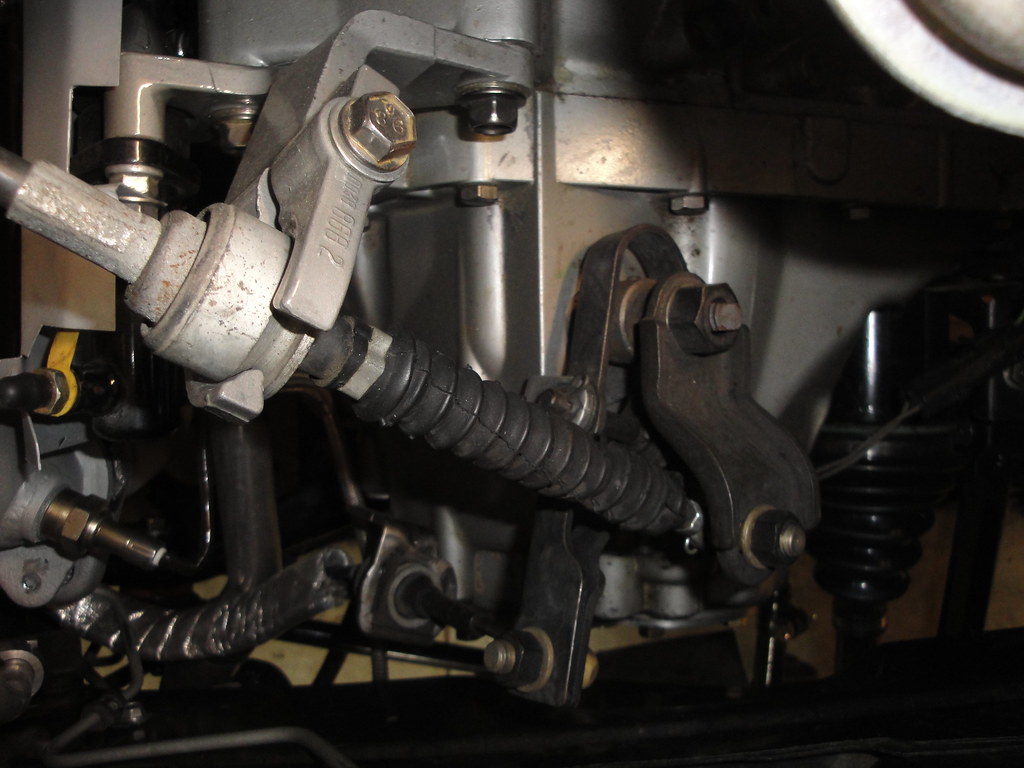
Proper routing of cables should prevent binding.


------------------
My World of Wheels Winners (Click on links below)

3.4L Supercharged 87 GT and Super Duty 4 Indy #163

[This message has been edited by fierosound (edited 04-27-2019).]

IP: Logged
zobari
Member
Posts: 99
From: belgium (EUROPE)
Registered: Jul 2018


Feedback score: N/A
Leave feedback

Rate this member

Report this Post04-10-2019 03:56 PM Click Here to See the Profile for zobariSend a Private Message to zobariEdit/Delete MessageReply w/QuoteDirect Link to This Post
Thank you for your two responses I have finally understood.

I have appreciated a lot your images
IP: Logged
olejoedad
Member
Posts: 18006
From: Clarendon Twp., MI
Registered: May 2004


Feedback score: (5)
Leave feedback


Total ratings: 205
Rate this member

Report this Post04-10-2019 04:40 PM Click Here to See the Profile for olejoedadSend a Private Message to olejoedadEdit/Delete MessageReply w/QuoteDirect Link to This Post
Number two is the adjustment nut.
IP: Logged
zobari
Member
Posts: 99
From: belgium (EUROPE)
Registered: Jul 2018


Feedback score: N/A
Leave feedback

Rate this member

Report this Post04-11-2019 03:48 AM Click Here to See the Profile for zobariSend a Private Message to zobariEdit/Delete MessageReply w/QuoteDirect Link to This Post
Thanks olejoedad
IP: Logged

next newest topic | next oldest topic

All times are ET (US)

Post New Topic  Post A Reply
Hop to:

Contact Us | Back To Main Page

Advertizing on PFF | Fiero Parts Vendors
PFF Merchandise | Fiero Gallery | Ogre's Cave
Real-Time Chat | Fiero Related Auctions on eBay


Copyright (c) 1999, C. Pennock