In the process of preparing to replace a badly leaking valve cover gasket, I have gone through all the archives (27 pages of "valve cover" search). I have a pretty good understanding of the job, which seems relatively simple on a 2.5 L, and don't feel I need to ask a lot of questions. However, I would like to clarify some things.
1) On the right side of the cover, the PCV valve line lifts easily out of the grommet. Maybe too easily, I think. I noticed that the end of the PCV line is not sitting straight in the grommet. It is tight up against an electrical hose underneath, and over time has tilted to the left. The right side is raised a millimeter or two more than the left. I've posted pictures of the cover, and line alongside the electrical:
I think this should be tight in the grommet, and straight. I'll get new grommets with the Felpro package, but suggestions to adjust the tight line so it's not tilted would be appreciated.
2) On the left side of the cover, the breather hose is stiffer. I take it I can just put something like a screwdriver underneath it, and pull on either end of the screw driver to force it and the grommet out?
3) I have ordered the Fel-Pro rubber gasket. Ogre and others have indicated that a line of gasket sealer- from what I have read, I am inclined to use Permatex The Right Stuff- should be applied on both sides of the gasket. I tend to agree with this, so there is less chance of leakage. But am wondering if I am setting myself up for a world of hurt, if I have to get the cover off at a future date?
I'm hoping this is it, although I may be back with a question or two mid job.
Thx,
Wayne
[This message has been edited by waynrayn (edited 01-17-2019).]
Any rubber or cork is a waste of time/money. Never use sealer with rubber gaskets. Many will install just RTV sealer and no gasket. I never say you should even tho GM did many at the factory. More confusing Some Covers are made for this but not all. Big problem is Many people don't clean and sealers won't seal for long.
gaskets do not have seals for PCV. Loosen the bolt and/or carefully bent the tube to fit the valve better. Valve doesn't care about being install a bit off. PCV Seals and hose get hard etc and leak a little to a lot. left side plastic elbow is often hard to remove because seal is hard. If you get a new Dorman cover. carefully cut the old seal to get elbow out w/o breaking. Dorman and some other made just PCV grommets but don't have # right now. https://www.dormanproducts....eyword&q=PCV+Bushing Dorman says should be 42322 1 per pack and likely you need 2
------------------ Dr. Ian Malcolm: Yeah, but your scientists were so preoccupied with whether or not they could, they didn't stop to think if they should. (Jurassic Park)
The BEST valve cover gasket you want to use on the Duke is Felpro PN FEL-VS50179T as theogre mentioned. This rubber/steel gasket has raised edges to seal properly and comes with all the hardware needed for installation.
Thank you for your replies. The items I have already ordered are, yes, the "New Engine Valve Cover Kit, Cap And Grommets Dorman 264-905," and the "Fel-Pro VS50179T Valve Cover Set." These items are on their way, and should be here shortly (I'm in Canada, couldn't get them locally).
"On a good valve cover..... coat both sides of the gasket with either super 300 or HiTack gasket adhesive. Aviation sealer is good if you can find it. People who use only RTV are generally asking for leaks. If the cover is bent up a bit, RTV can be used with a gasket. Make sure everything is very clean or the RTV will not stick. Neither will any of the other sealers above. Do not get excessive with RTV. Peices of it can break loose and plug up oil pasages. Not a good thing. As for material..... I like the "rubber" gaskets better than cork. They take a better seal and hold it longer. they are also less prone to crush destruction."
From this, I am still thinking that I should put adhesive, whether HiTack or The Right Stuff, on either side of the Fel Pro gasket regardless?
[This message has been edited by waynrayn (edited 01-17-2019).]
Do Not use Any type of sealer w/ felpro gasket "kit" above. Install Dry and follow directions in the kit using the right "washers" w/ the gasket.
High Tack and Super 300 Sealers can work on cork and rubber but you must clean all oil or they often won't work either. RTV Silicon and related "casket eliminators" will fail when you fail to clean off all oil/grease on parts. These are never to be used w/ most gaskets and ones require that often only in some spots like many oil pan sets you use a little at gasket joints. Most people use way too much of the product then push out by the gasket and the "Boogers" can cause big problems like blocking drain holes under valve covers on most engines not just Fiero 2.5l "Duke."
Even the "kit" likes clean parts but not like above that will fail for even a very thin film of oil you can't see on surfaces to seal. Using added sealers then final clean should be alcohol or brake clean on a clean rag then wipe everything the sealers touch.
Another example: The 2.5l timing cover over the gear set often can't use a gasket to the block, oil pan or both. GM had several version of the timing cover for this engine family. When you have non gasket versions, You use RTV silicon and careful cleaning on all parts and wait a day or more to "dry" or you will have a leak and often sooner. Cover to block you use a thin line of sealer. Cover to pan then often use more because your filling a big gap but not so much will squeeze out.
"... left side plastic elbow is often hard to remove because seal is hard. If you get a new Dorman cover. carefully cut the old seal to get elbow out w/o breaking."
When you say "old seal," do you mean to cut the grommet on the left side? How?
Yes, Cut the old grommet if needed. any small knife should do. you likely not need cut all the way to make it give up pressure on the elbow.
Can try carefully pull and twist the elbow so barb end inside the cover can work itself thru the rubber. You don't force the elbow any other way likely prying w/ whatever or likely will break it.
If cover is off the engine, clean so oil doesn't get on everything and "sit" on it or attach to engine again to hold while you cut/pull/twist the elbow.
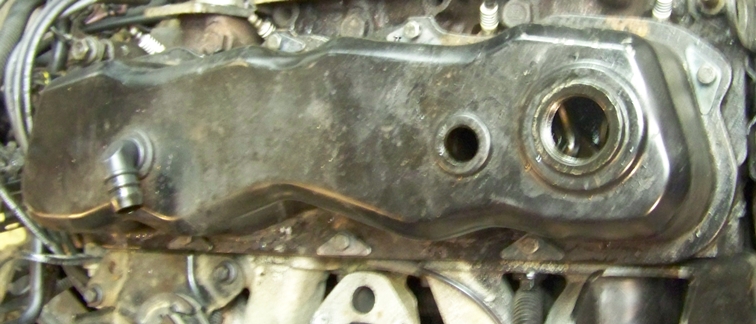
So... The parts, correctly chosen and labeled ("New Engine Valve Cover Kit, Cap And Grommets Dorman 264-905," and the "Fel-Pro VS50179T Valve Cover Set") have arrived.
However, looking at them, the design of the gasket and the new valve cover are not making sense to me.
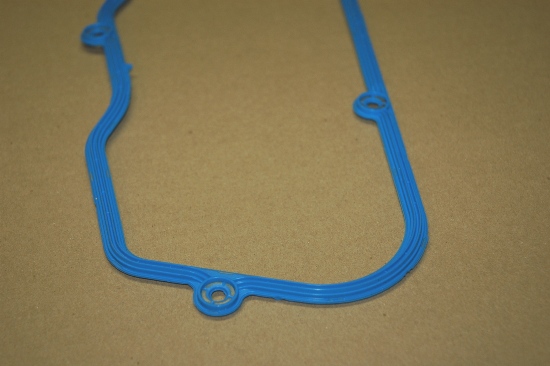
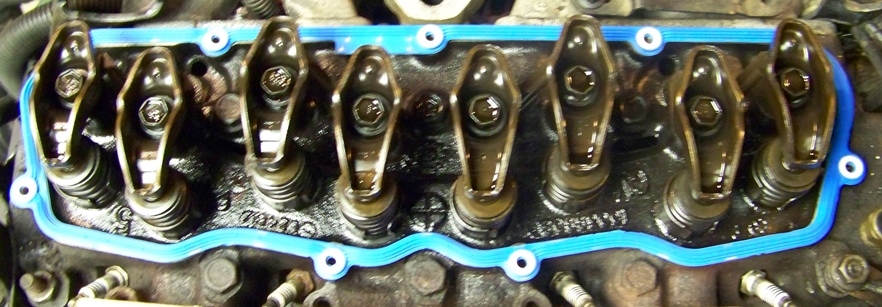
The gasket has an impression around four of the bolt holes, meaning it narrows, and is not consistently thick. Also, the new cover flange has gaps ("divot"?) in these four areas too.
I've also tried using the provided force spreaders (I think these are the force spreaders), as it seems the impressions in the gasket might be designed for them. It's better, but they leave a gap also.
I understand I'm doing something (several things?) incorrectly here. Obviously the gasket and cover flange are designed this way. But it makes no sense to me, in terms of sealing oil inside.
Could someone please explain what my mistake is?
Thanks very much,
Wayne
[This message has been edited by waynrayn (edited 01-22-2019).]
Sure, it makes sense that the force spreaders in fact go on the outside of the cover. That was just an attempt on my part, to see what worked. But that still leaves me with the problem in picture number 3, a big gap between the narrowed gasket and the flange divot (gap). If I torque that really hard to close the gap, it will likely bend the flange badly.
To me, the valve cover flange should be uniform all the way around, without gaps- in fact my old one appears to be, although I haven't taken it off yet- and so should the gasket- it should not have impressions narrowing it in spots.
Why are it and the flange designed this way, and how is it installed without leaks?
[This message has been edited by waynrayn (edited 01-22-2019).]
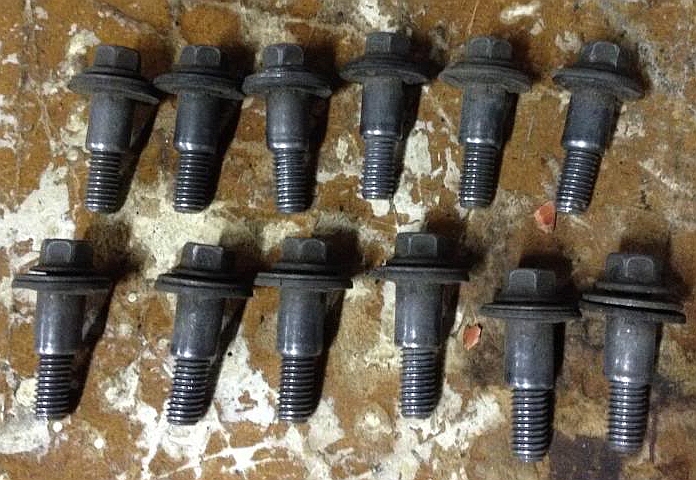
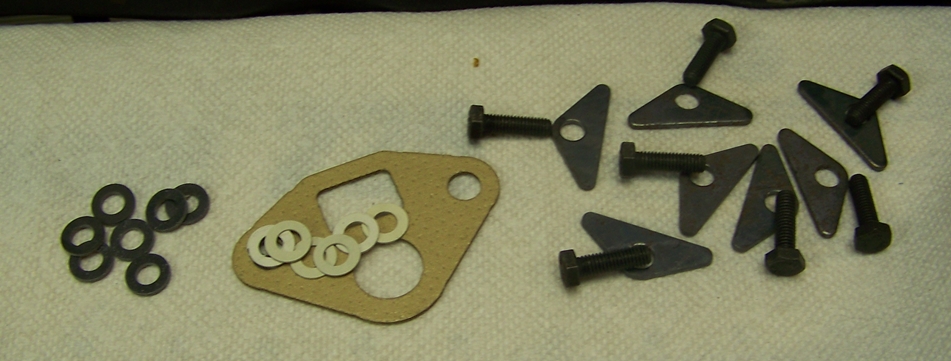
The new valve cover bolts appear to be the typical hexagonal bolts that I already have in the old cover. There are seven in the package, as well as o-rings and washers.
[This message has been edited by waynrayn (edited 01-22-2019).]
I see... Thanks for the picture. Yours have a small lip under the hexagonal head, then the shoulder, and then an o-ring, it looks like. My old ones, still in the cover, just have the lip under the hexagon. No shoulder or o-ring. The new ones still in the package have no lip or shoulder, just the hexagon. This wasn't a concern to me, as I intended to use the force spreaders.
I went to three auto shops/parts dealers, to ask about my problem with this gasket ("Fel-Pro VS50179T") and valve cover (("Dorman 264-905").
All three places said that while the gasket shape fits, it is poorly designed to seal in oil, because as I said above, it tapers around the bolt holes, right where the valve cover flange coincidentally gaps:
... They recommended a cork gasket. This is uniformly thick, and the design makes total sense to me:
Except that it's crappy cork, will need a ton of RTV, and I hate it.
... So why is the (expensive) PermaDry Plus gasket designed this way? More so, why is everyone in the forum recommending these, and not having trouble with them?
I figure it's one of two things: Either your Dorman valve cover flange doesn't have any gaps like this one (where did you buy it?), or your Fel-Pro gaskets have tabs sticking out, that fit into the gaps in the flange, to provide a seal.
Can anyone explain this?
Thanks,
Wayne
[This message has been edited by waynrayn (edited 01-24-2019).]
The rubber cylinders around the bolt holes will seal the gap when the bolts are tightened. The adjoining ribs have to taper to the same level as the hole cylinders to ensure continuous contact adjacent to the hole cylinders. The ribs between the holes will be squeezed down by the rocker cover to seal between the holes.
I went to three auto shops/parts dealers, to ask about my problem with this gasket ("Fel-Pro VS50179T") and valve cover (("Dorman 264-905").
All three places said that while the gasket shape fits, it is poorly designed to seal in oil, because as I said above, it tapers around the bolt holes, right where the valve cover flange coincidentally gaps...
Did you talk to a knowledgeable mechanic at any of these shops, or just to some parts jockey behind a counter?
Thank you for asking. I spoke with people at the repair desk at two dealerships (one which does Pontiac), and a parts store (Lordco here in Canada, equivalent of Auto Zone). All were mechanics or ex-mechanics. All immediately saw the issue when I showed them the valve cover and Fel-Pro gasket.
Based on David's comments, I'm happy to give this a try. I really didn't want the hassle of returning either the valve cover or the gasket, as I had to order them from the U.S.
I know it's a simple project, hopefully all is good.
I spoke with people at the repair desk at two dealerships (one which does Pontiac), and a parts store (Lordco here in Canada, equivalent of Auto Zone). All were mechanics or ex-mechanics. All immediately saw the issue when I showed them the valve cover and Fel-Pro gasket.
I've never talked to a person behind a desk at a dealership or especially at Lordco(!) who knew their azz from a hole in the ground.
When I replaced my valve cover gasket, I believe I used the same Felpro gasket as you have. My valve cover had been brutalized, however.
Try this... You will need a perfectly straight, level, workbench. Flip the valve cover upside down, and rest the flat flange on the edge of the bench. Tap the flange with a small hammer, so that it is flat, and not "indented" where the bolts held it on, before. Work your way all the way around the valve cover, until everything is uniform. The "rail" on the head is perfectly flat. The idea is to make the valve cover as flat as possible, before you even think about adding the gasket into the mix.
The gasket that you have, should(?) have plastic bushings around the bolt holes. Those bushings will only allow the bolt to compress the gasket so much. The valve cover flange will also compress the ridges on the gasket, between the bolt holes. This will produce the best seal possible, without using silicone or other sealer. Use the spreaders under the bolts, between the bolt head and the valve cover flange, to stop the bolts from compressing just the area of the flange around the bolt.
Just snug the bolts down until you feel resistance. You don't need to tighten them until stuff bends.
I did mine a couple of years ago, and it hasn't leaked a drop. (The rear main seal is a whole 'nother story.)
[This message has been edited by Raydar (edited 01-25-2019).]
Do not return either. I have updated cover w/ screw cap use by some later years, Dorman is similar but uses gaskets I think, and same gasket...
Follow Felpro directions and Ignore idiots claim they know better Felpro designers/engineers and compare to rubber and cork. Felpro made this gasket thicker in some spots and the thicker areas squeeze down to fit gasket and non gasket covers and even damage covers if isn't beat to hell by fools.
CLICK FOR FULL SIZE
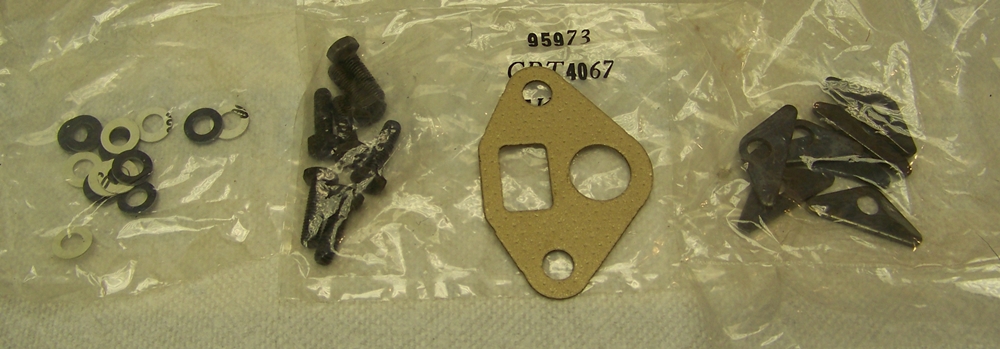
Parts shipped w/ new Gasket VS50179T...
In short... Lay gasket on engine. It fits only one way. put correct "washer" in gasket holes. White goes w/ no casket covers like mine. Grey/black goes w/ smooth cover made for gaskets. put cover on put metal piece and New Felpro Bolts in each hole. I installed the load spreaders as shown w/ Most wide edge in, intake side pointed to intake, to spread load over the casket evenly as possible.
Do Not reuse old cover bolts! Many are shorter then new bolts and added length is needed because load spreaders.
If you really want the old cover and/or cork... Most covers of both types have been warped and hit many times and metal is weak and warp easy and leak day to months after. I only reused this one because rarely found a good one w/ very little damage. Reusing non casket covers are not simple bash to flatten. You have to support the flange upside down and carefully restore hitting the bottom because of the rolled holes.
You likely have oil in the bolt holes... Do Not use torque spec or you will wreck or break parts.
Do Not use RTV with any valve cover gaskets. Use High Tack or Super 300 or equivalent paint/spray sealer and only w/ cork or rubber. Felpro "kit" goes completely dry.
[This message has been edited by theogre (edited 01-26-2019).]
Thank you very much for taking the time to post this, with detailed explanation and pictures. I wasn't expecting a further post, and appreciate it.
I had already started the work, but mostly was cleaning the head. I also cleaned the bolt holes painstakingly, using Q-Tips and brake cleaner.
I definitely wanted to use the new Dorman cover, which has a smooth flange. I am still somewhat concerned about the gaps in the flange. I used the thicker washers in the Fel-Pro gasket. I did use the new longer bolts.
I put the gasket on dry. Because I cleaned the head thoroughly, and the valve cover was new, and the bolt holes were clean, I did torque it to spec (60 inch pounds, according to the instructions I got).
Also, the force spreaders are properly topside on the valve cover! (That's a joke regarding my earlier post about trying them underneath, against the narrow spot in the gasket)...
Having removed the EGR, I noticed that its bottom and the intake are very dirty. Any suggestions as to the quickest/safest way to clean this appreciated. I don't think I need a new one yet. I will look in archives for comments on this.
Many thanks & regards,
Wayne
[This message has been edited by waynrayn (edited 01-27-2019).]
EGR ports gets soot from exhaust. You don't need to clean the ports very well.
Use a small brass brush to loosen and suck out w/ vacuum cleaner. Use some hose to lightly blow air by mouth in both ports so can tell if port can get air flow. TBI have a small hole for this and can block up.
likely may not help if total blocked to TBI side. If blocked then need to remove air cleaner bolts and bolts holding fuel lines to intake/head to try to get clearance to clean other end of the passage. If you need to remove fuel line use TWO flare wrenches. If remove, put mounting bolts in finger tight. Hold the big one in place and only turn small one to loosen the line.
If TBI gasket is bad... Just get a "rebuilt" kit that has all gaskets, fuel regulator diaphragm, etc. Even before that, turn on key just to prime the fuel system and look for leaking at fuel reg. Many are and kit should have this and cheaper the buying just the diaphragm. See my Cave, 700 TBI
[This message has been edited by theogre (edited 01-28-2019).]
It looks like the EGR valve isn't working. I cleaned it, and tested it by depressing the diaphragm, putting my finger (wearing rubber glove) over the hose nozzle, and letting go. The diaphragm always returns, despite repeated attempts, so I don't think it's holding the vacuum. Good thing I didn't just stick it back on...
Often this test is bogus. Many vac operated OE EGR valves does not test by holding a vacuum or use a hand vac pump w/ engine off or at idle. They need exhaust pressure at same time to work. Most Aftermarket replacements can test this way but not all. And you can't tell just looking. Many PN don't tell when EGR is Positive or Negative exhaust pressure type valve.
Avoid Universal EGR or if you must install correctly. See my Cave, Emissions
Thank you very much, I will read your section on emissions in the Cave tonight.
Most of my above work is done, except for the EGR.
I have also decided to replace the transmission side cover gasket, as it definitely seems to be leaking. It looks to be part #54301 at the Fiero Store.
Archived comments say to replace the TCC solenoid and pressure switch as well, but I think this is for the V6, and I have a 2.5L.
When replacing the transmission side cover gasket on the 2.5L, is there anything else which should be replaced at the same time?
TCC switch problem happens to many older auto trans not just V6. Use ACDELCO 8689901 not TFS and other "universal" solenoids. Have all wiring except 3rd gear switch.
Is a big pain because 87 duke have the huge bracket over the left cover. make sure the trans won't move when you remove that bracket or you can break other things.
[This message has been edited by theogre (edited 01-30-2019).]
Thanks for your suggestions. I have gone ahead and ordered the ACDELCO 8689901. I was able to obtain the side cover gasket (Fel-Pro) locally.
I have some time until the solenoid arrives, so I'll continue working on the EGR and cleaning the intake. I'll also read your notes on emissions in the Cave.
I'll check archives to study removal of the trans side cover.
1) Many archived comments suggest replacing the 3rd gear pressure switch as well. The suggested part number is GM Part #8643710. However, when I locate this, typically on Amazon (good price for Canada), it indicates this part is incompatible:
The Fiero Store switch looks similar, and does not differentiate between 2.8 and 2.5. Mine is 2.5. Am I okay to ignore this warning?
2) Ogre commented that I should support the trans prior to removing the big bracket. Is this best done from above, or below? Any suggestions to make this easier?
As Ogre said, the end bracket of the tranny has been very difficult to get off. I have it completely loosened, the tranny is supported underneath. But the inlet/outlet tubes for transmission fluid circulation are in the way. There doesn't seem to be any option but to remove them. I don't think this is a problem, and plan to twist them out with the black hexagonal collar (not the brass).
When replacing them, after cleaning would it be a good idea to use some sort of thread sealant or teflon tape, to keep them from leaking?
[This message has been edited by waynrayn (edited 02-17-2019).]
You need 2 wrenches same as most flare fittings but here likely can use any close end wrenches.
Flare fittings do not use any sealers.
But if you remove the big nut then little need some screwing in the trans because think is NPT thread and most will leak w/o it. Light coat of Paint on white no dry pipe sealer should work.
An update: I have successfully replaced my valve cover and gasket, both side and bottom gaskets on the transmission, and also the TCC solenoid and pressure switch. Everything is re-assembled.
Along the way, I also replaced the EGR valve, and thew in the PCV valve as well.
It took time to order things in, as I decided to replace them.
I am pleased with the gaskets, which do not appear to be leaking at all.
However, I do have one area leaking, which is the transmission inlet and outlet nozzles:
I was surprised at this, because after cleaning them, I used some pipe joint compound on the threads. I snugged them in by hand first, then tightened a bit more till they were firm. I did not expect this to leak.
Apparently either my tightening was not enough- I couldn't find any torque spec- or the pipe joint compound is not compatible. It is not auto compound, although it is rated for heat and pressure (PTFE).
Could anyone suggest how to seal the threads better? I did not loosen the large brass nuts behind, only the nozzle threads, when I took them off to remove the support bracket.
Also, is it just me, or is the trans dipstick hard to read? Every time I try to see the fluid level, the side with markings is always dry, and the backside is wet. I've tried reversing the dipstick when I insert, but it doesn't seem to make any difference. I never seem to get a clear indication of level, like I can with the oil dipstick. I know however that I have put in at least the 8 pints or so required.