Pennock's Fiero Forum
  Technical Discussion & Questions
  Hand sketched schematic for Gen 2 headlight motor controller and replacement relay

Post New Topic  Post A Reply
Email This Page to Someone! | Printable Version


next newest topic | next oldest topic
Hand sketched schematic for Gen 2 headlight motor controller and replacement relay by Chris Eddy
Started on: 09-30-2017 11:38 AM
Replies: 10 (657 views)
Last post by: 2.5 on 10-03-2018 09:27 AM
Chris Eddy
Member
Posts: 469
From: Pittsburgh, PA
Registered: May 2016


Feedback score: N/A
Leave feedback

Rate this member

Report this Post09-30-2017 11:38 AM Click Here to See the Profile for Chris EddySend a Private Message to Chris EddyEdit/Delete MessageReply w/QuoteDirect Link to This Post
One more plank on the bridge to fix it all..
I had to repair my gen 2 headlight control box. Fortunately I had two of them to fuss with.
I did figure out how to bench test the unit.
I use two LEDs, red and green, back to back (reverse polarity) with a 1K resistor in series... on each motor output (a pair for AB and another for CD).
I then apply 12V power to the unit. Ground to D (the 5 pin are numbered up side down). 12V to B and E.
Then you just touch 12V to the A (open) and C (close) terminals, and the LEDs will both blink with one color or the other. In the down direction, the relay closes as well.
One of my useful additions is that I have found a replacement for the relay. Panasonic HC4-HP-DC12V from digikey. At almost $13, they are not giving them away. But when the alternative is....
I did order one and put it in, and it works on the bench and in my car.
I made up a hand sketch of the complete schematic, but sadly since photobucket is being a dick, I cannot post it here.. unless someone knows how to post a PDF.
I will happily email it to you, but let me know if you PM me since the forum does not notify me of PM posts.
IP: Logged
PFF
System Bot
Stubby79
Member
Posts: 7064
From: GFY county, FY.
Registered: Aug 2008


Feedback score: N/A
Leave feedback


Total ratings: 58
Rate this member

Report this Post09-30-2017 12:28 PM Click Here to See the Profile for Stubby79Send a Private Message to Stubby79Edit/Delete MessageReply w/QuoteDirect Link to This Post
You've got me curious. By the looks of that relay, there's no way it would fit inside my gen 2 module. (then again, mine came from a later model camaro/firebird, so who knows?)

You should be able to post a link to the web page that contains anything from photobucket.
IP: Logged
Chris Eddy
Member
Posts: 469
From: Pittsburgh, PA
Registered: May 2016


Feedback score: N/A
Leave feedback

Rate this member

Report this Post09-30-2017 12:35 PM Click Here to See the Profile for Chris EddySend a Private Message to Chris EddyEdit/Delete MessageReply w/QuoteDirect Link to This Post
The web link to the relay on Digikey's web site..
https://www.digikey.com/pro...V/255-1920-ND/647797
Link to previous post with a picture of the gen2 module..
https://www.fiero.nl/forum/A...130314-2-112597.html
I will work on that schematic link..
IP: Logged
Chris Eddy
Member
Posts: 469
From: Pittsburgh, PA
Registered: May 2016


Feedback score: N/A
Leave feedback

Rate this member

Report this Post09-30-2017 12:57 PM Click Here to See the Profile for Chris EddySend a Private Message to Chris EddyEdit/Delete MessageReply w/QuoteDirect Link to This Post

Chris Eddy

469 posts
Member since May 2016
Let's see if this worked, posted it to vgy.me

Sorry it's tilted..
IP: Logged
theogre
Member
Posts: 32246
From: USA
Registered: Mar 99


Feedback score: N/A
Leave feedback


Total ratings: 568
Rate this member

Report this Post09-30-2017 09:59 PM Click Here to See the Profile for theogreClick Here to visit theogre's HomePageSend a Private Message to theogreEdit/Delete MessageReply w/QuoteDirect Link to This Post
Nice diagram.
the omron relay is still available too.

Should not replace MOSFET... If does, so far big trouble as Cliff and other found out.
Very short: could not find exact match and upgrade it but that charge FET resistance values and screwed up load sensing.

PA75N85 Ron 0,085Ohm(5A) IOW 85mΩ @ 5a (PA75N85S TO220 case)
(Ron is listed same on some China/Japan sites too.)
but
nte2389 etc Ron is 40-45mΩ @ 20a.
Test Volts/Amps may not matter but replacements are ~ 1/2 the resistance...
So if Ron is part for load sensing then the "upgrade" mosfet won't work for long w/o recalculated other parts... result in frying the module & melting motors.

------------------
Dr. Ian Malcolm: Yeah, but your scientists were so preoccupied with whether or not they could, they didn't stop to think if they should.
(Jurassic Park)


The Ogre's Fiero Cave

IP: Logged
Chris Eddy
Member
Posts: 469
From: Pittsburgh, PA
Registered: May 2016


Feedback score: N/A
Leave feedback

Rate this member

Report this Post09-30-2017 10:07 PM Click Here to See the Profile for Chris EddySend a Private Message to Chris EddyEdit/Delete MessageReply w/QuoteDirect Link to This Post
Very cool, I looked high and low for GI MOSFET data (GI became Microchip a LONG time ago). Could not find anything.
But 85mr is the crucial bit of data. The closest that I could find is 90mr, which is pretty close,
[url=https://www.digikey.com/products/en/discrete-semiconductor-products/transistors-fets-mosfets-single/278?k=NCH+MOSFET+TO220&k=&pkeyword=NCH+MOSFET+TO220&pv612=560&FV=1f140000%2Cffe00116%2C9780001&mnonly=0&ColumnSort=0&page=1&stock=1&quantity=0&ptm=0&fi d=0&pageSize=25]https://www.digikey.com/products/en/discrete-semiconductor-products/transistors-fets-mosfets-single/278?k=NCH+MOSFET+TO220&k=&pkeyword=NCH+MOSFET+TO220&pv612=560&FV=1f140000%2Cffe00116%2C9780001&mnonly=0&ColumnSort=0&page=1&stock=1&quantity =0&ptm=0&fid=0&pageSize=25[/url]
So if anyone is desperate (and if your controller does not work, your headlights don't work, and you wont pass inspection.. so you might be desperate)..
Then this part might fit the bill.
IP: Logged
pmbrunelle
Member
Posts: 4376
From: Grand-Mère, Québec
Registered: Sep 2008


Feedback score: N/A
Leave feedback


Total ratings: 62
Rate this member

Report this Post09-30-2017 11:56 PM Click Here to See the Profile for pmbrunelleSend a Private Message to pmbrunelleEdit/Delete MessageReply w/QuoteDirect Link to This Post
You could also get a modern MOSFET having much lower RDS(ON) and then installing a series resistor.

But while we're discussing this, an all-new solid-state headlight module design to work with Gen 2 headlights would be a decent project, having more appeal to Fiero folks than a standalone ECU.

People who aren't techno-geeks could appreciate the need for this! Possibly also if the module could be used to convert 84-86 to Gen 2 motors.
IP: Logged
Chris Eddy
Member
Posts: 469
From: Pittsburgh, PA
Registered: May 2016


Feedback score: N/A
Leave feedback

Rate this member

Report this Post10-01-2017 11:16 AM Click Here to See the Profile for Chris EddySend a Private Message to Chris EddyEdit/Delete MessageReply w/QuoteDirect Link to This Post
The Ron does have to be right.. lowering it would require gaining it up. And raising it would cause more heat.
The right idea is to not use Ron as a current sensor.. it varies in production, and is a poor way to do it.
Working on a new Gen2 controller board...
Half way through, have to add a microcontroller.
https://vgy.me/0zjE6L

[This message has been edited by Chris Eddy (edited 10-01-2017).]

IP: Logged
theogre
Member
Posts: 32246
From: USA
Registered: Mar 99


Feedback score: N/A
Leave feedback


Total ratings: 568
Rate this member

Report this Post10-01-2017 02:36 PM Click Here to See the Profile for theogreClick Here to visit theogre's HomePageSend a Private Message to theogreEdit/Delete MessageReply w/QuoteDirect Link to This Post
Try Using [img thumb] for big images.

 
quote
Originally posted by Chris Eddy:
The Ron does have to be right.. lowering it would require gaining it up. And raising it would cause more heat.
The right idea is to not use Ron as a current sensor.. it varies in production, and is a poor way to do it.
Yes but GM allows some variations... So 90mΩ might work fine but nte2389 et al 1/2 of Ron is far outside this and quickly kills the system. (90mΩ may trip Load Sense a bit early cause fake Jam Motor(s). More so w/ iffy motors and HL lift parts.)

Not ideal for fixing but design works for decades now and was cheap to make.
GM have Millions of modules that last for years and likely < 1% fails is a very good rate. 87 & up Fiero Sunbird Firebird Corvette etc have same type of module w/ minor versions. You don't see many things now w/ < 5% fail rate in ~5 years. Many are dead in 1-2 years like many iThings from Apple.

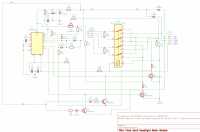
If you fix a Dead MOSFET board... Look for other problems causing a fried FET...
Example: Cliff's original one shows signs got wet at minimum. Plugs aren't "Water Proof" just weather resistance and water can still get in thru plugs or case "glue." (glue is likely old type "windshield sealer" and often doesn't seal well.) Water could make board to swell etc causing FET w/ no or poor connection to heatsink. Heatsink is copper on the other side of board. (Is enough heatsink for short duty cycle the FET is on.)

If board shows signs of water then can have other parts w/ damage too. Resistors etc can change values etc and fried MOSFET as a side effect.
Crack solder joints anywhere can do same... Load Sense won't get good "data" and might not see the real loads and doesn't shutoff the MOSFET. Even if LS is very simple and resets the "timer" chip. (Very likely) Load won't reset because iffy joints etc.

So while you can try to fix... Don't use it until you make sure the Load Sense works. If LS does not work then Timer runs full power to motor(s) every time goes up/down at End of Travel for 2-5 sec. That bad enough but If Timer fails then you quickly will have fried the module and likely the motors and wiring to them.

The board and the chip uses capacitors and caps can fail just from old age. Is why Many Fiero Tach fails.

Digital module? Can likely use 556/558 timer and "better" load sense circuit to reset the chip.
Likely relay is shut off too to save coil lifetime and not eat power when motors are done.
One ways to sense load is a small coil w/ reed switch or hall effect sensor. Pull enough power thru the coil and switch/sensor trips resetting timer...

Many Digital items use a lot more power. HL module only uses a very few mA for the one chip in side. More "standby" power eaten by ECM etc the less time before you have a dead battery.

[This message has been edited by theogre (edited 10-01-2017).]

IP: Logged
theogre
Member
Posts: 32246
From: USA
Registered: Mar 99


Feedback score: N/A
Leave feedback


Total ratings: 568
Rate this member

Report this Post10-03-2018 12:38 AM Click Here to See the Profile for theogreClick Here to visit theogre's HomePageSend a Private Message to theogreEdit/Delete MessageReply w/QuoteDirect Link to This Post
I found my half dead module and found some errors/corrections in the above drawing...
D1 D2 D5 are 1N4001 (D1 label is partly cut off at the end of T1/C1 plug)
D3 D4 are 1N914F (F is likely Fairchild Semiconductor, Can barely just read the body.)
Q1 Q2 are PA75N85 made by GI [General Instrument] (Also made many "Set Top Boxes" used by Cable TV years ago.) only data I found... 60V, 23A, 75W, Ron 0,085Ohm(5A)
Q3 Q4 Q5 are GES5813, Not GE5 5815, made by GESS [GE Solid State] data at https://www.mouser.com/ds/2/68/lssgp078-277012.pdf
Don't have bench power etc to see zener volts right now. No markings I see other than blue band.

You marked close as active low... Not the case. This module has power on close pin and this power from Taillight fuse also powers the motors to close. Correct HL switch etc wiring is on Gen2 page of cave.

Note: Relay on my board is Omron MY4-02 GM 12VDC (Omron modifies spec and label such and worse marking.)
GM Relay Contacts are rated for 5A 28VDC as printed on the side but standard MY4-02 12VDC still available from Omron is only rated at 3A 24DC.
Good Motor draws less to run like 1 to 2 amps and spikes at ~4.5A at end of travel or if have a jam. Hard to read the meter to see running amps because so short of run time. (Bad motor(s) or module will fry either/both as shown in other threads.)
So replacing w/ standard relay can work because relay is not a power switch but still die sooner then the GM relay.
This is also why the big MOSFET have very little heat sinking. just brass rivet to large copper that nowhere.

Clean and fix above and three R#. Didn't check all of wiring...
CLICK FOR FULL SIZE
IP: Logged
2.5
Member
Posts: 43225
From: Southern MN
Registered: May 2007


Feedback score: (1)
Leave feedback


Total ratings: 184
Rate this member

Report this Post10-03-2018 09:27 AM Click Here to See the Profile for 2.5Send a Private Message to 2.5Edit/Delete MessageReply w/QuoteDirect Link to This Post
 
quote
Originally posted by Chris Eddy:
the forum does not notify me of PM posts.


It notifies me of mine, you should be able to turn that on.
IP: Logged
PFF
System Bot

next newest topic | next oldest topic

All times are ET (US)

Post New Topic  Post A Reply
Hop to:

Contact Us | Back To Main Page

Advertizing on PFF | Fiero Parts Vendors
PFF Merchandise | Fiero Gallery | Ogre's Cave
Real-Time Chat | Fiero Related Auctions on eBay


Copyright (c) 1999, C. Pennock