I call this thread my build ATTEMPT, because it’s just that. I’ve never tried anything this ambitious before and its already turning out to be more difficult than I expected. My thought going in to this was that the SD4 would be the easiest swap (though not the cheapest) because of dealing with the same block, it would bolt right up, and I wouldn’t have to worry about fabricating anything. Cost is less of an issue than dealing with the lack of tools and skill to make things fit that weren’t designed to go together. (This is going into an 84, so that wiring would have to be considered if doing a 2.8/3.1 swap.) I bought what I thought was a relatively complete engine. It was previously used for racing so I knew the cam was not going to be something that could be run on the street and the compression would also be an issue, but I thought I might be able to deal with that by running at least a partial tank of E85 for an Octane of about 96 or so. I’ll list, in no particular order, some of the issues I’ve been dealing with, some more significant than others.
1. Fuel. I first thought I would use the Holley TBI, as sold by the Firestone a few years ago. However I came to the realization that this TBI would not be able to supply enough fuel to approach the 180hp goal I was shooting for. So what to do….. old fashion carb?? One of those fancy self-learning/auto tuning EFI systems from Holley, FAST, etc.? Well, that is not so easy. Those self-learning systems are mostly designed for 8 cylinder cars, and they are very expensive and some feedback I’ve gotten is that they don’t work so well. So the current plan is to get a 2 bbl TBI out of a late 80s 4.3 Blazer, and educate myself on the art of EFI tuning.
a. Need an adapter plate to mate the 2bbl TBI on to the 4 BBL Super Duty intake. There are companies that make these adapters but they are about 100 bucks, and some of the feedback I’ve seen says they are too thin, and the TBI bolts can pull out or strip easy. Solution, by my own ½” Aluminum stock from Ebay, metal cutting Jig saw blades and metal cutting whole saw. (Sorry no access to a CNC machine). After a lot of labor, I have a workable, but not so pretty adapter. b. Mounting holes in the intake were helicoiled, and each hole was a different size. Rip out all the helicoils, make 3 trips to Home depot to find the right screws to attach my adapter plate.
2. Cam. I mentioned above, I knew going in I’d need a cam, what I didn’t know how that would nearly kill the whole project. One of the first things I learned about SD4 blocks AFTER I got this engine is that some engines have 5 ROLLER BEARINGS for the cam, while others are 3 bearings like regular Iron Duke block. No one has 5 journal cams that can be ground to run on the street. Call Lunati Cam, Crane Cams, Comp Cams, Isky, Bullet/Ultradyne. It was hard finding ANY 5 journal cam. The couple I did find could not be ground for the street. Next I tried to send the cam from the race engine off to be reground. After the guy has the cam a few days he tells me he can make it a bit milder, but I am still looking at a 260 duration at .050. As one of my last hopes I try Kansas Racing, who has the rights to build the Super Duty block. Their website says they have Cams. I called KRP every day for a week, and got the receptionist who said someone will call me back when I told her I wanted to order a cam. No one called. I tried email, and Fax. Saying I WOULD LIKE TO PLACE AN ORDER, but still no one responds. That is one helluva way to run a business. After I was starting to consider removing the roller bearings and having the block converted back to run on 3 normal cam bearings, a guy from a small cam shop in North Carolina contacted me saying he could do a streetable cam. It’s still very aggressive in my opinion, but that’s the best I can do for now. The other hard part about this is the lifters. All of these 5 journal cams are cut for SOLID/Mechanical lifters, not hydraulic. The engine had lifters in it, but since I didn’t know their exact history I decided to buy new lifters. There is another 400 bucks spent that I didn’t plan on.
3. Pistons. Knowing that the compression was super high with the flat top pistons that cam in this block, I ordered stock Fiero pistons which would still give a nice compression ratio in this engine. Well, I didn’t know that some pistons have a floating pin and some are pressed. And the pressing happens on the rod, not the piston. Duh me. So the Fiero pistons wouldn’t work with the nice H beam rods that I have. Next I find out that SBC pistons can be had in a number of different configurations with a compression height almost identical to the stock Fiero. So I get ready to order one of these in the Floating Pin configuration, only to then realize that the compression height of the pistons in the engine is much closer to 1.50 and not the 1.57 or so that is stock. (It’s hard to measure this without the proper tools). This means the new piston is going to stick out of the block and probably hit the cylinder head. SBC Chevy piston won’t work in this block. Now I have to order custom pistons. Another 600 bucks.
4. Rocker Arms and Studs. Although the head that came on the engine had springs, it had no studs or rocker arms. First mistake is just me being stupid. I looked at the stud holes, put in a 3/8 bolt, and saw the hole was bigger. I assumed they were Metric 10 size. Order up some M10 studs. When I get them, I try one and see that it goes in the hole, but not very easily. Next thing when I put the rocker on, I see the stud is not long enough. (I bought the longest M10 stud available from Summit Racing). Gotta send these back. Realizing that I need to have 7/16 studs to get one that is long enough I start thinking I have to send the head out to be machined for larger studs. Get the new studs, and find out they screw right in. Wow…one good thing went right. No machine work needed.
Rocker arms themselves are another problem. The Scorpion 1.7 Rollers that I bought were not long enough to properly contact the center of the valve. Good customer service at Scorpion. The guy there recommended a different rocker (for a Ford) that is another .12 longer from the stud to the valve. I haven’t gotten the new ones yet, so don’t know if they’ll fit. I find it very odd that not one single rocker manufacturer publishes this so called ‘trunion’ length from the center of the stud to the roller tip. This is a very important measurement if you are working on something other than your basic Small Block Chevy. The 433 head, not sure about others is about 1.6” in this dimension, the rockers I had appeared to measure out at about 1.47 or so.
5. Head. This is the #433 head. It came with some monster valve springs on it. I spent a lot of time agonizing over whether the springs would be too much for a street engine. The guy that is grinding the cam for me recommended a 500lb open seat pressure spring. So now I go out and buy a spring pressure gauge, I find out that mine are just over 400 lbs, so I think I’ll keep the springs. The head came with ugly red paint on it, so I stripped that off and wire brushed all the carbon out of the ports. As I am doing a final wash of the head and inspection before getting ready to reinstall the springs, I find out that that wonderful port job on the head, was so good, it left the metal too thin on the intake ports and there are small holes burned thru. Gonna try to take the head out to get welded this week. Figure at least 150 bucks to weld this, then another 200 bucks or so to regrind the weld to make it somewhat smooth. Ugh.
6. Oil pump. Engine originally had an external/dry sump sump system. Buy an internal oil pump, not a big deal, but still unknown is what other changes I am going to have to deal with. I do know the oil filter mounting point on the block has been bastardized to hook up the dry sump system, so perhaps I can still utilize that and run a relocation kit and put the filter somewhere else, but again, I am still very nervous about what I don’t know yet about internal engine changes that need to be done or undone, to convert back to an internal oil pump.
7. Intake gasket. I knew the ports were different on the SD4 head, but somehow managed to order the wrong gasket. Sent it back. Still waiting for a replacement.
8. Exhaust. I knew that the 801 SD head had ports that didn’t line up with the stock exhaust manifold, but I wasn’t sure about this head. When I got the engine home I take an old exhaust gasket from my 84 and see that it goes right on. Studs are in the right place (which is not the case with all SD heads), but the ports don’t line up. I find someone selling a NEW Hooker Try-Y exhaust header, though a lot of Google searching. Header shows up, but is the stock Fiero mounting flange not the SD flange. Now trying to figure out what to do with the exhaust. Perhaps there is some kind of adapter that can be made, or else have the flange cut off the Hooker and something else welded in its place. Also need to decide whether or not to have the header ceramic coated. Since this will be the last thing to go on, I think I may be out of money if I wait until later to coat it.
I also purchased a 4 speed tranny from an 85 V6 with the idea that the case is a bit strong than the one from the 84. The price was right, and the tranny seems problem free. I changed the output seals and got a new release bearing so that should be good to go.
So that is where I am today. Waiting on new rockers and hope they will be long enough, waiting on new cam, custom made pistons, new lifters and waiting on feedback as to whether or not the head can be welded and reported and still contemplating what to do with the header. I’ll post a link to some pics if anyone is interested. In the meantime, maybe this little ‘rant’ has discouraged anyone else thinking about an SD4 build. It really helps to have someone knowledgable to talk to about these engines. Even if they can't answer your question, its another set of eyes to help you look out for the various parts you'll need on a build like this. I appreciate those that have helped me out so far.
As a side project, I am trying to locate old magazines from the mid 80's about the SD4 and the Indy Pace Car. Most of them are fluff pieces but I have come across a couple of good ones, which listed specific parts which were used in the build up of the SD4 program.
Oil Pump. Got my internal oil pump today. The pick up tube assembly is sold separately and must be 'press fit' on to to pump. Ok,... how do you do that? This is not a solid gear that you can put in a 5 ton press and press it on, its pretty fragile. Watched an online video from Melling which says... NEVER put the pump on the engine and try to press in the tube and NEVER put the pump in a vise to press in the tube. The guy in the video presses it in with some special tool, so quickly I don't know what he did. I tried putting the tube in the freezer for a couple of hours, but I guess I wasn't quick enough, or it wasnt enough temperature change, because it still won't go together. Perhaps some Googling today will yield the secret assembly technique.
Next issue, oil pump mounts to the block one of the Crank's main bolts, which appearently has a stud and a nut on the top of it. Well, my engine was assembled with some pretty awesome aftermarket bolts. Not ARP, but something of similar or better quality. Problem is that bolt doesn't have the special stud for the oil pump tube to attach too. Now I have to run down a stock Iron Duke bolt for this purpose.
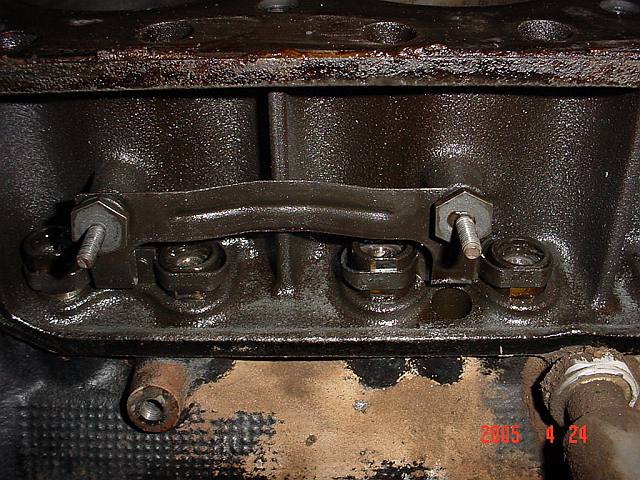
When you get your cam reground, they should be able to give it a hydraulic roller cam profile. I bought new AC Delco hydraulic roller lifters for my engine - just regular roller lifter for Duke parts. I also found and used stock anti-rotation retainers as pictured in this Duke engine photo.
I also have the SD4 aluminum cylinder head GM PN 10038433 None of these SD4 gaskets are available in Canada, got them from the States.
Get this intake gasket - Fel-Pro intake gasket (cut to fit) PN FPP-12381 Trim the port openings to match those in your head.
Header gaskets - there are two listed for the 2.5L (sometimes). One is the for the Duke head, the other is for the SD4.
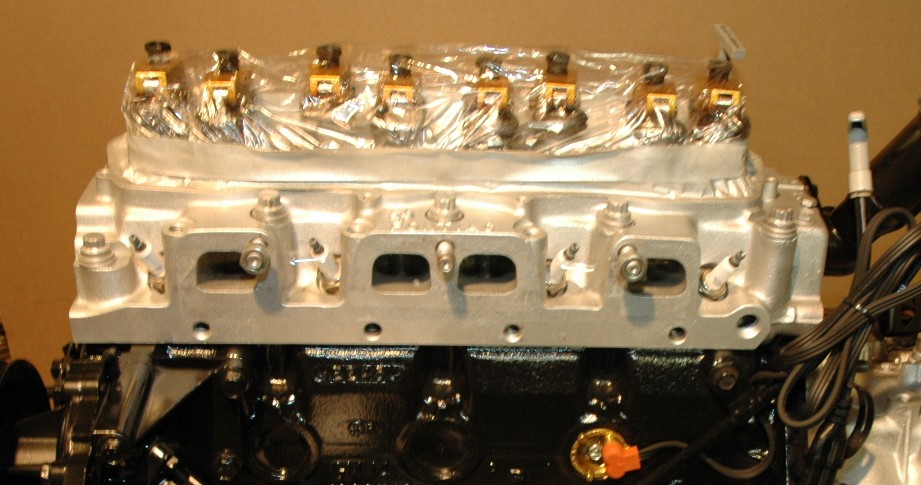
Here's a pic of the exhaust ports on my SD4 head. Fel-Pro SD4 header gasket is PN FPP-1441 and is what matches the ports.
Here's a comparison of the difference in exhaust gaskets. The top one matches my SD4 head's exhaust ports, the lower is a stock Duke gasket.
While it will bolt on, a header built for the Iron Duke head partially blocks the SD4's exhaust port. You can see how by how much when the SD4 gasket is matched to the Duke gasket underneath. The already smaller SD4 exhaust port has it's flow blocked by a fair bit.
Tony - thanks for confirming the intake gasket. The number you provided is the one I ordered the SECOND time. I did manage to get the exhaust gasket correct. And I ordered two of them just because I knew they might be hard to get, and I'm sure it would need to be changed at someone point in the future.
Regarding the cam...I'll be the first to admit Cams are a bit of a mystery to me. I had no idea before I started that hyraulic rollers and solid rollers weren't interchangeable to any given roller cam. The folks I talked to all gave me the impression that the way these 5 journal, roller bearing cam blanks were machined, they couldn't be corrected for hydrualic rollers. And I made sure they knew I saw building a street engine not one for racing, and who wants to be relashing the valves all the time. I have no idea if they are right, or I just misunderstood what they were saying, but that is my take away. New cam should be here in a couple of weeks. Plenty of other bits to worry about until then.
If you're running a mild cam, why don't you just pick up a 3-journal camshaft? I don't know if the journal diameters are the same, but I could mic my 5-journal cam for you to give you something to compare to.
Update for this week is that I took the head to be welded, and they told me that based on where the hole was in the intake port, they would not be able to get the welding tip up in there. So welding is out. Before trashing the head I am going to try to repair it with some epoxy. I found some high temp epoxy that is suppose to be good to over 350 degrees, and withstand chemicals and solvents. Since this is the intake port I assume the temp will stay under 200 degrees. The epoxy came yesterday. I'm currently trying a little test just to see how well it bonds to aluminum on a couple of scraps.
I also got my pistons ordered. It will be 4 weeks to custom make them. They are from Arias Pistons. For those that don't know, Arias also makes a version of Super Duty 4 block, for anyone looking for a new one and not getting any love from Kansas Racing. I contacted Cosworth who made some of the original Super Duty 4 pistons. They confirmed what I suspected that their SD4 part had long been discontinued. They are willing to make up batch if there were the demand for a group buy, but for one engine it would be too costly.
Wait!!!! Try calling this guy first, he is the best and I believe he can do what you need on that head. He has a method called spray welding and I've seen entire ports reshape with this technique. http://www.headbytes.com/WeldingProjects.html
The latest setback (or call it a realization) is that the oil drain back holes in this head do not lead back to holes in the block which takes the oil back to the pan. Instead, they drain out into a 'pocket' in the front of the head. This pocket corresponds to a port in the front bottom of the intake manifold. Now I am going to have to plumb for oil return lines out of the bottom of the intake into the oil pan. Gotta get a bung welded in my brand new shiny oil pan. WTF.
So these really aren't 'drop' in ready. But the benefits......
I applaud you for keeping a 4 cylinder. I have an 85 duke and with some minor tweaks and keeping the smaller tires it is a really fun and tossable car. To me the 0 to 30 time is as important or more so than the 0 to 60 time
The latest setback (or call it a realization) is that the oil drain back holes in this head do not lead back to holes in the block which takes the oil back to the pan. Instead, they drain out into a 'pocket' in the front of the head. This pocket corresponds to a port in the front bottom of the intake manifold. Now I am going to have to plumb for oil return lines out of the bottom of the intake into the oil pan. Gotta get a bung welded in my brand new shiny oil pan. WTF.
Moroso oil pan had the bungs on it PN 2035 (long discontinued I think) I used Aeroquip fittings in the manifold and braided stainless steel lines for the returns.
[This message has been edited by fierosound (edited 11-08-2014).]
Making slow progress now. I decided to send back my 2nd set of Rocker Arms because I wasn't happy with the alignment of the rollers on the top of the valve. Hopefully the 3rd set will be a charm.
I also completed the epoxy of the holes in the head. I give this a 50/50 chance of working. The epoxy is nice and hard when it dries, and it will support the high temp without a problem. The weakness will be how well it sticks to the head. I wasn't able to clean the back side of the hole, so I've got my fingers crossed.
I've ordered all the parts to support the oil drain out of the intake manifold back into the oil pan. Those should be in by the end of the week.
Attempted for the first time to hone my cylinder walls, with an new 70 dollar honing 'brush'. Looks ok, but I suppose, I needed some more up and down action with the drill, or should I say FASTER action. Swrils I created are probably a bit too circular for the perfectionist, but I'll live with it.
Should get the new Cam today or tomorrow. Then I'll be waiting a few more weeks on the pistons as the last internal component.
Ongoing project, is to figure out what to do with the header. So far the best I can come up with is, the flange on the header is going to have to be cut off, and new one welded on. I'm hoping to stumble on a cheaper solution before spring.
1. Had to buy spring measuring device to make sure these were going to cut it.
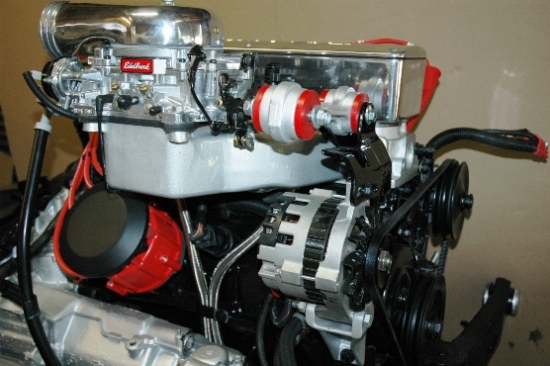
2. My 2 bbl Throttle body mounted to the Super Duty Intake. if you look closely between the ports you can see the fittings I had to install for the lines to return the oil to the oil pan.
3. New Crower Solid roller Lifters
[This message has been edited by edfiero (edited 11-23-2014).]
Fair enough, FWIW, 454's got 2 inch bore TB's I think they flow around 750-800 CFM, probably way overboard for a superduty though.
Edit, what are you doing for engine management?
This TBi is from a V6 Blazer, bores are about 1.75, so it won't be quite as bad as the one from the 454. I figure that engine was rated at 165 hp. I hope to be at 180 or roughly double a stock Duke, so this 2 BBL TBI should just about cover me. For management, I haven't made a final decision, but currently leaning toward http://www.dynamicefi.com/
Its been pretty cold this winter, so progress is slow. Some of the latest updates are:
1. Arias Pistons installed Note to self, need more practice filing the piston rings. 2. Cam installed after much delay. First time I put the cam gear on and stuck it in the block there was way too much end play. The cam would move in and out of the block by about a 1/4 inch. Spec is something like .005". I have th stock duke cam spacer, but it didn't work. I emailed several people, but ultimately got no help on this. Ended up finding a set of washers/shims that were roughly the same diameter as the cam snout. Put those behind the cam thrust plate, and now my end play is down to .003" So hopefully that will work. 3. Spent some time obtaining various fittings and hoses to plumb the oil return from the intake manifold back to the oil pan. 4. Lifters installed. Spent the weekend trying to determine the correct pushrod length. I am going to try 9.25 and see how that works. Based on what I've read online 5/16 should be good enough, with no need to go to 3/8. 5. Contacting a friend of a friend to make a custom adapter plate to match my hooker exhaust header to the head. I have two different SD4 adapters, but neither of them will work in taking me from a stock duke pattern on the header, to the SD4 head. First attempt at the adapter wasn't correct, so we are doing our second cut at it. 6. I've ordered some new trunk insulation so that I can do that while the engine is out. Found some stuff at JCWhitney which is black fiberglass like stock, though about twice as thick. Obviously not a perfect match, but better looking I think than putting the silver/aluminum stuff in there. Also ordered new shifter cables today from Rodney and got my Tach recalibrated a few weeks ago since the car was down for the winter and the tach was reading about 700 RPM high. 7. (EDIT) Another thing I spent time on was the Crank Gear. I don't think I mentioned earlier, but I did have another thread about it, was that there was a lot of play in my Crankgear. After removing the old gear I found the key to be damaged and the inside of the gear messed up. So I got a new gear. Only problem was the timing set on the engine were 'straight cut' gears. The new gear I bought was a regular duke gear which has the teeth cut on an angle. So now my perfectly good cam gear won't match the new crank gear. Had to by a new Cam gear too. Ended up going with the Alumimum gear rather than the fiber one. Maybe its not any better than the fiber but in my head I think it is. (anyone want to buy my straight cut cam gear?. I need to sell of some stuff to pay for this project)
I think my next big step will be to start buttoning the engine back together and then spin the oil pump with a drill. I need to make sure that oil is getting to all the right places given that I am converting back to an internal pump from a dry sump system.
[This message has been edited by edfiero (edited 03-02-2015).]
My other current quandary is with the water pump. I have two brand new water pumps and a pump that came with this engine. I removed the pulley from the old pump and tried it both the new pumps, and found that the pulley slides right on. It's suppose to be a press fit. WTH?? All 3 pumps are the same part number. Adding to the confusion, with the SD4 engine build kit that I got from GM, which included the water pump, was a water pump pulley FLANGE. This flange is a press on fit to both of the new water pumps. However, the kit did not include a pulley, and I don't know what pulley is suppose to mount to this flange. I'm fine with using the flange, but no clue where to find a pulley to mate with it. I can't just use any old pulley has it has to be the right offset to get the belt to align.
I have been reading your interesting progress with a SD4, but I'm a little confused. I was always under the impression that the SD4 was always built as a full on race engine (hence the power level). It seems most of your struggles are from trying to de-tune it to a street vehicle. Was the original SD4 engine that came in a Fiero built more street worthy than what you obtained (minus switching the carbs for TBI)? How much of a difference are we talking in terms of power/reliability?
I have been reading your interesting progress with a SD4, but I'm a little confused. I was always under the impression that the SD4 was always built as a full on race engine (hence the power level). It seems most of your struggles are from trying to de-tune it to a street vehicle. Was the original SD4 engine that came in a Fiero built more street worthy than what you obtained (minus switching the carbs for TBI)? How much of a difference are we talking in terms of power/reliability?
The engine that came in the Fiero was not an SD4, it was an 'Iron Duke' The block was lightened significantly(aka Weakened) in the name of Fuel Economy. The SD4 was never sold as a crate engine. It was sold only in pieces that you could purchase thru GM Performance. However even then you couldn't buy all the pieces. Cam, Pistons, etc all had to be sourced separately. GM gave you a Block and Heads. And it was sold for 'Off Road Use Only' While I am sure this was to get around an emissions rules, most people that did this did so for the purposes of racing. This engine was used in the NASCAR Goodies Dash Series also very populate in Midget/Sprint cars. So most used parts that are found today do in fact come from race engines. And yes it is a bit of a challenge to build one which will be streetable in stop and go traffic.
Ugh. It is one step forward and two steps back with this project.
I received the JCWhitney insulation and I purchased a pattern from FieroSails. I am happy with both, next step there will be to get the engine out of the car and see how well it fits. I'm still waiting for my header adapter plate. The guys shop is not heated so not much progress over the last month since it was so cold.
I got some pushrods. I am going with 9.3 inch ones which happen to be the stock size from the Pontiac 455 So with pushrods in hand, I started to do a dry run of the engine assembly so I could see what else was wrong. I went to put on the timing cover and see that that the previous owner had drilled out two of the bolt holes for a larger size for some reason. Had to track the bolts down. The guys didn't even use metric, now I have a mix of SAE and metric on here. I put on my oil pan, filled up with oil and started priming the oil pump. I had another thread about this, but no one answered it so I just gave it the old college try. Looks ok, since I have oil coming up the push rods.
However, as I am rotating the engine over, I see the crank is rubbing on the oil pan. No problem, perhaps a couple of hacks with a hammer and dolly will solve that. But Nooo.....
I pulled the pan back off yesterday, and I find that the crank wasn't just rubbing the pan, it gouged 4 nice slices into the oil pan, to the point of almost pushing all the way thru the pan. Unless someone knows of where I can get a larger pan, that will still fit on a stock cradle, I'll probably have to get this one welded, before I try to bang on it to make some clearance.
[This message has been edited by edfiero (edited 03-23-2015).]
I appreciate the documentation of your efforts. I've long wanted an SD4, and reading what all could be involved (depending on how it was configured) is very interesting.
I didn't find any suggestions on an alternate oil pan. The ones that were originally available for the SD4 are no longer made, so I decided to cut some corners, literally. I took a cut off wheel and ground down the corner of the rod bolts which was rubbing on the oil pan. Then I put several layers of masking tape on the inside of the oil pan, to build up a little thickness, and put the pan back on for a test fit. Turned the crank over a few times and it looks like I am good now. The tape wasn't pulled off or ripped into by the rod bolts. Mixed up some JB Weld to fill the gouges in the oil pan, and put the pan on with a generous bead of red RTV.
I'm can finally see the finish line off on the distance. Though I still don't have a good solution for the water pump pulley and I'm still waiting for a guy to fabricate a header adapter plate for me.
Those items aside, within the next two weeks I think I'll be ready to begin dropping the old engine out of the car since the weather has warmed up a bit.
YES. Sold, I emailed that guy before I bought the SD I have. The exact reply to my email is "Sorry sold it awhile ago but I have a brand new bare aluminum 801 id sell ya."
Any chance you can get shot of the bowls in the head? I can't find any pics with the valves out
Sorry. Valves and springs have already been reinstalled and I don't think I captured any pics of that. I can only say this head was nicely ported by someone.
Found a picture of an 801 from a recent ebay auction. Thanks anyway though
I've epoxied more than my fair share of intake ports, we use it to raise the port floors on motorcycle heads. I use Manley A/B epoxy, you'll have to order it but it is great stuff
If you didn't already get your cam sorted out, you could try Delta in Tacoma, WA. You should also be able to use the 3 bearing cam in the 5 bearing place if you want to go that route
Edit: Saw you already got your cam
[This message has been edited by Slammed (edited 04-06-2015).]
The latest challenge was attempting to lash the valves. If you have never done this on solid lifters before, it is a pain compared to hydraulic lifters. Anyway I was having a problem where the rocker arm wasn't compressing the spring enough on several of the cylinders. I ultimately discovered that the lifters were rubbing on the lifter cover and not dropping back into the bore each time. Since the lifter cover was on with RTV rather than a gasket it was a pain to clean it off. I corrected the problem by switching to a different style cover. It seemed to resolve the problem, and the rough lashing is done. If I have to take this cover off again for some other reason, I'll switch to a gasket. That is going to be too messy to do again after the engine is in the car.
Intake manifold is on now, along with the TBI. Just about done. Still no luck on the water pump. Guy making my header flange promises it will be here in a few days. Though once the engine is in the car there will be a lot more work to do in fabbing up the air intake and the throttle cable. Who knows what else will be a problem.
Friday I am going to start dropping the old engine out of the car. Pictures to follow soon.


.JPG)
.JPG)