Pennock's Fiero Forum
  Technical Discussion & Questions
  painting the rally sport coupe

Post New Topic  Post A Reply
Email This Page to Someone! | Printable Version


next newest topic | next oldest topic
painting the rally sport coupe by fst4rsc
Started on: 08-23-2014 04:59 PM
Replies: 12 (479 views)
Last post by: KurtAKX on 09-19-2014 01:44 PM
fst4rsc
Member
Posts: 98
From: Farmington, NM
Registered: Oct 2003


Feedback score: N/A
Leave feedback

Rate this member

Report this Post08-23-2014 04:59 PM Click Here to See the Profile for fst4rscSend a Private Message to fst4rscEdit/Delete MessageReply w/QuoteDirect Link to This Post
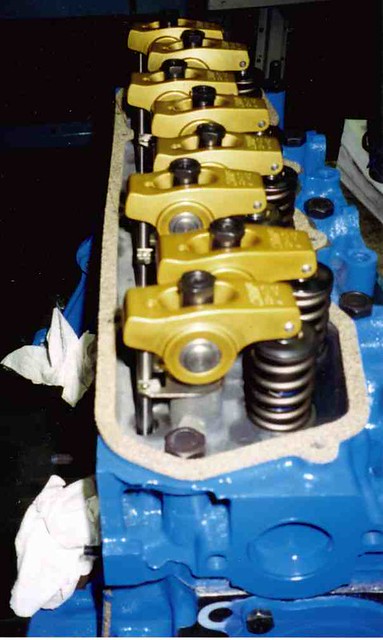
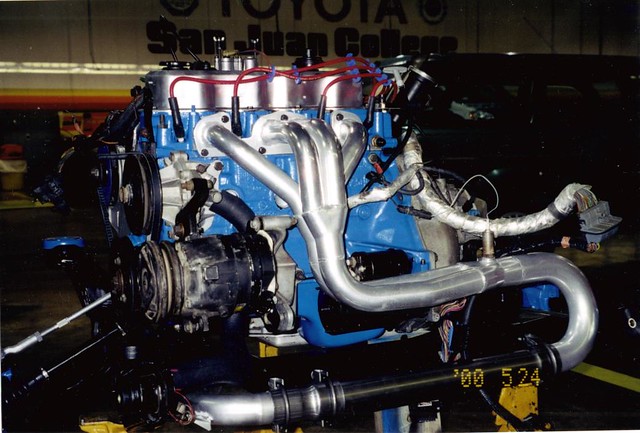
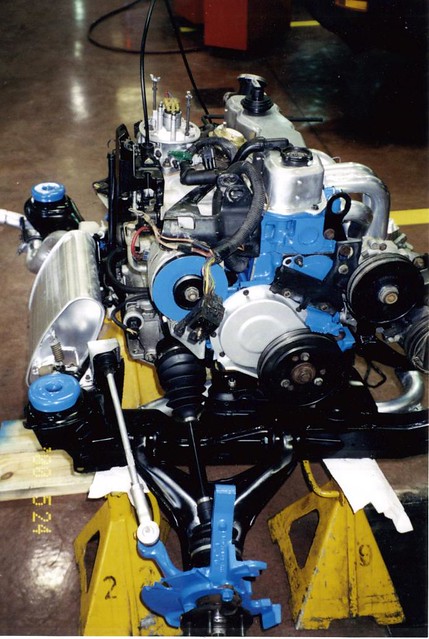
Some 10 or so years ago I rebuilt the engine and transmission in my 86 sport coupe. It has a mild cam, roller rockers, ported, balanced, Holly TBI, Hooker headers. Its now a 125 HP 2.5L. Some of you may remember the old super tech 4 rsc:


After the rebuild, I drove it for a while. Then I lost interest, parked it, and got into jeeps again. Now, after some ten years I’m back at it. Last winter I dropped the tank, drained the old fuel, and replaced the fuel pump while it was out. Changed the fluids, cleaned the squirrels nest out, bled the brakes, and got it running again. Still trying to dial it in (the computer does not like the mods at idle) but I now use it as my daily driver (although, I can walk to work if I want). A few weeks ago I got a new windshield.

Now I’m ready to try to get some body work and paint done. I wanted to run by some issues and plans with you all about doing things myself.

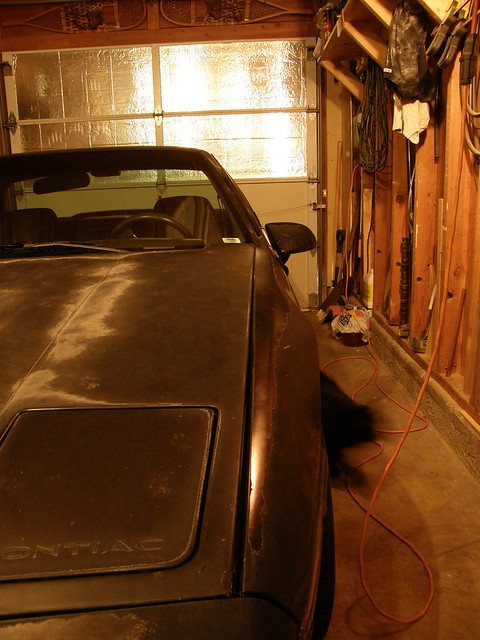
First, my garage is only a single car garage, so I’m thinking I probably wont be able to paint it all at once. Here is the car now and how tight the garage is:


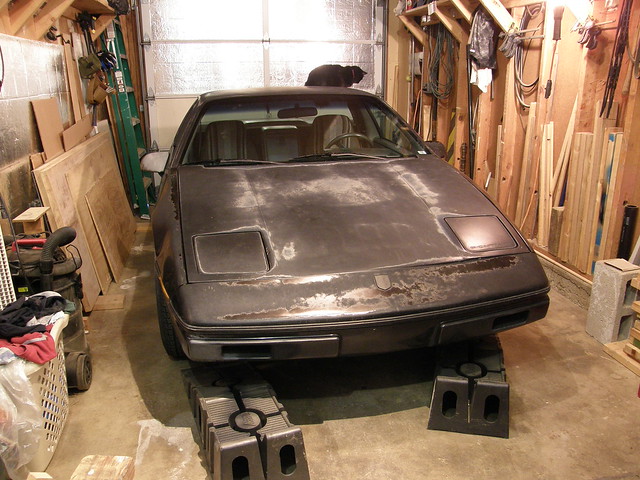
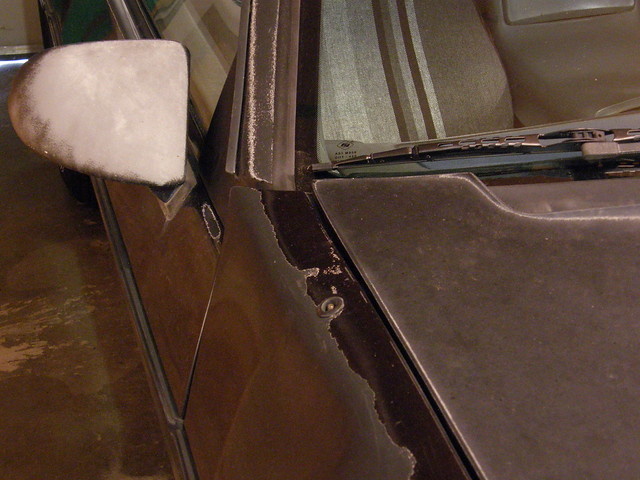
I did not realize it when I bought it (I’ve learned a thing or two since then) but its been hit on the passenger front, putting the hood out of alignment.


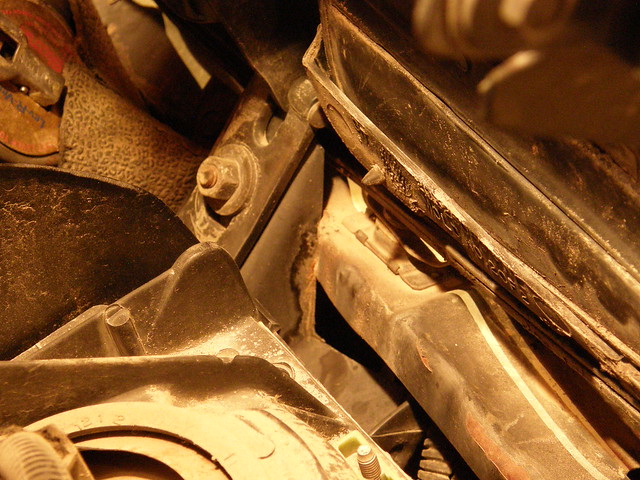
Looks like the front part of the frame is bent in about half an inch or so:


I also did something dumb 10 years ago. Removed the luggage rack and tried to put a dodge shadow spoiler on it. Now I’m wishing for that original luggage rack again as I think its retro cool now. I may try to find another (let me know if somebody has one they want to get rid of). In the mean time, I kind of like the no spoiler original fiero look too. I have a bunch of holes to fill.


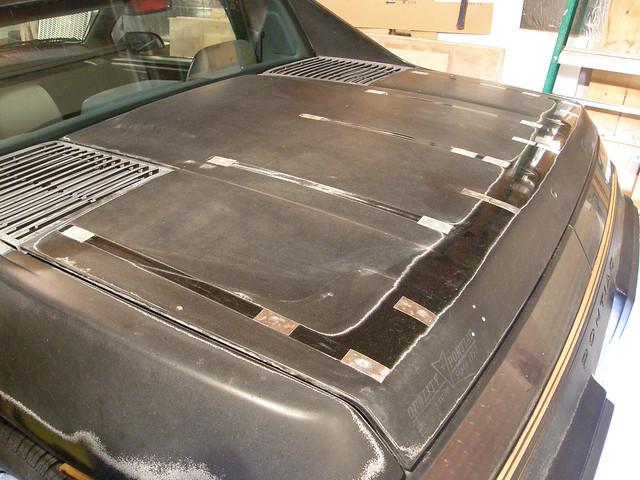
As you can see the paint has been baked off by the New Mexico sun. The roof is real bad and rough. However, the car is rust free.

So here are my questions:

1. Do you think I can pull the frame back using a come along and blocks? Or will this require a frame shop?

2. Is it going to be ridiculous to pull the parts off and paint separate? Of course, I have to replace dew wipes, work on the deck lids, etc. How about the roof? Rocker panels? Might these be weekend projects? That would be nice.

3. I’m thinking of using a $50 1.4mm gun and using single stage urethane paint from Eastwood
http://www.eastwood.com/eas...ard-black-paint.html

I have never sprayed autos before (except using an airbrush on scale models). I do some carpentry at home and wont mind this gun it also comes with a 2mm tip. I can hook two compressors I have in parallel for plenty of cfms.

Should I use the eastwood urethane primer on the bare plastic, everywhere, or only on repairs and mods? Anyone use the eastwood paints? Does this require a clear coat? The paint job does not have to be show quality. I don’t have a lot of money for this, but I would like it to look nice. (even a rattle can job would look 200% better than now though!) I dont really want do do multiple coats on multiple parts.

Thanks for your replies.


IP: Logged
PFF
System Bot
White 84 SE
Member
Posts: 812
From: Chicago, Illinois USA
Registered: Nov 2008


Feedback score: N/A
Leave feedback

Rate this member

Report this Post08-26-2014 10:47 PM Click Here to See the Profile for White 84 SESend a Private Message to White 84 SEEdit/Delete MessageReply w/QuoteDirect Link to This Post
For filling holes I found that fiberglass on the underside works and Bondo on top. Like you I also removed the luggage rack and kinda want it back but still rather like the bald look too! I am thinking "pull it yourself" type places to obtain a rack. There have been times when the rack would have been useful. For paint I gather there needs to be a good amount of flex additives for the front and back bumpers....they always get those tiny cracks. Good Luck!

------------------
84 Duke, Holley TBI, Manual Trans 4.10, CompuCam, White

IP: Logged
fierogtlt1
Member
Posts: 1006
From: Orlando,Florida U.S.A
Registered: Jul 2012


Feedback score: (1)
Leave feedback

Rate this member

Report this Post08-26-2014 11:28 PM Click Here to See the Profile for fierogtlt1Send a Private Message to fierogtlt1Edit/Delete MessageReply w/QuoteDirect Link to This Post
The engine is looking awesome.
What is the color blue that you used?
IP: Logged
rogergarrison
Member
Posts: 49601
From: A Western Caribbean Island/ Columbus, Ohio
Registered: Apr 99


Feedback score: N/A
Leave feedback


Total ratings: 551
Rate this member

Report this Post08-27-2014 10:20 AM Click Here to See the Profile for rogergarrisonSend a Private Message to rogergarrisonEdit/Delete MessageReply w/QuoteDirect Link to This Post
Forget using flex additives....they never worked in 1969 and still dont. You paint it just like you would paint any other car. As far as cracks in the bumpers, fix them with products made specificly for that part. If there are visible cracks in the paint, sand it to bare part. Cracks also have a way of hiding in flexible bumpers where you never see them. You prob want to go with basecoat/clearcoat 2 part paint...its more flexible than any additive anyway. The flex was for car bumpers WHEN they were painted with hard lacquer...and like I said it never worked anyway. IF you decide to paint parts off, it does make a big difference with the color you paint. If its metallic colored, the parts have to be set up and arranged as they are on the car to match, and painted at the same time..the same can of paint may not match the next day (air, humidity, temp, etc all affect it). Solid colors like white dont make any difference. I paint all my jobs mostly assembled. Ive been painting professionally since 1964, everything from cars and semis to planes, rvs and boats.
IP: Logged
DKcustoms
Member
Posts: 1071
From: Central NY
Registered: Oct 2013


Feedback score:    (15)
Leave feedback

Rate this member

Report this Post08-28-2014 06:59 AM Click Here to See the Profile for DKcustomsSend a Private Message to DKcustomsEdit/Delete MessageReply w/QuoteDirect Link to This Post
PM sent about the luggage rack
IP: Logged
fst4rsc
Member
Posts: 98
From: Farmington, NM
Registered: Oct 2003


Feedback score: N/A
Leave feedback

Rate this member

Report this Post08-28-2014 11:19 PM Click Here to See the Profile for fst4rscSend a Private Message to fst4rscEdit/Delete MessageReply w/QuoteDirect Link to This Post
 
quote
Originally posted by fierogtlt1:

The engine is looking awesome.
What is the color blue that you used?


Thanks. Its all dirty now If I remember right, it was just that high heat engine spray paint, Ford Blue. That paint has actually held up well.
IP: Logged
fst4rsc
Member
Posts: 98
From: Farmington, NM
Registered: Oct 2003


Feedback score: N/A
Leave feedback

Rate this member

Report this Post08-29-2014 12:01 AM Click Here to See the Profile for fst4rscSend a Private Message to fst4rscEdit/Delete MessageReply w/QuoteDirect Link to This Post
 
quote
Originally posted by rogergarrison:

Forget using flex additives....they never worked in 1969 and still dont. You paint it just like you would paint any other car. As far as cracks in the bumpers, fix them with products made specificly for that part. If there are visible cracks in the paint, sand it to bare part. Cracks also have a way of hiding in flexible bumpers where you never see them. You prob want to go with basecoat/clearcoat 2 part paint...its more flexible than any additive anyway. The flex was for car bumpers WHEN they were painted with hard lacquer...and like I said it never worked anyway. IF you decide to paint parts off, it does make a big difference with the color you paint. If its metallic colored, the parts have to be set up and arranged as they are on the car to match, and painted at the same time..the same can of paint may not match the next day (air, humidity, temp, etc all affect it). Solid colors like white dont make any difference. I paint all my jobs mostly assembled. Ive been painting professionally since 1964, everything from cars and semis to planes, rvs and boats.


LOL I think any cracks were baked off some time ago! However, where it did not get blasted by the sun, the paint looks in good shape. But yes, I'm aware, good prep is critical. I'm a fairly detail oriented guy so I'm pretty good there. I Was hoping to keep it low cost and simple with the Eastwood single stage urethane (solid black). But then again, If I'm going to do all this labor, maybe I should go 2 stage.. It does say the Eastwood single stage urethane can be clear coated if desired.

Have you used Easwood paints? What system do you like?

I was under the impression urethane paints were flexible.

I think I have also read from you Roger not to prime the bare plastic? However, after I fill the holes, I believe I need to prime to smooth.

I dont think I have enough room in the garage to lay out all the parts at once. So, for my first automotive paint job, in this little garage, it might have to be real simple color.

Thanks,
Eric
IP: Logged
Tha Driver
Member
Posts: 4559
From: S.E. USA
Registered: Sep 2006


Feedback score:    (46)
Leave feedback


Total ratings: 204
Rate this member

Report this Post08-29-2014 04:13 AM Click Here to See the Profile for Tha DriverClick Here to visit Tha Driver's HomePageSend a Private Message to Tha DriverEdit/Delete MessageReply w/QuoteDirect Link to This Post
Eastwood products are usually over priced for their quality. I use PPG DP epoxy primer on the whole car - it gives better adhesion than anything else, & it's flexible on the bumpers if you use the 401 catalyst. For an inexpensive paintjob, I use Dupont Nason base/clear. It's the only cheap paint that I've found that lasts. I used it on my BMW - http://angelonearth.net/BMW.html . You can paint the parts on different days, even metallics & pearls, if you use the same air pressure & techniques & there is not a major difference in temps. Just hang them in the same orientation as they hang on the car.
Do a search & you'll find lots of posts on prep & such.
HTH,
~ Paul
aka "Tha Driver"

Custom Fiberglass Parts
IP: Logged
rogergarrison
Member
Posts: 49601
From: A Western Caribbean Island/ Columbus, Ohio
Registered: Apr 99


Feedback score: N/A
Leave feedback


Total ratings: 551
Rate this member

Report this Post08-29-2014 12:38 PM Click Here to See the Profile for rogergarrisonSend a Private Message to rogergarrisonEdit/Delete MessageReply w/QuoteDirect Link to This Post
I use BASF/RM Diamont or Sherwin WIlliams Dimension 4 basecoats. I use Finish 1 urathane clear, but I hear Nason is good too. You do need to primer any body work. I dont primer new plastic parts (except rarely when included directions say to). I just did some BMW plastic body parts...just paint and clearcoat as instructed. One reason its good is if it gets chipped from a car door or rock, its the plastic color and not a glaring primer spot. If you sand anything with rougher than 320, it also needs primered. If I do a job and sand it all over with 320 and no body work or defects to fix, I dont waste time or material primering it. ie/ i did a color change to my Sebring conv from factory silver to Corvette Orange and just scuff sanded the excellent paint and sprayed the base and clear. It still looks great after about 5 years and wins show trophies. No chips, cracks or peeling. I would recommend base/clear for your black. Single stage is deeper black than clearcoated black, but both need color sanded and buffed. Your not going to be happy with single stage just left as sprayed, it will dryback and look dull. Humidity, temp, and air pressure both have a huge affect when spraying colors...black should be fine though. Metallics settle differenly in paint depending on those. ie/ metallics will be lighter with low humidity, higher temp or higher air pressure, and vice versa will make them darker. The metallic particles settle deeper or higher in the color.
IP: Logged
jmbishop
Member
Posts: 4484
From: Probably Texas
Registered: Jul 2006


Feedback score: N/A
Leave feedback


Total ratings: 169
Rate this member

Report this Post08-29-2014 11:19 PM Click Here to See the Profile for jmbishopSend a Private Message to jmbishopEdit/Delete MessageReply w/QuoteDirect Link to This Post
I've used come alongs to pull core supports out but the fiero is a little stronger up front than modern cars. I also like replacing modern core supports I just try to straighten them out first to get the rest of the surrouning areas close to original position so its easier to fit the new metal. Its worth trying to pull the fiero out anyway and if you cant get it close.enough consult a.frame shop.
Panel off is what I prefer.

[This message has been edited by jmbishop (edited 08-29-2014).]

IP: Logged
fst4rsc
Member
Posts: 98
From: Farmington, NM
Registered: Oct 2003


Feedback score: N/A
Leave feedback

Rate this member

Report this Post09-18-2014 12:04 AM Click Here to See the Profile for fst4rscSend a Private Message to fst4rscEdit/Delete MessageReply w/QuoteDirect Link to This Post
Thanks everyone. There is a sherwin williams store here in town (I live in a smaller town/city and somewhat isolated). I might check them out for the other supplies, cleaners and such. Will look into pricing and prep. As I get to it, slowly, I'll try to post the progress. The ten year plan!

The gun is in and I plan to practice with it on some wood doors I'm refinishing.
IP: Logged
PFF
System Bot
Black84originalowner
Member
Posts: 59
From: Jupiter, FL
Registered: Jul 2008


Feedback score: N/A
Leave feedback

Rate this member

Report this Post09-19-2014 01:24 PM Click Here to See the Profile for Black84originalownerSend a Private Message to Black84originalownerEdit/Delete MessageReply w/QuoteDirect Link to This Post
Now is the time to delete the antenna! Various methods to do it. Way worth it, looks wise, I think.
IP: Logged
KurtAKX
Member
Posts: 4008
From: West Bloomfield, MI
Registered: Feb 2002


Feedback score:    (9)
Leave feedback


Total ratings: 128
Rate this member

Report this Post09-19-2014 01:44 PM Click Here to See the Profile for KurtAKXSend a Private Message to KurtAKXEdit/Delete MessageReply w/QuoteDirect Link to This Post
back from the dead
IP: Logged

next newest topic | next oldest topic

All times are ET (US)

Post New Topic  Post A Reply
Hop to:

Contact Us | Back To Main Page

Advertizing on PFF | Fiero Parts Vendors
PFF Merchandise | Fiero Gallery | Ogre's Cave
Real-Time Chat | Fiero Related Auctions on eBay


Copyright (c) 1999, C. Pennock