Pennock's Fiero Forum
  Technical Discussion & Questions
  F23 SWAP QUICK REFERENCE ... LOOK HERE ...

Post New Topic  Post A Reply
Email This Page to Someone! | Printable Version


next newest topic | next oldest topic
F23 SWAP QUICK REFERENCE ... LOOK HERE ... by Purple86GT
Started on: 05-21-2014 05:58 AM
Replies: 6 (4341 views)
Last post by: ericjon262 on 05-22-2014 06:30 PM
Purple86GT
Member
Posts: 1592
From: Ontario, Canada
Registered: Mar 2012


Feedback score: (1)
Leave feedback


Total ratings: 62
Rate this member

Report this Post05-21-2014 05:58 AM Click Here to See the Profile for Purple86GTSend a Private Message to Purple86GTEdit/Delete MessageReply w/QuoteDirect Link to This Post
DONOR VEHICLE WITH COMPATIBLE BELLHOUSING:
 
quote

2000-2002 Cavalier / Sunfire with 2200 engine


AXELS:
 
quote

Use stock Fiero manual transmission axels.


HTOB SPACER INFO:
 
quote
Originally posted by fieroguru:

Most F23's should measure +/- .020" of so of the measurements I took (the bearing wobbles some, so there will be some variation in the measurement). The dimensions below were from a brand new F23 HTOB with the bleeder assy installed and open, so there was no air or trapped fluid to alter the measurements.

2.776" Retracted
1.899" Extended

With these measurements, the HTOB has a range of travel of about 0.877". If you go with the assumption that room for extension (releasing the clutch) should be 2/3rd (0.585")to 3/4ths (0.658") of the available travel,

Then you want the clutch fingers of the pressure plate to be between (1.899 + .585 =) 2.484" and (1.899 + .658" =) 2.557"

So measure your clutch fingers and see what the dimension is. If it falls between 2.484" to 2.557 then you don't need a HTOB spacer. If not, then a spacer is needed. For example if your pressure plate fingers are 2.200" from the bell housing surface, then you will need a spacer 0.284 to 0.357" thick.


SPACERS CAN BE ORDERED FROM SPEC CLUTCHES.

HTOB HYDROLIC ADAPTER: buy it here: Roger Thelin


COMPATIBLE CLUTCHES:
 
quote
SPEC 3+ FIERO GT
XTR STAGE 3 CLUTCH KIT BERETTA CAVALIER FIERO GT SUNBIRD 2.8L 3.1L GRAND AM 2.3L


TEMPLATE FOR SHIFTER BRACKET:


SHIFTERCABLES:
 
quote


F23 shift=74" +2-3" for a total of 77" overall length, eye fitting one end, small ball cup on the other
Source: California Push-Pull

Stock Fiero Getrag 5 Speed select=71.70" overall, eye rod one side, small ball cup on the other.
Source: California Push-Pull


quote
Originally posted by fieroguru:

The item of concern is the length of the California push & pull SHIFT cable on this swap was just barely long enough and has a pretty sharp bend as it enters the shifter. The cable really needs to be 2-3 inches longer to have a more gradual lead in into the shifter.


F23 ADAPTOR BRACKETS
SELLER: FIEROFLYER
 
quote
Originally posted by FIEROFLYER:


Link to detailed tutorial about F23 transmission:
F23 Tutorial

[This message has been edited by Purple86GT (edited 05-21-2014).]

IP: Logged
PFF
System Bot
lateFormula
Member
Posts: 1048
From: Detroit Rock City
Registered: Jul 2002


Feedback score: (2)
Leave feedback

Rate this member

Report this Post05-21-2014 06:49 AM Click Here to See the Profile for lateFormulaSend a Private Message to lateFormulaEdit/Delete MessageReply w/QuoteDirect Link to This Post
The drawing of the template for a shifter bracket is completely inadequate for making one correctly. It does not have enough dimensions to fully define the part.
IP: Logged
fieroguru
Member
Posts: 12127
From: Champaign, IL
Registered: Aug 2003


Feedback score:    (45)
Leave feedback


Total ratings: 258
Rate this member

Report this Post05-21-2014 07:21 AM Click Here to See the Profile for fieroguruSend a Private Message to fieroguruEdit/Delete MessageReply w/QuoteDirect Link to This Post
 
quote
Originally posted by Purple86GT:

HTOB HYDROLIC ADAPTER: buy it here: Roger Thelin


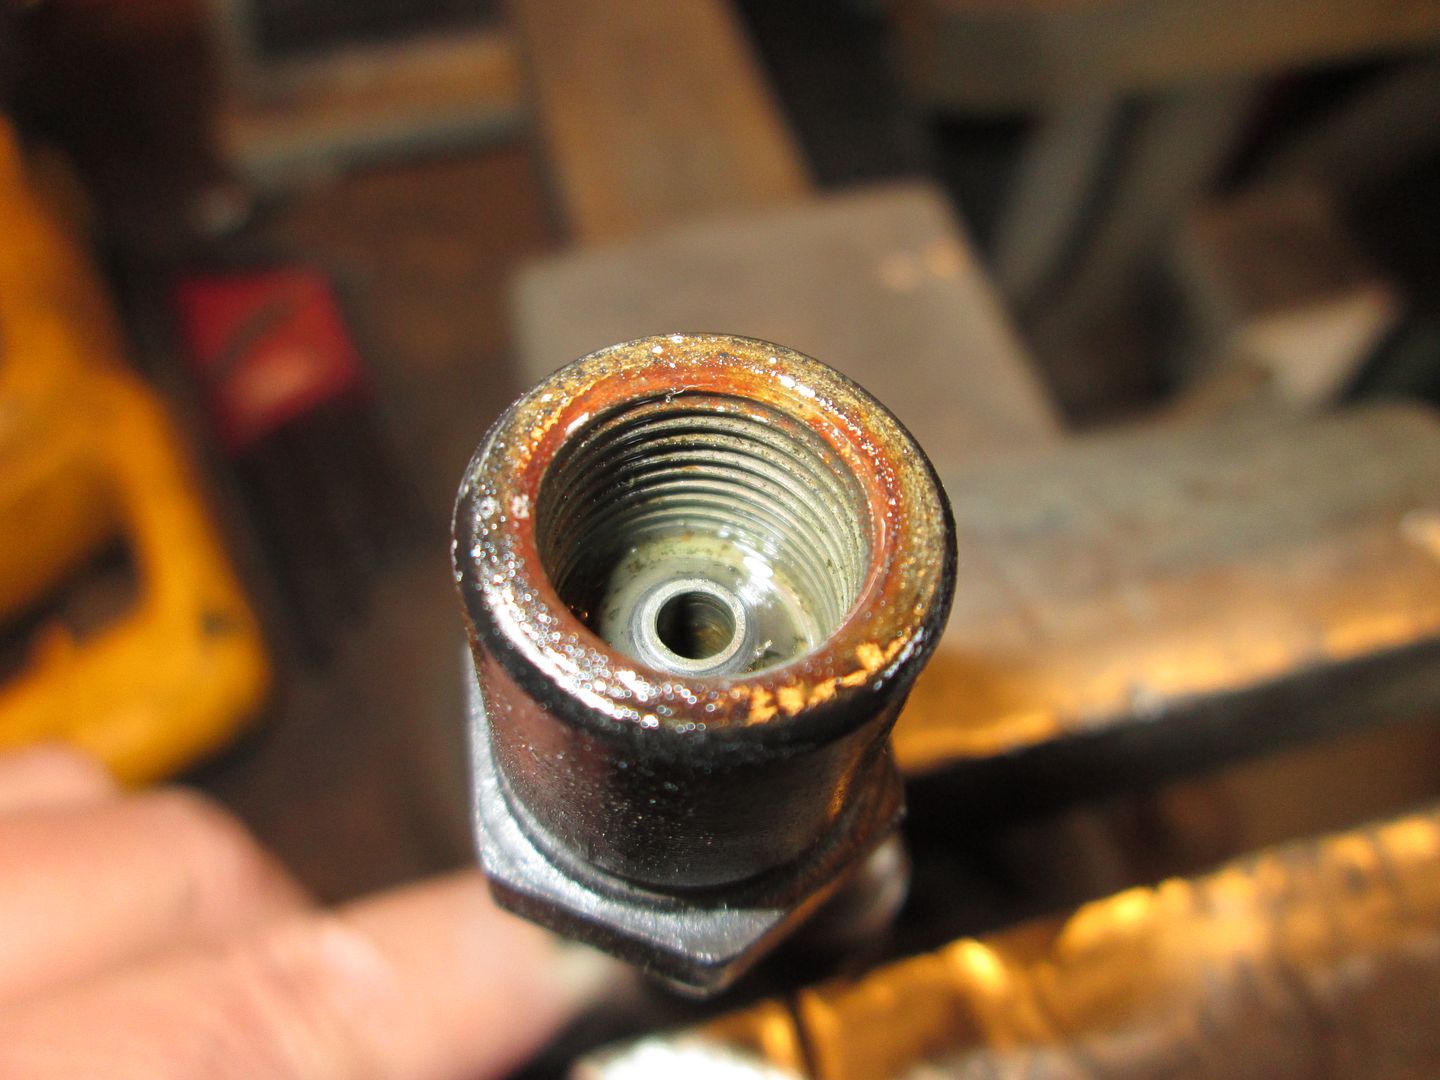
I would not recommend using this part. The flare on the Thelin adapter is not the proper one needed for the Fiero line. The Thelin adapter is for an inverted flare line and the Fiero clutch line uses a bubble flare. Several have used it, but bolting two dissimilar flare styles together and hoping they seal isn't a good solution. To use the Thelin adapter, at a minimum I would recommend using a flare tool to convert the fiero bubble flare to an inverted flare.

Here is the flare fitting on the Thelin adapter:


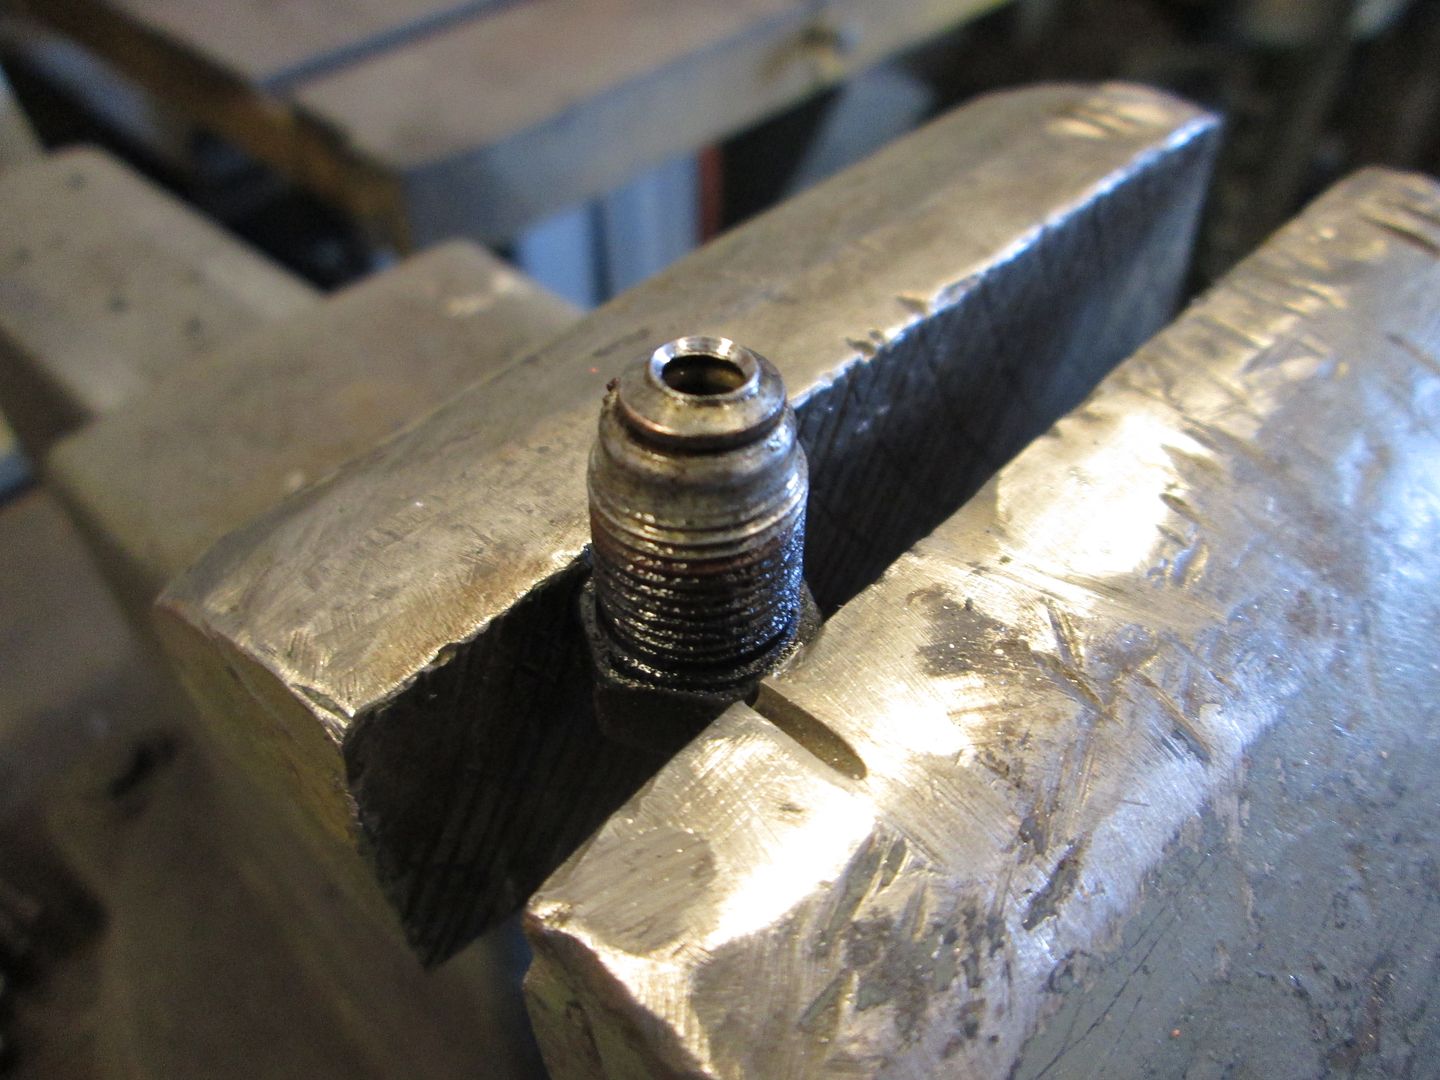
Stock fiero clutch line after tightened to the Thelin adapter - notice how the bubble flare has been deformed:


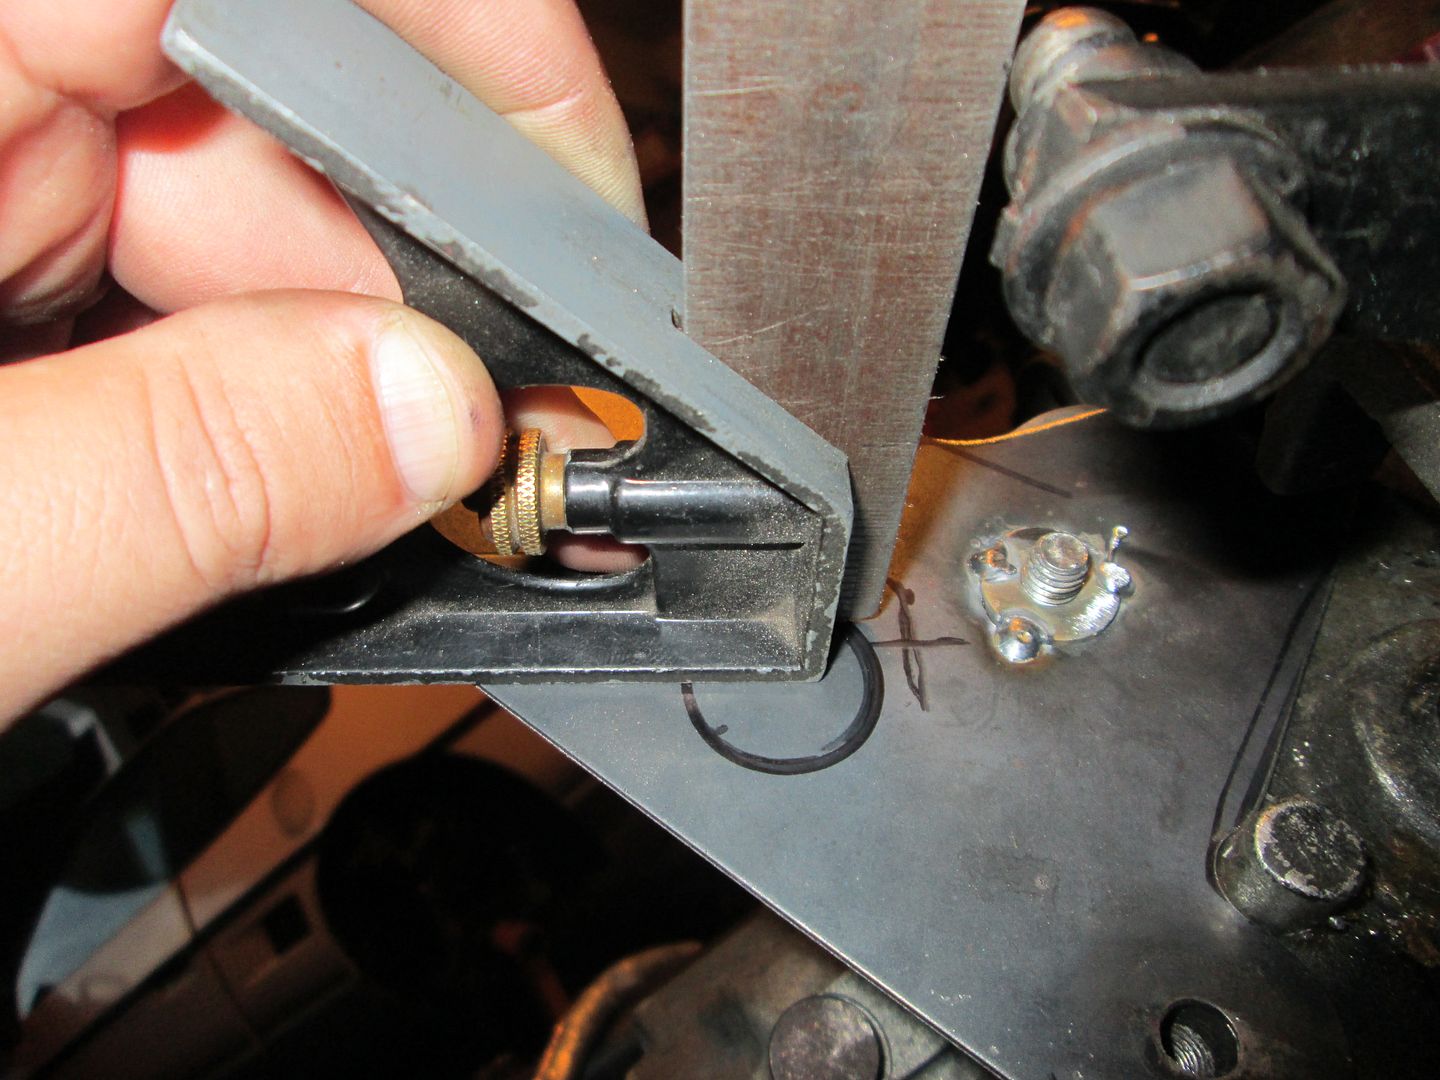
The geometry of the Thelin adapter makes it more difficult to connect to the fiero hard line. I used a replacement line and was able to bend it 90 degrees so it would better line up with the Thelin adapter:


quote
Originally posted by Purple86GT:

TEMPLATE FOR SHIFTER BRACKET:


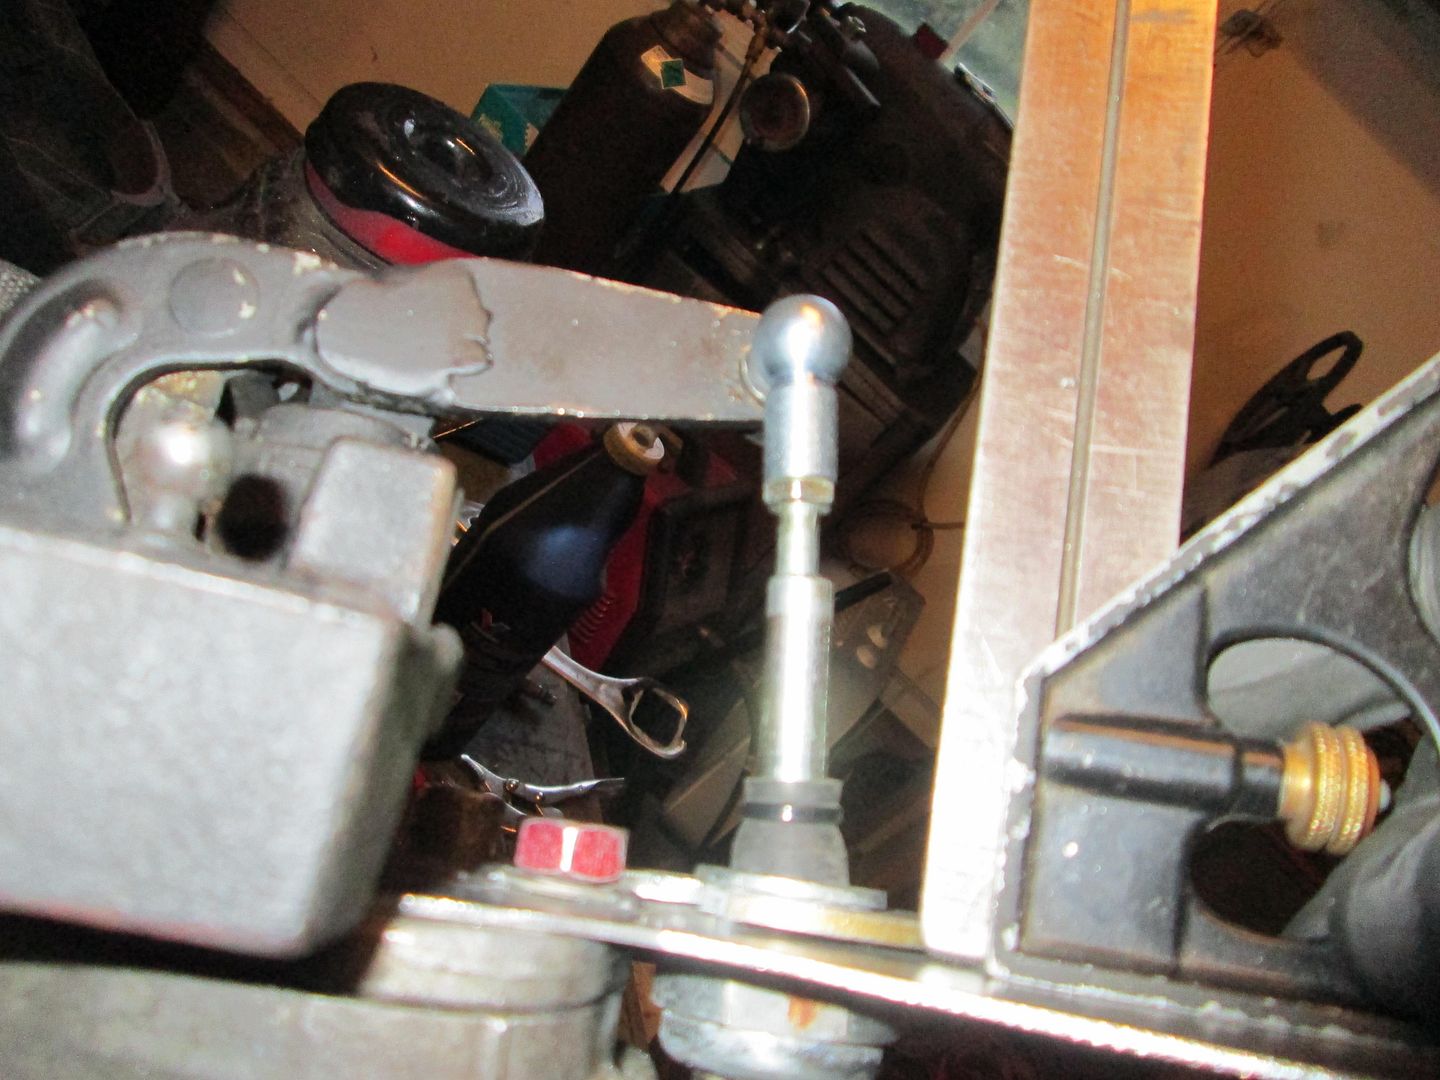
Having reworked nearly every aspect of the swap that the F23 tutorial was based on, I can tell you that this drawing is not correct and has some built in mis-alignment in the cables between the bracket and the shifter. This can cause binding and hard shifting. Here is a picture from when I was remaking this bracket. The circle is the placement of the cable with this drawing, the X is where it should be to keep the cables in line with the shifter ball studs:


Here is a visual of the mis-alignment of the cable "AFTER" I moved it in closer to the transmission case:


The item of concern is the length of the Californial push & pull SHIFT cable on this swap was just barely long enough and has a pretty sharp bend as it enters the shifter. The cable really needs to be 2-3 inches longer to have a more gradual lead in into the shifter.

[This message has been edited by fieroguru (edited 05-21-2014).]

IP: Logged
FIEROFLYER
Member
Posts: 3974
From:
Registered: Oct 2002


Feedback score:    (13)
Leave feedback


Total ratings: 180
Rate this member

Report this Post05-21-2014 09:21 AM Click Here to See the Profile for FIEROFLYERSend a Private Message to FIEROFLYEREdit/Delete MessageReply w/QuoteDirect Link to This Post
Unfortunately as shown in the photo you can not get the select cable much closer to being lined up perfectly as the tranny casing is in the way so either you have to completely redesign this part or except that the cable will not be straight with the select lever on the tranny.
You can make the lever on the shifter end of the cable longer but the cable itself only allows for so much more movement at that end and if you straighten out the cable at the tranny end you end up not being able to get all gears.
For the F23 I have experimented with many different ways of making the shifter work including using Roger Thelin's kit which requires removing the shifter assembly at the tranny replacing the main shaft and bolting the assemble back in turned to line up the shift arm better for use in the Fiero.
In the end none of the solutions is perfect and each has its own flaws mostly because this tranny was never meant for mid engine mounting but we Fiero people are stubborn enough to make it usable not perfect but still better then using an old possibly abused out of date stock Fiero tranny.
IP: Logged
ericjon262
Member
Posts: 3082
From: everywhere.
Registered: Jan 2010


Feedback score:    (10)
Leave feedback


Total ratings: 66
Rate this member

Report this Post05-21-2014 11:16 PM Click Here to See the Profile for ericjon262Send a Private Message to ericjon262Edit/Delete MessageReply w/QuoteDirect Link to This Post
I'll dig up the pics of my custom shift linkage if you want it, but for now, here's what I've got that I can throw in:

http://www.j-body.org/forum...f=41&i=50735&t=50735

http://www.crateenginedepot...2286-P17424C701.aspx

 
quote
Originally posted by Will:


quote
Originally posted by FieroGT42:

I've been keeping an eye out for an easy and inexpensive way to adapt an F23/F40 quick disconnect to the stock cluck system while I'm doing an auto-to-manual swap, and I found a solution I'd like to share.

Since I'm converting to a manual, I need to run a new clutch line including a flex line, so this is perfect for me. I am not endorsing any manufacturers or retailers below. This is just the information I compiled.


F23/F40 HTOB clutch line adapter/flex line

I've been looking for a suitable adapter or a way to make one since I discovered that the F23/F40 clutch line coming from the bleeder junction is plastic and is obviously not suitable for flaring to meet a stock Fiero or custom line.

If you have the bleeder Y-pipe junction block thingamajig with the quick-disconnect intact, you can remove the plastic line and attach the steel end to an adapter or brake nut of your choice. On the F23, the supply side tube inside the plastic line is just a few hundredths under 1/4" OD so it will fit nicely inside 1/4" adapter. I welded one to seal it, then filled the cavity with JB Weld, but I was curious to find out if someone already made a solution for those who can't or don't want to bother with this.

Knowing that the F23 was used in the F-body (Cavalier/Sunfire) as well as the Delta platform (Cobalt, G3, etc.) and many others, I looked at what they were using. Eventually I found someone making adapters for $60-80, and another who made a part starting with a BMW clutch line. The aftermarket BMW lines for $40+ looked a little Autozone/Pep Boys ricer quality to me, so dug a little more and found the part that it originally replaced. Apparently there's a Getrag in a BMW E46 that uses the same connector on the HTOB side and the other end is threaded. With just an adapter or clutch line threaded into that, you can have a German OEM quality flex hose and HTOB/clutch line adapter manufactured in one piece without having to hack, weld, braze or crimp. Since I'm swapping from auto to manual, this was ideal for me. I'd have needed to buy a flex hose anyway. If you're swapping an F23/F24 into an auto, or if you're swapping into a manual and have an old flex hose, this would probably work for you.

The part is about 16"-ish long. The flex section is 31 cm/12" and the usable length from the F23/F40 plastic bleeder junction is 37.5 cm / 14 3/4". The quick disconnect plugs into the F23 and uses the same clip as the stock hose, and the other end terminates in a female metric M 10 x 1.0 bubble flare. The stock Fiero lines used M12x1.0 bubble flare, so a one-piece adapter should let you use this for a flex line while minimizing the number of connections that can leak. Since I'm running a new clutch line, and I think 3/16 will be easier to bleed than 1/4", I'll have a single 12mm-10mm adapter on my clutch master instead.

The prices I found below are for the cost in USD including shipping to central USA. There are flashy stainless braided variants of untested quality and durability out there ranging from $40 to $80 shipped, but the OEM part is even more affordable and may actually be more reliable. And one of the biggest benefits, to me, is that there is no welding, brazing or other "Mickey Mousing" to use it.

I bought the OEM part. Here's what you can expect to receive:


[ /url] [url=http://s297.photobucket.com/user/Hexadecimus/media/Fiero%20F23%20clutch%20line%20adapter/6-metric-flare-end.jpg.html] [/url ] [url=http://s297.photobucket.com/user/Hexadecimus/media/Fiero%20F23%20clutch%20line%20adapter/7-installed.jpg.html]


These are the OEM part numbers and applications. You can probably get the part from any BMW dealer for these cars or use them to check interchanges:

These are the parts and sources I found:

code:
OEM:

$ Part # Manufacturer retailer
28 W0133-1815281-FTE FTE Amazon.com
* 21 52 6 774 267 (same as above)
* 323E.352E.03 (same)
35 21526774267 Genuine BMW part ECSTuning.com
35 21526774267 (41523 ) Genuine BMW part secarpart.com
37 21526774267 Genuine BMW part (various dealership websites)

NOTE: FTE/EPS has been making OEM European parts for over 60 years. It may be an exact OEM part.
In any case, I'd expect it to be of the same quality.

I've confirmed that the FTE is in fact the OEM part, so any of the above numbers should be genuine.


Aftermarket braided SS:

$ Part # Manufacturer retailer
36 18/33, 207 ? Euro-wise.com
40+ AP-E46M3-400 Agency Power many various websites
42.36 SSCLC160 ? from turner motorsport
45 SS-CLU-02 Rogue Engineering Rogue Engineering

The Agency Power/Turner parts are generally thought by many Bimmer enthusiasts to come from the
same manufacturer. Rogue Engineering may have a different supplier or make their own stuff. I didn't
do that much research since I didn't use their parts.


Jason

------------------
1st class A**hole.

we're in desperate need of a little more religion to nurse your god-like point of view...

//www.fiero.nl/forum/Forum2/HTML/119122.html

IP: Logged
Purple86GT
Member
Posts: 1592
From: Ontario, Canada
Registered: Mar 2012


Feedback score: (1)
Leave feedback


Total ratings: 62
Rate this member

Report this Post05-22-2014 08:06 AM Click Here to See the Profile for Purple86GTSend a Private Message to Purple86GTEdit/Delete MessageReply w/QuoteDirect Link to This Post
Does that rubber hose connect to the Fiero clutch line without adaptors? I can't tell from your picture. What size is the female fitting on the hose?

Also, I'm interested to see the pictures and more importantly the specs on your custom shift linkage. Many talk about a custom shift linkage but the information never follows through.

Thank you!
IP: Logged
ericjon262
Member
Posts: 3082
From: everywhere.
Registered: Jan 2010


Feedback score:    (10)
Leave feedback


Total ratings: 66
Rate this member

Report this Post05-22-2014 06:30 PM Click Here to See the Profile for ericjon262Send a Private Message to ericjon262Edit/Delete MessageReply w/QuoteDirect Link to This Post
 
quote
Originally posted by Purple86GT:

Does that rubber hose connect to the Fiero clutch line without adaptors? I can't tell from your picture. What size is the female fitting on the hose?

Also, I'm interested to see the pictures and more importantly the specs on your custom shift linkage. Many talk about a custom shift linkage but the information never follows through.

Thank you!


it requires an adapter from m10-m12, but that's simple enough, all the info is in the quote with the pictures.

here are the pictures of the shift linkage, it was built around stock isuzu cables, next time around I'm going to order custom cables to provide better routing. the last pic was from the prototyping phase, please excuse the ugly welds and surface rust. that's the closest I have to an installed pic ATM. I don't have specs, it was what you call, "eyeball engineered"...


from the prototype phases, don't have a finished installed pic at the moment.

IP: Logged

next newest topic | next oldest topic

All times are ET (US)

Post New Topic  Post A Reply
Hop to:

Contact Us | Back To Main Page

Advertizing on PFF | Fiero Parts Vendors
PFF Merchandise | Fiero Gallery | Ogre's Cave
Real-Time Chat | Fiero Related Auctions on eBay


Copyright (c) 1999, C. Pennock