Trying to install the new ball joints I got, and no matter how hard I try, they keep going in crooked. It seems to me that unless you get everything lined up absolutely perfect, once you start putting pressure on them, they will tilt a bit one way or the other. I tried to adjust the tool to straighten out the first one that went in crooked, and long story short, I put another order in with Rock Auto today.
When installing the ball joints, should the adapter cup sit on the outer edge of the ball joint or the inner? I would think it would be more likely to go in straight using the inner (black) spot, but not sure if that area is strong enough to take the pressure required to get the ball joint into the seat in the control arm.
[This message has been edited by NetCam (edited 11-24-2013).]
mine done same thing I there doesnt seem to be an adapter that fits very well , at the point it started tilting on mine used the press with only adapters on top and a small flat piece on bottom to push the tilted side up and everything went together well,, You will have same issue with the new ones,,,
------------------
87GTseries 1 3800sc (7.597 @88.53 1.579 60ft) (series II swap in progress) 85GT Northstar/ 4t80e 86GT 3800 n/a My Build
Happened to me too. After backing them out a couple times and retrying, I gave the control arm a good whack with the hammer and the joint snapped in perfectly straight. Don't forget to use the snap ring to hold them in.
It helps to put the ball joints in the freezer overnight to "shrink" them.
After we figured out what the heck we were doing with the first one, the second lower ball joint went in quite easy on my '88 Formula.
When the new ones arrive I'm going to toss them in the freezer, and if it's as cold as I expect it to be I'm thinking of heating up the control arm with a torch a bit before I try pressing them in. If I don't go too crazy, just warm them up a bit I don't think it can hurt.
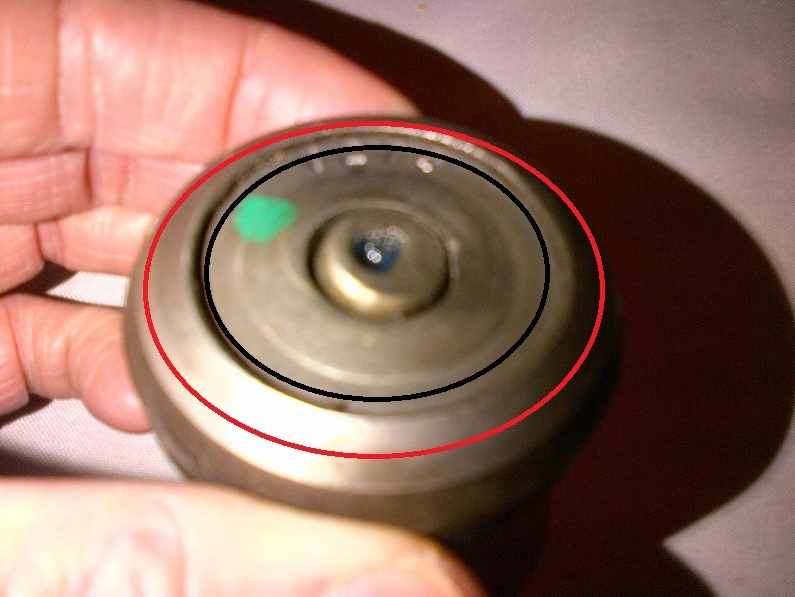
When installing the ball joints, should the adapter cup sit on the outer edge of the ball joint or the inner? I would think it would be more likely to go in straight using the inner (black) spot, but not sure if that area is strong enough to take the pressure required to get the ball joint into the seat in the control arm.
I used an old socket and Duc Tap, and tapped them in (Black Line). Obviously you can't tap the center cap (by its self).
Finally got the right front ball joint in, but having a hell of a time getting the second one to go. One question, and it may sound like a stupid one, but at what point does the rubber boot go on? I've done a search and come up empty. The FSM is useless because all it says is the ball joints are welded in and you have to replace the whole LCA. The boots that were on mine were pretty much destroyed and covered with grease so it's hard to see how everything was supposed to be put together.
Edit: These ones came with the retainer clips, which I haven't put on yet. Does the boot pull over the clip and then the steering knuckle crushes down over the boot?
[This message has been edited by NetCam (edited 12-01-2013).]
These ones came with the retainer clips, which I haven't put on yet. Does the boot pull over the clip and then the steering knuckle crush down over the boot?
Push the ball joint all the way on until it bottoms out (or bottoms up as the case may be), install the clip in the groove, and then push the rubber boot onto the shoulder. Once the knuckle is assembled onto the LCA, the boot's not going anywhere.
Thanks Patrick, I thought that was where they went, but it's always good to hear it from somebody else.
So I decided to go out at 10:00 at night in sub-zero weather and give it another shot. Now it's official, the neighbours think (know??) I'm crazy. Upside is I finally defeated that PITA ball joint. Now all I need to do is hope for some near decent weather so I can put the rest back together, which should be a piece of cake after the ball joints.
[This message has been edited by NetCam (edited 11-30-2013).]
On to the final (?) steps now. Went to drop the steering knuckle down over the new ball joint, and it seems to stop about 3/4" or so above where it needs to be. Is there a trick to getting the knuckle to drop down to the right level? I was thinking that putting the sway bar link on first was a bad idea, but then thought it should just push up if it needs room. When I was jacking up the LCA it got to the point where it was lifting the whole car and the ball joint wasn't going any further through the hole in the knuckle.
[This message has been edited by NetCam (edited 12-04-2013).]
Actually I'm surprised you didn't say "I don't know what you were thinking" because obviously I wasn't. I just went outside and I had the box with the new links in it and just started putting stuff together. I was rushing because I only had an hour to get work done, clean up and get back to work. Anyway...... I went back out, backed off the sway bar link and was able to wiggle the knuckle around until it was in the right position and it slid right down. Only thing I'm wondering now is if there's a certain point to turn the castle nut down to or if I just bring it down to the point where I can slide the cotter pin in, which is where I have it right now.
Only thing I'm wondering now is if there's a certain point to turn the castle nut down to or if I just bring it down to the point where I can slide the cotter pin in, which is where I have it right now.
You want to make sure that nut is tight. I don't know what the proper torque setting is (and I didn't use a torque wrench on there myself), but you don't want a loose lower ball joint.
Actually was able to find it in the FSM, at the end of the Front Suspension section. I had stopped looking the other day when it told me you had to replace the entire LCA because the ball joints couldn't be replaced.
I'm a little late to the game, but last time I had the front lower ball-joints replaced, I had a machine shop do it. They only charged me $20 for the job. IMO, it was worth the money.
I usually do most of my own mechanic work. But some things are such a PITA that it's worth paying someone else to do it.
... last time I had the front lower ball-joints replaced, I had a machine shop do it. They only charged me $20 for the job. IMO, it was worth the money.
I usually do most of my own mechanic work. But some things are such a PITA that it's worth paying someone else to do it.
In a situation where the LCA have already been removed from the car, I'm inclined to agree with you... but that wasn't the case here (or when I did it several months ago).
Besides, NetCam will now be able to advise future "newbs" how to do this procedure.
[This message has been edited by Patrick (edited 12-05-2013).]
Stainless steel cotter pins. Small investment, worth their weight in gold if you ever have to disassemble one of these in the future.
Saw this post after I got it all back together, I just used the ones that came with the ball joints. Will keep it in mind for the next time, which hopefully isn't anytime soon!
Stainless steel cotter pins. Small investment, worth their weight in gold if you ever have to disassemble one of these in the future.
I like to use "hitch clips" or "hair pins" wherever they'll fit, that way the next time I disassemble it I don't have to run out for the cotter pins I forgot.
Originally posted by NetCam: Saw this post after I got it all back together, I just used the ones that came with the ball joints. Will keep it in mind for the next time, which hopefully isn't anytime soon!
If you plan to hold on to the car for the long haul, you might consider buying some stainless cotter pins and swapping the ones you installed while they are clean and rust free. Replacing them would be all of fifteen minutes total. I purchased stainless cotter pins from McMaster Carr and got box lots of each size. It is probably a lifetime supply for me, but I am glad I have them on hand when I need them.
If you plan to hold on to the car for the long haul, you might consider buying some stainless cotter pins and swapping the ones you installed while they are clean and rust free. Replacing them would be all of fifteen minutes total. I purchased stainless cotter pins from McMaster Carr and got box lots of each size. It is probably a lifetime supply for me, but I am glad I have them on hand when I need them.
Not a bad idea now that you mention it. The ones on the car were so badly rusted they just snapped off when I tried to straighten them. Ended up turning the castle nuts with the pins still in and just ground them off. I couldn't even get the remnants of the cotter pins out and decided on new ball joints rather than mess with them anymore.