I bought all new ball joints from Rodney to install in the '88 Formula I've recently acquired.
The front upper ball joints are easy to install.
The front lower ball joints... aren't.
I've got a ball joint press here with about two dozen different tubes and collars etc, but I'm still having trouble "seating" the new lower ball joints.
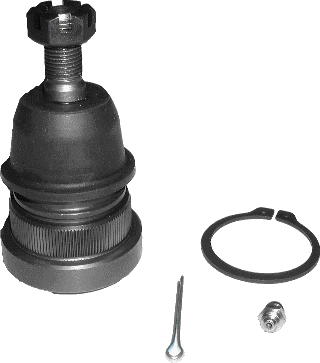
In this picture you can plainly see the shoulder at the bottom of the splines on the ball joint.
Is the ball joint supposed to be pressed in all the way so that the ball joint bottoms out on that shoulder in the lower control arm?
It seems to me from what I've seen pictured in many threads here (and on a buddy's Formula) that people stop pressing the ball joint in as soon as they can get that clip (also pictured) on. However, there's still 1/8" to 1/4" of spline showing below the lower control arm. The shoulder on the ball joint is therefore still 1/8" to 1/4" away from being seated.
I suspect that's not correct. I tend to believe that the ball joint should go in further until the shoulder on the ball joint actually meets the underside of the lower control arm.
So, who knows for sure? What's the word?
[This message has been edited by Patrick (edited 07-07-2021).]
Originally posted by Patrick: Is the ball joint supposed to be pressed in all the way so that the ball joint bottoms out on that shoulder in the lower control arm?
YES
And if you really want to make sure the ball joint doesn't go anywhere, you can tack-weld it to the control arm, from the underside.
I bought all new ball joints from Rodney to install in the '88 Formula I've recently acquired.
The front upper ball joints are easy to install.
The front lower ball joints... aren't.
I've got a ball joint press here with about two dozen different tubes and collars etc, but I'm still having trouble "seating" the new lower ball joints.
In this picture you can plainly see the shoulder at the bottom of the splines on the ball joint.
Is the ball joint supposed to be pressed in all the way so that the ball joint bottoms out on that shoulder in the lower control arm?
It seems to me from what I've seen pictured in many threads here (and on a buddy's Formula) that people stop pressing the ball joint in as soon as they can get that clip (also pictured) on. However, there's still 1/8" to 1/4" of spline showing below the lower control arm. The shoulder on the ball joint is therefore still 1/8" to 1/4" away from being seated.
I suspect that's not correct. I tend to believe that the ball joint should go in further until the shoulder on the ball joint actually meets the underside of the lower control arm.
So, who knows for sure? What's the word?
So, I had a similar concern when I installed new ball-joints too. Personally, I pressed the ball joint on as far as I could get it... basically until it bottomed out. A lot of people use a sledge hammer, some bricks, and a plate with the grease fitting not installed so they can pound it in. (hahah), but if you have a legitimate press, you'll want to go ahead and press it in as far as it'll go.
As you can probably see, the good news is that the tension will (almost) always be pulling the ball-joints IN... but the circle-clip is just to prevent it from backing out if you hit a crazy bump or something goes horribly wrong. If you can, and it's not too difficult, try to push it in all the way.
I've only had 84-87s... so I've never had the clip. I have heard about the tac-welding trick too... I think some ball joints even came like that, if I'm not mistaken.
I just installed a pair on a Grand Prix,the rubber grease seal will press down, or you can preess it down by hand, if your wondering why it doesnt look like the stud is long enough. I used a socket, duck Taped to the bottom of the ball joint, to tap it into place.(otherwise if you dont you'll crush the metal grease seal,the socket should ride along the circular groove). The shaft is tapered,so you migh have a small gap 1/4 inch on the bottom. So dont pound extra hard on the ball joint.The rubber grease seal will cover the small gap. Might as well grease the chassie while its in the air.
I tend to believe that the ball joint should go in further until the shoulder on the ball joint actually meets the underside of the lower control arm.
I agree too. It should bottom out in the control arm. Make sure you don't have it going in crooked, but I'd imagine since you can see it sticking out like you've mentioned, you already know its not crooked.
By the way, I had trouble finding a ball-joint press with the correct-size adapter collars. Nothing was exactly right, so I used a piece of exhaust pipe - an adapter piece. It was either 2" I.D. x 1-3/4" I.D., or 2" I.D. x 1-7/8" I.D. I suspect the former. Cut down to the same length as the collars in the kit, it worked great.
I pressed them in all the way with a balljoint press from autozone. It had all the right sizes for everything, I put my impact wrench on it and gave it some heat with a propane torch, it doesn't take much heat. With heat and the impact wrench operating the press it took around 10 minutes to get a side in, once I got it started going in straight.
I got Moog ball joints for my 88 and pressed them in with a press from Orielly. The underside of the control arm was a bit difficult to get the adapters to fit because there is a lip. My ball joints didn`t come with a clip but I can`t imagine those things backing out as tight as they were.
[This message has been edited by TXGOOD (edited 09-07-2013).]
This was actually one of the more pain-in-the-azz things I've ever done with a Fiero. I bought the cheap ball joint press tool from Harbor Freight and still didn't have all that I needed. Ended up sawing one of the sleeves in half. It's been a while, so I don't remember all of the gory details. I think I used an impact wrench, or at least a breaker bar, to press them in. It wasn't pretty. It always looked like it was "right on the edge" of slipping. Be careful.
I used a 1 or 2 pound hand held sledge (short handle) from Harbor Freight tool (along with the socket, Duct Taped to the bottom...didnt have any problems and was easy to do).
[This message has been edited by James Bond 007 (edited 09-08-2013).]
First of all, thanks for all the responses. Much appreciated. It was helpful to know that the ball joints were indeed supposed to be pressed in until the shoulder seated against the underside of the lower control arm.
One thing I should've mentioned was that we were doing this with the lower control arms still attached to the car. So the suggestion of using a BFH to pound the ball joints in wouldn't have worked.
Here's a picture of the ball joint press that we were using.
It turns out that Canadian Tire has a "loan" program where you "buy" the above kit for $229 (plus tax), but if you return it within 72 hours, it doesn't cost a cent to use it. I don't understand why they offer this service (I guess they hope you'll just keep it), but I was quite happy to be able to use the press and then return it within the 72 hour period.
Okay, this is what we discovered after my opening post...
It turns out when we were pressing the first ball joint up and into the lower control arm, that once the ball joint started to come through the top side of the control arm, it was actually making contact with the edge of the tube we were supposed to be pressing the ball joint through. Yes, the tube was large enough for the ball joint to go into, but because the control arm is not perfectly flat around where the ball joint protrudes, the tube accidently got cocked off to one side a tiny bit... just enough for the ball joint to catch the edge of the tube.
So we used a slightly larger tube (which allowed a bit more margin of error) and then we had no trouble pressing the ball joint up all the way. Now that we knew what the heck we were doing, the lower ball joint on the other side went in quite quickly.
To make it a little easier getting the ball joints into the control arms, we put the ball joints in the freezer and "shrunk" them down. We saw no need to tack weld them in place afterwards, because they're in there very tight. Even the supplied clips seemed to be unnecessary, but yes, we put them on anyway.
One thing I will say is that it's quite confusing at first figuring out what collar/tube/plate (from the ball joint press kit) goes where when first using it. The directions which come with the kit are quite generic, and it takes awhile to see what works best with the Fiero control arms and ball joints.
So thanks again to everyone. It was quite helpful to get some feedback while doing this for the first time.
Originally posted by Patrick: .... To make it a little easier getting the ball joints into the control arms, we put the ball joints in the freezer and "shrunk" them down. We saw no need to tack weld them in place afterwards, because they're in there very tight. Even the supplied clips seemed to be unnecessary, but yes, we put them on anyway. ...
Good show!
I didn't freeze mine. Just "gorilla'd" them in. But yeah... No need to weld them. I also used the clips though.
The only ball joint that I ever saw come out of a LCA was on my Formula parts car. The P/O had driven it into a dirt bank in the rain. Hit hard enough to "egg shape" the hole in the knuckle where the ball joint stud went through. The rest of the car was a write-off. (hence the "parts car") Bent stuff all the way back to the firewall, behind the passenger seat. I actually considered the possibility that the cradle might be tweaked. (It wasn't.)
[This message has been edited by Raydar (edited 09-08-2013).]
I have in the past done them where they broke, talk about a pain in the ass, the BFH works great if you can get it high enough, and even if you can't. I called an old buddy of mine who races cars and asked him how he would do it my situation. he suggested putting a concrete block under the control arm and whacking the crap out of it with the BFH from the top, hitting the control arm down after cleaning the hole out with some fine sandpaper then greasing the hole before putting the joint in. to do it that way you have to take the grease fitting out if it was already installed or not put it in until you are done.
Steve
------------------ Technology is great when it works, and one big pain in the ass when it doesn't
The easiest way to press ball joints in or out is to remove the lower control arm and use a 10 - 20 ton hydraulic shop press. You will still need the ball joint press kit to use the collars/sleeves on the press. If you have any small independent auto parts stores that have a machine shop for engine rebuilding nearby, they often have a hydraulic press and they will press in new ball joints for a small fee, but this requires that you remove the lower control arms from the car as well.
I installed these in my uncle's Fiero last fall... When we bought the car we were wondering why it was clunking and wondering at highway speed. Turns out the previous owner installed lowering ball joints at some point, but they weren't pressed in all the way down and tack welded in as recommended. The holes on both control arms where you press them in looked like ovals since they were flopping around for who knows how long... the new ball joints just slipped right into position without a press. To avoid having to buy "new used" control arms I welded the ball joints in, very slowly so I wouldn't over heat the grease or warp the internals... They will never be coming out, so hopefully they last a while... In Rodney I trust!
Lesson is, make sure they are pressed all the way in, the C clip installed, and then tack weld them in.
------------------ "Discord" Red 1988 GT under restoration!
Let's Go Mets!
( ͡° ͜ʖ ͡°)
[This message has been edited by Shho13 (edited 07-17-2016).]
Lesson is, make sure they are pressed all the way in, the C clip installed, and then tack weld them in.
Tack welding regular (non lowering) ball joints shouldn't be necessary on front lower control arms (unless the holes are elongated from previously botched ball joint replacement).
quote
Originally posted by Patrick:
To make it a little easier getting the ball joints into the control arms, we put the ball joints in the freezer and "shrunk" them down. We saw no need to tack weld them in place afterwards, because they're in there very tight. Even the supplied clips seemed to be unnecessary, but yes, we put them on anyway.
[This message has been edited by Patrick (edited 07-17-2016).]
First of all, thanks for all the responses. Much appreciated. It was helpful to know that the ball joints were indeed supposed to be pressed in until the shoulder seated against the underside of the lower control arm.
One thing I should've mentioned was that we were doing this with the lower control arms still attached to the car. So the suggestion of using a BFH to pound the ball joints in wouldn't have worked.
Here's a picture of the ball joint press that we were using.
It turns out that Canadian Tire has a "loan" program where you "buy" the above kit for $229 (plus tax), but if you return it within 72 hours, it doesn't cost a cent to use it. I don't understand why they offer this service (I guess they hope you'll just keep it), but I was quite happy to be able to use the press and then return it within the 72 hour period.
Okay, this is what we discovered after my opening post...
It turns out when we were pressing the first ball joint up and into the lower control arm, that once the ball joint started to come through the top side of the control arm, it was actually making contact with the edge of the tube we were supposed to be pressing the ball joint through. Yes, the tube was large enough for the ball joint to go into, but because the control arm is not perfectly flat around where the ball joint protrudes, the tube accidently got cocked off to one side a tiny bit... just enough for the ball joint to catch the edge of the tube.
So we used a slightly larger tube (which allowed a bit more margin of error) and then we had no trouble pressing the ball joint up all the way. Now that we knew what the heck we were doing, the lower ball joint on the other side went in quite quickly.
To make it a little easier getting the ball joints into the control arms, we put the ball joints in the freezer and "shrunk" them down. We saw no need to tack weld them in place afterwards, because they're in there very tight. Even the supplied clips seemed to be unnecessary, but yes, we put them on anyway.
One thing I will say is that it's quite confusing at first figuring out what collar/tube/plate (from the ball joint press kit) goes where when first using it. The directions which come with the kit are quite generic, and it takes awhile to see what works best with the Fiero control arms and ball joints.
So thanks again to everyone. It was quite helpful to get some feedback while doing this for the first time.
I borrowed advance auto's ball joint tool as shown above and used my shop press to remove the old and install new ones. Worked well. So many crooked tries I felt like Hillary.
Once it was straight it pressed right in.
When removing the old ones the pin Pushed out of the casing First and then the Casing had to Be pressed Out afterwards.
[This message has been edited by Lou and Blue (edited 07-17-2016).]
Strangely enough, I'm installing another set of Rodney's ball joints on another 88. This time the arms are off the car, since I'm replacing the bushings, too. I just placed the LCA upside down across the open jaws of my bench vice and pounded the ball joint in with a BFH. Easy peasy, since the zerk can be installed later. I tried pressing them in with little success. (Don't have the right size sleeves, and the ones I have kept slipping.)
This time, I'm not even going to use the C-clips. I certainly don't think they're going anywhere. The only 88 ball joint I ever saw knocked out of position was in a car that was 18" shorter on the right side than the left because it had been driven into a dirt bank. It also egg-shaped the hole on the knuckle, where the stud went through, and bent the stud.
My trw ball joints had no snap ring and no indentation for one . Pressed in all the way to the collar tight to the underside of the CA. They aren't going anywhere.
[This message has been edited by Lou and Blue (edited 07-19-2016).]
Just wish I could solve this : I opened a can of worms and now I'm stuck again , and I still haven't gotten to cutting the bumpstops yet..
As I was wAiting for the control arm paint to dry, I decided to remove the front seat bar to paint it before changing its bushings when I went to remove the bracket bolt , I broke the bolt for my front sway bar bushing clamp in the chassis....so bummed. These bolts are rusted BAD.... Still hoping i can remove the pas side steering rack strap clamp so I can get a new lower control arm bolt in (front pass side Lower control arm bolt) I hope those boys don't want to grab and snap too.
This stinks.... I have never had any luck with an ez-out I've had them break out and make things even more of a problem.


 Seems like yesterday.
 the BFH works great if you can get it high enough, and even if you can't. I called an old buddy of mine who races cars and asked him how he would do it my situation. he suggested putting a concrete block under the control arm and whacking the crap out of it with the BFH from the top, hitting the control arm down after cleaning the hole out with some fine sandpaper then greasing the hole before putting the joint in. to do it that way you have to take the grease fitting out if it was already installed or not put it in until you are done.


