I'm trying to switch out the front springs, but would like to do it with the least amount of effort possible. What do you guys suggest is the best method?
Jack the car up and put jackstands under the crossmember. Remove tires, brakes, and rotors Jack up under the A-arm almost to the point of lifting the car of the jackstands but leave it resting on stand. Take the cotter pins and castle nuts off the tie rod and ball joints. Use a pickle fork to pop off the tierod then the balljoints, set spindle aside now lower the jack slowly letting the A-arm fall and spring fall out. Sometimes you have to push the A-arm down further then it wants to fall on its own.
[This message has been edited by Mike Gonzalez (edited 01-14-2013).]
Its been awhile and I would wait for more definite answers , but I believe that you will want to take the spindle loose from the upper and lower control arms. Make sure you have a floor jack securely under the lower control arm, keeping upward pressure on it and tie the spring slightly loose to something like the front end. This is a safety measure in case the spring tries to jump out from the tension. Remove the shock and after backing the nuts off on the ball joint, use a tool for removing these or tap the side of the spindle with a hammer to help break it loose. After they are both loose ( top and bottom ) swing the spindle out of the way and slowly lower the jack. At full downward swing of the lower control arm, the spring will come off but you may need to yank at it from the bottom of the spring to get it over the perch (hump) on the LCA.
Putting shorter springs on should be easy because you will have more room. If they are about the same length as the old ones, I found placing the top of the spring in place and holding the middle with one hand and using one foot to press up and in on the bottom of the spring worked for me. Kinda hard to explain what I am doing with my foot but my heal of my shoe in on the ground and the toe of my shoe is bent back under the spring so when I roll my foot toward the car, the spring moves inward and slightly upward at the same time. Hope this made sense LOL and good luck
Steve
What Mike said but tie the spring just enough it cant move too far.
[This message has been edited by JumpStart (edited 01-14-2013).]
I improvised and made the first one I tried. It was okay, but the next time I had an order for Rodney I bought the one he sells. Works like a hot damn. And no more destroyed dust boots.
I improvised and made the first one I tried. It was okay, but the next time I had an order for Rodney I bought the one he sells. Works like a hot damn. And no more destroyed dust boots.
[/QUOTE]
LOL, i have never removed springs without replacing ball joints ! I figure if your gonna take it apart replace them while your there. If you just replaced them though I can see a use for that tool to save the ball joints, yes, the pickle fork will most likely destroy them.
I rather not mess with the ball joints as much as possible. And I'm not going to use a pickle fork. I don't feel like redoing the balljoints before their time.
I was hoping there is a way to do it without taking so much apart. Maybe a spring compressor?
I was hoping there is a way to do it without taking so much apart. Maybe a spring compressor?
No.
This isn't the springs in your door hinges you're trying to replace.
Get the tool I suggested and it really isn't all that difficult a job to do.
You only need to pop loose the bottom ball joints. The spindles can stay attached to the upper control arms. (Or I suppose you could do it the other way around.)
[This message has been edited by Patrick (edited 01-14-2013).]
IF you don't mind ruining the origional spring, use a cutting torch to heat up the spring till they sag under their own pressure. Then just pop the upper ball joint and pull it out, I've had them out a couple times and the lower control arm doesn't go low enough without putting dangerous deflection on the spring, so you have to lower it down enough that you can pop it with a pry bar, still a bad situation. For re installation just use a couple of exhaust clamps or lowering clamps to pull a couple coils together to make it fit.
the lower control arm doesn't go low enough without putting dangerous deflection on the spring, so you have to lower it down enough that you can pop it with a pry bar, still a bad situation.
Why is it a "bad situation"?
With the lower control arm lowered and hanging freely (after the ball joint has been popped), and with a chain (or rope) through the coils to prevent the spring from taking off... pop the spring out from the bottom with a pry bar. Piece of cake!
[This message has been edited by Patrick (edited 01-15-2013).]
With the lower control arm lowered and hanging freely (after the ball joint has been popped), and with a chain (or rope) through the coils to prevent the spring from taking off... pop the spring out from the bottom with a pry bar. Piece of cake!
My dad got snapped with a spring before and cut his hand up pretty good, and I've had one bounce across the shop, but the rope or chain is a good solution i didn't think about back then. It just seems when you try to lower the control arm down it puts a lot of deflection on the spring which can to jump unexpectedly, that's all i was trying to say.
I just finished taking my front end apart to put new ball joint grease boots on. I took my springs out, one good yank and it came out. Only goes in one way with a little push. I found that the shop that did my brakes tightened the nut to tight. Now I have to buy bearings. Have fun with your springs, be safe.
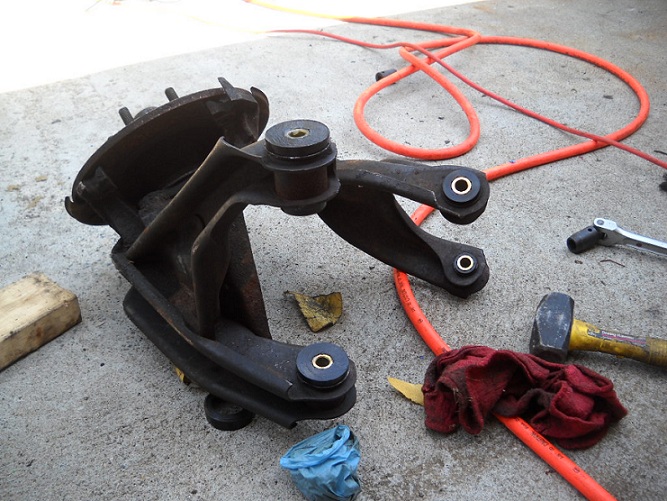
Ok here is how I did it. No ball joint removal or special tools. I just undid the tie rod end and tapped it out with a hammer, then undid the big bolt through the upper control arm while supporting the lower arm with a jack. I then pulled the upper arm out and twisted it 180 degrees horizontally to get it out of the way. I lowered the jack until the lower arm had moved as much as possible, and then popped the spring out with a prybar. It is pretty much contained by the huge bump stop so not much risk of it popping out violently and hurting you in my opinion.
Here's a picture of the front suspension assembly totally removed without undoing any ball joints
[This message has been edited by zkhennings (edited 01-16-2013).]
Ok here is how I did it. No ball joint removal or special tools.
Keep in mind that separating the upper or lower ball joint from the spindle does not require the "removal" of any ball joint.
That's an interesting way you've done it, but I wonder just how "easy" that would be to do on a front suspension that's not been previously disassembled, with everything all corroded? I've heard that getting that long bolt out of there for the upper control arm is sometimes a helluva job. I think I'd rather just pop one ball joint!
Apparently the "factory" method for front spring removal is to unbolt the lower control arm and to swing it down out of the way (still connected to the spindle). No thanks!
Originally posted by Patrick: Apparently the "factory" method for front spring removal is to unbolt the lower control arm and to swing it down out of the way (still connected to the spindle). No thanks!
Could you explain why that's not a good idea to do? I'm not sure I understand.
This isn't the springs in your door hinges you're trying to replace.
Get the tool I suggested and it really isn't all that difficult a job to do.
You only need to pop loose the bottom ball joints. The spindles can stay attached to the upper control arms. (Or I suppose you could do it the other way around.)
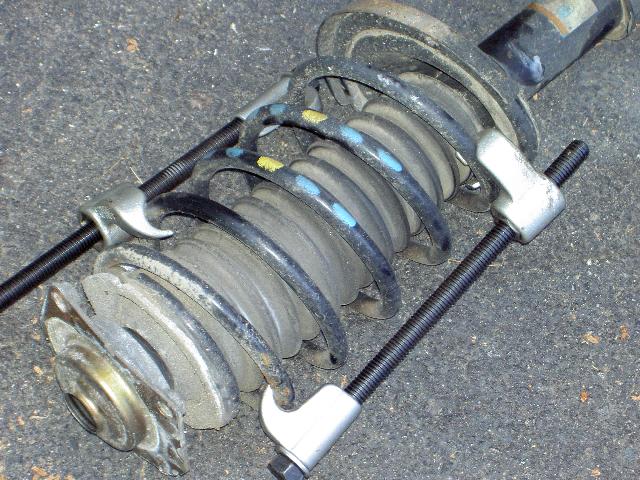
I agree with a few suggestions here. First off the ball joint separator is the proper tool to use. We have the GM/Kent More ball joint separator and it looks just like the home made one in the picture. To get the spring out only the bottom ball joint needs to be separated from the spindle. If you remove the upper you will have loads more work to do.The only risk with this is that the spring is under pressure so use a spring compressor to insure that the spring doesn't let go and do some damage. While the spring is out you can easily change the lower ball joint and the lower control arm bushings. if you decide to change the bushings mark and note the position of the shims. Reversing them can cause a bad misalignment condition.
------------------ " THE BLACK PARALYZER" -87GT 3800SC Series III engine, custom ZZP /Frozen Boost Intercooler setup, 3.4" Pulley, Powerlog manifold, Northstar TB, LS1 MAF, 3" Flotech Afterburner Exhaust, Autolite 104's, MSD wires, Custom CAI, 4T65eHD w. custom axles, HP Tuners VCM Suite. "THE COLUSSUS" 87GT - ALL OUT 3.4L Turbocharged engine, Garrett Hybrid Turbo, MSD ign., modified TH125H " ON THE LOOSE WITHOUT THE JUICE "
First off the ball joint separator is the proper tool to use. We have the GM/Kent More ball joint separator and it looks just like the home made one in the picture.
Ummm... the image of the "home made" ball joint separator I posted was taken directly from Rodney Dickman's website.
I have removed the front springs before, but I have my front end completely removed from the car and would like to disassemble it. Any ideas on removing the spring safely.


 Pickle forks for sure destroy the dust boots, if not damage the whole ball joint.
 And no more destroyed dust boots.