The 2.8 in my Formula died a while back so instead of fixing that engine I decided I would try doing what Fierosound and a few others have done (use the Fiero's heads, intake, etc. on the 3400 block).
I decided to go this route for a couple of reasons;
first off I don't know how to weld, so any custom brackets/parts I would have to have someone else make for me and that could get expensive.
Im planning to use this as my daily driver and the more powerful engines would make winter driving even less enjoyable.
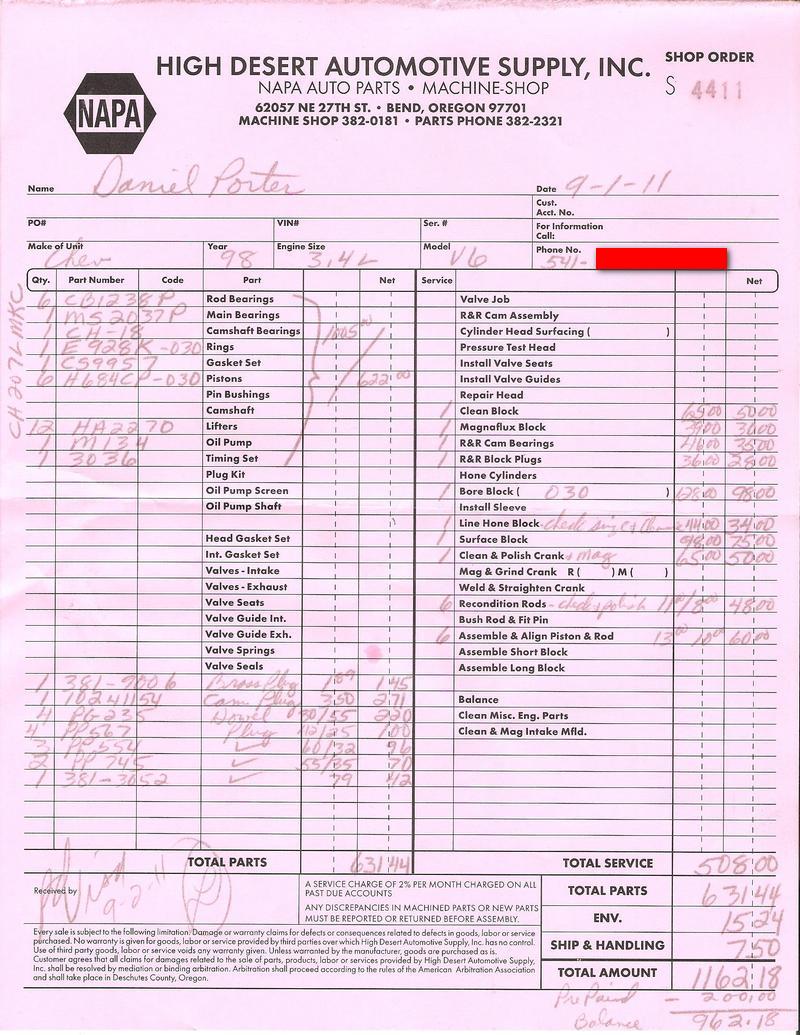
Engine Parts - $1072 Parts purchased from the machine shop - $631 * Rod Bearings * Main Bearings * Camshaft Bearings * Rings * Pistons * Lower Gasket Set * Lifters * Oil Pump * Timing Set * Various Plugs 1.6 Rocker Arms - $127 Custom length pushrods - $134 Clutch/Pressure plate - $125 Water Pump - $25 Head Gaskets (3.4L) - $30
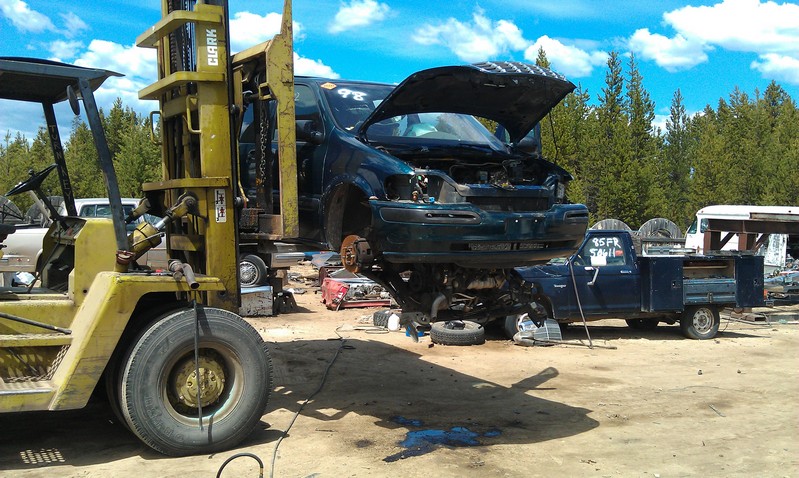
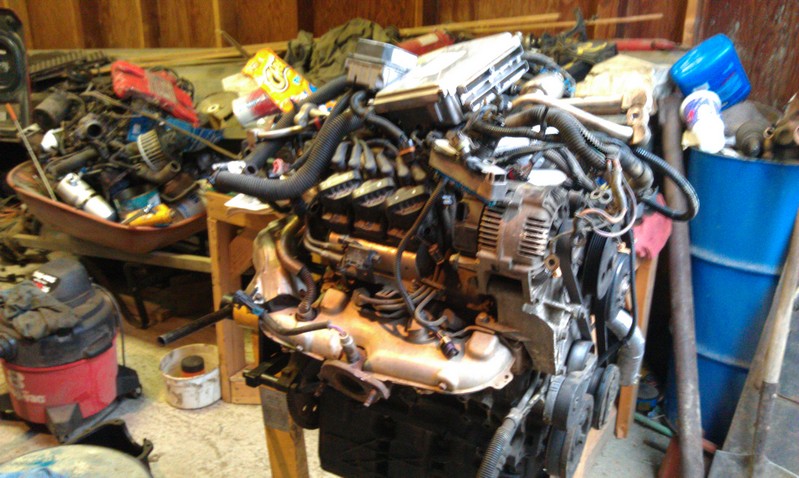
----------====================---------- The engine came out of a '98 Chevy Venture van at the local wrecking yard. I got the engine, wiring harness, and ECM (think thats what its called) for about the same amount as it would have cost me in fuel alone to go to the next nearest wrecking yard. However, I do not know if I will be able to save this engine or not, I've known that since I first started looking at it, a van load of empty antifreeze bottles and duct taped coolant lines are generally not a good sign. But for the price I think even if the block is beyond saving I could probably still sell the good parts and make my money back so it was a chance I was willing to take.
This is how we got the engine out of the van, it looks completely safe! I had already removed/unpluged everything from the top so it had plenty of room to go wherever it wanted when I took those bolts out, also made it easy to get to where you disconnect the steering shaft which is pretty much in the firewall normally but it moved to a much nicer place when I did this. Steering wheel didn't work after the drop, but who needs to turn anyways?
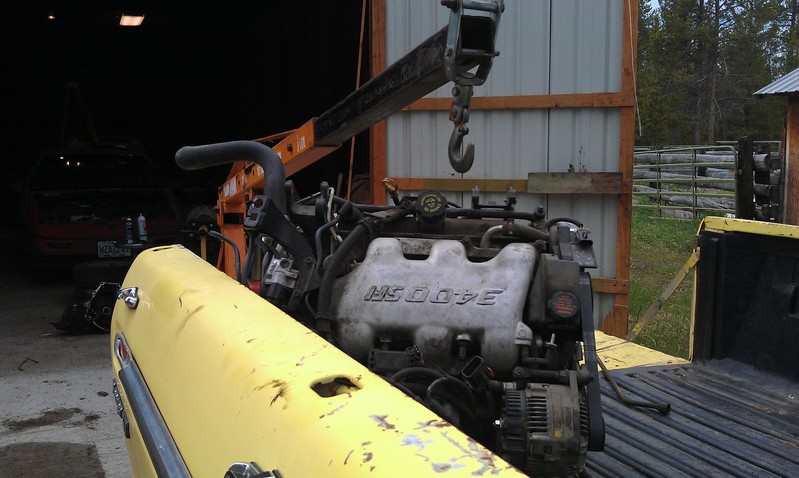
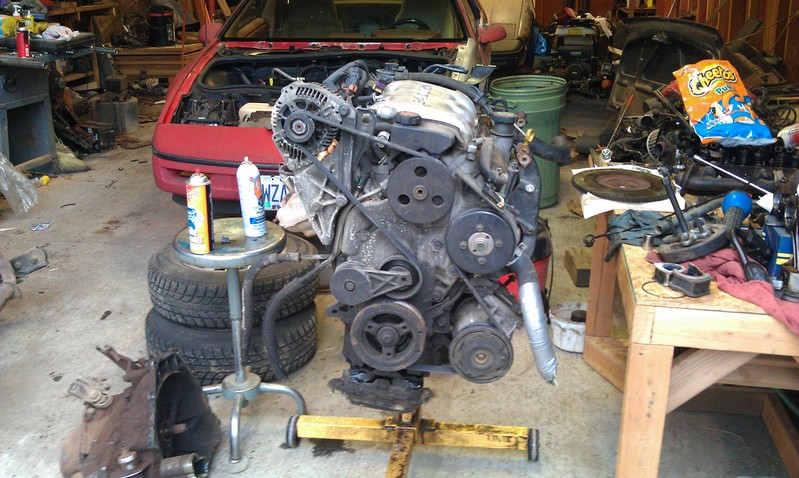
And the engine in the pickup about to go into the shop
I did have the old 2.8 on the engine stand, but before I took it off I removed the water pump and the timing chain cover, I found a couple extra pieces in it. Also I think my timing chain is a bit loose.... The car was still running, just using quite a bit of oil when I parked it to fix the engine. With the amount of stuff I found wrong I don't imagine it would have been for much longer, I'm actually surprised it was even still running as well as it was.
3400 On the stand.
I was planning on using the distributorless ignition stuff the 3400 had and the electronic cruise if I could, I don't know if this is the ECM I would want for that tho, it was the one that was in the van. I know whatever I do will require some custom programming. If this is the one people want to use, I would recommend grabbing one out of these vans they are really easy to get to they sit in the air intake box just before the air filter. All you have to do is pop the cover off the air box, pull the thing out (it is just wedged in with some foam type pads) and unplug the wires. Much better than the ones you have to spend hours ripping apart a dash to get to.
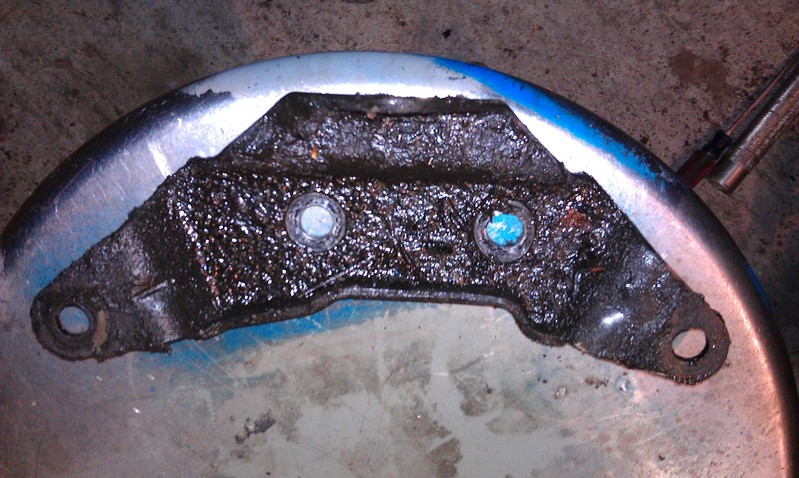
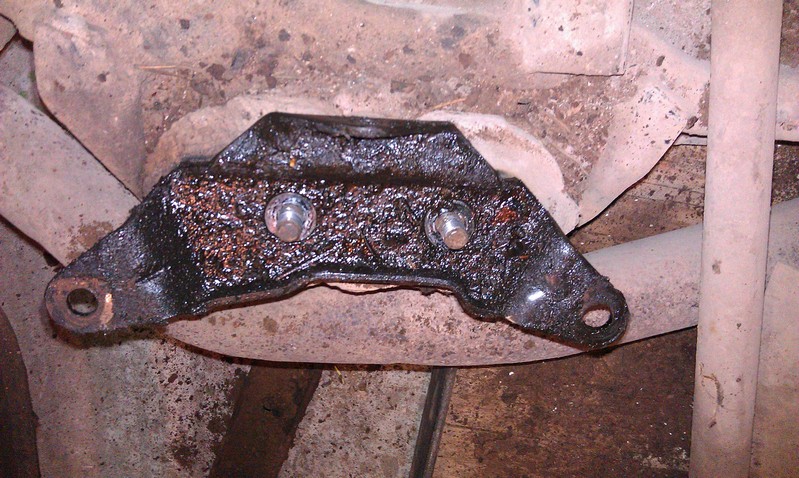
Also, as you can kind of see in the picture of the engine on the stand, the front mount for the engine from the van is on the bottom of the oil pan. The mount bracket bolts to the pan with three bolts, 2 going up into it and one going in from the front
The bracket even fits on the little rubber mount the Fiero has, I don't know if it will actually put the engine in the right place. I'm guessing not because that would be too easy, but I can hope :P. It is still a bit early for me to be figuring out how to mount the engine on the cradle, need to see if I can even get the engine fixed first.
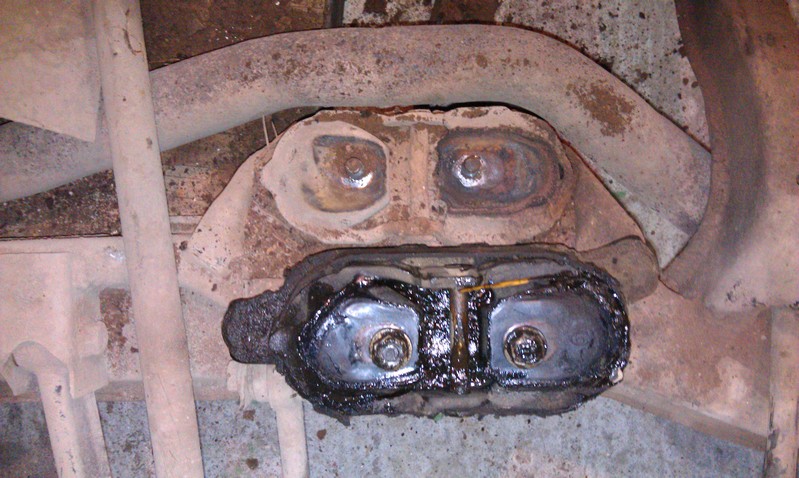
Even the little rubber mounts look pretty similar, except the van one has little tabs for the bolts that go down into the cradle.
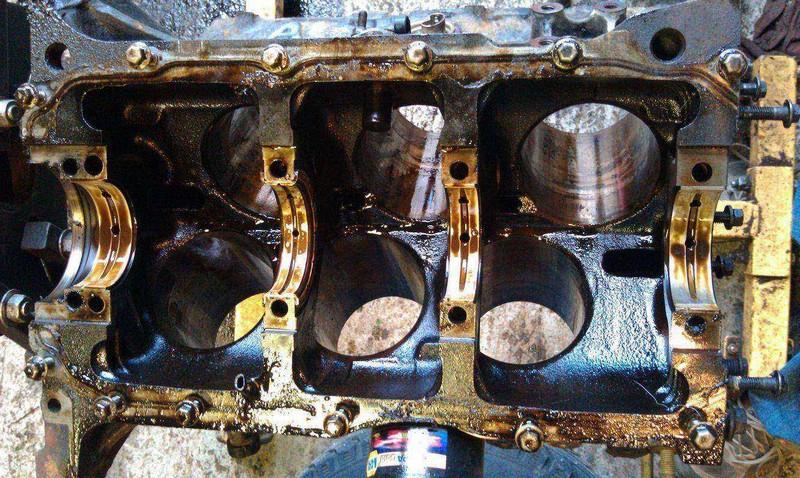
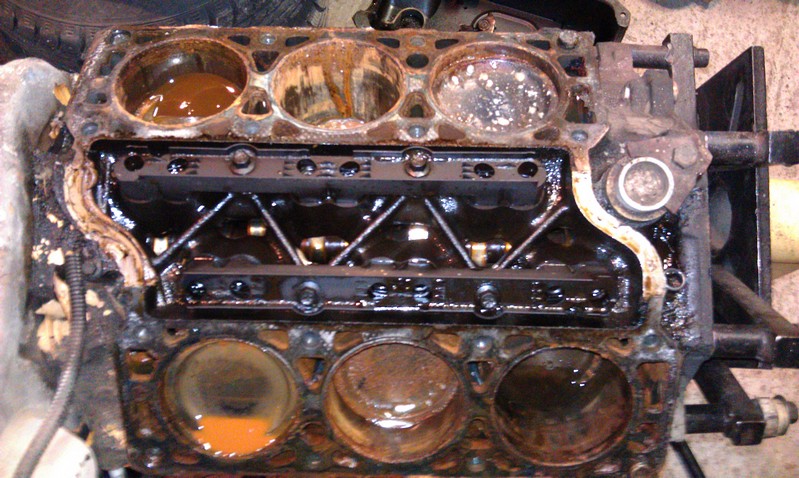
I wanted to see exactly what damage the engine had so I tore it down a bit. I didn't take too many pictures while I was doing it, it went pretty fast and was pretty easy. It didn't look too bad under the intake/center thing. Camera wasn't playing very nice however so sorry for the kind of blurry picture.
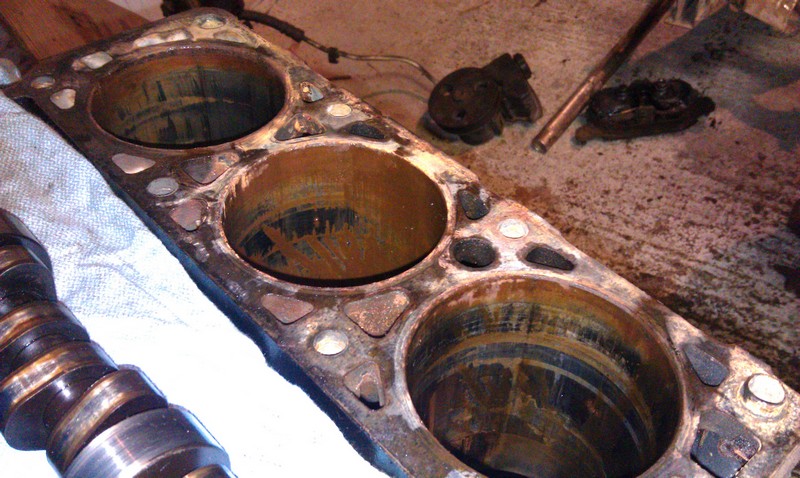
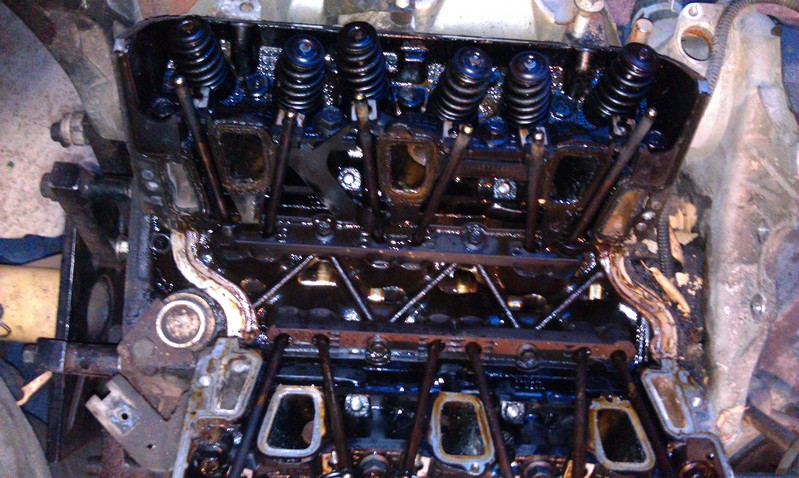
After I got the heads off however..... I think the local gas stations may watering their fuel down a bit.... :P Actually the head gaskets were pretty well shot. I still have yet to take the crank, pistons/rods, and cam out. Will probably do that Monday or Tuesday and then take it into a machine shop sometime next week to see if it can be saved. The engine can be turned quite easily, nothing is stuck or hung up. The rust colored junk on the cylinder walls pretty much just wipes off with a cloth, the walls themselves don't look to be scratched up, there is a bit of a rough area just above where the pistons were sitting probably from the water being there but it didn't really seem that bad. I don't know if it is warped or anything tho, there was a lot of water on top of the pistons.
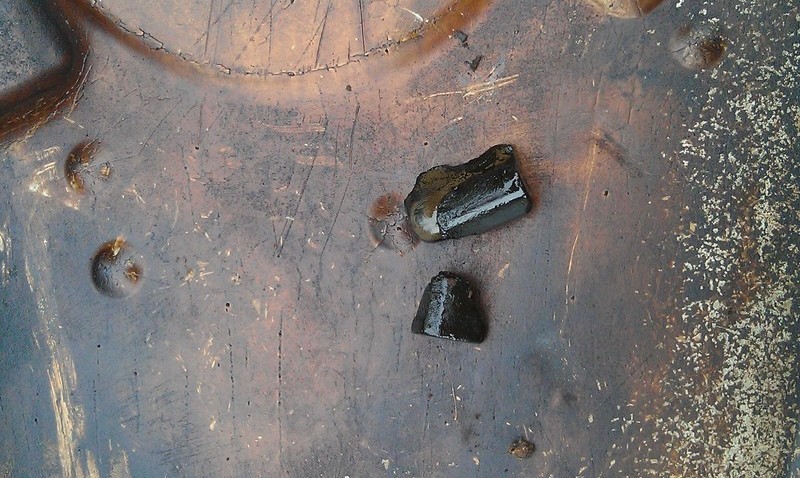
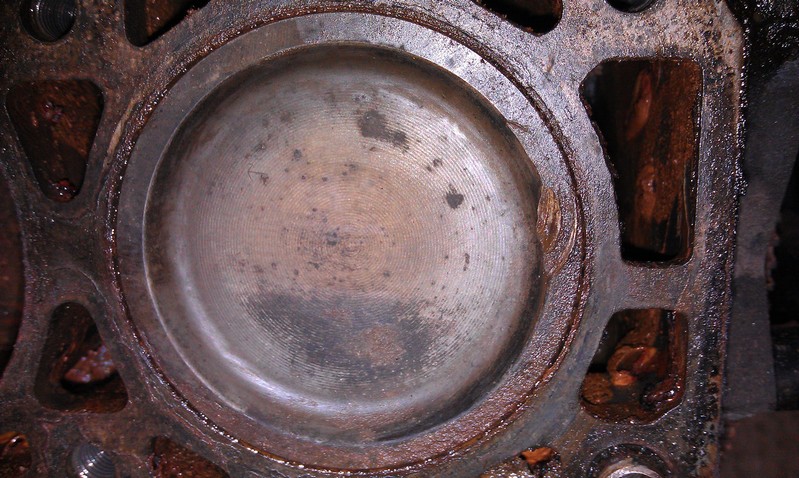
2 of the pistons did have marks on them, (looking from the front of the engine, the one in the front left and the one in the right rear) both had marks that looked like this
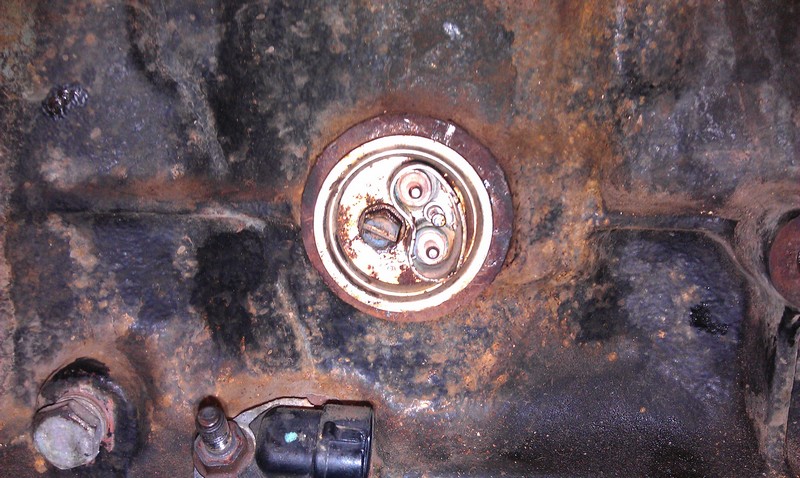
None of the rods were lose on the crank, it looked like dirt or grease or gelled up junk on the top of the oil pump thing, but there were no big chunks or metal in its screen or in the pan.
[This message has been edited by Blacksheep (edited 02-06-2012).]
I seem to remember Fierosound writing that the 3/8" diameter pushrods were not actually needed. That the 5/16" ones were fine in the new length since there were not going to be any heavy duty valve springs used. You read anything like that?
I seem to remember Fierosound writing that the 3/8" diameter pushrods were not actually needed. That the 5/16" ones were fine in the new length since there were not going to be any heavy duty valve springs used. You read anything like that?
The local parts shop is pretty good at getting weird parts, I talked to them a couple weeks back about the pistons they said it shouldn't be a problem to get them. I believe the pistons/rings were about $300-$400 or so, don't remember the exact price. I will add it to the list when I order them.
As for the pushrods, I do remember reading that the 5/16" ones would be fine, I seem to remember something along the lines of the 3/8" ones just being what was sent or something of that nature. The company he linked on his webpage that he got the pushrods from (Smith Brothers Pushrods is actually located in Bend, OR which just happens to basically be where I live so when I get to that point I will probably just go pay them a visit.
A couple small things missing from my website (got lots of grief over it).
Water pump. A couple of the bolts are larger on the 3400. I just drilled my timing cover and water pump, but others have heli-coiled them to the size used on the Fiero engine.
Timing cover. There's a small bypass hole, that has no corresponding coolant hole on the 3400 block (usually nothing but an open area) and needs to be plugged.
Front motor mount. My 87 had a simple L-shaped bracket that needed minor grinding to clear a corner of the aluminum oil pan. Very different on the 88 with a U-shaped bracket - more work required.
Engine looks like it had a bad LIM leak for a long time. Those marks on the pistons look like a piece of metal was in there.. Look for replacing cam bearings for sure and maybe the cam. These engines had aluminum bearings through out. Try to replace them with Clevite tri-metal bearings. Use the 3400 injectors with the 2.8 rail and manifold. I've got an engine completely rebuilt with 2.8 heads DOHC pistons, Smith Bro push rods, 3.1-1.6 stamped rockers and of course the tri-metal Clevite bearings through out. Mine came from a '98 Olds Silhouette. Haven't installed it yet. Mine had water in it but not for long, only the cam bearings were bad, the crank and everything else were good. I reused the stock cam because I ran out of money but I wish I could've put a solid stick cam in it. 3400's have a hollow cam. Some have been known to break due to the cam bearings seizing from water deterioration. Unless you reuse the side oil pan bolts, don't look for sealing rings for them because they don't exist. You have to get new bolts from GM with the built in seal. They're about $3 a piece.
You'll also need an '87 front timing cover. As for plugs for the various sensors, if you don't use them most just leave them there but I found soft plugs for the ones I didn't use.
[This message has been edited by raysr11 (edited 06-06-2011).]
Pictures like that are why I'd never put in a used-intact motor and always rebuild...and why I'll never put in a 4.9 again as they are impossible to rebuild, essentially.
Welcome to the 3.400 club! I hope you are doing some intake and exhaust mods to help that baby breathe right. I have my shortened porrted and polished upper and middle intake and Darrel Morse throttle if you wanna part with $200.
The marks on the piston look like valve marks and judging from the water in the cylinder it may have a broken camshaft allowing piston valve contact. I'm surprised you didn't try to turn the crankshaft before buying the motor, that would have been a heads up it was probably bad.
Fierosound - I do remember reading in the other threads where those issues were brought up, I was expecting all that.
Raysr11 - Thanks for all the info, + for you . Also, what is the reason for the '87 front timing cover?
Lou_dias - I may be interested, but I'm not sure yet. I will have to see how my funds are looking after I get further into the swap.
Joseph Upson - You are right, I looked at the heads last night, the valves for those cylinders are messed up. I did turn the engine over while it was still in the yard it did sound like it had some compressions issues but at the time I was thinking it was from a blown head gasket, warped head, or something of that nature. It turned easy and I couldn't hear or feel anything hitting/binding up inside. I knew I was taking a chance with the engine, but as I said before for the price I paid I figured even if I couldn't fix it I could probably sell some of the parts and get most if not all of my money back.
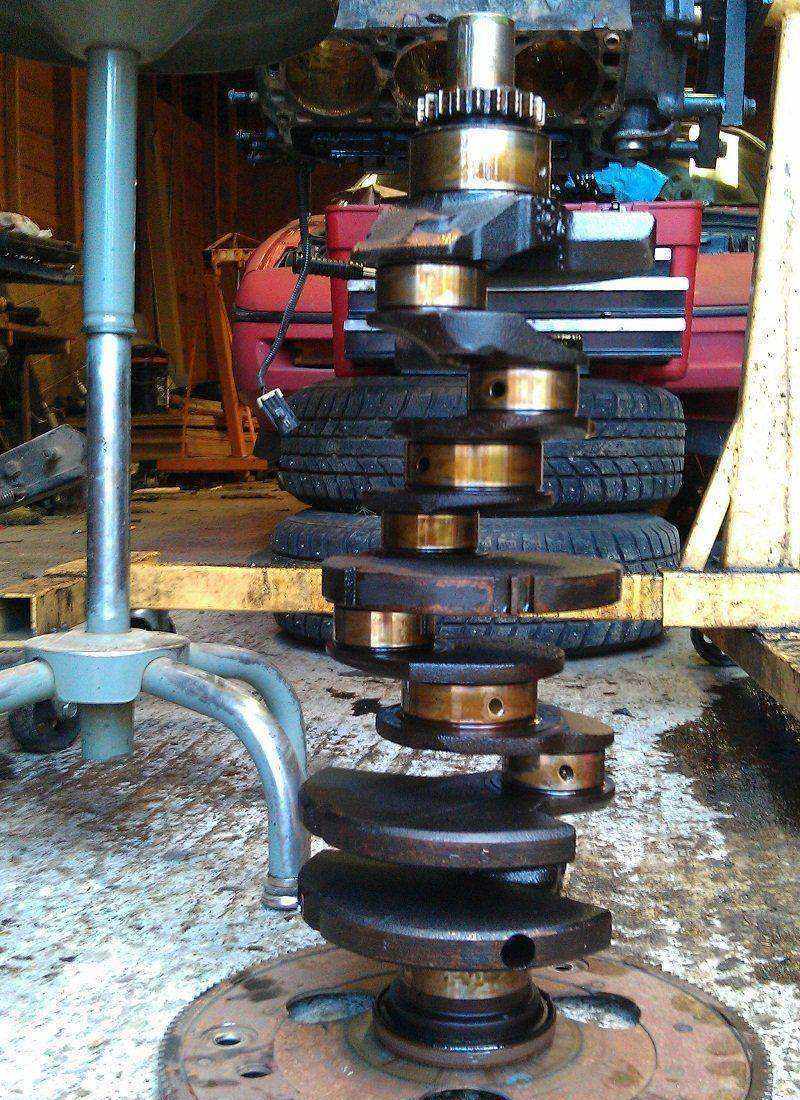
I did pull the crank and the camshaft out last night, just didn't get around to posting pictures yet, they will be up soon. The crank and the cam both looked fine. All the bearings on the crank (rods/main) looked fine, none of them looked worn. Couldn't see the cam ones very well.
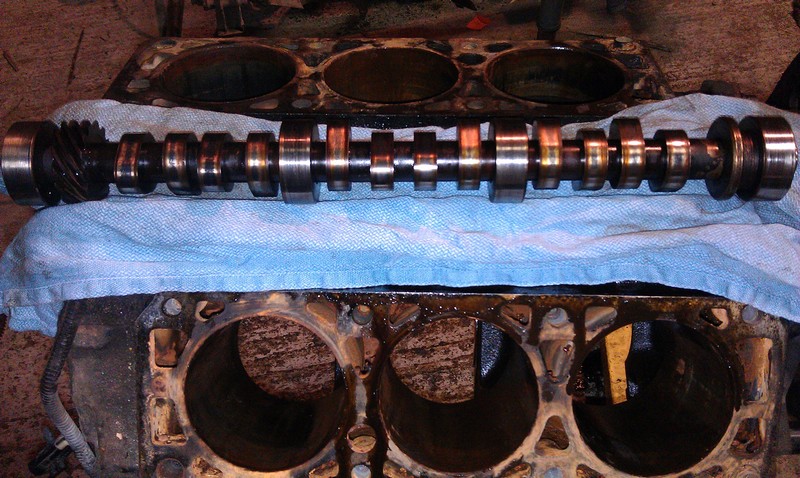
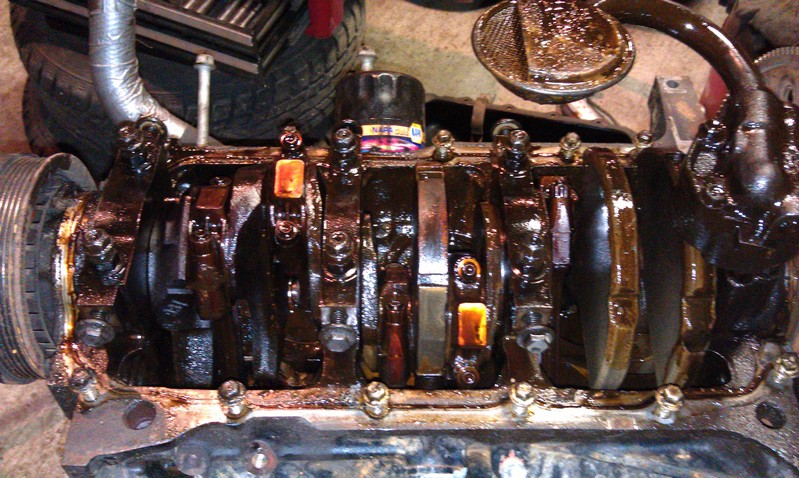
I took the crank and pistons out of the block last night. The crank and all the bearings on it looked pretty good. Timing chain looked a little worn but not anywhere near as bad as the one on the 2.8. Camshaft looked alright as well, not broken, lobes were smooth didn't feel like there was any wear. It is hollow, think this is the first camshaft Ive seen that is that way.
Crank
Cam
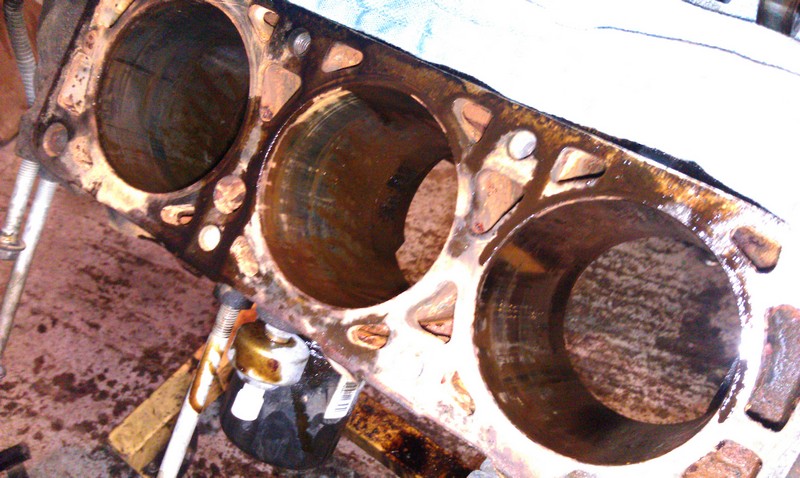
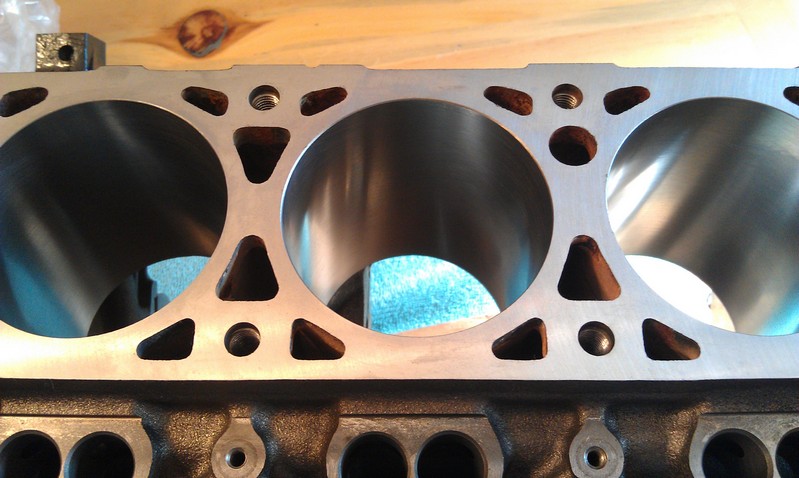
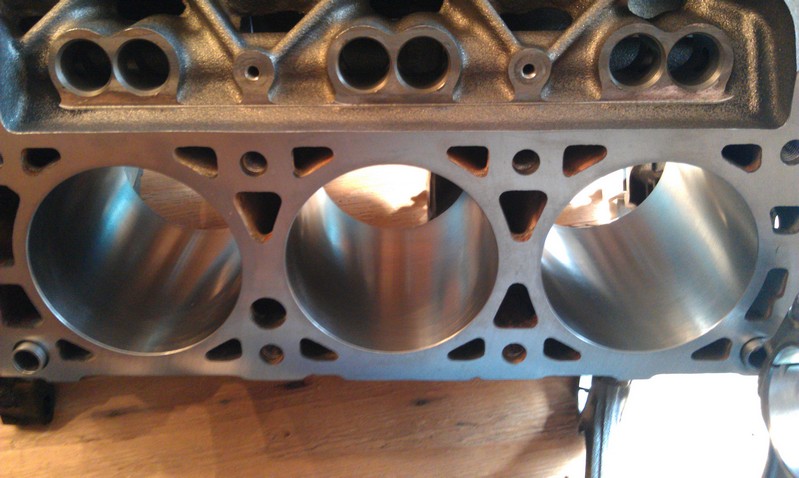
Cylinder walls still look pretty messy, but they are smooth, cant feel any big scratches, indents (like in the 2.8), etc. Left:
Right:
It even had one of those little block heater things in it :P
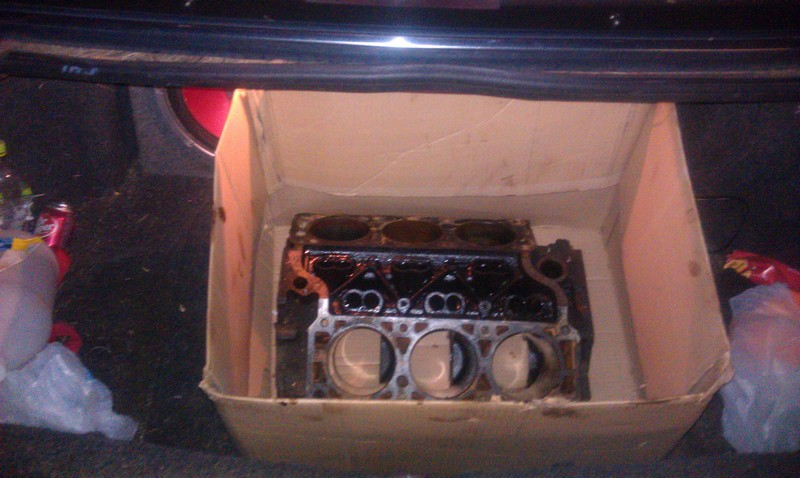
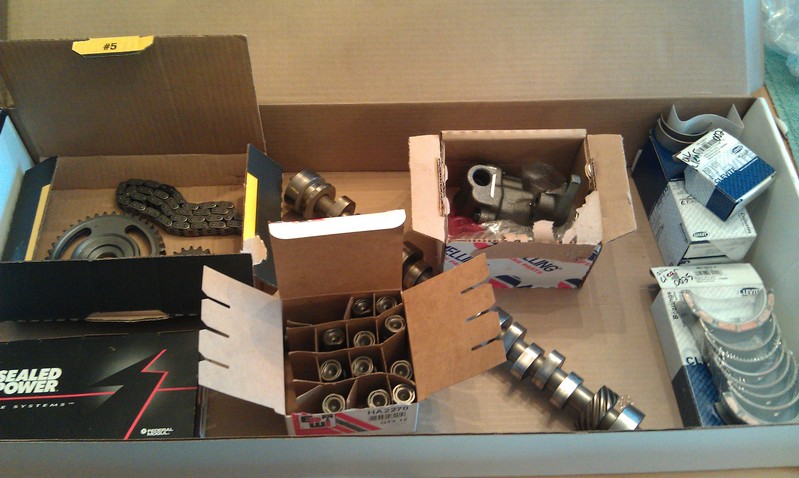
All boxed up and waiting to go to the machine shop. The sable's trunk is quite large, I think it is actually bigger than most apartments :P Other parts are up front on the floor in the passenger side in bags so they don't roll around everywhere and get messed up.
ya, I knew the 3400 cover wouldn't work, its quite large and has a weird little water pump off to the side. Was mostly just wondering if there was a reason for the '87 model or if the one from my '88 would work as well? I haven't quite got to that part yet so I haven't spent much time looking at the timing cover.
Also the engine block is at the machine shop, they said they would be able to look at it either the end of this week or beginning of next week.
I'll take the distributor plug if you aren't going to need it.
I'm going to try to use the distributorless setup if I can so I will need it. There is another 3400 in the yard here, the engine is seized, but it should have that plug too if you can't find one. Don't know what kind of shape the plug is in, or how much he would want for it.
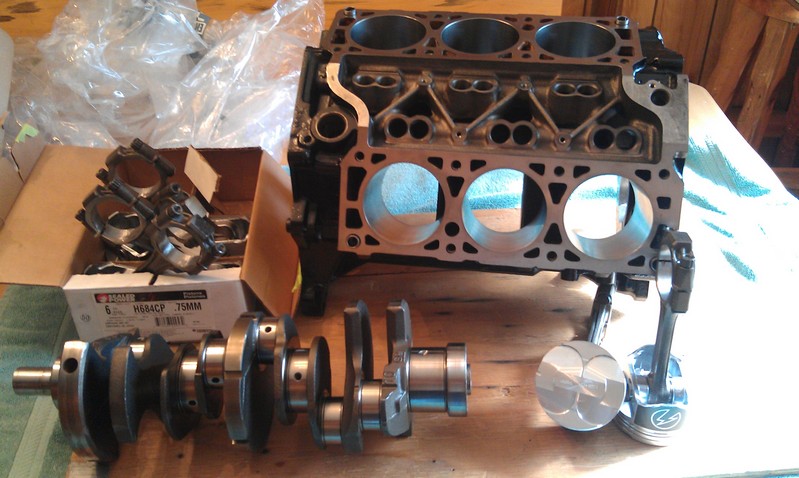
Got some parts back from the machine shop today, they are a lot shinier now then when they went in
I put everything back in the bags/boxes for now to keep them from getting covered in dust. I also got a box full of gaskets and stuff of that nature for the lower end. I'm still waiting for the heads, and then I will need the push rods and a few more parts for the top end and most likely a new clutch. I did have most of the parts to redo the top end in the 2.8, all the upper gaskets including head gaskets, new head bolts, etc. I would think most of that I can still use, but I'm not sure if the head gaskets and the head bolts are what I want to be using.
I didn't drop the heads off until today, was originally holding off on having the heads done until I knew if they could save the block, then I just haven't had time to get into town while they are open. Probably won't get the heads back till the start of Oct. their head guy is out on a honeymoon or some such nonsense for 2 weeks, plus now I'm kind of broke for this month anyways (well I have money in my savings but they key word there is saving, its not really money I should be blowing on hobbies) :P
and the costs for today, (also added the costs to the list in the first post)
This project is not dead, it just had to take a back seat for a while when some other expenses came up I have started work on it again, cleaned the shop and started to get the engine put together this weekend, just got the crankshaft and cam put in, and the timing gears and chain on
Also picked up what is hopefully some of the last few parts I will need. I had the heads redone after I got the block back, new pretty much everything except rocker arms (have some of those on order now). They were finished at the beginning of November (slowest machine shop ever....) and I have since lost the receipt so I cant scan it, it cost $404.96. New 1.6 rockers from Comp Cams - $126.96 Pushrods from Smith Bros. Pushrods (pushrods.net) - $134.28. These are great people to work with btw, I called them up a few min before closing Thursday evening, they had the pushrods ready when I showed up at noon the next day. Clutch/Preasure Plate - $125 Water Pump - $25 Head Gaskets (3.4L) - $30 ($15ea).
[This message has been edited by Blacksheep (edited 02-06-2012).]
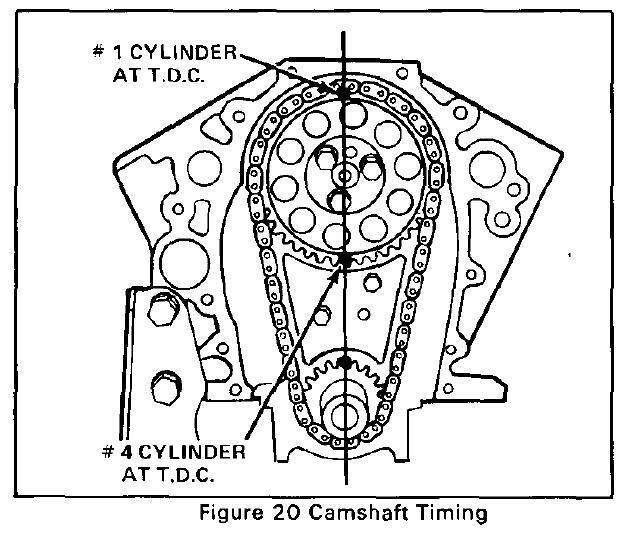
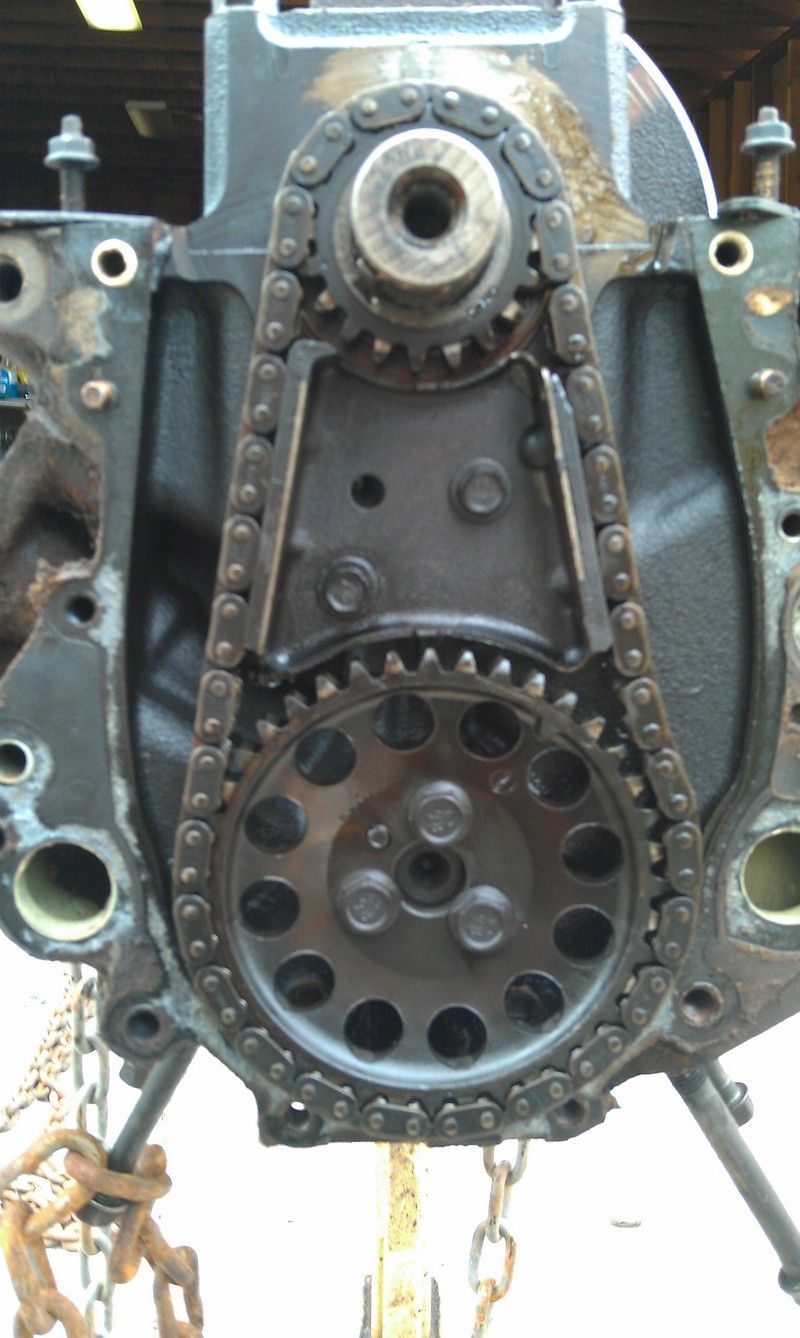
Does anyone know if I have the timing gears set right here?
I was assuming the round hole was the mark for the gear on the cam and that it would point down towards the dot on the gear on the crank. Please correct me if I was wrong, its a lot easier to change now than once the engine is back in the car :P
Also, I haven't put the timing chain damper thing on yet the timing set doesn't come with one and the old one was cracked so I ordered a new one.
I forgot to mention in the last post, when I put the crank in I used the torque specs I had for the 3400 on the main bearings (37 lb ft + 77°), and the Camshaft Sprocket Bolt (103 lb ft).
I put the pistons in, I used the Fiero's torque specs for the caps on the rods.
Also got the heads put on. I used head gaskets for a 95 Camaro 3.4 and new Fiero head bolts. I used the Fiero's torque specs and order for the head bolts. I also put on the guides that keep the lifters straight, those pretty much have to go on before you put the heads on I found out, luckily I hadn't torqued the bolts on the heads down yet....
I'm still not sure if I have the timing gears set right. If I have them set like I do now, when the mark is lined up with the hole like in my last post, both valves on number one are closed, and the exhaust valve on number two is open, does this sound right?
I'm also not 100% sure if I got the valve lash set right. To set it, I made sure the lifter was all the way down (I watched the cam thru the holes) then tightened the nut on the rocker arms while spinning the push rods until I could feel more resistance to turning the rod as the arm started to push down on it. I've read quite a few differing posts of people saying to tighten them down anywhere from another 1/4 turn to 1 1/2 turns (the Fiero book I have said 1 1/2 turns, but that was also for the non-roller lifters in the fiero so I don't know if this is different). I tightened mine an additional one turn for now, but I may have to change that. When I tightened them down that extra turn it started to push the valve open pretty much as soon as I started, so do I need to back it off and do something different? These are roller lifters and I put them in oil before I put them in the block.
Also, I'm not sure if it matters which end of the push rod is up with these custom push rods, the shiny end was up in the bag they came in so I figured putting them in that way was good logic :P Plus I remember seeing a picture of someone else doing this swap having them this way.
I took my timing cover and water pump over to the drill press as well and drilled out the three holes that use larger bolts in the 3400 block. I believe the top two in the Fiero were M10x1.5, and the bottom one was M8x1.25, on the 3400 block the threads for all three are M12x1.75. I believe I used a 31/64" drill bit to drill the holes, at least that's what the drill bit set said it was (it was just slightly larger than the M12 bolt I had).
Pictures like that are why I'd never put in a used-intact motor and always rebuild...and why I'll never put in a 4.9 again as they are impossible to rebuild, essentially.
Welcome to the 3.400 club! I hope you are doing some intake and exhaust mods to help that baby breathe right. I have my shortened porrted and polished upper and middle intake and Darrel Morse throttle if you wanna part with $200.
That's no joke at all. I put out hundreds of dollars on rebuilding mine, and ended up recovering just a few dollars when I scrapped the block. The issue with mine was the top middle three head bolts, all 6 (3 on each side) stripped out before reaching proper torque. I would have cost more than just buying a wrecked car to fix those, and there was still no guarantee it would work.
Not meaning to take it off topic, great thread so far btw.
Smith Bros were easy to deal with when I did my first 3900 install, they must be really popular now because they charged you about $50 more than they charged me for the same custom pushrod application. Perhaps it was because I placed my order just before they ran a batch through the hardening process that they included mine in.
There's nothing like nice shiny metal parts to start a build with. Looks good.
"then tightened the nut on the rocker arms while spinning the push rods until I could feel more resistance to turning the rod as the arm started to push down on it."
I believe you have them too tight. Spinning is not accurate because it does not tell you when the slack has been remove. Zero lash means no slack. The method that I've learned is lifting and wiggling the pushrod where you can hear it click in the lifter cup. The moment you no longer can lift or wiggle the pushrod is zero lash. If you keep tightening the rocker arm until the pushrod is hard to spin you are way over tight.
And here is what I have on timing chain alignment:
The pushrods wern't exactly hard spin, I just tightened them until it felt slightly different. But I was thinking this made them too tight with the extra turn, I will try again but with lifting and wiggling the pushrod.
That timing chain picture is the same one I have in my Fiero manual, but the problem is I am using the cam gear from the 3400 and it looks different. The 3400 Cam gear doesn't have any marks, only thing I could see was the one round hole so I was assuming that was the mark, wasn't sure tho.
Smith Bros were easy to deal with when I did my first 3900 install, they must be really popular now because they charged you about $50 more than they charged me for the same custom pushrod application. Perhaps it was because I placed my order just before they ran a batch through the hardening process that they included mine in.
I think next time I should have you order the push rods for me :P
Wow, that block and parts look awesome! Going well so far, I wish you better luck then I had. My 3.4 swap project was a complete disaster. I basically did exactly what you are doing now, except it was the Camaro 3.4 and my machine shop killed me in cost. Fought it for a year without it running right at all, more and more problems, so finally ripped it out and sold it at a big loss.
Wow, that block and parts look awesome! Going well so far, I wish you better luck then I had. My 3.4 swap project was a complete disaster. I basically did exactly what you are doing now, except it was the Camaro 3.4 and my machine shop killed me in cost. Fought it for a year without it running right at all, more and more problems, so finally ripped it out and sold it at a big loss.
Thanks
Your build was one of the ones I read when I was deciding what I wanted to do for an engine swap, it was really too bad you ran into all the problems you did
I too like shiny clean engine parts, I just wish they would stay that way. I live down a dirt road tho, so keeping stuff clean is next to impossible
Originally posted by Blacksheep: I think next time I should have you order the push rods for me :P
I believe what may have happened is my order put them on the map for the 60 degree V6 crowd. When I told the owner of the WOT-TECH store on the 60 degree forum how much I paid for a set, I believe he arranged with them to have sets made to order and purchased through the store to go along with the custom cams offered because what you paid is about what they cost there also, $139.99.
[This message has been edited by Joseph Upson (edited 03-08-2012).]
I believe what may have happened is my order put them on the map for the 60 degree V6 crowd. When I told the owner of the WOT-TECH store on the 60 degree forum how much I paid for a set, I believe he arranged with them to have sets made to order and purchased through the store to go along with the custom cams offered because what you paid is about what they cost there also, $139.99.
Nice! I don't really mind paying what I did for mine, they were pretty good people to do business with.
Originally posted by Blacksheep: Thanks Your build was one of the ones I read when I was deciding what I wanted to do for an engine swap, it was really too bad you ran into all the problems you did I too like shiny clean engine parts, I just wish they would stay that way. I live down a dirt road tho, so keeping stuff clean is next to impossible
Yep, but I learned alot from that experience, and have long since moved on to bigger and better things. But I haven't had an engine that "clean" since then. Though it wasn't very clean after I removed it.
[This message has been edited by mattwa (edited 03-08-2012).]
I also did a bit of wiring a couple weeks ago that I forgot to post. I had Darth Fiero reprogram a 7730 ECM for me. I brought the wiring harness into the house and removed the old heat shield tape cause it was pretty much dead, you could poke it and it would fall apart :P.
Then I had to move the wires from the two plugs in the Fiero to the correct places in the plugs that go in the 1227730 ECM. The old plugs from the Fiero,
The new plugs without any wires in them,
I used the instructions Darth Fiero has on his site (http://www.gmtuners.com/files/Fiero_V6_to_7730_DIS.pdf) for where the wires go. I was a little bit confused with where the wires went in the new plugs, on the PDF they are listed as BA11, GF9, GE7, etc. (two letters before the number), the plugs only had a single letter (A-F). After looking at a 1227730 pinout diagram it seemed that if I just ignored the first letter listed on the PDF it would be correct (BA11 = A11, GF9 = F9, GE7 = E7, etc.). I did not ask Darth Fiero if this is correct yet, I moved the wires kind of late one evening and just forgot about it until now....... I also apparently didn't take any pictures of the plugs with the wires in them, I will do so tonight when I get home. I have not got around to adding any of the extra wires that are needed yet, waiting for the engine to be a bit more together first so I can make sure they are the correct length and I don't end up with random wires everywhere :P
This is my high tech wire removal tool that I spent all day at work making with a paper clip and a pair of pliers, it was a productive day :P
I also ordered some heat shrink tubing, I only ordered a couple of pieces but I think they sent it in the biggest box they had
That B stands for black connector, and G stands for green connector. So it meant Green A11, etc.
Well that just makes too much since..... Works for me tho, all the G's in the pdf are either GE or GF and that green connector was labeled E/F so those wires would be correct, and all the B's were BA, BB, BC, or BD and the two black connectors were labeled A/B, and C/D so those should be correct as well. And here is all my messy wires (the wire mess will be cleaned up before it goes back in the car),
Nice. I don't remember about mine, I did that in 2009. Btw, get GOOD replacement wire-loom. Not the pretty colored ones that aren't high temp. They melt. Don't ask how I know this. Lol.
Nice. I don't remember about mine, I did that in 2009. Btw, get GOOD replacement wire-loom. Not the pretty colored ones that aren't high temp. They melt. Don't ask how I know this. Lol.
Ya, I think I remember someone using some blue wire loom somewhere.... :P I was planning on cleaning up the wire loom that is on the 3400 wire harness most of it was still in pretty good shape. I will be getting some new heat shield tape as well. Also, the heat shrink tubing I got is supposed to be higher temp weather proof stuff that cant catch on fire so I think it should work ok on the wires I have to solder in the engine bay.
Most of it was fine, it was just the ones that was closer to the headers that melted.
It was so pretty...too bad it never ran right.
yep
Where did you get the spark plug wires you used? Were they a custom length or for a specific car? I was planning on mounting the coil packs over where the battery was too, I think they look good over there.
Where did you get the spark plug wires you used? Were they a custom length or for a specific car? I was planning on mounting the coil packs over where the battery was too, I think they look good over there.
Universal V8 set from Summit Racing. I made them to length myself. I actually still have all six of them, I was planning to use them for my 3800 swap, but they aren't working as well as I'd like. You interested? They are blue of course. Dirty, but very few miles on them, and they would come with the metal shields around the boots.


 . Also, what is the reason for the '87 front timing cover?