just an fyi the ac compressor on my la1 i got out of a 2003 grand am bolts right to the block and oil pan without any bracket... can you give me a link or explain how you did your idler pully for the p/s delete?
just an fyi the ac compressor on my la1 i got out of a 2003 grand am bolts right to the block and oil pan without any bracket... can you give me a link or explain how you did your idler pully for the p/s delete?
Hmm well my 2005 Equinox motor has a little bracket but I'll take it off and see if there are bolt holes that line up on the block, thanks for the tip. About the PS idler, it's just an idler pulley that bolts right into the timing cover. I don't have the specifics of it but I got it through Milzy Motorsports in Dayton Ohio http://www.milzymotorsports.com/ He sourced me a bunch of parts, is doing my PCM tuning, and is very helpful all around. Shoot him an email, I'm sure he can hook you up with one also. It cost me $20.
We -trueleo.com- didn't know about the cleanence problem with our pipe and the thermo housing, but thanks to his photos we can adjust our jig for the aluminium heads, Very nice work throughout, car will be awsume when done,
No schoolwork to do today so I decided to drive out to the shop to work a bit on the motor. First I removed the ... panel ... that fills the gap around the starter from my 2.8 block, didn't realize I needed it till now.
Also notice the oil filter adapter, how it sticks out. It needs to be removed to clear the cradle.
New starter installed and removed that oil filter adapter
Unscrewed the oil filter screw from the adapter and put it back in the block (where LA1 3400's are anyway) and now the oil filter just screws right up. Nice and easy.
That gap I had between the transmission and oil pan luckily got filled with that panel thing I was talking about with the starter. It wasn't a perfect fit, it crushed the edges flat and I had to do some bending to get the starter in there. None of us heard any rubbing when I turned the motor over a few times by hand so it should be good to go.
Finally this is the new upper intake I plan on using. Notice it doesn't have "3400SFI" cast on top, now I don't have to read it backwards. I plan on sand blasting it, cutting off that large EGR port and putting a 85-86 "Fiero" sticker on top just like my stock 2.8.
An issue arose sadly with the AC compressor. It seems the compressors for all the 3100 and 3400s are the same (or so says the guy at Advance Auto) but it won't bolt up to my block or adapter. So I need to figure out if the stock 2005 Equinox AC compressor will work with this set up or if I need to get a custom bracket to allow me to mount the 98 3100 compressor I have already. I haven't run my AC for a while in the Fiero (belt broke and too lazy to replace it) so I don't think I'd mind not having it but to me, the swap wouldn't be complete without a functional AC system. Especially since the car came from the factory with it.
[This message has been edited by KaijuSenso (edited 06-20-2014).]
Got the Venture upper intake cleaned up and bolted down this weekend.
Cut off that EGR port and sand blasted, going to leave it straight aluminum for now. During my next upgrade project I'll paint the entire motor.
J-B Stik was used to plug the remaining EGR hole, hard as a rock now.
also a before and after picture of the throttle body I got from Pull-A-Part, just used some brake clean. took less then 10 min.
And now the motor as it sits. Plan is to re coat the headers before re installation. Was going to get Jet Hot but owing taxes changed that plan...
Used a heat gun to reshape the PCV valve's plastic holes that runs to the intake. It was pretty close already but now it fits snug and shouldn't pop out. The more I look at this intake the more I think it should be painted red before I put the motor back in...
[This message has been edited by KaijuSenso (edited 06-20-2014).]
Replacing the crank pulley on the left with the LA1 pulley on the right. The point is to get the trigger wheel that's inside the pulley. Also notice it'll act as an under drive pulley.
Luckily the timing cover is the same on this motor as the previous generation because it still had the threaded holes to mount the 24x sensor (that reads the trigger on the pulley)
LA1 cam position sensor installed, it has a really long wire (compared to no wire on the previous sensor) that will probably need to be tucked away somewhere.
Painted the intake red, couldn't help leaving it all boring and straight aluminum. It's a little darker then I wanted but now it just needs that Fiero GT sticker from Rodney Dickman. Also got the alternator installed, used a bracket and alternator from a 2004 Grand Am.
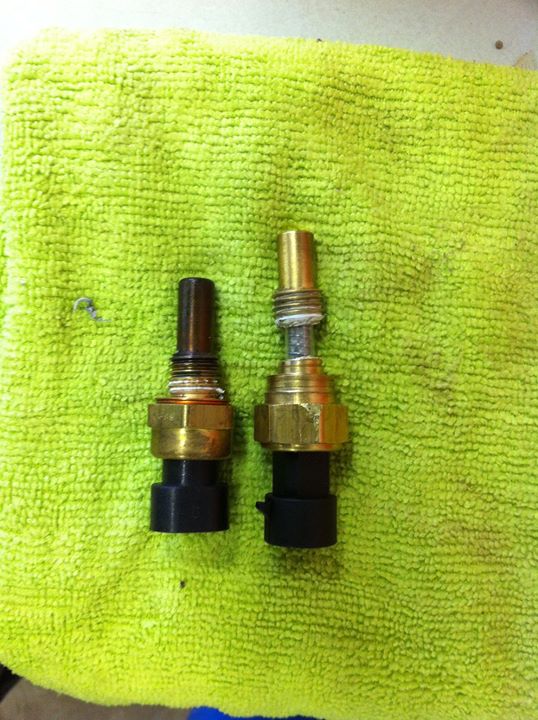
Well remember that custom coolant temperature sensor I got? It was special made for 3500 swaps into 3400 cars and I kinda broke it...I thought it would thread further into the hole and over tightened it. Lesson learned, gotta order another one. On the left is the LNJ coolant temp sensor, has a different connector on the end.
Coming up next is lots of random header pictures. Notice I painted it with VHT's flame proof ceramic paint. Wish I could afford Jet Hot but taxes got me this year...
Well that's how it sits after today. On my list of stuff to do I still have, AC Compressor: getting a bracket to mount my 3100 compressor for 3500 swapped cars new coolant temp sensor serpentine belt external mount 7x crank trigger: going to mount after bolted to the cradle new spark plug wires wiring harness catalytic converter delete
then mount the aluminum cradle bushings and get it in the car!
[This message has been edited by KaijuSenso (edited 06-20-2014).]
Time to start the wiring, it really isn't bad at all (so far). All I did for 9ish hours is organize as many wires as I could using Ryan's pin chart on the Sinister Performance website.
Pulling the pins is really easy and I labeled them all. A few are missing though (aka on Ryan's chart but not in my wiring harness) and I have 1 wire that doesn't exist on his chart. I'll ask about them when I have the list with me.
Next I need to pull the Fiero C500 and C203 connectors but that'll have to wait because it's Finals Week! Can't wait to get them over with so I can finish this engine swap!
[This message has been edited by KaijuSenso (edited 06-20-2014).]
I bought a drill bit and tap from NAPA and resized the hole in the cylinder head to fit the standard size 3 wire coolant sensor. I didn't like the idea of having to get creative with keeping up with the coolant temps. If you go that route check your depth to make sure you will not have interference with the combustion chamber, the 3900 heads are a little bigger and had also been clearanced from the factory in that area.
Looking at that dirty TB plate, I want to pass along a tip for all: The best way to clean gum off of parts -including the brown gas gum you find on things like carb jets etc- is GM's Top End cleaner. It's about $10 a can but you can use over and over again. The trick to make work really great s to boil the parts in it! As it heat up, the deposits will simply float off the part/s and leave say, a brass carb jet looking like shinny gold.
There is a catch; you have to do it outside as it smells and be ready to put somehting over the laddle or whatever youre boiling it in because it can catch fire. If you keep the flame away from the top -fumes- you'll be fine, besides it goes out easy when covered. It takes but min or two for it to work. I havent tried it yet on injectors but Im sure it will work great,
Got the Venture upper intake cleaned up and bolted down this weekend.
I know it aesthetically pleasing, but there is a good performance reason for not using the early minivan intake... just making sure you're aware. Other wise it looks great! I had lost track of this thread.
Taken from WOT-TECH:
quote
This is an upper intake from a minivan. No 3100 or 3400 is on the manifold, which makes it nice for 3100 owners. The EGR type (top right flange in pic) is the major reason for using this type manifold. Its the worst performance of all upper intakes however. 99 N body 3400s use the same style manifold unfortunately. The crease being pointed out is the culprit, restricting flow to the number 5 and 6 cylinders.
Looking through the throttle body port, you can see the restriction that crease present to the entire manifold. There is no reason for the crease.
Back to 2000, the crease is gone, giving this manifolds the best equal flow distribution potential.
Much better opening for the throttle body. The IAC (idle air controller) opening is also now connected to the main bore. This is something to be aware of but won't effect anything.
Ya carbon sadly I realized that the van intake is the worst flowing intake by reading WOT tech articles after I already had it painted and bolted up...But I also learned (well I knew but it didn't click) that I have 3500 heads and lower intake thus a major performance mod already installed stock! My plan all along was to only use this intake as a baseline for a swap. Now that I know it's already got 3500 lower, that's more reason to find a 3500 upper asap, it'll definitely be the first mod I do after the motor runs.
Working on the wiring now, I've asked questions about it in a separate thread so if anyone can lend some input it would be appreciated.
Not much of an update, just been working on wiring these past couple of days. Came across another sensor that needs to be replaced with the previous 3400 sensor. The Knock Sensor won't thread into the location of the LNJ (or 3500) location. The LNJ has 2 knock sensors and the 3100/3400 only needs one.
I removed the coolant drain plug on the "rear" side of the motor, cleaned the threads a little and was able to screw in the 3400 knock sensor. For comparison in the picture, the knock sensor (big round sensor with small 1 wire connector) is directly left of the Crank Position Sensor and above that is one of the stock LNJ knock sensors. In theory anyone wanting to do a 3500 swap with OBDII will need to do this basic sensor addition.
[This message has been edited by KaijuSenso (edited 06-20-2014).]
Just about ready to put the motor in the car, wish the rain would stop though...
Got this spacer for the AC compressor to bolt a 3400 compressor to the "3500" block I have.
Mounted the motor and trans to the cradle, no issues with the Equinox specific oil pan.
Just barely a gap between the oil pan and my 2 1/2" catback exhaust from WCF.
and the stock V6 fiero motor mount bracket bolted right up with NO modifications (unlike other 3x00 swaps I've seen)
installed the Rodney Dickman aluminum cradle bushings.
mounted up the Koni-Eibach struts
TCE 7x External Crank Trigger gaped to just about 0.050
Took 4 tries (morons at Advanced Auto were trying to tell me a 685 and 690 would fit even after I told them I needed about a 90 inch belt) but I finally got the correct serpentine belt, an 895.
Well once the weather calms down I'll put the cradle back in the car and hook up the lines and finish the wiring.
[This message has been edited by KaijuSenso (edited 06-20-2014).]
Found a few hours of sun Wednesday and got the motor under the car.
then it decided to rain so had to wait till today. It's supposed to be really nice today and tomorrow so I'll try to get a lot done.
Alternator bracket bolt hits on the dog bone mount. Just bent it out of the way for now but I'll cut it out because I won't be using the stock dog bone anyway.
I didn't expect this, the alternator pulley is hitting the shock tower. Did anyone else have this problem? It must be the alternator bracket I used, from an 03+ Grand Am. Going to have to dent the shock tower for clearance.
Got the cradle all bolted up. Need to work on the Wiring next...oh boy... But on the plus side I also got the wheels on and set it down for the first time since December! Can you tell the rear is lowered? It's pretty subtle. Plan is to get the car running, then rebuild the front suspension with the rest of the parts I have.
[This message has been edited by KaijuSenso (edited 06-20-2014).]
Thanks carbon! Not much of a picture update today but I got the heater hoses connected as well as 90% of the radiator hoses.
I went the easiest route and used the 1 stock heater line that ran around the engine compartment, then added some hose to extend it a bit from under the dog bone. Then routed the other heater hose about the same but around the shock tower and under the battery box, then across the firewall and connected to the metal line that goes into the cabin. That other larger hose on top, not connected is for the brake booster. I just got a $2 elbow fitting from the hardware store attached it to the stock brake booster line, then ran some 3/8 inch line around the intake manifold (where the metal heater line routes). Only issue now is the fitting on the upper intake is larger then the 3/8 inch hose. Going to try to heat up the hose with a heat gun and get it on there (it isn't that much bigger).
For the radiator hoses, I used part # C71850 for the water pump side and E71855 for the thermostat side. The thermostat side is a little long so will need to be cut and I plan on putting in an Inline coolant fill neck. Hopefully these hoses will work and anyone else doing a 3500 swap, this might be a good starting point for the hoses you'll need.
Next plan is to go to pull a part and get an AC hose to modify, fuel lines, and figure out my upper engine mount. (Looking to use the stock 3400 upper mount and make a bracket that attaches to the shock tower.)
[This message has been edited by KaijuSenso (edited 06-20-2014).]
For the radiator hoses and t-stat do you delete the thermostat that's in the engine and use a fill like the Fiero with the stat in it? I have an 88' that I want to swap a 3500 into and I've been wondering about the coolant hoses and what to do about the fill. Any pictures you could provide of the hoses and routing would be great. Good progress!
Here's what I'm doing with the coolant fill so far. Just using an inline fill from Summit (2.25 inch) and I'm just going to block off the overflow on it and still use the stock thermostat. The hoses are pretty self explanatory, they just go directly to the metal tubes that run under the car. There isn't much room for error ( a bit tougher with my larger Truleo exhaust). I'm gonna tie them up as close to the firewall as I can to avoid the heat or touching the AC compressor.
[This message has been edited by KaijuSenso (edited 06-20-2014).]
So you're just going to use the t-stat that goes in the replacement engine and the Summit fill is just add coolant right?
Correct, stock 3400 thermostat and thermostat housing, and I "spliced" in the inline coolant fill.
Worked for 4 hours today and I feel like I'm still miles away from a running swap. Finished up wiring the PCM and started making clearance for the alternator pulley on the shock tower. I feel like I'm so close, yet so far. Still need to make sure the charging system is connected correctly and fab up some fuel lines. Then I can see if she starts! I know once I get it started I'll get another burst of energy to get it drivable. I still have to fabricate the upper engine mount (Looking at using the stock mount on the timing cover) and hook up the throttle cable, shift cables, and brakes. That's off the top of my head though.
awesome progress man!! keep up with the updates i'm learning alot from your swap.. i'm sure i am going to have a few questions when i get where you are
awesome progress man!! keep up with the updates i'm learning alot from your swap.. i'm sure i am going to have a few questions when i get where you are
Glad a few people are finding this interesting
Today I was working on the shift cables and am not happy with how they line up. The thermostat coolant neck is just about in the way as well as that bracket you use to hoist the engine. Of course I couldn't just remove the bracket because one of the bolts hits that coolant neck. So I removed one bolt and spun the bracket as far down as I could before it hit the headers. At least it's out of the way for now. The shift cables don't go straight in like I want and it's touching the exhaust pretty good (with the heat wrap). Might have better luck with the stock crossover instead of the larger Fiero style exhaust I got from Trueleo.
Hopefully the mechanic at work will have some spare time tomorrow to help button up the rest of the basics I need to start the motor.
I rigged up the throttle work work enough to start the motor by myself, but it doesn't stay running if you let off the throttle. Also found the MAF ground wire wasn't hooked up as well as pin M of the C203 so I got those fixed up and this is how she acts when I turn it over.
I've been trying to hold the throttle less and less once I get it started and it is definitely trying to find idle but still needs more time to learn I guess. It's also throwing a check engine light, pulled the codes and got MAF (fixed) 4 codes that just said see the reference manual (so no idea what that means), EVAP, EGR (should have been deleted...), and a few for the oil level sensor.The air in the coolant is slowly but surely bubbling out but it's still claiming to get hot really fast, throwing the fan on and eventually flashing the check engine light. I don't run the engine very long per interval so I can get out and top off the coolant fill funnel.
Once I get it running right I'm taking apart the exhaust. The stock manifold gaskets just aren't good enough so I ordered some 3x00 gaskets from WOT Tech and I'm sending it back to Trueleo for some modifications. The shift cables won't line up properly (very very snug fit) and will melt on the exhaust. It seems they were designed with the 5 speed in mind but I'll be working with Francis to get it better for both the 4 speed and the 3x00. At the moment though it's fun running it with open exhaust, the sound and smell of a race car, excellent.
While I'm waiting on the exhaust, my next step will be to disassemble the front suspension for the rebuild. I'll go about it the same as the rear, leaving the uprights a brakes how they are but sandblasting and painting the control arms before installing the new ball joints, tie rods, and poly bushings. Seems to be a good amount of work ahead of me before the car is road worthy but it'll be worth it.
No updates, sorry. A guy quit at the shop so I'm working more until the new guy is up to speed (or school starts, which ever happens first) but Francis T should have received the exhaust in the mail early this week for the modifications. I'm hoping he can figure out a way to make room for the shift cables so they don't melt, it looks like the slave cylinder might be in the way to move the exhaust enough for the cables to not touch.
On the 60degreeV6 forums, it was suggested I check to see if the throttle body and upper intake I'm using are interfering with the Idle Air Control port. That's worded a little funny but basically the port for the IAC might be blocked when the throttle body is bolted to a different intake then it was designed for, thus leading to my car not idling without some throttle. I'm not going to check that though until I get the exhaust bolted back on.
if it comes down to it, look into the 3500 manifolds, would need to re-do the exhaust, but they are a bit diffrent from the "crossover" style of the 31/3400's... should bolt right on.
with the IAC could it be possable that you just have a stuck or sticky motor? one way to check is if you have access to a scan tool look at your IAC steps in the data list if it is unusually high number (don't remember what spec is) then you may have the bolckage problem with the throttle body/intake combo.. you can also try an active test on the IAC and see if the engine rpm responds to you adjusting it with the scan tool.. hope this doesnt sound confusing i'm better at doing these things than trying to explain them..
[This message has been edited by 86 toy (edited 06-22-2011).]
Just a little preoccupied with my summer class, Fundamentals of Mechanical Vibrations...fun stuff...
Still waiting on the exhaust from FrancisT, he said he'd let me know when he starts on it but I haven't heard anything for a while. Noo big deal considering the holiday weekend. I was looking at a Ford Taurus at work the other day and noticed it's dog bone mount. It mounts to the shock tower on one side and uses multiple mounting points on the engine. Probably going to pick one up from Pull A Part and see what I can do. The plan would be to put it on the passenger side shock tower and try to mount it to the stock 3400 upper motor mount.
I've also been thinking about the throttle cable issue. The GT cable should work with modifications to the bracket. Because of the shorter length of the GT cable, I'll need to probably decrease the length of the bracket so I can loop the cable around and bolt it to the side of the throttle. Similar to what DarthFiero shows how to do for the 3800. I'm going to send him an email asking about what it did for the 3100 swap he accomplished.
Anyway, just thoughts for now. Other then school and more hours at work, my daily driver is acting up a bit so I'm looking into that also.
This is how I plan on setting up an upper motor mount. Bought a poly adjustable dog bone from Rodney Dickman and need to fab up the motor side for a mount like this.
[This message has been edited by KaijuSenso (edited 06-20-2014).]
Finally started working on the front suspension rebuild! Was allowed to tow the car into the corner of the shop while we aren't extremely busy so I jacked her up and started tearing stuff apart.
This is obviously the shock that was on the car. Oddly enough it's the same adjustable Koni that I'm putting back in. I do wonder though how old it is and can see the future with how it will weather. Still seems to work ok though which is good.
Here is about how far I got on both sides of the front. Those pesky lower control arm bolts are being difficult of course so I sprayed them with PB Blaster. I'm expecting the torch to come out soon. I cut the spring to get it out but notice the top is rusted in place. Also sprayed it with PB Blaster and it'll have a date with a hammer and/or pry bar later this week.
Also started sand blasting the upper control arms but it's so humid out the blaster is getting clogged, slowing my progression and I only had time to finish one of them. I really wanted to get them both painted so I could assemble the new bushings and ball joints tomorrow but oh well.
There seem to be a few issues with the rear portion of the car. I'm very disappointed in myself, realizing I installed the cradle bushings upside down...They are literally not holding the cradle up at all. The other issue is with the clutch. While trying to get the car on the tow dolly (which I couldn't do myself) I tried shifting it in reverse on the trans, then starting the car to roll it back onto the dolly. Well of course the clutch didn't disengage so once the new guy at worked stopped by to help, I bled the slave cylinder a few times. No bubbles, there seems to be good piston travel. I'm not sure what to check next. Fluid is clear, new clutch master and slave a few years ago. Pedal feels kinda squishy but I've been driving my Audi for a while now and can't remember how the Fiero clutch used to feel. As I'm typing this I just thought to check to see if the pedal is bent which I'll do next time I go to start it. If I screwed up the clutch install I'll be even more disappointed in myself because that means dropping the cradle entirely again...
But back to good news my exhaust came back from Trueleo Racing. He modified the crossover to give more clearance between it and the thermostat housing as well as for the two shift cables. Hopefully it all lines up nice and neat now and I'll try to find some time to install it this weekend. Francis also threw in a new heat shield he was thinking about, for between the exhaust and the shift cables. I'll see if it works in my application but I have a feeling it'll just put me right back to where my shift cables were before the exhaust mods.
Well overall I'll hopefully get the car moving by it's own power by this time next week, but we all know how deadlines come and go
[This message has been edited by KaijuSenso (edited 06-20-2014).]